Introduction
If you've been growing for any amount of time, you know 10oz indoor plants don't come overnight. I grew 4oz plants for a long time, but recently, I've gone to growing just TWO, ~10oz plants. I would like to share my method with the readers here on 420mag. The method is not complicated, and not radically different than what anyone else is doing here. This won't be an exact STEP BY STEP tutorial; this article is designed for people with some experience. I'll tell you how I do it, and if you follow the basic principals, you can grow 10oz plants too. It is relatively inexpensive and easy to set up and maintain.
TheCapn's Experience
I started a few years ago with DWC (deep water culture) in 5 gallon buckets. Then I tried fence post rails with sprayers in them (subject to power failures and not enough space for roots). I've also done StinkBud's Single units (spray aero / dwc combo, which I really like). I've done dirt, sunshine #4, happy frog, ocean forest (slower than hydro), top feed hydroton buckets (water channels and hydroton pinches roots), and bio buckets (leaks, loud, and complicated). Yes I have wasted a lot of money on equipment. The point is I've done them all with success in each, and trust me, I have made my fair share of mistakes. After this, I analyzed it all, to decide what method gives the most yield, with least amount of problems, and best return on investment for both money and effort spent. I will tell you WHY I do things a certain way, and why I think these methods are a great way to grow for both beginners and experienced growers alike. This article is about methods that work for me. If you're an experienced grower and already successful with your growing method, I do not recommend changing it. If you're a new grower, or an experienced hydro grower looking to change methods, read on. I don't have any ground breaking tricks or magic potions, I am simply putting together a tutorial of how I get 10oz / plant indoors.
Think Big
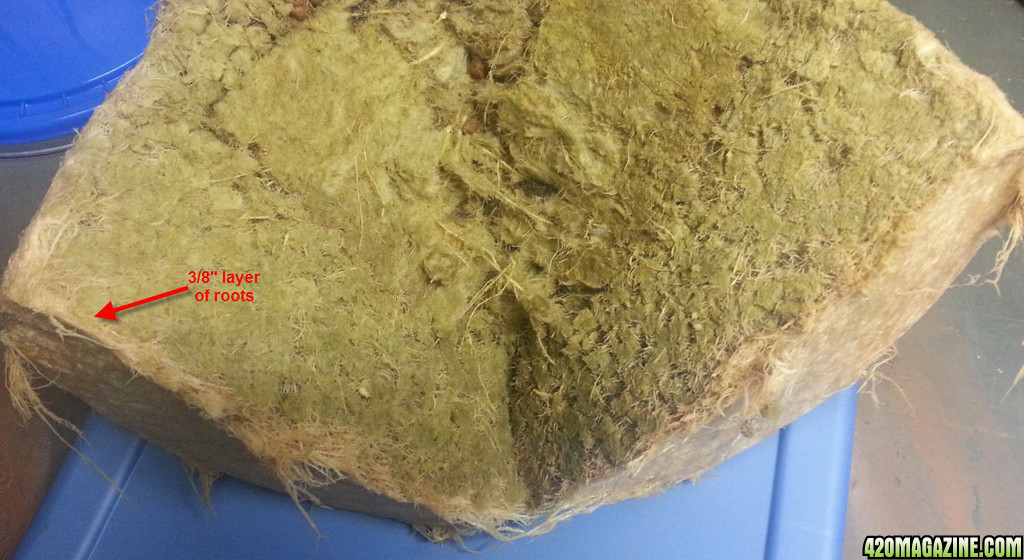
If you research techniques for growing large indoor plants, you will find the people who grow these indoor chongers all have one thing in common: big space for big roots. Yes, you will find people growing 4 ft tall plants in 4" rockwool cubes, but they are getting 3-4oz max from one plant. Logically, a 4" cube can't hold enough root mass to maximize the potential of a monster plant.
Some will argue light is more important for growth. Here's a picture of a plant grown (from another website) under ONLY a 400w HPS, and this yielded 16oz. It was grown in tub (10gal+) of rock wool cubes (top fed). I'm not saying ANYONE can get 16oz with a 400W light and a tub. This grower has been to the rodeo before. My point is, big roots = more nutrient uptake = big plants.

Let's get started
I'm going to show you the most simple and inexpensive way (I have found) to grow a 10oz+ plant. For the limited scope of this article, I'm going to assume you have SOME experience in growing. You know how to germinate a seed, you know how to sex a plant, you know the basics. If you're totally new, book mark this page and come back to it once you know the basics.
The Grow room
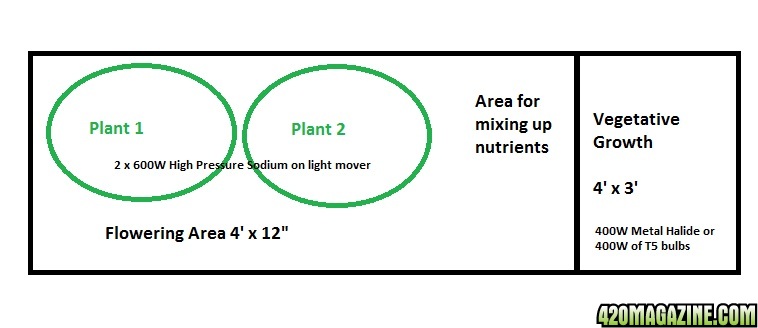
If you want to flower two plants at a time, you will need about 50-60 sq ft of space, and that includes space for vegetative growth (veg). One 4 x 3' area for veg, about 9 x 4 for flowering, and some space to mix up nutrients, and misc equipment. The flower area MUST be light proofed from the veg area. Your room must have exhaust air to the outdoors. Your room should look like a closet, and guests in your house should be able to walk by the room without wondering what's inside.
Lighting
In VEG, you will need about 400W, no less than 250W. Use several T5 high output 5000-6500K bulbs, but preferably, a Metal halide in a cool tube is the best way to go because you can duct the light heat out of the room. Lights on 18 hrs, off 6 hours.

In Flower, two 600W HPS (high pressure sodium) lights are needed (one for each plant), inside ducted hoods. Don't waste your money on non air cooled hoods. If you can only afford ONE light, then just go with one for now, get the other when you can afford it. Lights on 12 hrs, off 12 hours.

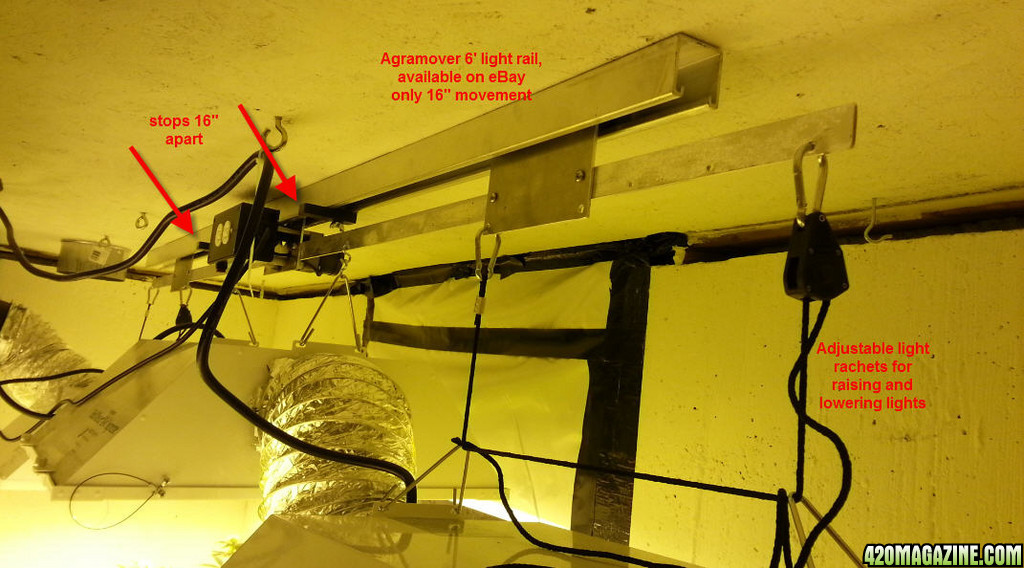
OPTIONAL: I use a light mover. Using this method of growing, your plant will be about 4' x 3'. If you don't have a light mover, that's fine, just keep the light higher over the plant to spread the light further.
Ventilation
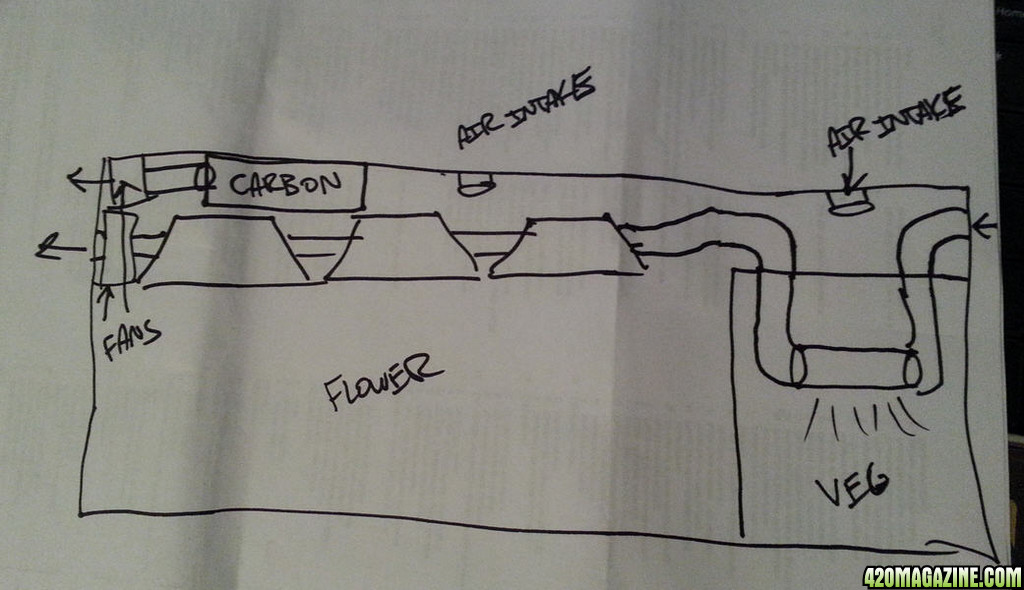
To keep co2 moving in the room, a fan is needed. I suggest you do not SKIMP on this fan. Get an oscillating fan designed to run 24/7. Then use one 6" 200cfm+ duct fan to cool your lights. Since your lighting is all sealed, this exhaust has no odor. You can help heat your house with it in the winter. Use another 6" duct fan to exhaust air from the room, pulling thru a carbon filter. If you can only afford one 6" fan, pull all air into the carbon filter, then thru all the lights and then outdoors.
Growing your plants
Finally we get to the fun part! Your room is set, you have your fans running, and it's time to get on with the show. I'm going to skip how to grow from seed and how to clone, and assume you already have plants. We will be using Rock wool grow-cubes, in a ebb and flow set up, and the SCROG method. I'll explain WHY I use these techniques.
Grow Medium
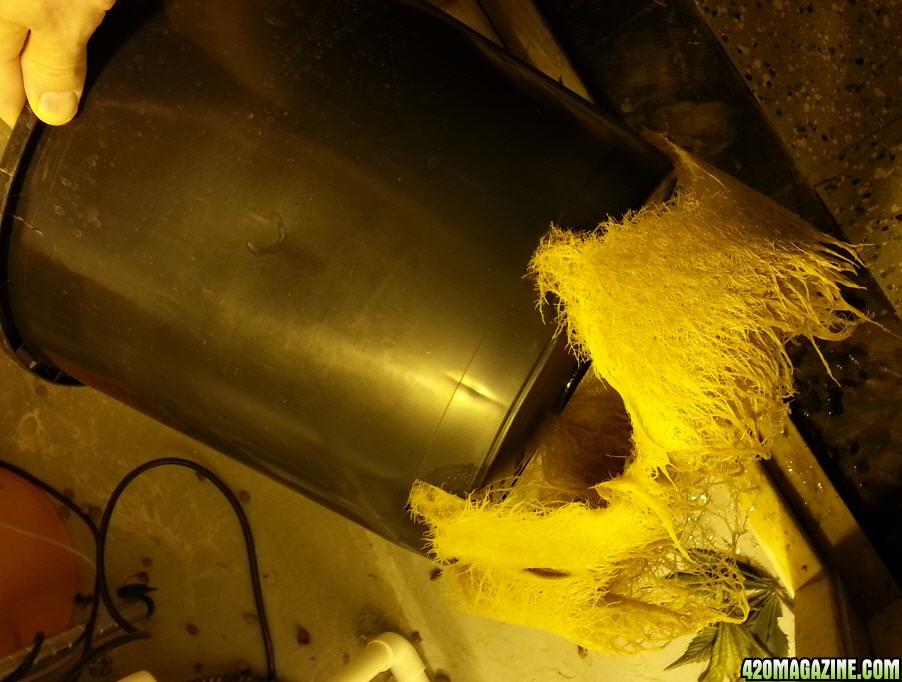
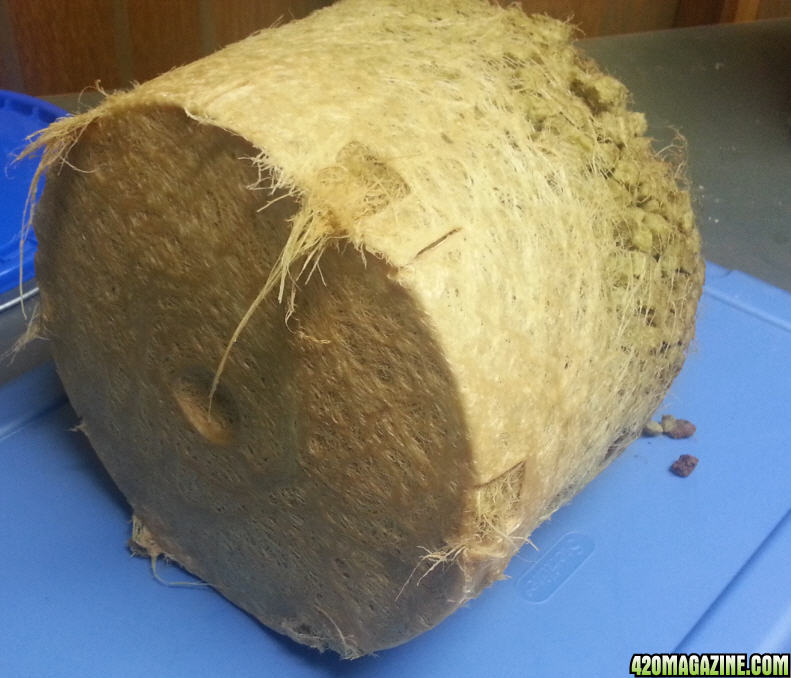
We will be growing in Rock wool grow-cubes for both veg and flower. Why rockwool? It is clean. The rockwool gro cubes are square. It is the perfect media for giving your roots a place to take hold, and also leaving tons of oxygen in the spaces between the square cubes. In addition, rockwool will not pinch or break roots, as hydroton will. It is lightweight and it is about the same price as high quality soil. At my local store, a bag of grow-cubes is $24, and a bag of "happy frog" soil is $22. Rockwool allows you to water your plants 2-3 times a day, giving them more opportunity to get fresh nutrients, then, lots of oxygen (but still moist). We won't be wasting any rockwool; it will be a mass of roots before we are done.

Growing Method (Irrigation)
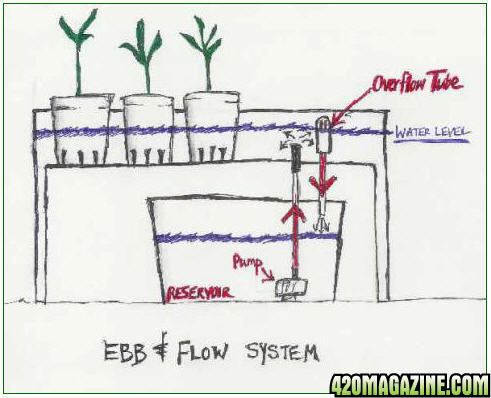
Ebb and flow (aka Flood and drain) WHY?
1. Roots love a wet and dry cycle. Ebb and flow floods the roots with nutrients and then lots of oxygen. It is a time proven method of growing.
2. Limited plumbing means less chance for leaks. No sprayers clogging, no air pumps running.
3. Because we are growing in rockwool, we only need to flood 2-3 times a day, using an inexpensive water pump, and no noisy air pump is required. So we don't have a magnetic water pump constantly sucking minerals from and heating our water, or making too much noise. And we don't need to worry about a power outage.
4. Using ebb and flow, instead of "top feed", completely floods the grow container, giving equal nutrients to all parts of the root system. No chance for water channeling.
5. Ebb and Flow in rockwool is less prone to pythium (over aero or DWC), which can destroy an entire crop in a couple weeks.
Vegetative Growth
Ok lets set up our veg closet. You use Ebb and flow, or top feed to waste if you prefer. We can use a regular inexpensive nursery pot in a "flood and drain" tray, with a fitting on the tray to drain to a waste bucket or a ebb and flow reservoir. If you choose ebb and flow, set your timer to flood one time a day when the lights come on. A tray like this should be ~8" tall, and can be found at any hydro garden store, or you can DIY. Water fills in from the bottom, floods the tray, and then overflows out the other fitting. When the pump shuts off, the entire tray drains back thru the pump.
Here is an example of a plant sitting in a flood tray
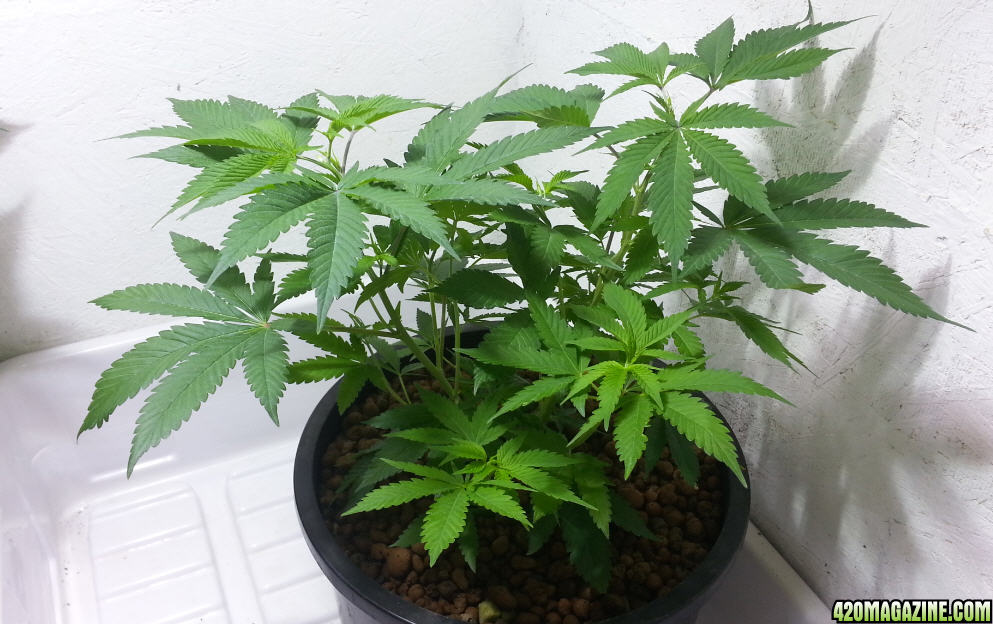
A flood tray is simple to set up, low chance of leaking, low maintenance, and inexpensive. As plants in pots get larger, the roots quickly fill up a 1-2 gallon pot, and you'll need to transplant to a bigger pot. I do not recommend starting your plant in a BIG pot. Roots tend to grow to the walls of the pot, then circle. Personally, I hand water to waste during more humid months. After flooding a tray, the entire tray is wet and that water evaporates, adding humidity to your grow room. In the dry months, you will want this effect. It's Up to you.
Your goal in VEG is to grow your plants as big as fast as possible to prepare them for flower. Most importantly, we will SHAPE or train them to look more like a square bush, instead of a christmas tree, more on that below. Along with regular nutrients, I use Dutch master liquid light foliar spray. It DOES make a difference!
How do we shape our plant in veg?
This is one of the most important things we need to do in order to get a high yield. We want to give our plant a "vanilla ice ice baby" FLAT top. This is what separates the 4oz plants from the 10oz plants. There are tons of articles on this site on HOW to do these techniques. I'll show you how:
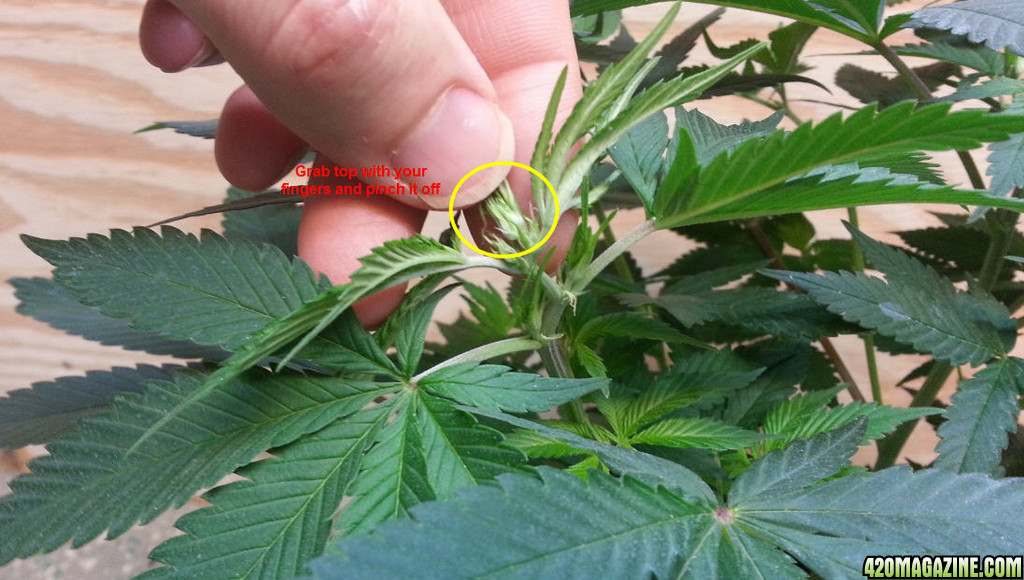
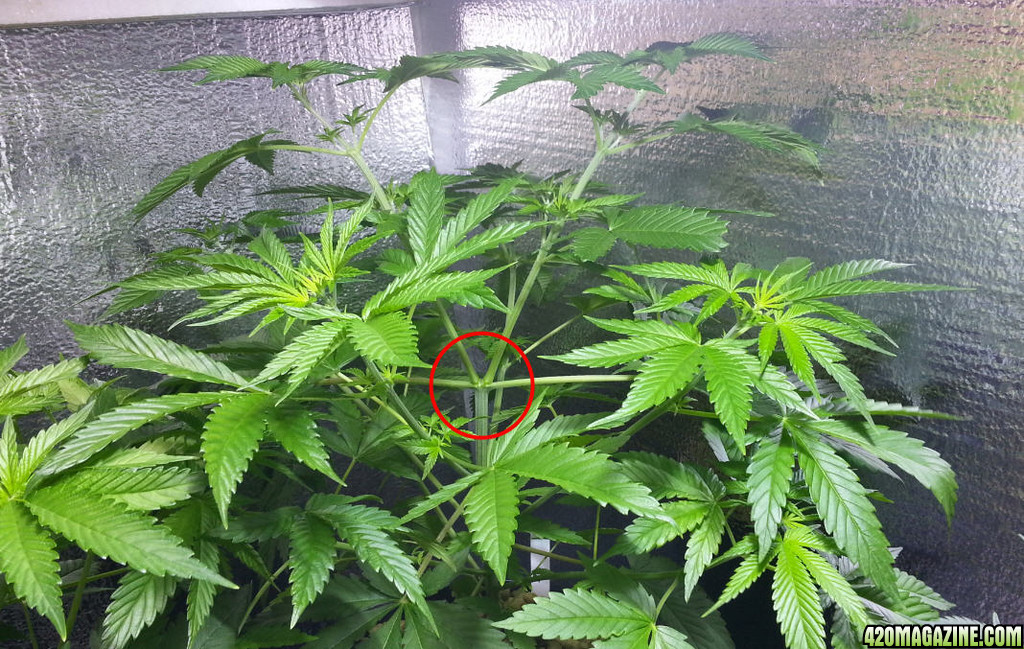
Topping. When we TOP a plant, we take off the terminal shoot; meaning, the very top of the branch that is making upward growth. Sometimes, it is hard to tell which one is actually the top. When we do this, it causes the two lower branches (bud sites) to grow more equally, instead of the main shoot being dominant. Here's how:
Find the terminal shoot from the branch
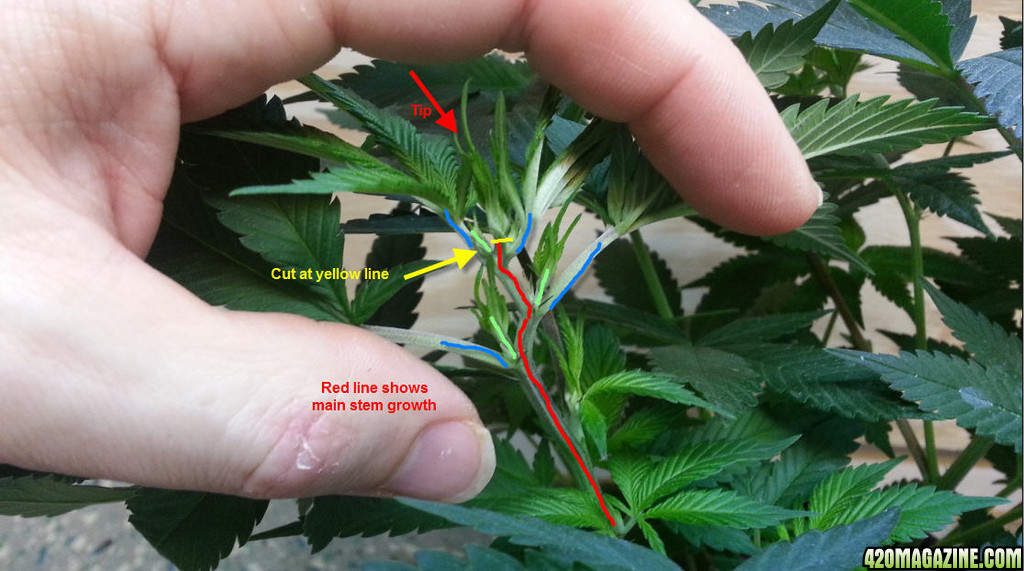
cut it, and you just made TWO branches instead of one
Here is a perfect example the results of topping.
Knowing when and where to top: This is where some experience comes in. You will get the feel of when it is time to top your plants. From seed, wait until the plant has about 4-5 sets of fan leaves, then cut the very top. Once the plant grows a bit, like the results above, you can top it again, making 4 main branches. After that, it's time to bend her over ;-)
LST (low stress training)
LST simply means a way of training our plants to grow a certain way, without radically hurting them. Typically, when we refer to LST, we are talking about bending or holding down branches in order to expose more light to lower branches. Auxins are spread out more evenly to all branches. Google "auxins" for more information, but in a nutshell, auxins are the hormone in plants that make them grow straight up, and most plant energy is focused on the center and tallest part of the plant. Distributing these auxins to other areas in the plant, cause it to grow more evenly. The end result is a few dozen colas (bud masses) of the same size, rather than a few massive colas (prone to mold because they are too thick) and many little ones.
When I train my plants, I gently spread it out so the little branches can get more light. I don't "kink" the branches (aka super cropping). Super cropping is more of a HST High stress, because the plant must repair the damaged tissue. I generally do whatever it takes to spread out branches so they are not on top of each other.
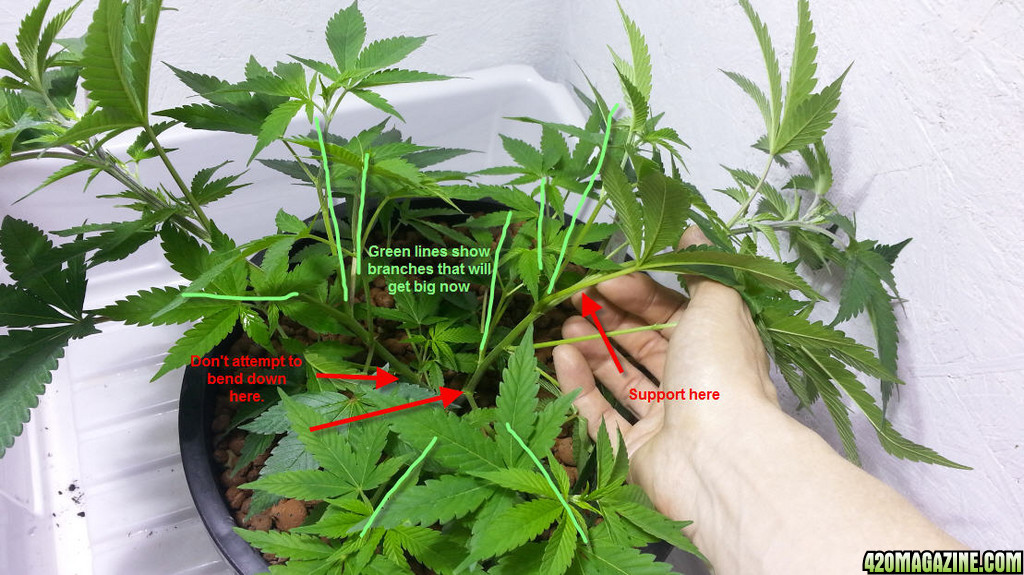
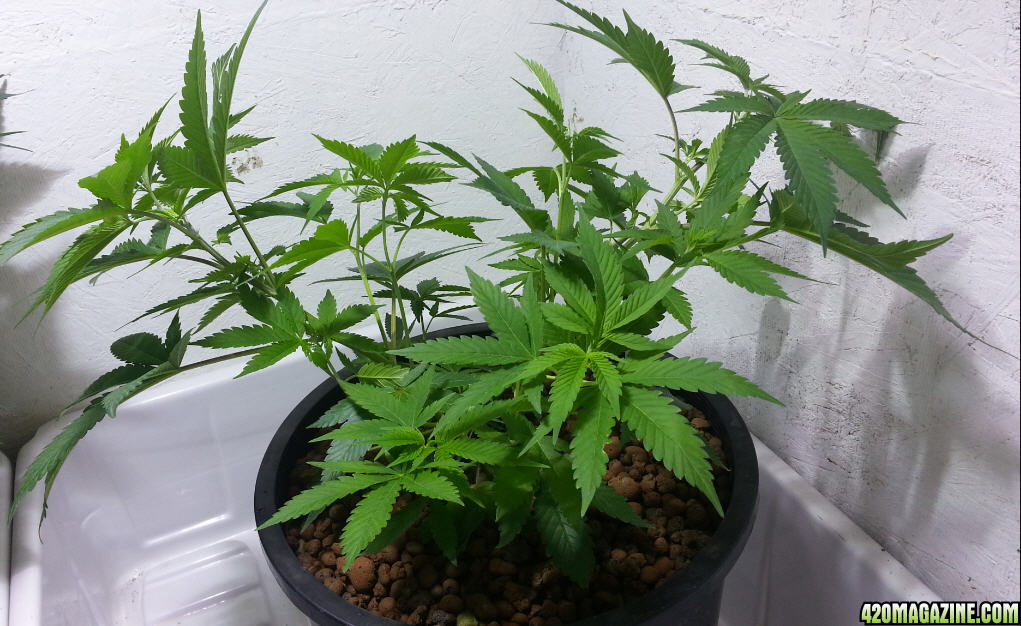
In some cases I will super crop if needed. Here is another picture after a quick session of bending:
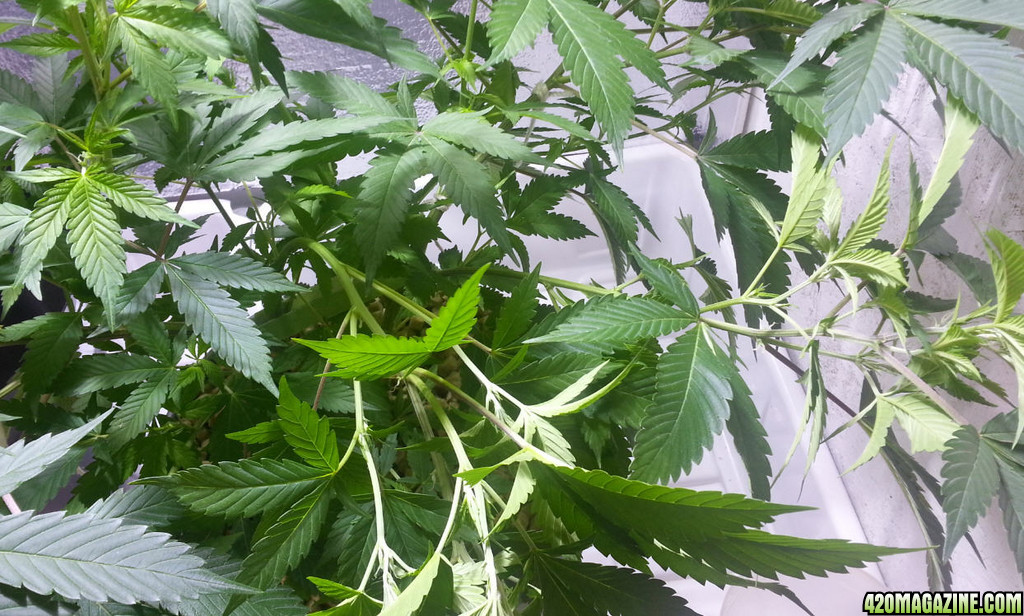
I'll do this every few days, and tie branches down if necessary. Lets fast forward a bit... Here is the same plant 17 days later, 36" x 30" and ready for flower:
Perpetual
We want to harvest a plant once a month. So, at all times we will have two plants in flower, one month apart, and two plants in VEG, one month apart. Each plant in "vegged" for 2 months and flowered for two months. So every time you harvest a plant, you will take the plant that has been in veg for two months, take a clone of it, then put it into flower. If you're afraid your clone won't make it, take a few. Read this if you need a cloning recipe.
Flowering
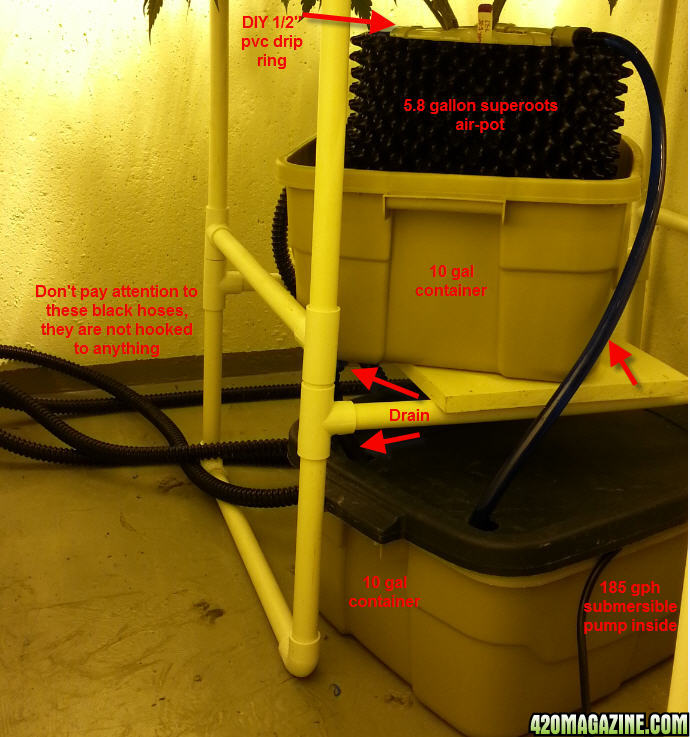
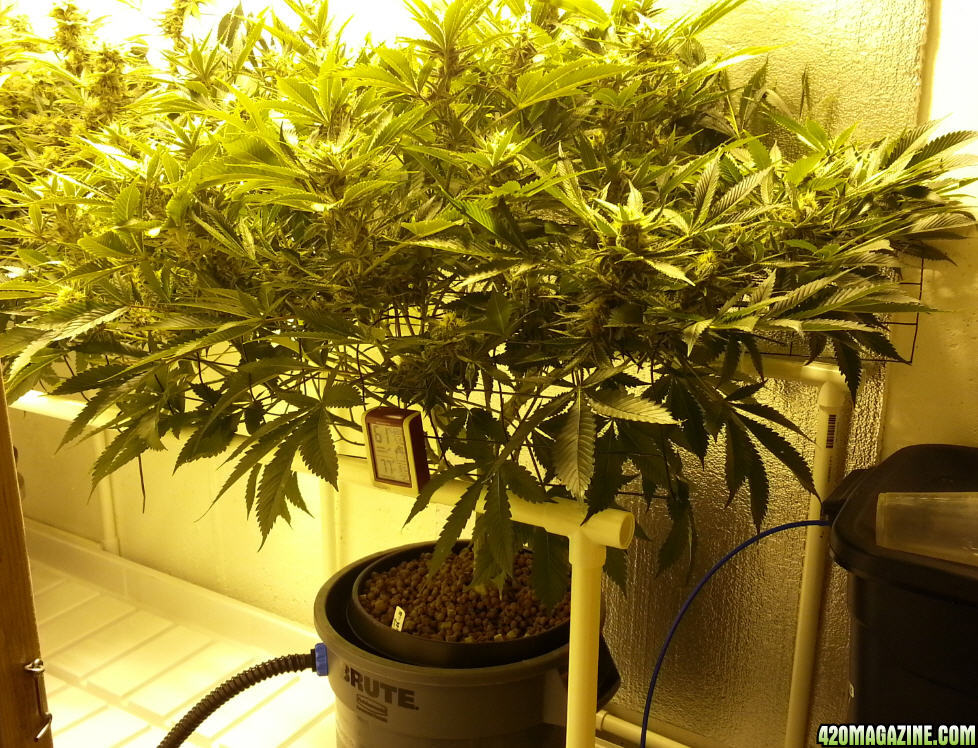
When you're ready to flower, your plant should be around 2 ft x 3ft wide. Two months from clone or from seed should give you the size you need to go 10oz. In the above picture, you will see I am experimenting with even bigger pots (to see if there is a significant difference from 3.5 to 5 gallons of media), but for the scope of this article, I'll show you how to do it in the 3.5 gallon nursery pot. I will detail this a little more because I have not seen anyone use this same method before. Basically we will make a ebb and flow bucket.
Materials needed
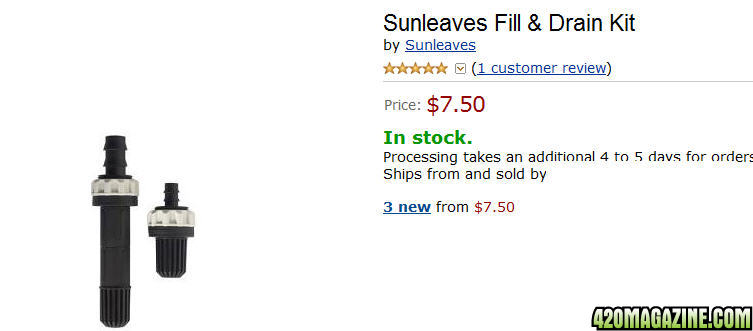
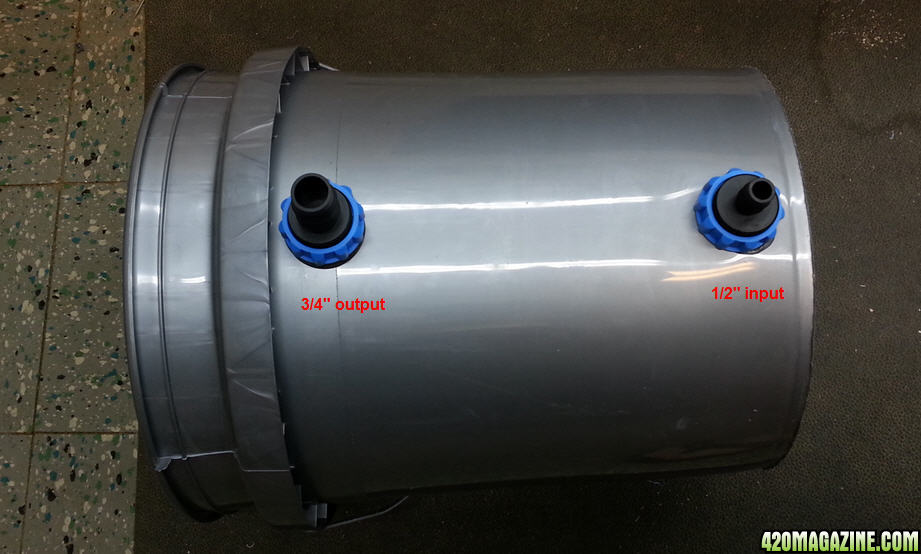
1. Flood and drain kit (1/2" input, 3/4" output)
2. One 5 gallon bucket
3. One 7-10 gallon reservoir (any container will work)
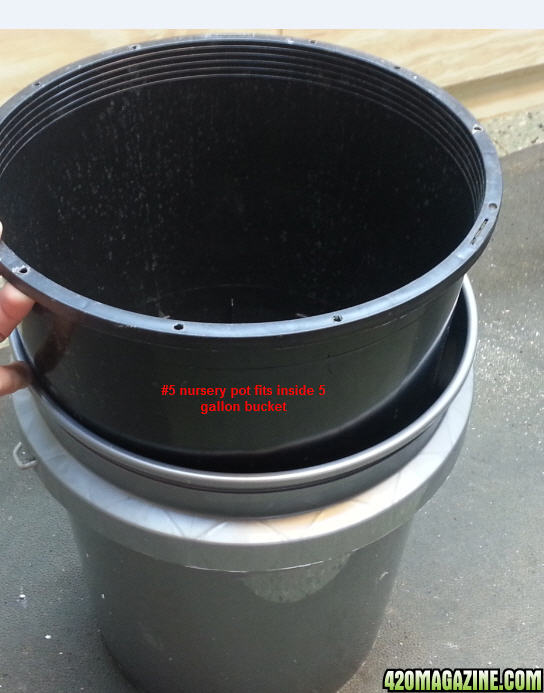
4. One #5 nursery pot $5
5. One small bag grodan grow-cubes (NOT CHUNKS) will do 3 pots $24/3 - $8
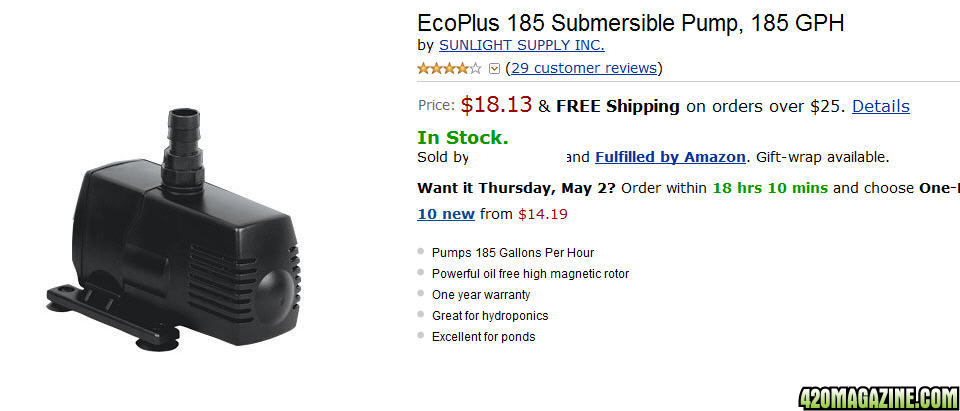
6. Any small water pump $18
7. A few feet of 1/2" and 3/4" flexible hose $10
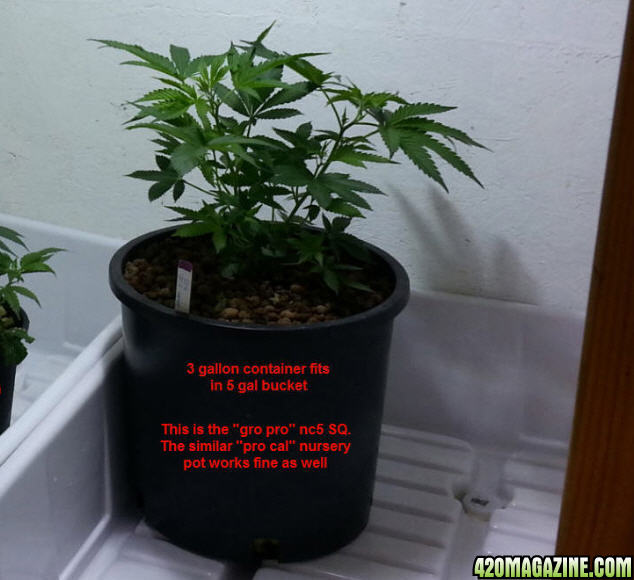
Put it together
1. Grow your plant in your #5 (3.5 gallon) nursery pot. Notice this pot fits right inside a 5 gallon bucket.
2. Drill holes in your buckets and install the flood and drain kit
3. Place the 5 gallon bucket, about 12" off the floor, with your reservoir sitting right on the floor.
4. Water pump goes to the bottom fitting with 1/2" tube, and drain hose 3/4 goes to top fitting
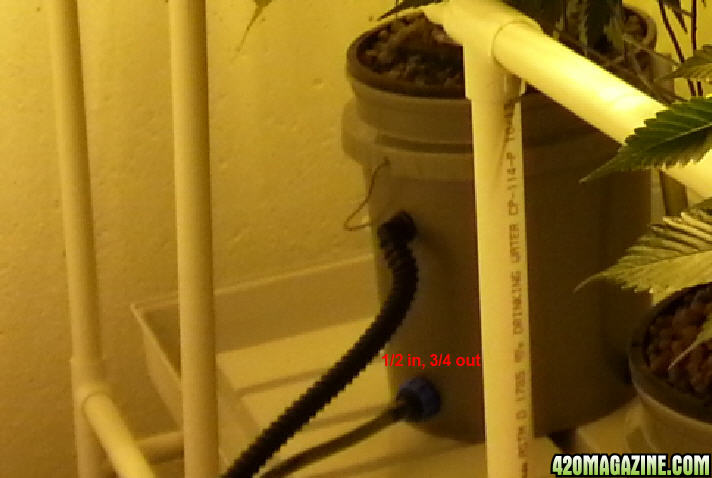
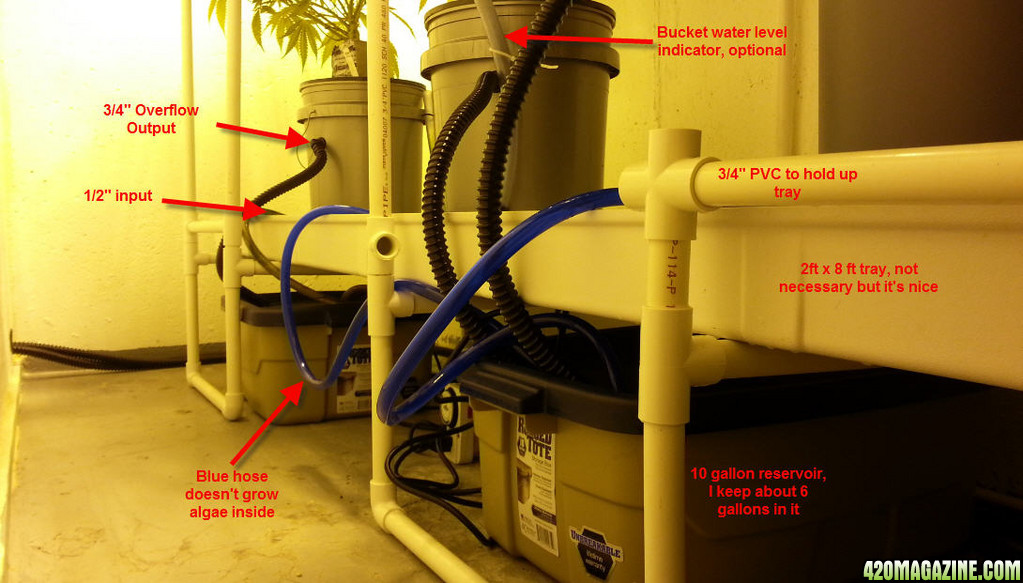
When the pump kicks on, it will fill the bucket from the bottom and overflow out the higher, 3/4" fitting. When the pump shuts off, the entire bucket drains back thru the pump.
Set your timer to run twice a day. Once at lights in, again 8 hours later. You are now up and running! Time to feed your plant into the screen.
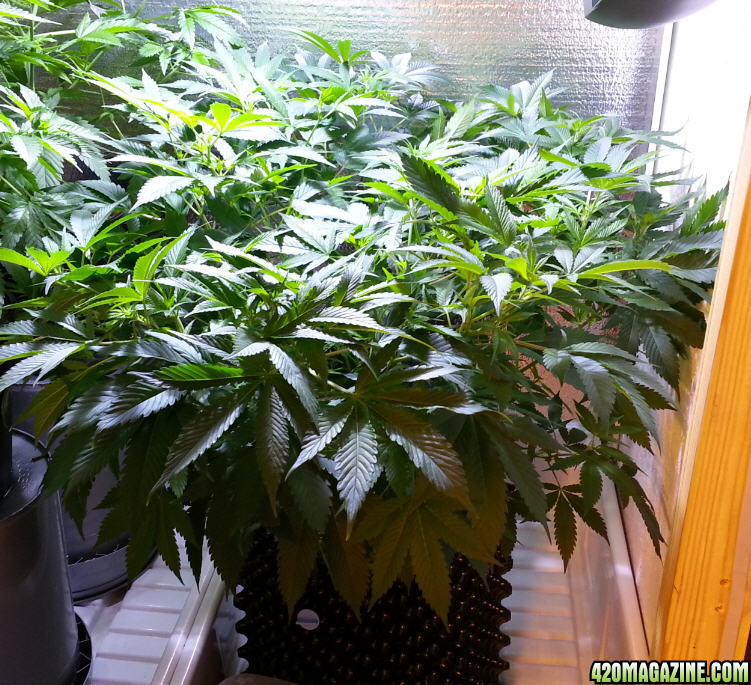
SCROG
SCROG stands for "screen of green". It is similar to a trellis, where we spread out branches in equal distances from each other, to get an even canopy of buds. Check out this picture of a past plant I harvested. You can see how I fed the branches up thru the screen (metal garden fence from hardware store) keeping all branches about the same height. Also notice a couple branches were actually "kinked" to get them where I wanted them. This is the same technique we did above in VEG, however, in flower, the branches produce colas, and the weight of the cola will bend the branch down. Plus, the screen gives us more control.

I wont go into too much detail about how to do this, because there is no much info about it already, as it is a very popular method. You should use plastic coated metal fencing, usually found at home stores, for putting around the garden. The holes are 3" x 2". Put the screen on top of the plant (your canopy should already be somewhat level), secured with cable ties, on any type of support (I use PVC pipe). Slow and steady here! Don't break any branches. Move branches around as needed to spread them evenly. As you do this, you may be able to move the screen down a little bit. To move a branch, you can pull it under the screen, and push it up where you want it. If you are afraid to break it, you can use wire cutters to cut a wire, move the branch one step over, and bend the wire back. You will adjust branches under the screen, every few days, for the first 10 days of flower. If you have branches not tall enough to reach the screen, make sure they are getting light, and they will get tall enough in the next week. After 10 days, no more adjustments should be needed; just let them stretch. Branches will stretch ~12" or more above the screen. This is a good thing, and these branches will fill up with buds. Here are a couple pictures:

After two weeks, take a look under the canopy. Any bud sites that don't get light, get chopped off. If not, they take up energy and don't ripen well with no light. Don't get crazy here ok? If it's questionable, leave it. I have a lot of green here above the canopy. I don't remove fan leaves unless they are really blocking buds. I try to fold them under if possible. Fan leaves provide energy to the plant.
Nutrients
I could write another article just on nutrients, so I won't do it here. In a nutshell, use a popular line nutrients. Use a ppm of no more than 600 (@.5 conversion rate) during vegetative growth, and 1400 during flower. If you don't have a meter, mix up a few gallons at 1/3-1/2 of what the vendor's nutrient calculator says, then take your mix to your local grow store and ask them to check the PPM, then adjust from there. PH should be 5.6 to 6.0 throughout the entire grow. Change your nutrients once a week. Depending on the strain, you may be able to go longer, but I risk deficiencies if I wait too long.
Beneficial Bacteria
Again, I could write another post just on this, so I will try to keep it short and simple. Roots benefit greatly from beneficial bacteria in the grow medium. Some growers refer to them as "bennies". I use heisenberg's beneficial tea once a week. Making tea can be daunting for new growers. The fact is, I cannot get plants this healthy without beneficial bacteria. It is an important part of this growing method. At a minimum, I would suggest using "aquashield" and some type of mycorrhizae in all the water you use. Better yet, buy a bag of "ancient forest" from your grow store, and follow the tea recipe on the back of the back.
Summary
I know I've missed many items here. Like I said before, this is not a "step by step", but should give novice and intermediate growers enough information to copy this method and start growing some indoor banshees themselves. Again, nothing of what I'm doing is different than what others are doing already, I'm just putting it all together in one tutorial. However, I have yet to see anyone use the 3.5 gal pot of rockwool cubes in the 5 gal ebb and flow bucket. I think grow-cubes are over looked. They are an excellent growing medium. No, I don't work for grodan, but that chick on youtube has some nice t_ts, yeah?
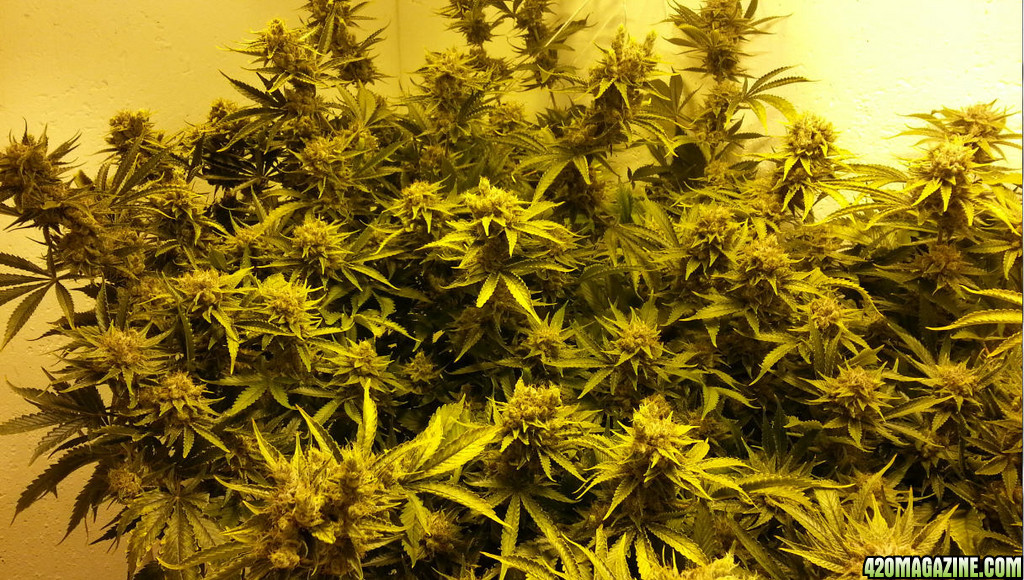
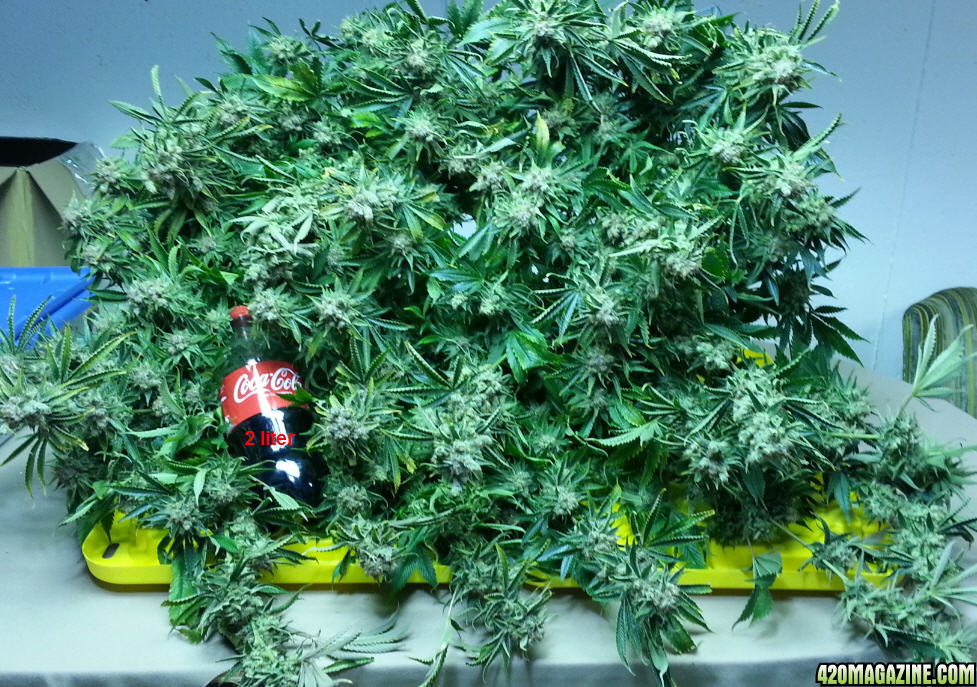
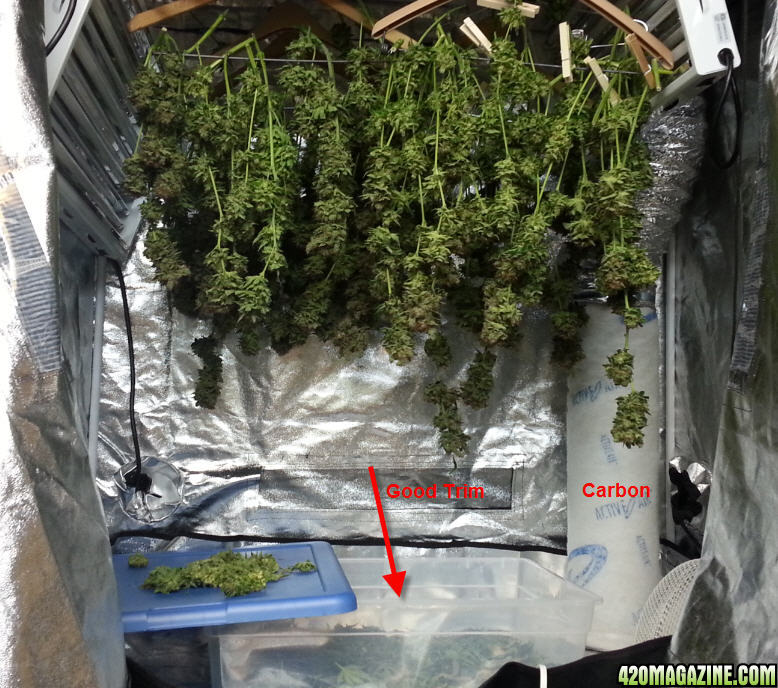
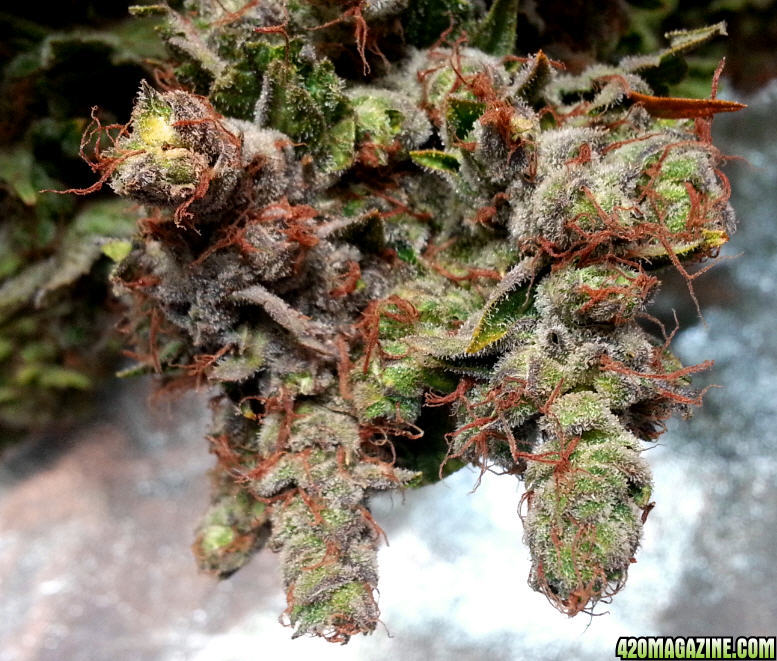
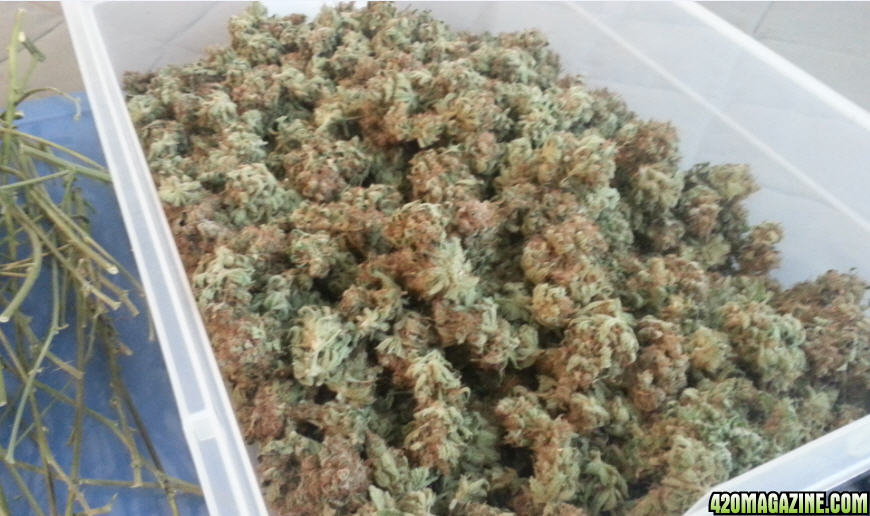
Here are a couple final pictures of two plants in flower, about 4 weeks apart.
I apologize for any typos or grammar errors above. Questions and constructive tips encouraged. Happy Growing!
If you've been growing for any amount of time, you know 10oz indoor plants don't come overnight. I grew 4oz plants for a long time, but recently, I've gone to growing just TWO, ~10oz plants. I would like to share my method with the readers here on 420mag. The method is not complicated, and not radically different than what anyone else is doing here. This won't be an exact STEP BY STEP tutorial; this article is designed for people with some experience. I'll tell you how I do it, and if you follow the basic principals, you can grow 10oz plants too. It is relatively inexpensive and easy to set up and maintain.
TheCapn's Experience
I started a few years ago with DWC (deep water culture) in 5 gallon buckets. Then I tried fence post rails with sprayers in them (subject to power failures and not enough space for roots). I've also done StinkBud's Single units (spray aero / dwc combo, which I really like). I've done dirt, sunshine #4, happy frog, ocean forest (slower than hydro), top feed hydroton buckets (water channels and hydroton pinches roots), and bio buckets (leaks, loud, and complicated). Yes I have wasted a lot of money on equipment. The point is I've done them all with success in each, and trust me, I have made my fair share of mistakes. After this, I analyzed it all, to decide what method gives the most yield, with least amount of problems, and best return on investment for both money and effort spent. I will tell you WHY I do things a certain way, and why I think these methods are a great way to grow for both beginners and experienced growers alike. This article is about methods that work for me. If you're an experienced grower and already successful with your growing method, I do not recommend changing it. If you're a new grower, or an experienced hydro grower looking to change methods, read on. I don't have any ground breaking tricks or magic potions, I am simply putting together a tutorial of how I get 10oz / plant indoors.
Think Big
If you research techniques for growing large indoor plants, you will find the people who grow these indoor chongers all have one thing in common: big space for big roots. Yes, you will find people growing 4 ft tall plants in 4" rockwool cubes, but they are getting 3-4oz max from one plant. Logically, a 4" cube can't hold enough root mass to maximize the potential of a monster plant.
Some will argue light is more important for growth. Here's a picture of a plant grown (from another website) under ONLY a 400w HPS, and this yielded 16oz. It was grown in tub (10gal+) of rock wool cubes (top fed). I'm not saying ANYONE can get 16oz with a 400W light and a tub. This grower has been to the rodeo before. My point is, big roots = more nutrient uptake = big plants.
Let's get started
I'm going to show you the most simple and inexpensive way (I have found) to grow a 10oz+ plant. For the limited scope of this article, I'm going to assume you have SOME experience in growing. You know how to germinate a seed, you know how to sex a plant, you know the basics. If you're totally new, book mark this page and come back to it once you know the basics.
The Grow room
If you want to flower two plants at a time, you will need about 50-60 sq ft of space, and that includes space for vegetative growth (veg). One 4 x 3' area for veg, about 9 x 4 for flowering, and some space to mix up nutrients, and misc equipment. The flower area MUST be light proofed from the veg area. Your room must have exhaust air to the outdoors. Your room should look like a closet, and guests in your house should be able to walk by the room without wondering what's inside.
Lighting
In VEG, you will need about 400W, no less than 250W. Use several T5 high output 5000-6500K bulbs, but preferably, a Metal halide in a cool tube is the best way to go because you can duct the light heat out of the room. Lights on 18 hrs, off 6 hours.
In Flower, two 600W HPS (high pressure sodium) lights are needed (one for each plant), inside ducted hoods. Don't waste your money on non air cooled hoods. If you can only afford ONE light, then just go with one for now, get the other when you can afford it. Lights on 12 hrs, off 12 hours.
OPTIONAL: I use a light mover. Using this method of growing, your plant will be about 4' x 3'. If you don't have a light mover, that's fine, just keep the light higher over the plant to spread the light further.
Ventilation
To keep co2 moving in the room, a fan is needed. I suggest you do not SKIMP on this fan. Get an oscillating fan designed to run 24/7. Then use one 6" 200cfm+ duct fan to cool your lights. Since your lighting is all sealed, this exhaust has no odor. You can help heat your house with it in the winter. Use another 6" duct fan to exhaust air from the room, pulling thru a carbon filter. If you can only afford one 6" fan, pull all air into the carbon filter, then thru all the lights and then outdoors.
Growing your plants
Finally we get to the fun part! Your room is set, you have your fans running, and it's time to get on with the show. I'm going to skip how to grow from seed and how to clone, and assume you already have plants. We will be using Rock wool grow-cubes, in a ebb and flow set up, and the SCROG method. I'll explain WHY I use these techniques.
Grow Medium
We will be growing in Rock wool grow-cubes for both veg and flower. Why rockwool? It is clean. The rockwool gro cubes are square. It is the perfect media for giving your roots a place to take hold, and also leaving tons of oxygen in the spaces between the square cubes. In addition, rockwool will not pinch or break roots, as hydroton will. It is lightweight and it is about the same price as high quality soil. At my local store, a bag of grow-cubes is $24, and a bag of "happy frog" soil is $22. Rockwool allows you to water your plants 2-3 times a day, giving them more opportunity to get fresh nutrients, then, lots of oxygen (but still moist). We won't be wasting any rockwool; it will be a mass of roots before we are done.
Growing Method (Irrigation)
Ebb and flow (aka Flood and drain) WHY?
1. Roots love a wet and dry cycle. Ebb and flow floods the roots with nutrients and then lots of oxygen. It is a time proven method of growing.
2. Limited plumbing means less chance for leaks. No sprayers clogging, no air pumps running.
3. Because we are growing in rockwool, we only need to flood 2-3 times a day, using an inexpensive water pump, and no noisy air pump is required. So we don't have a magnetic water pump constantly sucking minerals from and heating our water, or making too much noise. And we don't need to worry about a power outage.
4. Using ebb and flow, instead of "top feed", completely floods the grow container, giving equal nutrients to all parts of the root system. No chance for water channeling.
5. Ebb and Flow in rockwool is less prone to pythium (over aero or DWC), which can destroy an entire crop in a couple weeks.
Vegetative Growth
Ok lets set up our veg closet. You use Ebb and flow, or top feed to waste if you prefer. We can use a regular inexpensive nursery pot in a "flood and drain" tray, with a fitting on the tray to drain to a waste bucket or a ebb and flow reservoir. If you choose ebb and flow, set your timer to flood one time a day when the lights come on. A tray like this should be ~8" tall, and can be found at any hydro garden store, or you can DIY. Water fills in from the bottom, floods the tray, and then overflows out the other fitting. When the pump shuts off, the entire tray drains back thru the pump.
Here is an example of a plant sitting in a flood tray
A flood tray is simple to set up, low chance of leaking, low maintenance, and inexpensive. As plants in pots get larger, the roots quickly fill up a 1-2 gallon pot, and you'll need to transplant to a bigger pot. I do not recommend starting your plant in a BIG pot. Roots tend to grow to the walls of the pot, then circle. Personally, I hand water to waste during more humid months. After flooding a tray, the entire tray is wet and that water evaporates, adding humidity to your grow room. In the dry months, you will want this effect. It's Up to you.
Your goal in VEG is to grow your plants as big as fast as possible to prepare them for flower. Most importantly, we will SHAPE or train them to look more like a square bush, instead of a christmas tree, more on that below. Along with regular nutrients, I use Dutch master liquid light foliar spray. It DOES make a difference!
How do we shape our plant in veg?
This is one of the most important things we need to do in order to get a high yield. We want to give our plant a "vanilla ice ice baby" FLAT top. This is what separates the 4oz plants from the 10oz plants. There are tons of articles on this site on HOW to do these techniques. I'll show you how:
Topping. When we TOP a plant, we take off the terminal shoot; meaning, the very top of the branch that is making upward growth. Sometimes, it is hard to tell which one is actually the top. When we do this, it causes the two lower branches (bud sites) to grow more equally, instead of the main shoot being dominant. Here's how:
Find the terminal shoot from the branch
cut it, and you just made TWO branches instead of one
Here is a perfect example the results of topping.
Knowing when and where to top: This is where some experience comes in. You will get the feel of when it is time to top your plants. From seed, wait until the plant has about 4-5 sets of fan leaves, then cut the very top. Once the plant grows a bit, like the results above, you can top it again, making 4 main branches. After that, it's time to bend her over ;-)
LST (low stress training)
LST simply means a way of training our plants to grow a certain way, without radically hurting them. Typically, when we refer to LST, we are talking about bending or holding down branches in order to expose more light to lower branches. Auxins are spread out more evenly to all branches. Google "auxins" for more information, but in a nutshell, auxins are the hormone in plants that make them grow straight up, and most plant energy is focused on the center and tallest part of the plant. Distributing these auxins to other areas in the plant, cause it to grow more evenly. The end result is a few dozen colas (bud masses) of the same size, rather than a few massive colas (prone to mold because they are too thick) and many little ones.
When I train my plants, I gently spread it out so the little branches can get more light. I don't "kink" the branches (aka super cropping). Super cropping is more of a HST High stress, because the plant must repair the damaged tissue. I generally do whatever it takes to spread out branches so they are not on top of each other.
In some cases I will super crop if needed. Here is another picture after a quick session of bending:
I'll do this every few days, and tie branches down if necessary. Lets fast forward a bit... Here is the same plant 17 days later, 36" x 30" and ready for flower:
Perpetual
We want to harvest a plant once a month. So, at all times we will have two plants in flower, one month apart, and two plants in VEG, one month apart. Each plant in "vegged" for 2 months and flowered for two months. So every time you harvest a plant, you will take the plant that has been in veg for two months, take a clone of it, then put it into flower. If you're afraid your clone won't make it, take a few. Read this if you need a cloning recipe.
Flowering
When you're ready to flower, your plant should be around 2 ft x 3ft wide. Two months from clone or from seed should give you the size you need to go 10oz. In the above picture, you will see I am experimenting with even bigger pots (to see if there is a significant difference from 3.5 to 5 gallons of media), but for the scope of this article, I'll show you how to do it in the 3.5 gallon nursery pot. I will detail this a little more because I have not seen anyone use this same method before. Basically we will make a ebb and flow bucket.
Materials needed
1. Flood and drain kit (1/2" input, 3/4" output)
2. One 5 gallon bucket
3. One 7-10 gallon reservoir (any container will work)
4. One #5 nursery pot $5
5. One small bag grodan grow-cubes (NOT CHUNKS) will do 3 pots $24/3 - $8
6. Any small water pump $18
7. A few feet of 1/2" and 3/4" flexible hose $10
Put it together
1. Grow your plant in your #5 (3.5 gallon) nursery pot. Notice this pot fits right inside a 5 gallon bucket.
2. Drill holes in your buckets and install the flood and drain kit
3. Place the 5 gallon bucket, about 12" off the floor, with your reservoir sitting right on the floor.
4. Water pump goes to the bottom fitting with 1/2" tube, and drain hose 3/4 goes to top fitting
When the pump kicks on, it will fill the bucket from the bottom and overflow out the higher, 3/4" fitting. When the pump shuts off, the entire bucket drains back thru the pump.
Set your timer to run twice a day. Once at lights in, again 8 hours later. You are now up and running! Time to feed your plant into the screen.
SCROG
SCROG stands for "screen of green". It is similar to a trellis, where we spread out branches in equal distances from each other, to get an even canopy of buds. Check out this picture of a past plant I harvested. You can see how I fed the branches up thru the screen (metal garden fence from hardware store) keeping all branches about the same height. Also notice a couple branches were actually "kinked" to get them where I wanted them. This is the same technique we did above in VEG, however, in flower, the branches produce colas, and the weight of the cola will bend the branch down. Plus, the screen gives us more control.
I wont go into too much detail about how to do this, because there is no much info about it already, as it is a very popular method. You should use plastic coated metal fencing, usually found at home stores, for putting around the garden. The holes are 3" x 2". Put the screen on top of the plant (your canopy should already be somewhat level), secured with cable ties, on any type of support (I use PVC pipe). Slow and steady here! Don't break any branches. Move branches around as needed to spread them evenly. As you do this, you may be able to move the screen down a little bit. To move a branch, you can pull it under the screen, and push it up where you want it. If you are afraid to break it, you can use wire cutters to cut a wire, move the branch one step over, and bend the wire back. You will adjust branches under the screen, every few days, for the first 10 days of flower. If you have branches not tall enough to reach the screen, make sure they are getting light, and they will get tall enough in the next week. After 10 days, no more adjustments should be needed; just let them stretch. Branches will stretch ~12" or more above the screen. This is a good thing, and these branches will fill up with buds. Here are a couple pictures:
After two weeks, take a look under the canopy. Any bud sites that don't get light, get chopped off. If not, they take up energy and don't ripen well with no light. Don't get crazy here ok? If it's questionable, leave it. I have a lot of green here above the canopy. I don't remove fan leaves unless they are really blocking buds. I try to fold them under if possible. Fan leaves provide energy to the plant.
Nutrients
I could write another article just on nutrients, so I won't do it here. In a nutshell, use a popular line nutrients. Use a ppm of no more than 600 (@.5 conversion rate) during vegetative growth, and 1400 during flower. If you don't have a meter, mix up a few gallons at 1/3-1/2 of what the vendor's nutrient calculator says, then take your mix to your local grow store and ask them to check the PPM, then adjust from there. PH should be 5.6 to 6.0 throughout the entire grow. Change your nutrients once a week. Depending on the strain, you may be able to go longer, but I risk deficiencies if I wait too long.
Beneficial Bacteria
Again, I could write another post just on this, so I will try to keep it short and simple. Roots benefit greatly from beneficial bacteria in the grow medium. Some growers refer to them as "bennies". I use heisenberg's beneficial tea once a week. Making tea can be daunting for new growers. The fact is, I cannot get plants this healthy without beneficial bacteria. It is an important part of this growing method. At a minimum, I would suggest using "aquashield" and some type of mycorrhizae in all the water you use. Better yet, buy a bag of "ancient forest" from your grow store, and follow the tea recipe on the back of the back.
Summary
I know I've missed many items here. Like I said before, this is not a "step by step", but should give novice and intermediate growers enough information to copy this method and start growing some indoor banshees themselves. Again, nothing of what I'm doing is different than what others are doing already, I'm just putting it all together in one tutorial. However, I have yet to see anyone use the 3.5 gal pot of rockwool cubes in the 5 gal ebb and flow bucket. I think grow-cubes are over looked. They are an excellent growing medium. No, I don't work for grodan, but that chick on youtube has some nice t_ts, yeah?
Here are a couple final pictures of two plants in flower, about 4 weeks apart.
I apologize for any typos or grammar errors above. Questions and constructive tips encouraged. Happy Growing!
")
")


 Yeah a great idea to dry/cure that I must try. I also have a few of the 62% Humidipacks and could easily make a mount to keep the pac out of the pot.. I have to go give a deposit tomorrow to get some #4 ordered and will see what my friend who is the owner can do me for a huge bag of grodan croutons. If it wasn't for the fact I am already vegin in 1/2 gallon of #4 and am trying to see a difference in 5 gallons compared to the 3 gals I am currently using I'd try to switch and try this next reload. I will take cuts on the 1st and set aside a few just to veg in cubes and get my monster tree type grow on. I would like to be able to grow fewer but larger plants and in the long run get more weight for the same amount. I do have a brand new light mover that has a 4 foot spread and can take up to 50 lbs. I will be throwing around alot of ideas and will make sure to give ya a link to what might end up being my next journal.