How to: Simple Hydroponics

TheCapn

New Member
Jessie here! If you've been reading any of my posts, you've seen the fantastic growth and yields I've been getting with Ebb and flow buckets. Now, I'm simplifying it even more, with Top Feed To Waste.

What is top feed to waste?
Top feed is one of the most simple forms of hydroponic growing. "Top feed" can be as simple as watering plants by hand, or, can be automated with a small water pump on a timer. "To Waste" aka "drain to waste" means, we won't RE-USE the water; we let it go down the drain. The advantages to drain to waste are, we constantly water our plant with premium, bacteria free, ph adjusted water. There is less chance for root disease, less chance for PH drift, and less chance for deficiencies. NO need for chiller, no sprayers to get clogged, the list goes on and on.

Intro:
I started a few years ago growing Hydro. I thought I needed the BEST! I had so much sh_t running in the grow room, it practically vibrated the house. Over time I have learned how to simplify the process, without sacrificing quality or quantity. In fact, I'm growing bigger than I ever have, and I'll show you how I do it.

I've done may types of hydro looking for the fastest growing set up. I have an attic full of hydro equipment I don't use. I will quickly tell you what I've tried, and pros and cons for each.

bio buckets
PROS: Nice, DWC or better growth
CONS: Your grow room will sound like the fountain at the Bellagio. (leaks, loud, and complicated), plumbing everywhere

RDWC (recirculating deep water culture)
PROS: Amazing growth
CONS: Prone to pythium / root rot, plan on a large LOUD air pump for each container, hoses everywhere, chance for leaks, need chiller to keep water at 70, need battery back up in case of power outage, expensive to change nutrients due to large water volume

Aeroponics
PROS: Explosive growth, uses less water that RDWC or ebb and flow
CONS: Water pumps running 24/7 heat up water, demanding need for chiller. You might be able to get away with 75 degree water during veg, but eventually that water will be too warm for flower, putting you at risk for root diseases, loud water pumps, sprayers getting clogged, complicated plumbing unless you buy a pre-fab, subject to power failures / need battery backup

If you're doing one of the three above methods, you won't want to go on vacation more than a day without checking your grow. And if you do, you will need to take a friend thru a 2 week training course to teach him how to take care if something goes wrong.

Now we get a bit simpler:

ebb and flow
PROS: DWC comparable growth rates, less risk of root diseases than aero or dwc, flooding completely saturates the growing medium, giving roots no dead spots in the pot, uses some plumbing, but not complicated, no need for chiller, not affected by power outages, quiet, no air / water pumps running constantly.
CONS: Uses large amount of water

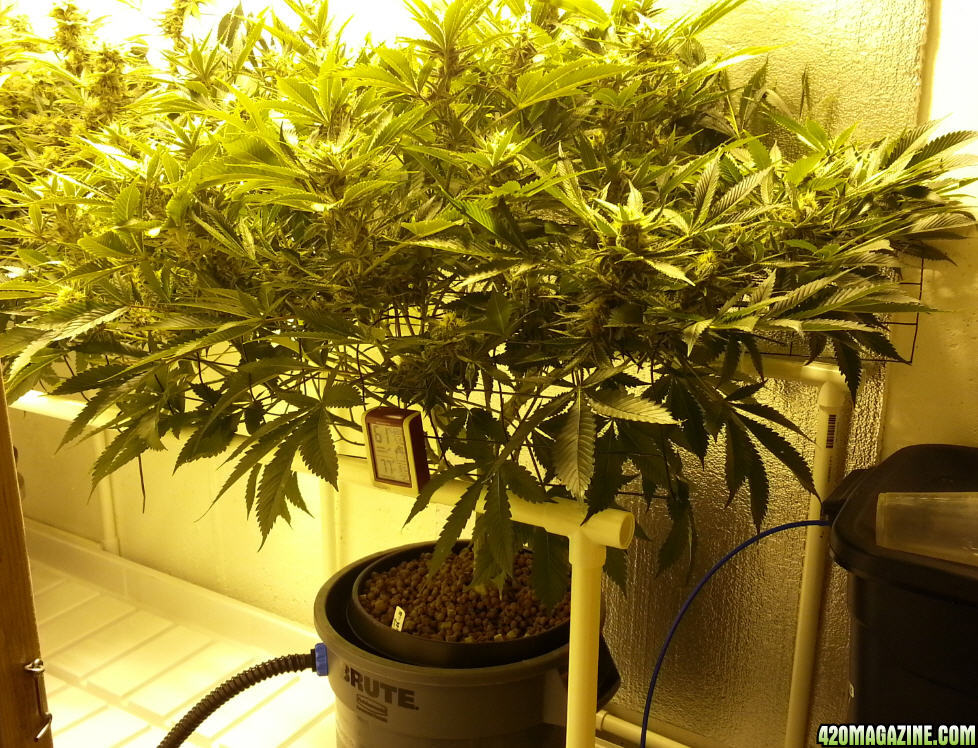
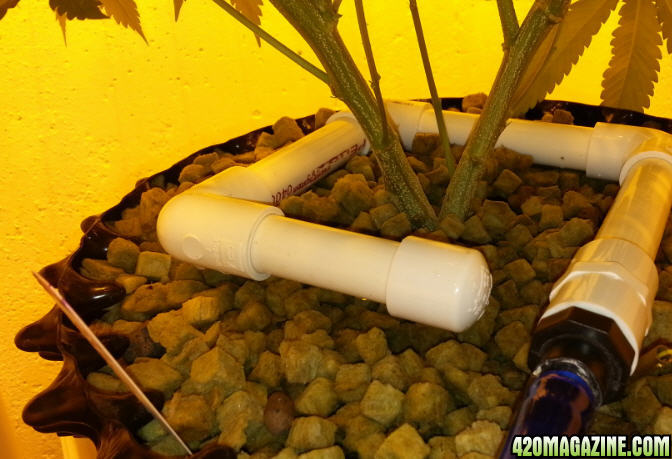
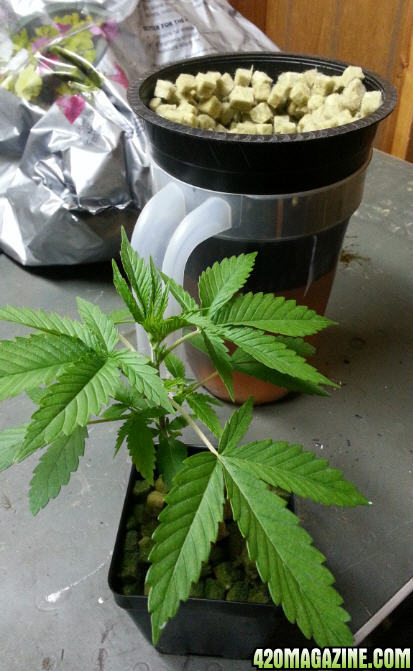
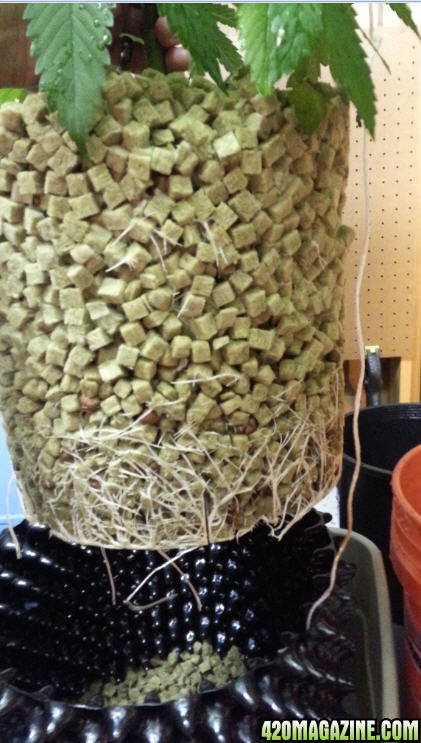
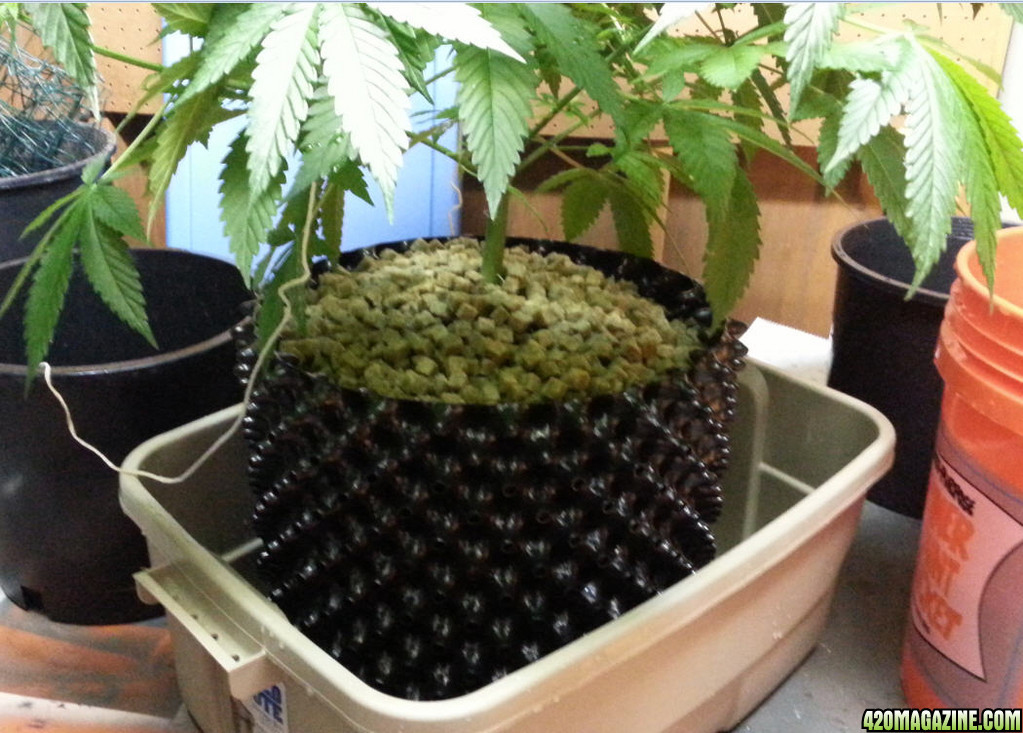
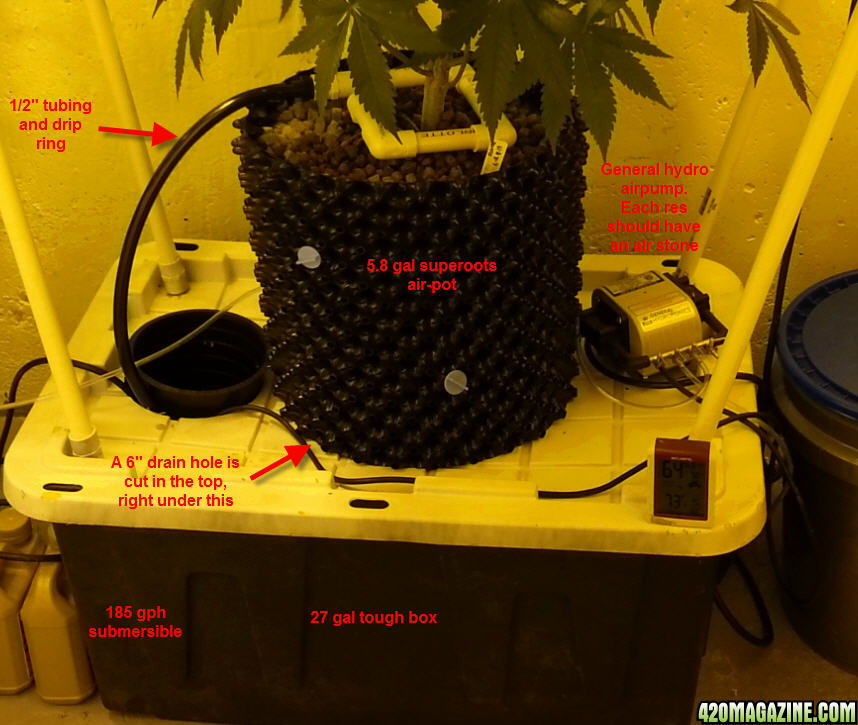
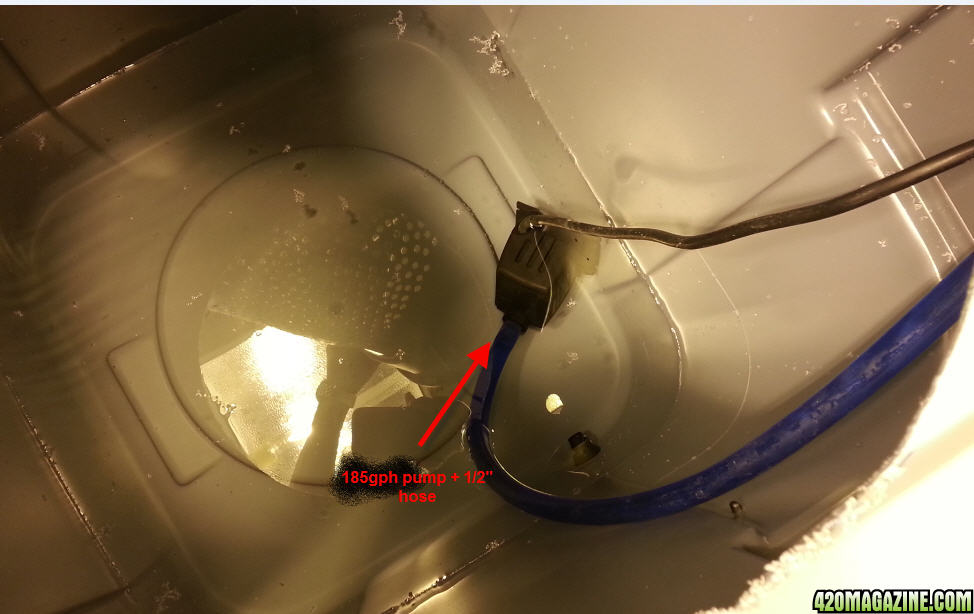
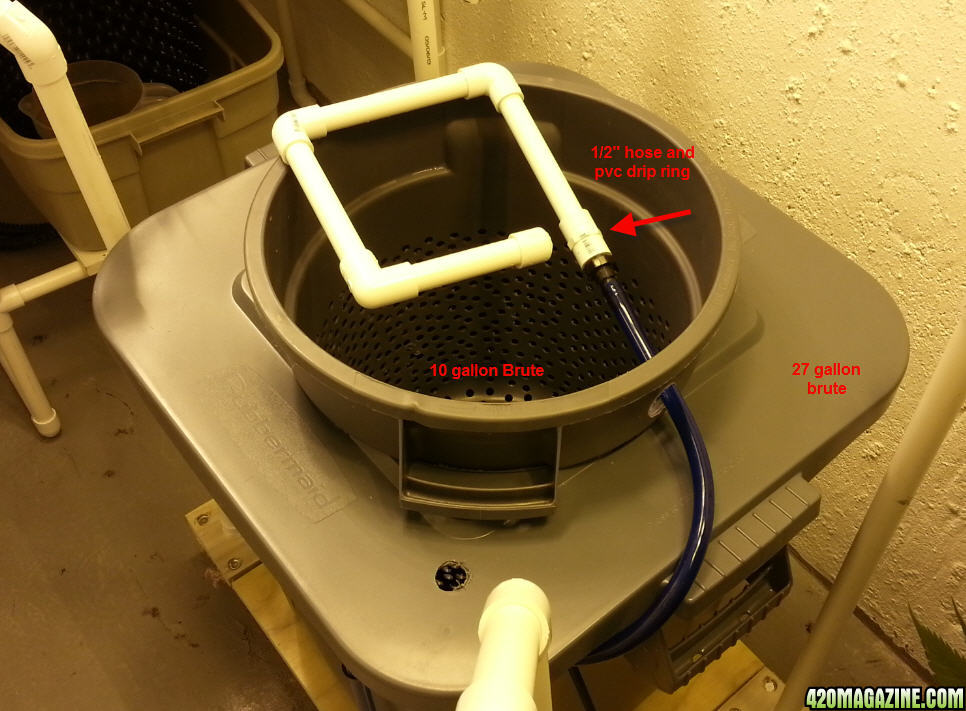
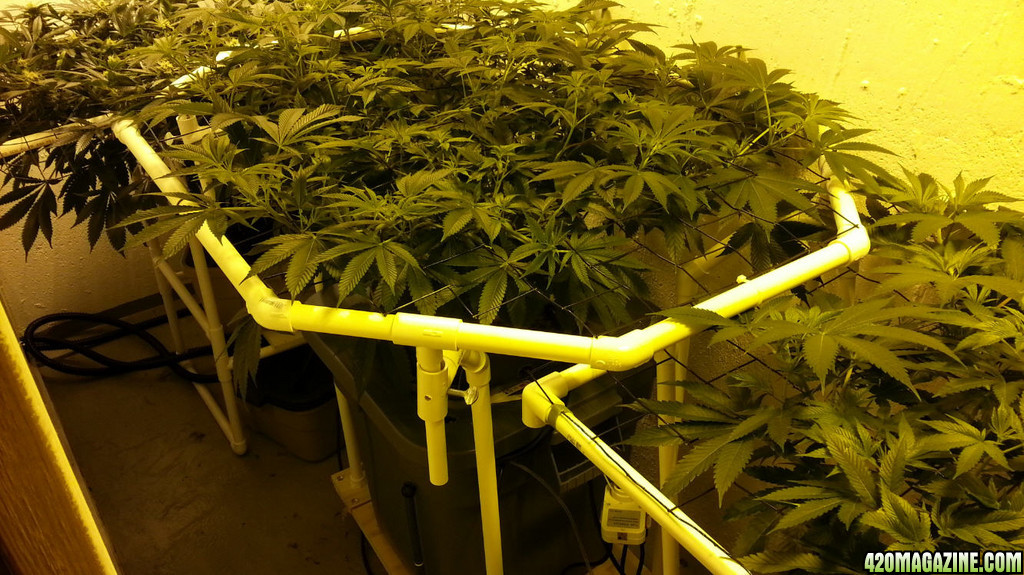
In this pic you can see I'm using a 10gallon flood container, with the plant in a 7 gallon nursery pot. For a full article on how to grow using this, check out my signature.
Ace21.jpg


I've done all these methods with success in each, and trust me, I have made my fair share of mistakes. After this, I analyzed it all, to decide what method gives ME the most yield, with least amount of problems, and best return on investment for both money and effort spent. I have been doing ebb and flow in buckets (see my signature) for some time now. Now, I'm trying Top Feed, and I'm going to do it here with you.

Top Feed to waste
PROS: DWC comparable growth rates if done correctly, almost NO risk of root diseases, inexpensive, uses simple plumbing, easy to set up, no need for chiller, not affected by power outages, quiet, no air / water pumps running constantly, leave your grow for a week or more without worry

TopFeed.jpg


What I've Learned
When I was a teen ager, I wanted that new Gibson Guitar so bad! And my dad told me, "Son, it's 10% guitar, 90% player." It's the same with growing. 10% equipment, 90% grower. You won't be mr ganja, just because you bought that $1000 aero setup. The equipment is only a small piece of the of the entire operation.
You don't think "Top feed" is "fancy" enough for you? You don't think "top feed" will give a great yield? Stick around and I'll show you how I do it, with one the most simple hydroponic methods.

PS, this is my first Top Feed grow so I don't know what to expect either ;-)

As always, thanks for checking out my articles. I am here to learn. Questions and constructive comments welcome. I will be starting the process in my next post. We will cover vegetative growth and flowering, topping, fimming, lst, and more, to get the maximum yield from a single monster plant.
 
Checking out the new thread. Love your style. I've been curious about those airpots too, so this will be an interesting one to watch.
 
Ok Chapter one! First, I'm going to give you a quick tour of how I take a plant from seed (or clone) and grow it through the vegetative stage. Again, this article will show you one of the simplest ways of hydroponic growing, top fed rockwool cubes (not blocks).

Let's skip the seedling and go from where we enter vegetative growth. People call this, "VEG". If we want BIG piles of smoke, we want to "VEG" for 8-10 weeks. If you are restricted to a low plant count, "Vegging" for a long period of time is the biggest way to increase your yield. You can grow a lb of bud with 4 plants in a 4 x 4 area, or a pound with ONE plant. In this article, we will grow a lb with one plant (I hope so anyway). Don't worry, it's easier than you think!

Grow your seed or clone in a rockwool block; I prefer to get clones started in a 3" block, seeds in the smaller blocks. Once roots start to poke out, fill up an ordinary $1 nursery pot with grow-cubes. Soak the pot with the growcubes in plain water (for a few minutes) at ph of 5.5-5.8. It is not necessary to soak them longer. Now, stick your rock wool block in it, as if you were planting in dirt.

Pic from 5/12: Here you can see I planted the seedling in the tiny square pot, and now I'm transplanting to the 6" net pot. Sometimes I use the netpots because when the roots grow out the sides, they air prune themselves, causing new roots to grow. You should transplant up a size a few times. This gets a nice root system growing. If you go with a giant pot right away, roots tend to grow to sides and then circle.
smallPlant1.jpg


Then I move up to a one gallon pot 10 days later on 5/22:
AgentOrangeVeg.jpg


Once the plant is about the size of this one, you will notice rapid growth. One nice thing about rock wool, is that it is hard to over water it. Over watering is a common mistake, especially with new growers, and rock wool takes the guess work out of it. The disadvantage: You need to water every day. At this stage of growth, I water once a day, with two cups of water, by hand.

I use general hydroponics nutrients, and I'll show you my recipe for veg. To make up your water, in a 5 gallon bucket, start with 20ml of botanicare calmag, 20ml aquashield, 20ml florablend. This should put your PPM around 200 (if you started with 0ppm water). Then, add 15ml grow, 10ml micro, and 5ml bloom. This is about 25% of the suggested dose on the chart, and should put your mix around 600ppm @.5 conversion, which is all I use up until the last couple weeks of veg. After mixing, check the PH. Mine lands right at 5.8, but you may have to "adjust" your PH slightly. If you don't have a PPM meter, use this recipe and you will be fine. If you don't have a PH meter, you shouldn't be attempting to grow a plant.

Here are the same two plants, on 5/31 (not even 3 weeks from the top picture), using this nutirent recipe, hand feeding once a day, and 18 hours of 400W of light a day.
OA2.jpg


In my next post, we will back up a bit, and look at how we start training these plants to grow like a hedge, instead of a x-mas tree.

To those who have subscribed so far, are you on your way to buy grow-cubes yet? :)
 
Thanks John. I just transplanted again into the final flowering pot, a 5.8 gallon superoots air-pot. Pictures to come tomorrow.
 
cool stuff capn i prefer coco to rockwool i find its simpler,cheaper,easy to reuse,and i can do anything with it that i can with rockwool ,you can get it in chunky thats similar to the cubes your using,and the biggest plus besides it having a similar growth rate to hydro,i can do full organics and now im experimenting with high brix, however if i did not do coco i would be using a similar system to what your doing, i have always gone for the simpler methods,i think about how nature works and ms earth does it simple, so i try to follow her, i love the shot of the "root pot" in the other thread talk about some solid roots, im also feelin ya on growing big plants, vs a bunch of little ones, only drawback is if you get a sick plant or any other disaster its a much bigger loss than say a sick plant in a hempy sog in 2liters, but besides that its my new preferred method, i think they get to express themselves better too, anyway just wanted to say good job on all the diy/how-tos :thumb::thumb:
 
cool stuff capn i prefer coco to rockwool i find its simpler,cheaper,easy to reuse,and i can do anything with it that i can with rockwool ,you can get it in chunky thats similar to the cubes your using,and the biggest plus besides it having a similar growth rate to hydro,i can do full organics and now im experimenting with high brix, however if i did not do coco i would be using a similar system to what your doing, i have always gone for the simpler methods,i think about how nature works and ms earth does it simple, so i try to follow her, i love the shot of the "root pot" in the other thread talk about some solid roots, im also feelin ya on growing big plants, vs a bunch of little ones, only drawback is if you get a sick plant or any other disaster its a much bigger loss than say a sick plant in a hempy sog in 2liters, but besides that its my new preferred method, i think they get to express themselves better too, anyway just wanted to say good job on all the diy/how-tos :thumb::thumb:

BigIrish, I REALLY want to play with coco. I'm embarrassed to say I've never grown in it, although I have used sunshine#4 and enhanced it with more coco so it is close. So when you grow in coco, are you doing top drip feed like I am here? If so, how many times do you irrigate per day during max growth times?
 
Sorry I am late lol, just found the link. You know I am subscribed:)

I am really excited to watch this journal from the start and with your new methods. I also have alot of spare parts not being used including a dozen of the 5 gallon airpots. Let me ask you this: with your grow methods versus mine (advanced #4) do you have problems with fungus gnats like I do or with it being Hydro is that problem resolved? I ask cause if its less bug problems it might be worth trying it out. The weights your getting are phenomenal and if I could get similar results it's a no brainer. My problem then would be finding enough sick people to donate the meds too :)
I have to run to the ranch for an overnight work trip but am so jazzed to watch your journal I am going to bring the wife's 3G enabled IPad so I can take a peak later LOL
 
In my last post I mentioned I would talk about training your plants. I decided that is "out of scope" for this article, so I made another article called "How to: Bend and Top your way to a 1lb monster". It is applicable in almost any growing medium, so check it out if you are interested.

So, back to Simple Hydroponics and top feed. Our plants are huge and it's time to flower them. First, we need to transplant our plant to the final, 5.8 gal superoots airpot. We can see some circling of roots, but not too bad. Look at those PEARLY WHITE ROOTS! Soak some rockwool cubes for 20 minutes, in your nutrient solution at about 500PPM, with a PH of 5.8, and then add some to the bottom of the airpot. You can do this with absolutely no shock to the plant.

transplant10.jpg


transplant24.jpg


s1lingblade asked about fungus gnats in rockwool. I have never had them, but rockwool is a less inviting medium than dirt for pests. gnats lay their eggs near the surface of the growing medium, so it is best to add a layer of hydroton on top of the rockwool cubes. This prevents algae from growing on the rockwool, which could become a house for fungus gnats to lay eggs. Add rockwool cubes all around the plant, and then tap the sides of the container, to make sure the cubes are packed all around the root ball.
transplant32.jpg
 
Now the fun part! Building our flowering system. Before putting your plant into flower, check out my article on "bend and top". Is your plant REALLY ready to flower? Many times I have flowered a plant too early, and then disappointed with the yield. It takes 2 months to flower a plant, why not veg for the same amount of time? A difference of two weeks could literally be a difference of 4-5 ounces of bud in the end.

We've been "top feed to waste" in vegetative growth for about two months. When using Rockwool during flowering, I have found it is TOO wasteful to "top feed drain to waste". The plants are so thirsty, we need to water them frequently, so I will show you how to set up a recirculating system "recirculating top feed" for under $50 (you might already have this stuff laying around). Let's put together our set up. I'll show you THREE different ways you can do it. In all three methods, you will have some type of reservoir with an air stone in it, a small water pump on a timer, and you'll need to build a little drip ring like this:

systemC3.jpg


Method 1:
This is the simplest and least expensive method, but produces big results. You only need a 185gph water pump, some pvc pipe, some 1/2 hose (don't use clear hose), and a couple 10 gallon totes. The concept is easy, and the picture explains it all. The 10gal tote that the plant sits in, just collects the water and funnels it back to the 10gal tote sitting on the floor.
setupA.jpg


Method 2:
Here I use a 27gal tough box. It has a strong, recessed lid. I paint the lid black, then a layer of white, to light proof it. I drill a 6" hole in the top, and set the plant right on top of it. When we top feed, the water simply drains thru the hole. This system can hold up to 25 gallons, so if you will be gone for long periods of time, this is the way to go.
systemB.jpg


Method 3:
This is the big mama, and uses 10 gallons of rockwool. This is somewhat experimental. I combined the rockwool with about 1/3rd hydroton. Instead of the 5.8 gal airpot, I made a similar set up with this 10gal brute trash can. I had to special order the 10gal brute. I also put in on a rolling cart, so I could easily turn it to get to the other side of the plant. Or, you could roll it down the street to your buddy's house :thumb:
systemC1.jpg

systemC2.jpg

systemC5.jpg


So now you've seen three different bad-ass flowering systems, two of which cost under $50 including the $18 water pump. I hope I haven't overwhelmed you with too many options. My point is, you probably have pumps and totes laying around the house, and you can get creative, and use any combination you like, as long as you follow the same basic principle. The advantages of these systems:

1. Allow you to leave them for up to a week at a time.

2. Immune to power outages. Power can be out for several hours at a time and roots wont dry up.

3. DWC comparable results, with less chance for root rot.

4. When compared to dirt, there is less chance with rockwool attracting pests. Rockwool is CLEAN. Price is same as high quality dirt.

5. Simple to set up, almost impossible to over water, easy to flush... need I go on???


If you choose to set up a system like this, here are a few rules of thumb.

1. Light proof your reservoir. If the reservoir water gets light, it could grow algae or anaerobic bacteria, causing root rot.

2. Put an air stone in the reservoir. The water should be aerated (pronounced "air-ated", not "air-eee-ated"). If you are using beneficial bacteria, it will die if the water is not aerated. We don't need a TON of air, just a basic flow of air will do, to prevent the water from growing any anaerobic bacteria.

3. It is important all of the rockwool gets saturated during irrigation. Adjust your pipe properly to ensure good penetration. oh yeah! TheCapn likes good penetration!

4. Irrigation times. Get a cheap 15min on, 15 min off timer. If you are using straight grow-cubes, I would start with 3-4 x a day, 15 minutes each time. If you are using a mix of hydroton and grow cubes, I would start with 6 times a day. After irrigating, wait 30 minutes and then lift your pot slightly to see how heavy it is. Then, come back in a few hours later. If you notice a difference, up the frequency. The beauty about rockwool cubes, is that it is difficult to over water. But we do want to let the roots get plenty of oxygen.

5. As with any system, keep your timers and plugs up off the floor. We don't want you getting electrocuted.

Here is a pic of all 3 happy plants. The rear one has been in flower for 3 weeks, the other two, just a week. It is hard to get them all in the picture:
all311.jpg


In the next post, we will talk a about water quality, nutrients, beneficial bacteria, ppm, and PH.
 
Can I get a vote for, "BNPOTM = Biggest netpot of the month"?

Got my vote :laugh:
very impressive, caught up & subbed for this. Need to get looking into all your other threads there Capn!!
+reps, :peace: CA215
 
Yep! Like I said, this one is somewhat experimental, so see if a giant container is overkill. In a previous flood and drain grow, this was the OUTER container. Now, it's the inner. Can I get a vote for, "BNPOTM = Biggest netpot of the month"?

YEHA BUDDY! that looks like some work! + reps for sure my man! lol i cant imagine how big she will get! hope you got alot of head room!!! ; )
 
Thanks for all the likes and comments. I actually DON'T have enough head room. I try to only flower TWO at a time, but somehow I ended up with an extra plant in veg so I'm packing 3 in this time.

Let's talk about water Quality, ppm, and ph. I could write a book on this, but I'm no chemist, so it would be all wrong. My point is I'll need to keep it basic here and tell you what you need to know to grow.

Let's start with equipment. Hear me now and believe me later. If you want results like you see in the pictures here, you need a PH and a PPM / EC meter. I use a meter that stays plugged in all the time. The difference between a good meter and a poor meter is... a good meter stays calibrated and gives consistent readings. I bought a $20 ph pen from china and threw it away after the first few times I used it. You don't need to spend $500, but don't buy crap either. This one goes for $150.
24716.jpg


PPM: A ppm / EC meter, measures the electrical conductivity in the water. You can't measure how much nitrogen or potassium, calcium, etc is in the water easily, but we can measure the conductivity, and "estimate" the parts per million of nutrients. When you read the nutrient calculator from the nutrient website, the ppm could be at a .5 conversion or a .7, or different yet. So pay attention. For example, my meter is based on the 500 scale. So when My meter reads 750ppm, the EC is 750 / 500 = 1.5EC. As plants get bigger, and thru different stages of growth, your nutrient recipe will change, and you will use a higher PPM in flower, than you will during vegetative growth.

PH: ph is the measure of acidity, or alkalinity in the water. Nutrients are able to be drawn up by the plant in hydroponics, in a PH of 5.5 to 6.5 (some better than others). Typically, in hydroponics, most people agree 5.8 is the optimal. I shoot for 5.9, so if I drift one way or another, I'm still in range. In hydro, you will keep that range of 5.5 to 6.5 for the entire grow. YOU WILL NEED to buy both PH UP and PH DOWN. These are chemicals we use to adjust PH. Stoners say, "..you need to PH your water". "PH" is not a verb.

It is nearly impossible to "guess" at ppm and PH. Don't try it in hydroponics. You can get a PH meter for around $50 and a ppm meter for around $20 on ebay. If you can't afford that, this is not a good hobby for you.

RO water: Reverse Osmosis water is more pure than tap water. My tap water has a starting ppm of 300! If this your case, you need to add 300 to the top of whatever nutrients you mix up. So, if you want a ppm of 500, you set it to 800, and assume that 300ppm of it is garbage. I ran tap water for a long time, and it was fine. It is ok if you set it out with an air stone in it overnight. This will help dissipate the chlorine in it. Chlorine kills beneficial bacteria (more on this later). After some time, I bought an RO unit. I can't say I notice better growth, but it is convenient, and my PH swings less with it.

Nutrients: Which nutrients are the best? Does anyone know? Arguments will go on until the end of time. My suggestion, go with a popular brand that your local grow shop carries and stick with it. Fox farms, General Hydroponics, botanicare, or others. Go with something popular, and you will always be able to find other growers who can give you advice, or you can compare with. I use General Hydroponics for base nutrients, and currently, I am trying dutch master.

Here are my recipes for the different stages of growth. I always start with about 4 gallons of water in a 5 gallon bucket, then I can add water to dilute to the ppm I desire.

For vegetative growth, this recipe should bring you around 500ppm
Fill a 5 gal bucket with water, then add:
20ml Cal mag plus, or cali magic
20ml florablend
5ml flora bloom
10ml flora micro
15ml flora grow
5ml rapid start (optional)
5ml liquid seaweed (optional)

Remember this is not PER GALLON, it is PER 5 gallons.

For ROOTED clones, I dilute this mix down to about 300ppm until I see new at least two new sets of leaves. DO NOT use ANY nutrients on a clone until you see a good root system or at least a little new growth. Once I see substantial growth, I go ahead and use this at 500ppm. I use this throughout vegetative growth, up until a week before going to flower. All the plants you see above, have been on this recipe.
nutrientsInVeg.jpg


For transitional stage (one week before and two weeks into flower) (around 700ppm):
Fill a 5 gal bucket with water, then add:
20ml Cal mag plus, or cali magic
20ml florablend
15ml flora bloom
15ml flora micro
15ml flora grow

For full flowering (3rd week of flower, until flush) (800ppm):
Fill a 5 gal bucket with water, then add:
20ml Cal mag plus, or cali magic
20ml florablend
60ml flora bloom
40ml flora micro
10ml flora grow
Note, I have taken this ratio as high as 1400 by adding more bloom and micro, but it doesn't make the plants grow faster.

Bloom Boosters
I use GH kool bloom to take this from 800ppm to 900 or 1000ppm in weeks 6 to 8. You can experiment with different bloom boosters. I wouldn't use any "ripening" agent, or anything sugary or gooey until weeks 7 and 8. The reason for this is you risk feeding the bad bacteria in your res, and this could lead to a case of pythium or root rot. Personally, I don't use anything beyond the koolbloom. I don't use "floralicious" for the same reason.

Everyone has their own take on nutrients. Stoner dictionary: "nutes". Whatever you choose, don't go with the directions on the bottle, as they are usually too high. If you follow the general hydroponics nutrient calculator, you will fry your plants.

NOTE: I'm not trying to advertise any products here. This post is by all means not exhaustive of all methods. I only posted my nutrient calculations as a guideline for others getting into Hydro. That being said, I used these same recipes to grow a "20 ouncer". This plant was exceptional, but the point is, you don't need to spend BIG MONEY to get big results.
 
BigIrish, I REALLY want to play with coco. I'm embarrassed to say I've never grown in it, although I have used sunshine#4 and enhanced it with more coco so it is close. So when you grow in coco, are you doing top drip feed like I am here? If so, how many times do you irrigate per day during max growth times?

I'm using number 4 and some straight coco and I top feed em when needed which is usually every 36 hours. I do try to dry them out once a week a lil just before they start to wilt, can't wait to get some cubes and scrub out one of the 5 gallon air pots. The great thing about my upcoming airpot/cube grow is I have all but the cubes lol. At 29 bucks I couldn't buy it today when I went an ordered the two BIG bales of advanced #4. I have 9 OG Kush Clones that have vegged for over 40 days and brand new 5 gallon smarties so this reload is already commited but the project upcoming is getting some cuts taken for it on the 1st of July. Of course I'll make sure you all get a link to that journal once it's up
 
Now the fun part! Building our flowering system. Before putting your plant into flower, check out my article on "bend and top". Is your plant REALLY ready to flower? Many times I have flowered a plant too early, and then disappointed with the yield. It takes 2 months to flower a plant, why not veg for the same amount of time? A difference of two weeks could literally be a difference of 4-5 ounces of bud in the end.

We've been "top feed to waste" in vegetative growth for about two months. When using Rockwool during flowering, I have found it is TOO wasteful to "top feed drain to waste". The plants are so thirsty, we need to water them frequently, so I will show you how to set up a recirculating system "recirculating top feed" for under $50 (you might already have this stuff laying around). Let's put together our set up. I'll show you THREE different ways you can do it. In all three methods, you will have some type of reservoir with an air stone in it, a small water pump on a timer, and you'll need to build a little drip ring like this:

systemC3.jpg


Method 1:
This is the simplest and least expensive method, but produces big results. You only need a 185gph water pump, some pvc pipe, some 1/2 hose (don't use clear hose), and a couple 10 gallon totes. The concept is easy, and the picture explains it all. The 10gal tote that the plant sits in, just collects the water and funnels it back to the 10gal tote sitting on the floor.
setupA.jpg


Method 2:
Here I use a 27gal tough box. It has a strong, recessed lid. I paint the lid black, then a layer of white, to light proof it. I drill a 6" hole in the top, and set the plant right on top of it. When we top feed, the water simply drains thru the hole. This system can hold up to 25 gallons, so if you will be gone for long periods of time, this is the way to go.
systemB.jpg


Method 3:
This is the big mama, and uses 10 gallons of rockwool. This is somewhat experimental. I combined the rockwool with about 1/3rd hydroton. Instead of the 5.8 gal airpot, I made a similar set up with this 10gal brute trash can. I had to special order the 10gal brute. I also put in on a rolling cart, so I could easily turn it to get to the other side of the plant. Or, you could roll it down the street to your buddy's house :thumb:
systemC1.jpg

systemC2.jpg

systemC5.jpg


So now you've seen three different bad-ass flowering systems, two of which cost under $50 including the $18 water pump. I hope I haven't overwhelmed you with too many options. My point is, you probably have pumps and totes laying around the house, and you can get creative, and use any combination you like, as long as you follow the same basic principle. The advantages of these systems:

1. Allow you to leave them for up to a week at a time.

2. Immune to power outages. Power can be out for several hours at a time and roots wont dry up.

3. DWC comparable results, with less chance for root rot.

4. When compared to dirt, there is less chance with rockwool attracting pests. Rockwool is CLEAN. Price is same as high quality dirt.

5. Simple to set up, almost impossible to over water, easy to flush... need I go on???


If you choose to set up a system like this, here are a few rules of thumb.

1. Light proof your reservoir. If the reservoir water gets light, it could grow algae or anaerobic bacteria, causing root rot.

2. Put an air stone in the reservoir. The water should be aerated (pronounced "air-ated", not "air-eee-ated"). If you are using beneficial bacteria, it will die if the water is not aerated. We don't need a TON of air, just a basic flow of air will do, to prevent the water from growing any anaerobic bacteria.

3. It is important all of the rockwool gets saturated during irrigation. Adjust your pipe properly to ensure good penetration. oh yeah! TheCapn likes good penetration!

4. Irrigation times. Get a cheap 15min on, 15 min off timer. If you are using straight grow-cubes, I would start with 3-4 x a day, 15 minutes each time. If you are using a mix of hydroton and grow cubes, I would start with 6 times a day. After irrigating, wait 30 minutes and then lift your pot slightly to see how heavy it is. Then, come back in a few hours later. If you notice a difference, up the frequency. The beauty about rockwool cubes, is that it is difficult to over water. But we do want to let the roots get plenty of oxygen.

5. As with any system, keep your timers and plugs up off the floor. We don't want you getting electrocuted.

Here is a pic of all 3 happy plants. The rear one has been in flower for 3 weeks, the other two, just a week. It is hard to get them all in the picture:
all311.jpg


In the next post, we will talk a about water quality, nutrients, beneficial bacteria, ppm, and PH.

Dang, sorry Cap The most informitive post of all and I just today found it lol. Lot's of questions answered now, thanks. I will make sure to send you a link to the one I do once the journal is up and running. Sure would like to see B.I.D. dedicate one of his tents to a grow cube/top feed, maybe with his upcoming L.E.D. Light? EH? lol
Thanks for showing how easy it really can be. I suffer from a version of K.I.S.S. its the a$$backward$ version and everything is harder than it has to be and it costs more to! lol

I choose method #1 as I have all of it but the cubes. I have already snaked two of the totes were going to use for moving, lol actually its just a loan I'll have to buy her 2 more and probably a lot more than just that. I did see at wally world today they were still 4.97 for 18 gallon ones
 
Back
Top Bottom