FreddieGrewGrr
420 Member
(Pics included are only just 5 weeks old, 3 days from 6 weeks)
Gonna try to keep this short and simple.. I'm hoping to be able to make a great contribution here in the next while.
I'll start off with a few smaller things that have been quite amazing. I am doing soil right now to be clear.
So for those who use Soil as a medium:
Be sure to use a healthy brand of professional grade soil like "Pro-mix" which has a decent amount of Mycorrhizae already, and keeps a decent amount of aeration throughout the stages. But also use some Extra Mycorrizhae spores (prefer to get them in the form that they're not ground up as fine as a powder, but rather small pieces bigger than a couple grains of salt/sugar for the best short and longer term results).
So after you've done the initial stage of Veg In the Solo plastic cups for a week or 2. You can take those and transplant them right into approximately 7-8 liters of Soil (I prefer Pro-mix WITHOUT any pre-loaded fertilizer).
But Do NOT do this in just any container.. I'll describe..
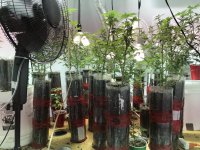
-Take 4 x 2l pop bottles, cut ONLY the top off the 1st bottle near where the point where you are left with a straight cylinder to the bottom of the pop bottle.
On the bottom of that 1st 2l pop bottle, drill or cut your holes and put your stones in place for water/nutrients drainage.
Then for the 2nd, 3rd, and 4th 2L pop bottles, you cut both the top and bottom parts off it, so you're left with just a plastic cylinder with no top or bottom.
-Take the 2nd pop bottle cylinder and mate it to the top of the 1st 2l pop bottle that you just left the bottom on.. You can use pretty much any basic silicone or Gorilla Glue on the outside where the 2 bottles meet to stop any leaks at all. I use some of the Red Permanent "Tuck tape" for added stability after the silicone is cured in about 24 hours. So you can repeat that exact method for the 3rd and 4th bottles. So you're left with what looks like an 8 litre pop bottle.. Yup, tall and narrow.. Lol. You can make a simple wooden table to place each of the bottles in so they don't just fall over. If not possible, then you can use thin Hemp rope and tie a bunch of these tall bottles together as they will then have created their own stability if you tie them tight enough but not too tight. (Simple table can be just a 4x4ft sheet of any thin plywood with a few 12" tall stands screwed on the bottom, can use 2x4 or 2x2 for the table stands.
Place the bottles so they have enough room so that your not left with too much competition for light as the "Sucker leaves" (what I call the main Sun suckers that we must prune IF we want to have many more nodes and branches. Not sure if anyone has made a map of the basic plant and how to prune for the absolute most branches with many nodes, but if not I'll try to get one drawn up and share soon as that alone can take a plant that you may leave go on its own kinda only focusing on the top, Aka the SOG (Sea of green method), so I'd rather reap the benefits of a SCROG (screen of green) method since we get what is like a fully loaded decorated Xmas tree but buds rather than ornaments, Garland & tinsel ,but we don't need any netting or screens to do that. (I'll check in case there's already accurate posts on how to properly prune for SCROG here so I don't go over already posted topics).
However, being that you can eliminate going to mid sized pots/buckets without any worry of deaths from putting small plants in large amounts of soil (Back in my teen years, I made the mistake of putting a small plant in a 5 gallon bucket right Outta the Solo cups and it died of course lol, however not in all cases.
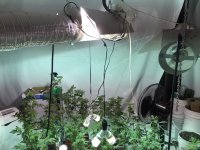
Since the plants will grow up faster and are already a bit higher than 5 gallon buckets, requires you to raise your Veg lights higher than you may have with lower containers.
Gravity is an overlooked factor in root growth, so this method helps to make the roots grow "Fast track" to the bottom since this freedom it has. It's easy to see the difference between that and bigger or smaller pre-made to sell containers with own eyes if you put it beside any other containers/planters.
End result is increased success of plant veg growth, also can see the roots all the way through to easily catch any possible algae etc.
Now that's not all...
Since the roots will be "speed growing" down faster than usual, they hit the bottom faster and start to turn upwards, or be subject to root rot, so I simply take the plants out of the container and literally CUT Off all the roots over 10-12" long, and I've sifted the soil thru a basic sifter (can use thin metal screen screwed to an open square of wood to get the old roots out and the stones from the bottom. Doing 1 plant at a time you place the rock/stones back in bottom and refill with your soil. But PLEASE MAKE SURE that you add a teaspoon of Mycorrhizae when you replant and you'll Always have the biggest yields in the end. But I've got a lot of great info to share yet. I hope this is helpful to anyone who's serious about getting the very most out of the space you have. Please let me know if I've left anything out that you need to know. I'll be as quick as I can to reply.
Cheers and peace to all
Gonna try to keep this short and simple.. I'm hoping to be able to make a great contribution here in the next while.
I'll start off with a few smaller things that have been quite amazing. I am doing soil right now to be clear.
So for those who use Soil as a medium:
Be sure to use a healthy brand of professional grade soil like "Pro-mix" which has a decent amount of Mycorrhizae already, and keeps a decent amount of aeration throughout the stages. But also use some Extra Mycorrizhae spores (prefer to get them in the form that they're not ground up as fine as a powder, but rather small pieces bigger than a couple grains of salt/sugar for the best short and longer term results).
So after you've done the initial stage of Veg In the Solo plastic cups for a week or 2. You can take those and transplant them right into approximately 7-8 liters of Soil (I prefer Pro-mix WITHOUT any pre-loaded fertilizer).
But Do NOT do this in just any container.. I'll describe..
-Take 4 x 2l pop bottles, cut ONLY the top off the 1st bottle near where the point where you are left with a straight cylinder to the bottom of the pop bottle.
On the bottom of that 1st 2l pop bottle, drill or cut your holes and put your stones in place for water/nutrients drainage.
Then for the 2nd, 3rd, and 4th 2L pop bottles, you cut both the top and bottom parts off it, so you're left with just a plastic cylinder with no top or bottom.
-Take the 2nd pop bottle cylinder and mate it to the top of the 1st 2l pop bottle that you just left the bottom on.. You can use pretty much any basic silicone or Gorilla Glue on the outside where the 2 bottles meet to stop any leaks at all. I use some of the Red Permanent "Tuck tape" for added stability after the silicone is cured in about 24 hours. So you can repeat that exact method for the 3rd and 4th bottles. So you're left with what looks like an 8 litre pop bottle.. Yup, tall and narrow.. Lol. You can make a simple wooden table to place each of the bottles in so they don't just fall over. If not possible, then you can use thin Hemp rope and tie a bunch of these tall bottles together as they will then have created their own stability if you tie them tight enough but not too tight. (Simple table can be just a 4x4ft sheet of any thin plywood with a few 12" tall stands screwed on the bottom, can use 2x4 or 2x2 for the table stands.
Place the bottles so they have enough room so that your not left with too much competition for light as the "Sucker leaves" (what I call the main Sun suckers that we must prune IF we want to have many more nodes and branches. Not sure if anyone has made a map of the basic plant and how to prune for the absolute most branches with many nodes, but if not I'll try to get one drawn up and share soon as that alone can take a plant that you may leave go on its own kinda only focusing on the top, Aka the SOG (Sea of green method), so I'd rather reap the benefits of a SCROG (screen of green) method since we get what is like a fully loaded decorated Xmas tree but buds rather than ornaments, Garland & tinsel ,but we don't need any netting or screens to do that. (I'll check in case there's already accurate posts on how to properly prune for SCROG here so I don't go over already posted topics).
However, being that you can eliminate going to mid sized pots/buckets without any worry of deaths from putting small plants in large amounts of soil (Back in my teen years, I made the mistake of putting a small plant in a 5 gallon bucket right Outta the Solo cups and it died of course lol, however not in all cases.
Since the plants will grow up faster and are already a bit higher than 5 gallon buckets, requires you to raise your Veg lights higher than you may have with lower containers.
Gravity is an overlooked factor in root growth, so this method helps to make the roots grow "Fast track" to the bottom since this freedom it has. It's easy to see the difference between that and bigger or smaller pre-made to sell containers with own eyes if you put it beside any other containers/planters.
End result is increased success of plant veg growth, also can see the roots all the way through to easily catch any possible algae etc.
Now that's not all...
Since the roots will be "speed growing" down faster than usual, they hit the bottom faster and start to turn upwards, or be subject to root rot, so I simply take the plants out of the container and literally CUT Off all the roots over 10-12" long, and I've sifted the soil thru a basic sifter (can use thin metal screen screwed to an open square of wood to get the old roots out and the stones from the bottom. Doing 1 plant at a time you place the rock/stones back in bottom and refill with your soil. But PLEASE MAKE SURE that you add a teaspoon of Mycorrhizae when you replant and you'll Always have the biggest yields in the end. But I've got a lot of great info to share yet. I hope this is helpful to anyone who's serious about getting the very most out of the space you have. Please let me know if I've left anything out that you need to know. I'll be as quick as I can to reply.
Cheers and peace to all