Aero cloner with light and smell proof tent for $75

DutchDude

Well-Known Member
Lets see what I can remember pricing wise:

For the cloner itself:

- 18 gallon Rubbermaid Roughneck $7.97 (HD)
- 375 gph fountain pump $20 (Fleabay)
- 1 yard 5/8" clear tube (indicator + pump connection) $0.69
- 1 eight foot length of 1/2" schedule 40 pipe $1.59
- Bag of ten 1/2" T's $1.79
- Bag of ten 1/2" 90's $1.59
- Two poly pipe 90's $0.90
- 10 Sprayers (Fleabay) $9.99
- 10 Net pots with foam inserts (Fleabay) $14
- Tiny bit of pipe insulation for around the cord exit and two 1" grommets for the indicator

Total: ~$60

For the tent:
- roll of black Visqueen $8.97 (Lowes)
- 4 length of 8 foot 1"x2" fir @ $0.89 = $3.56
- Emergency blanket (Walmart) = $2.47

Total: ~$15

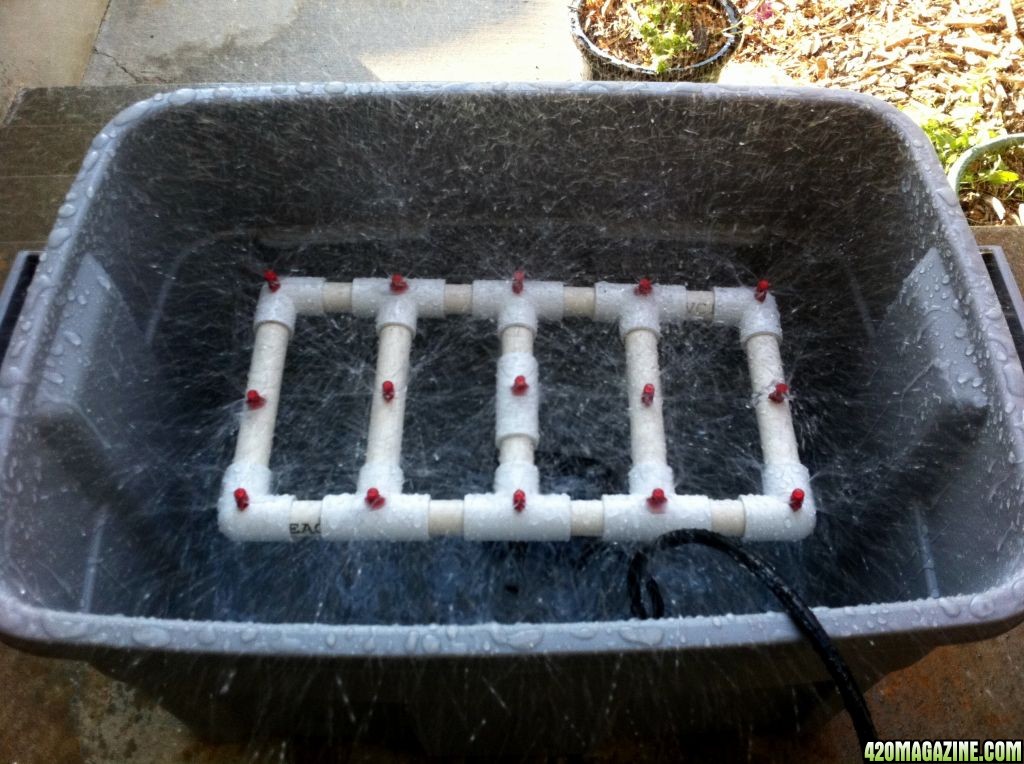
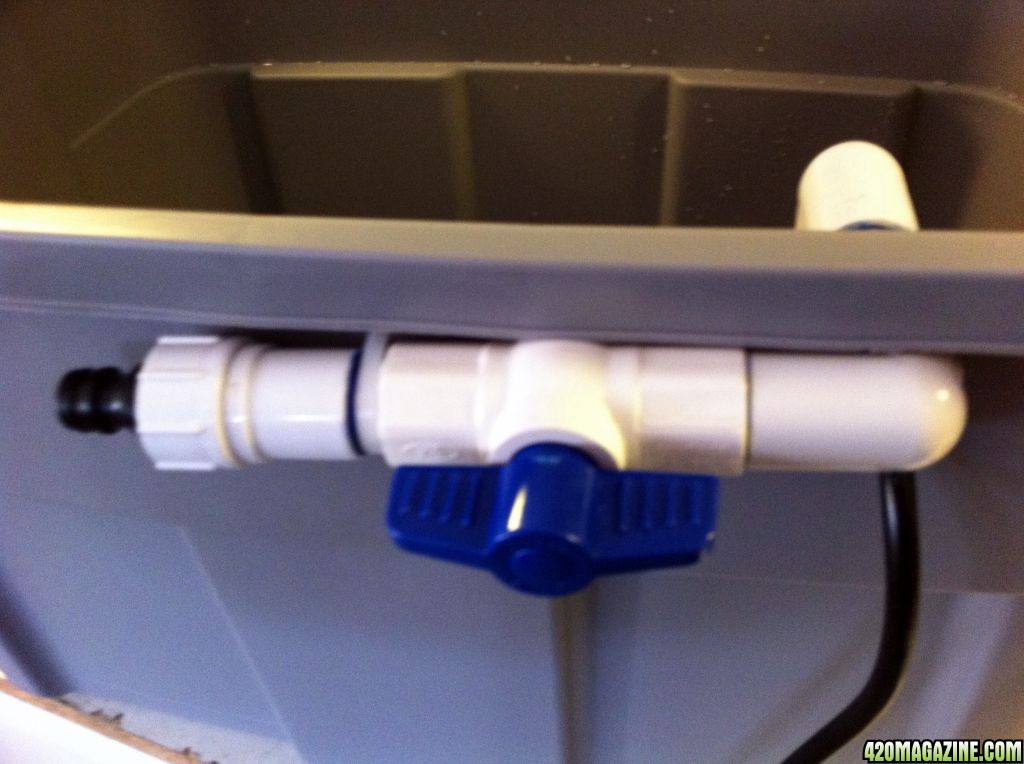
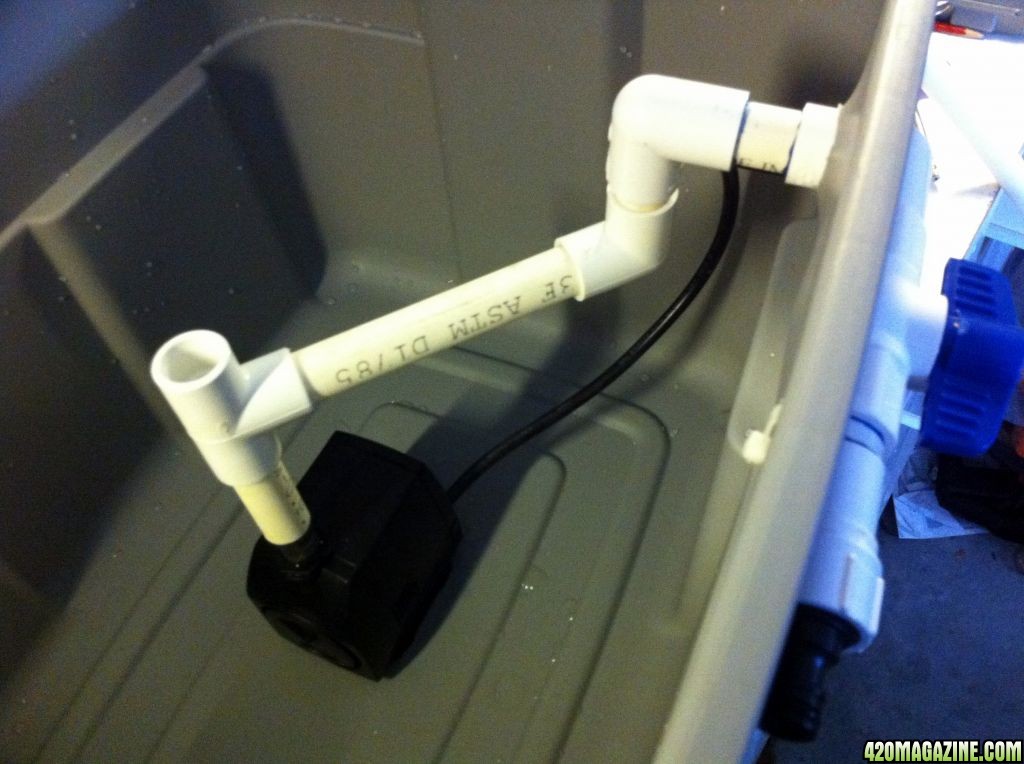
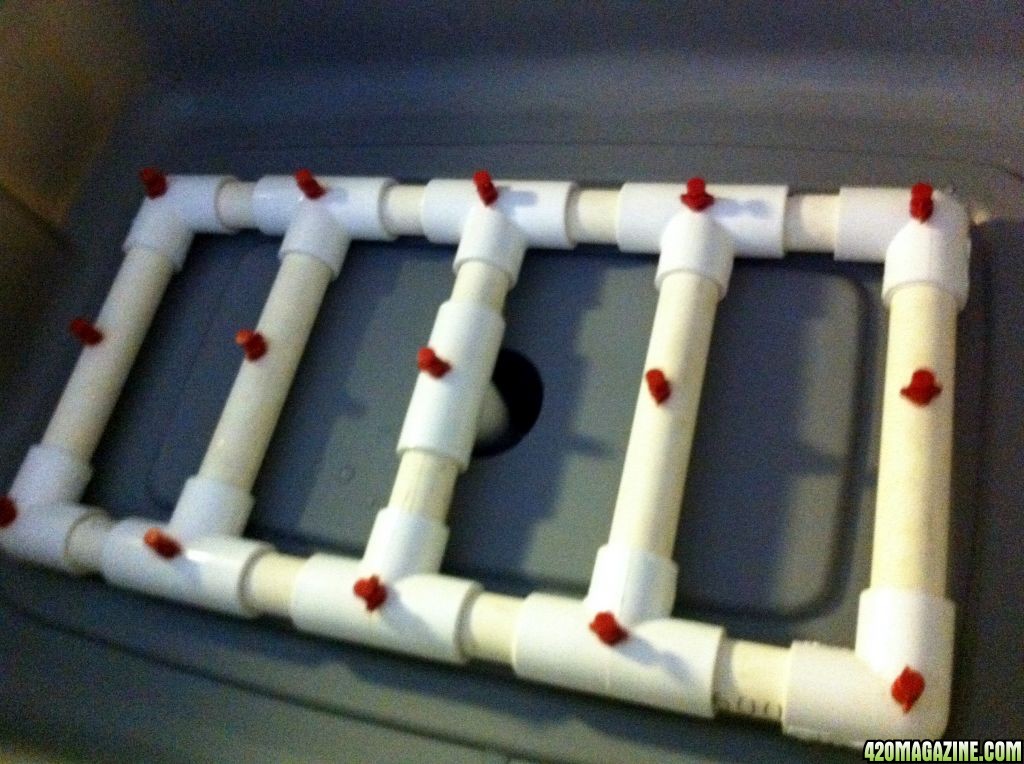
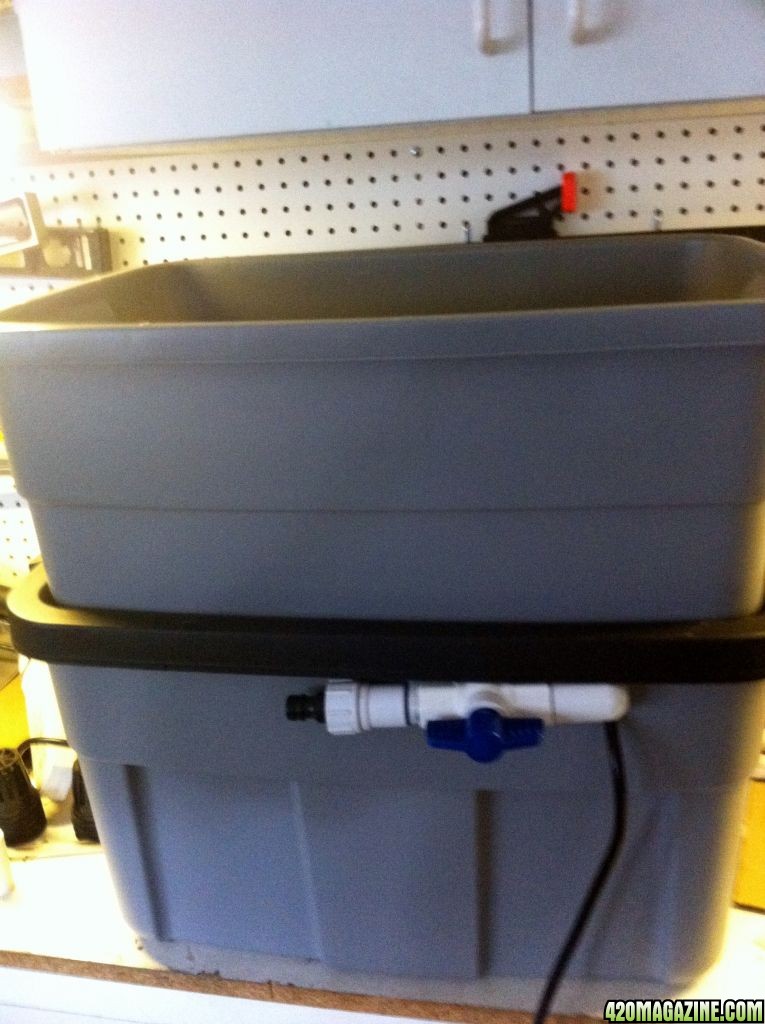
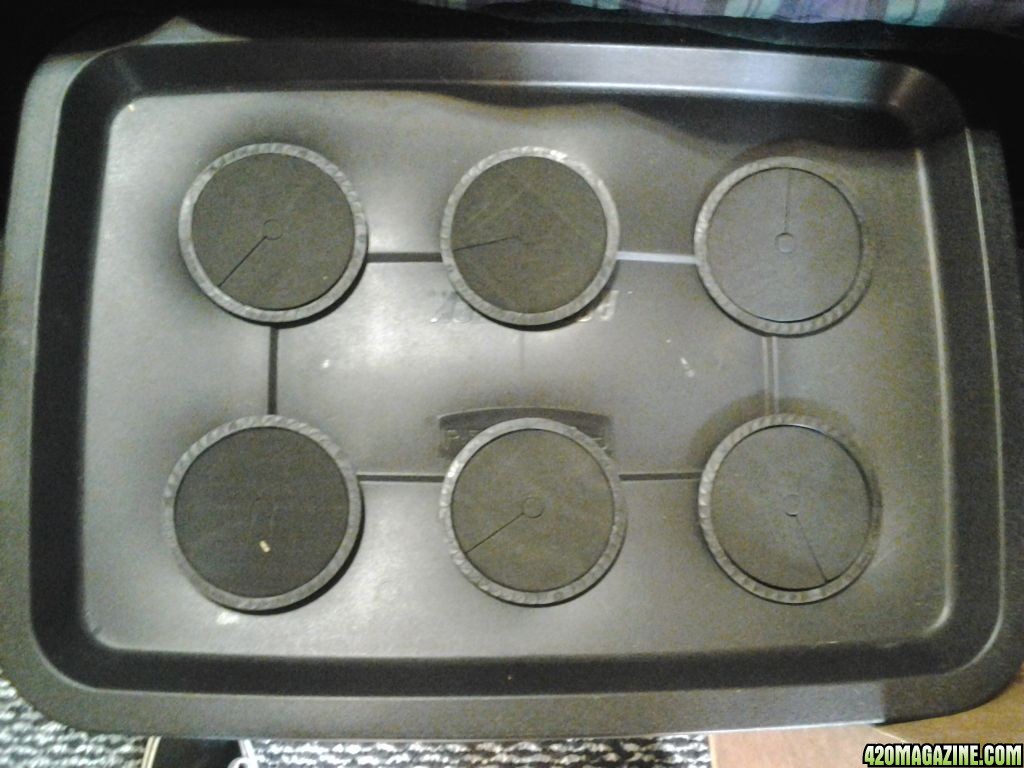
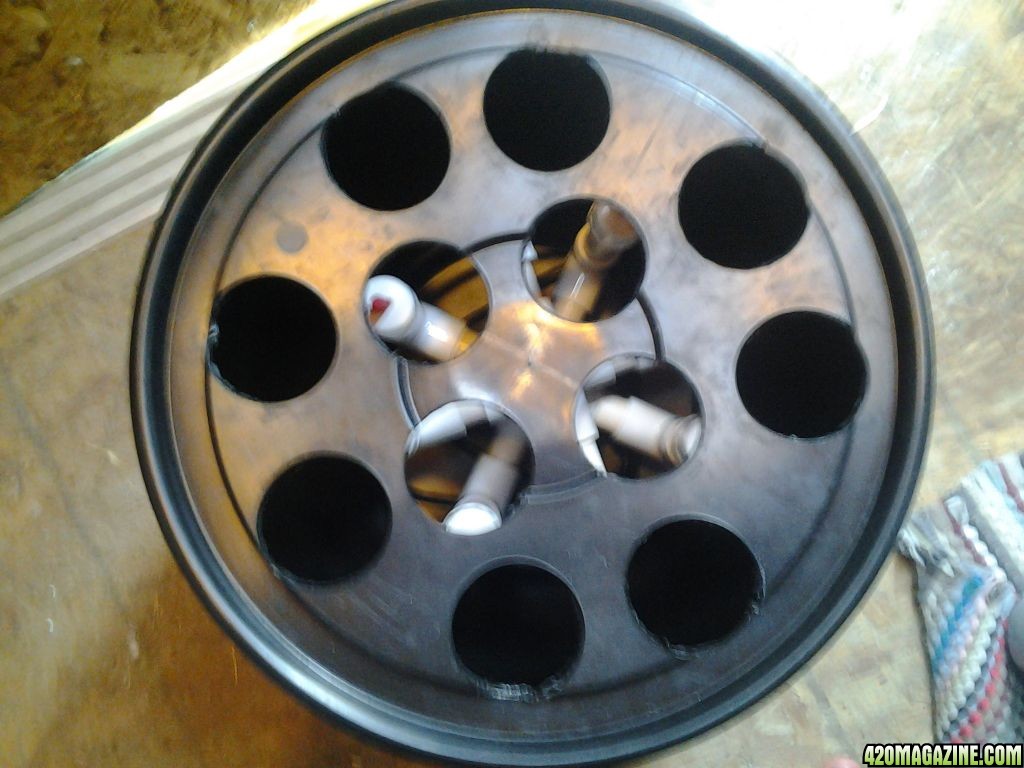
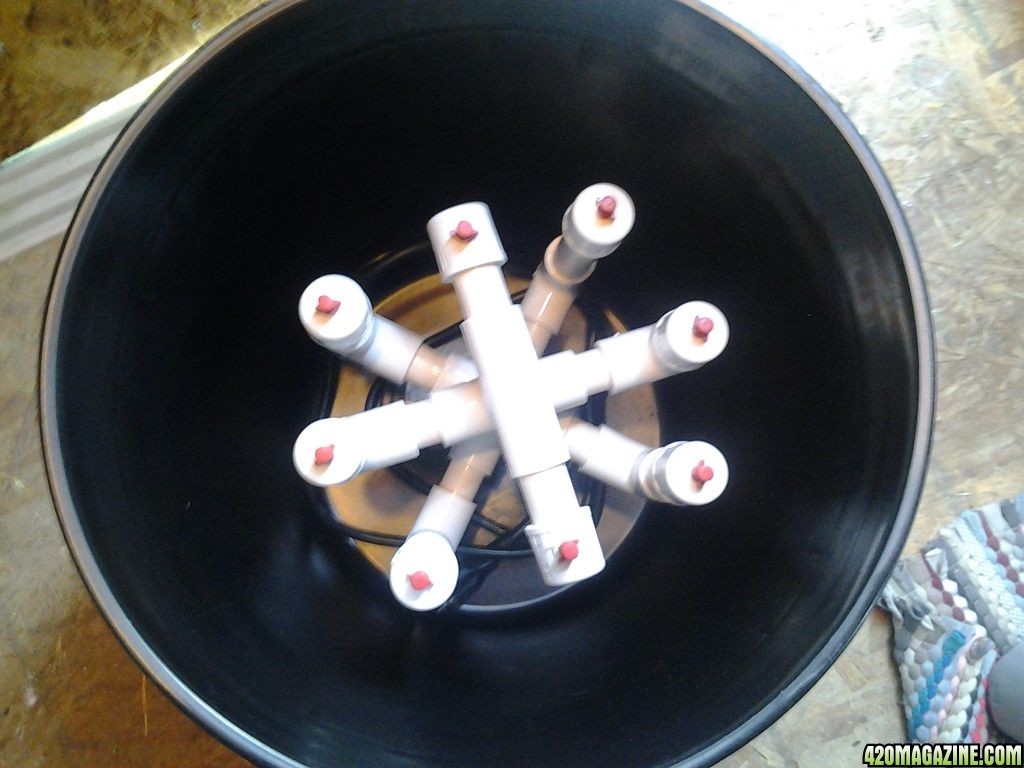
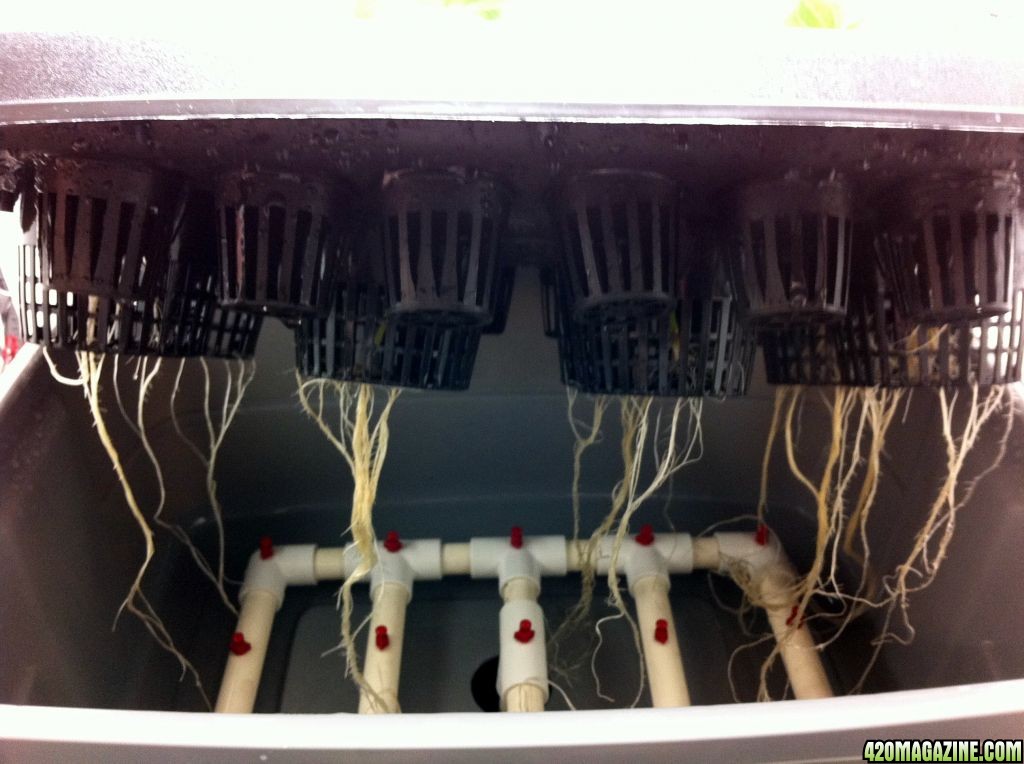
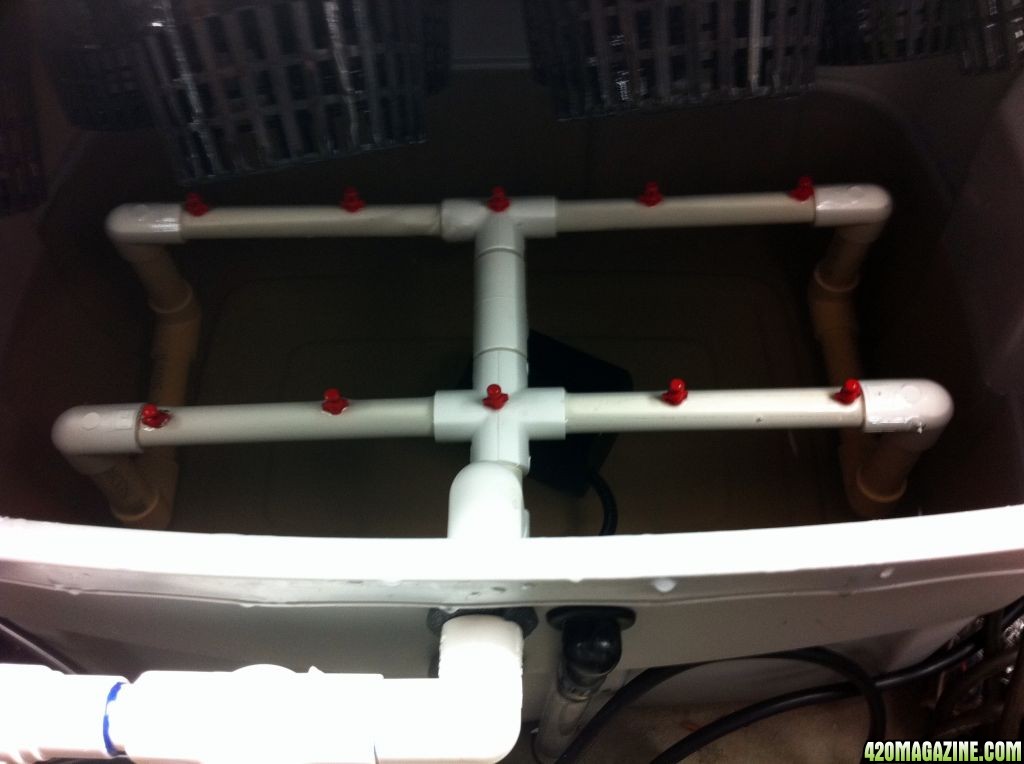
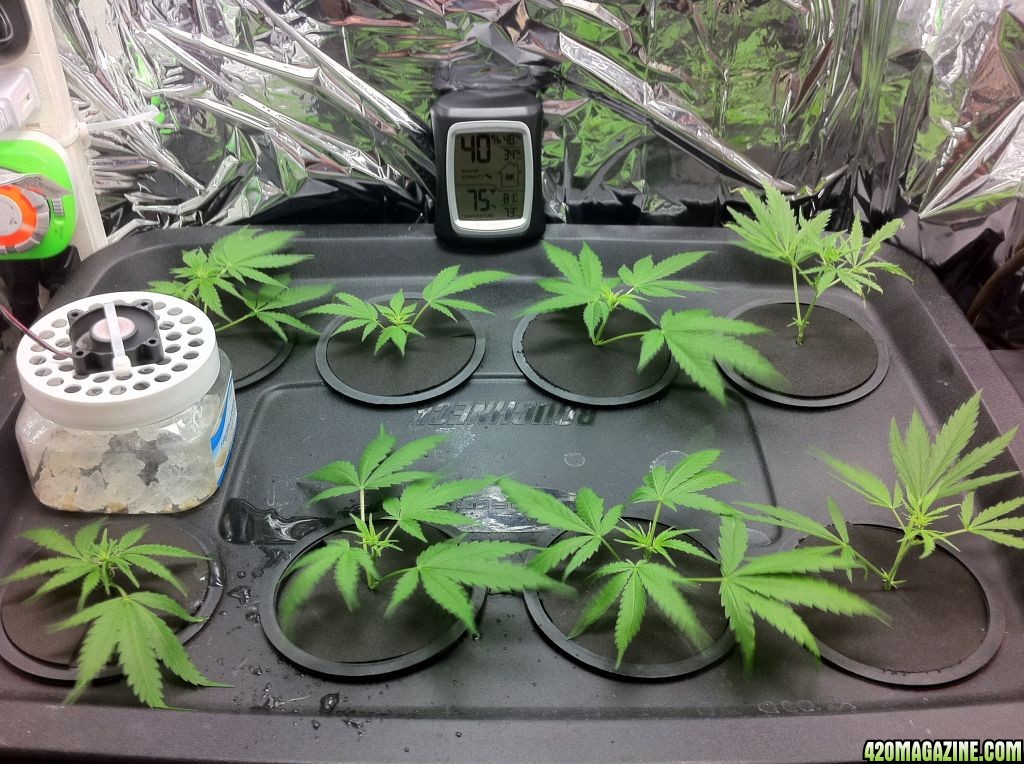
The cloner tub is just the standard Stinkbud design with a few modifications. I did not do the end caps, but put in 90s to connect the next leg, thus creating a circular design for pressure equalization. I also had to make it a bit shorter, otherwise the 3.75" pots would not go down all the way in the lid. I added a 4-way instead of a T in the middle, and make it go through the side for a fill/drain. Lastly I added a clear tube for a level indicator. For nutrients I have added to the 8 gallon tab water (160 ppm): one teaspoon of the spa pH down granules, one tablespoon of each the micro, grow, and flower, and three tablespoons of some B1 root stimulator from HD. Ph is now 5.9 and we are at 480 ppm.

IMG_039010.JPG


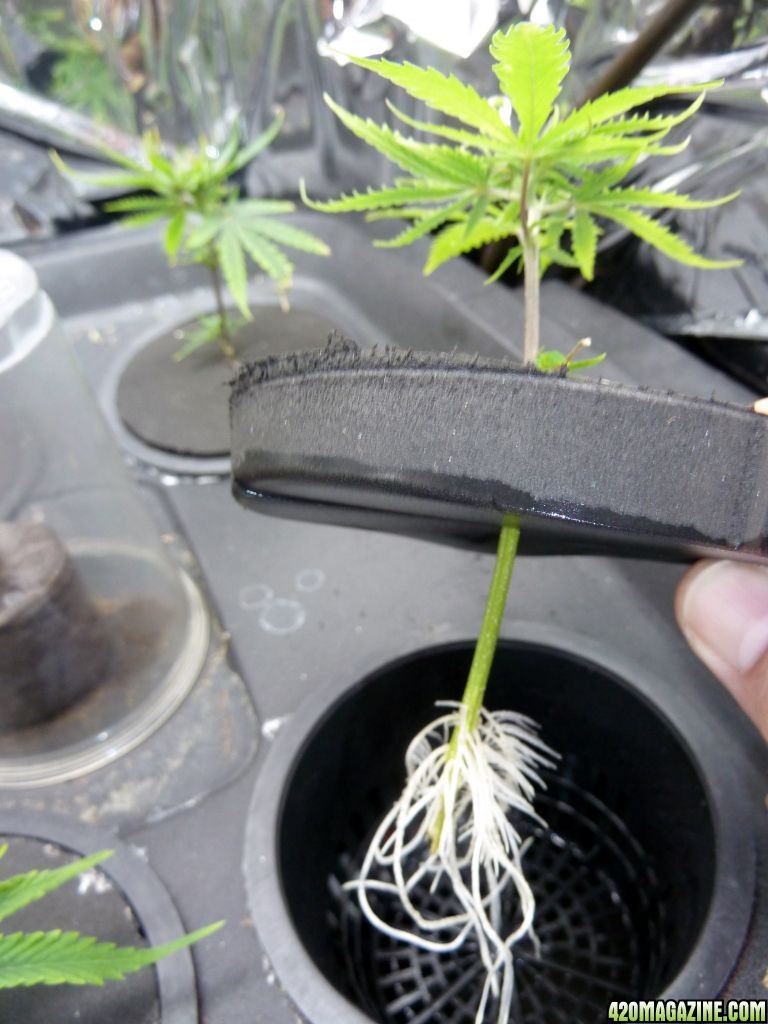
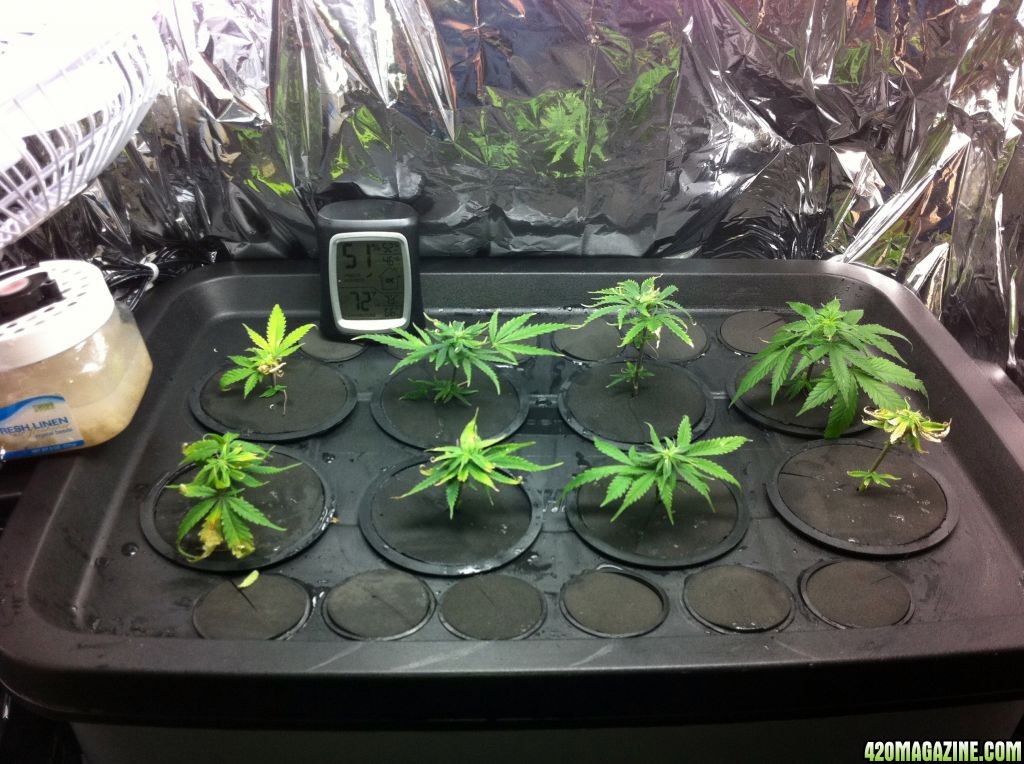
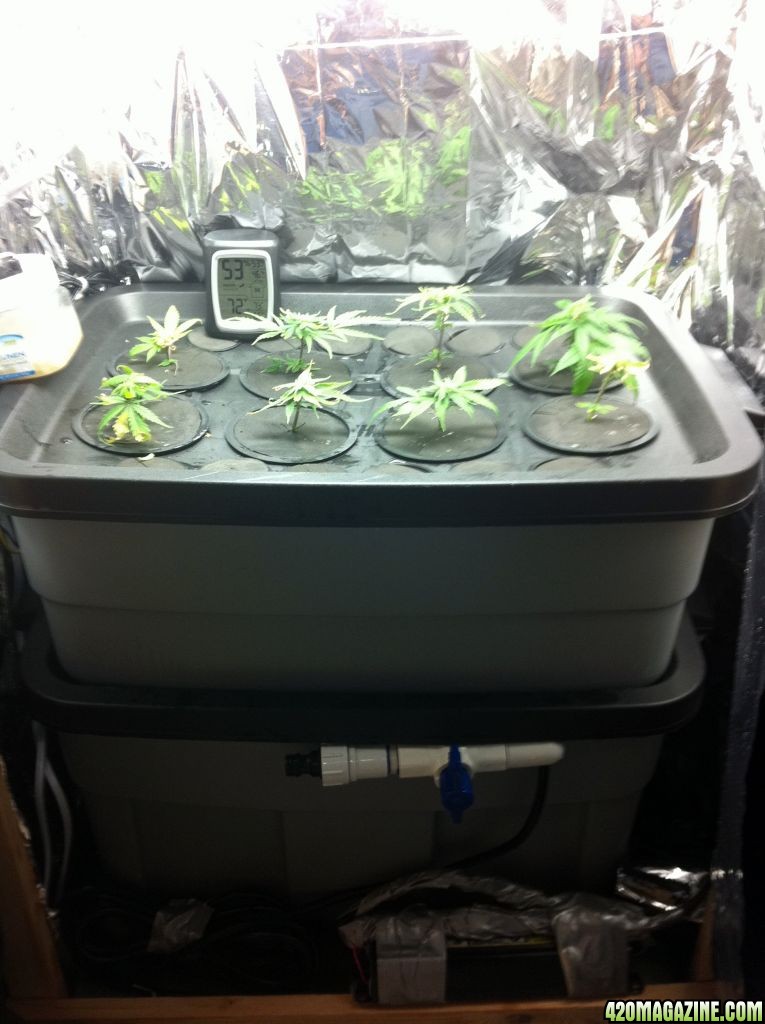
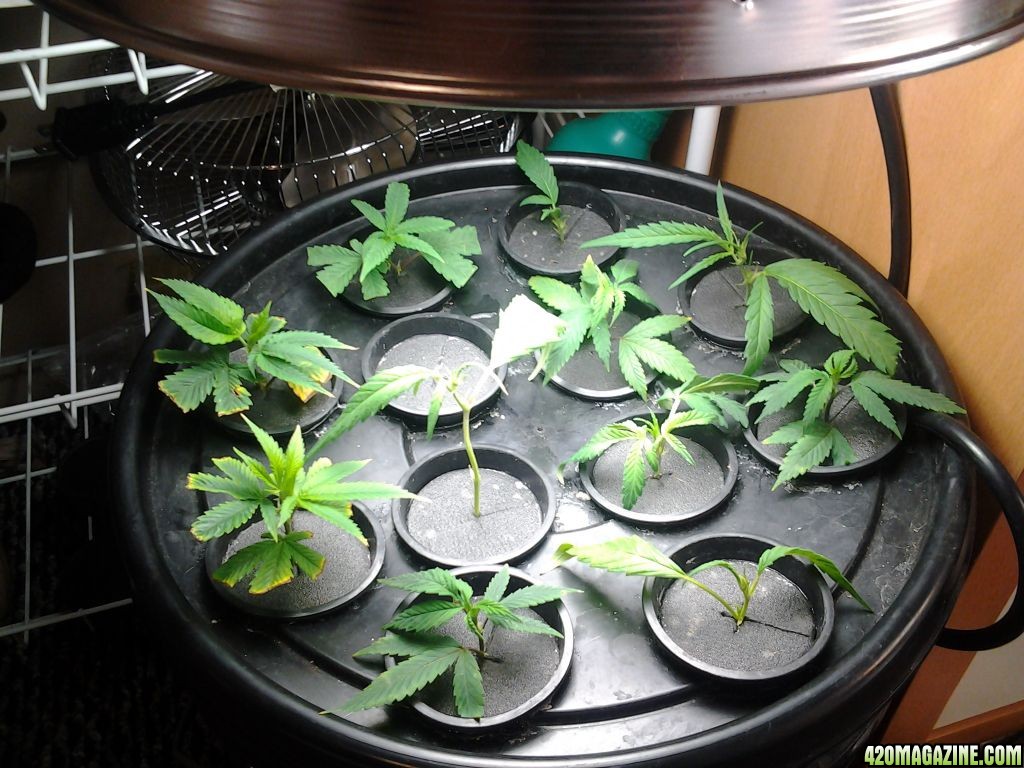
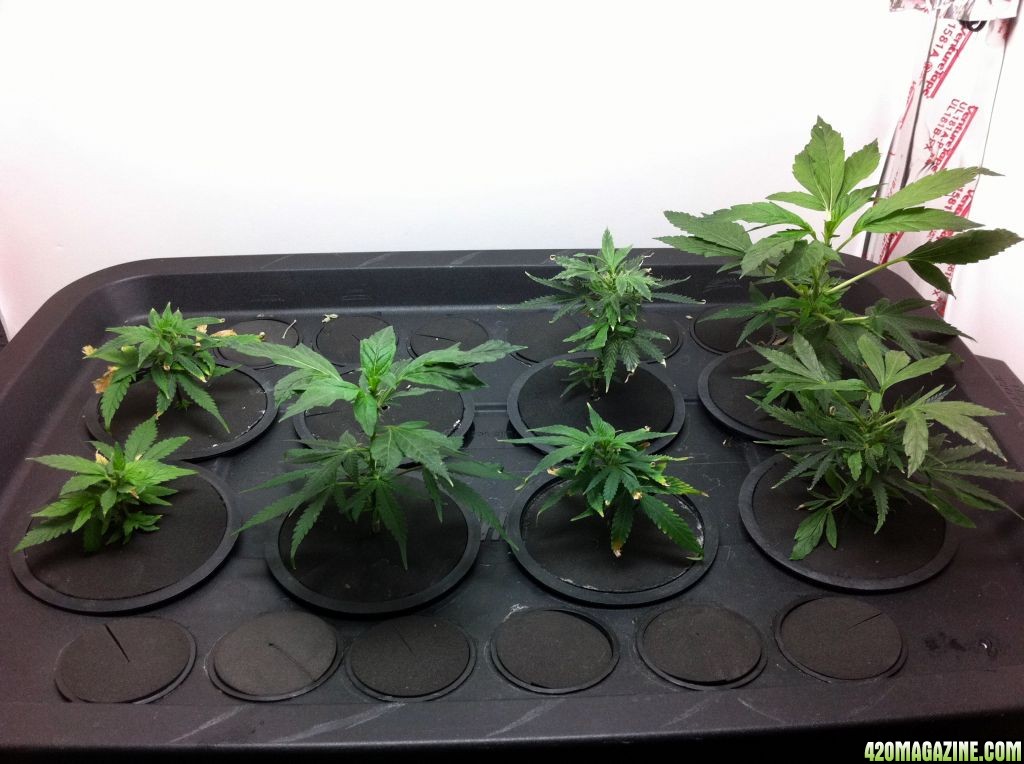
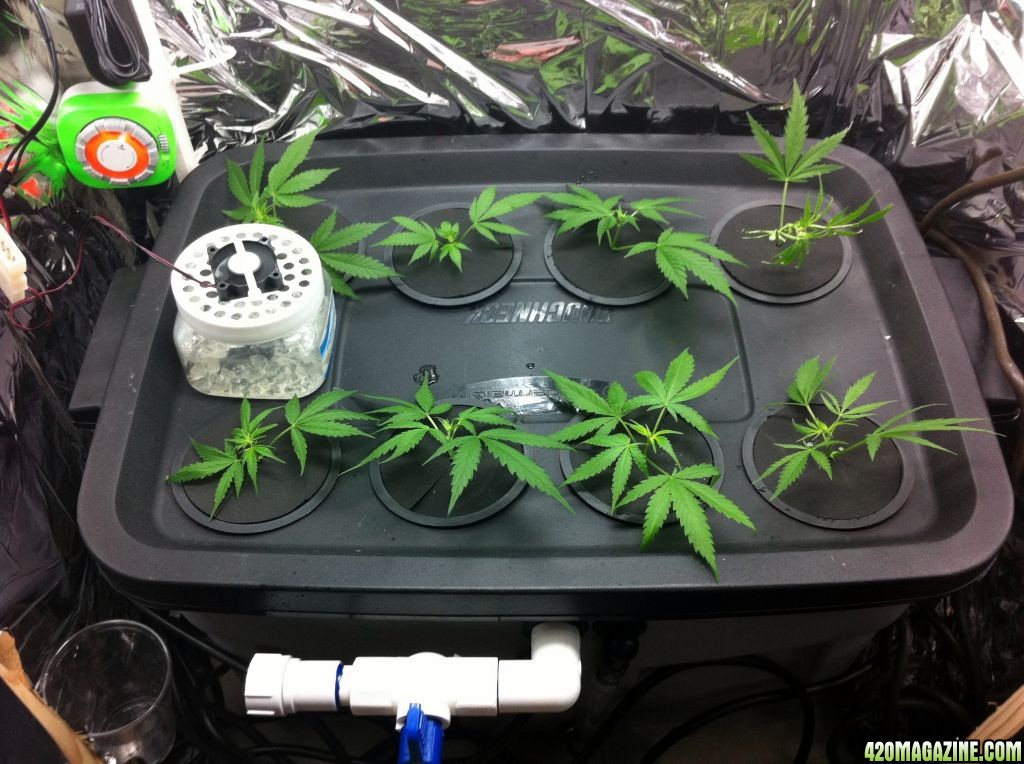
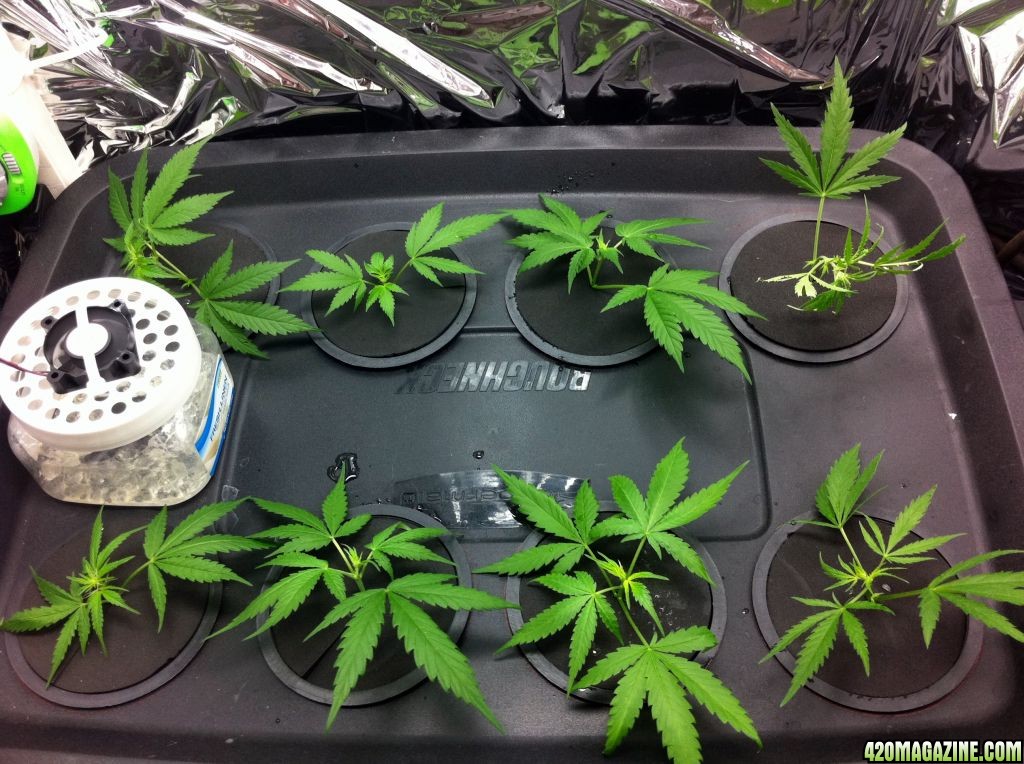
Here are the 3.75" net pots installed with the foam. The back row: the left three are the Jock Horror, and the right one is the Emerald Jack. The front row: the left three are Grapefruit Krush, and the right one is also Emerald Jack. The timer is a 50 second timer for 40 minutes and repeating. It is set to be on for two cycles (1 min 40 sec) and off for 4 cycles (3 min 20 sec)

IMG_03856.JPG


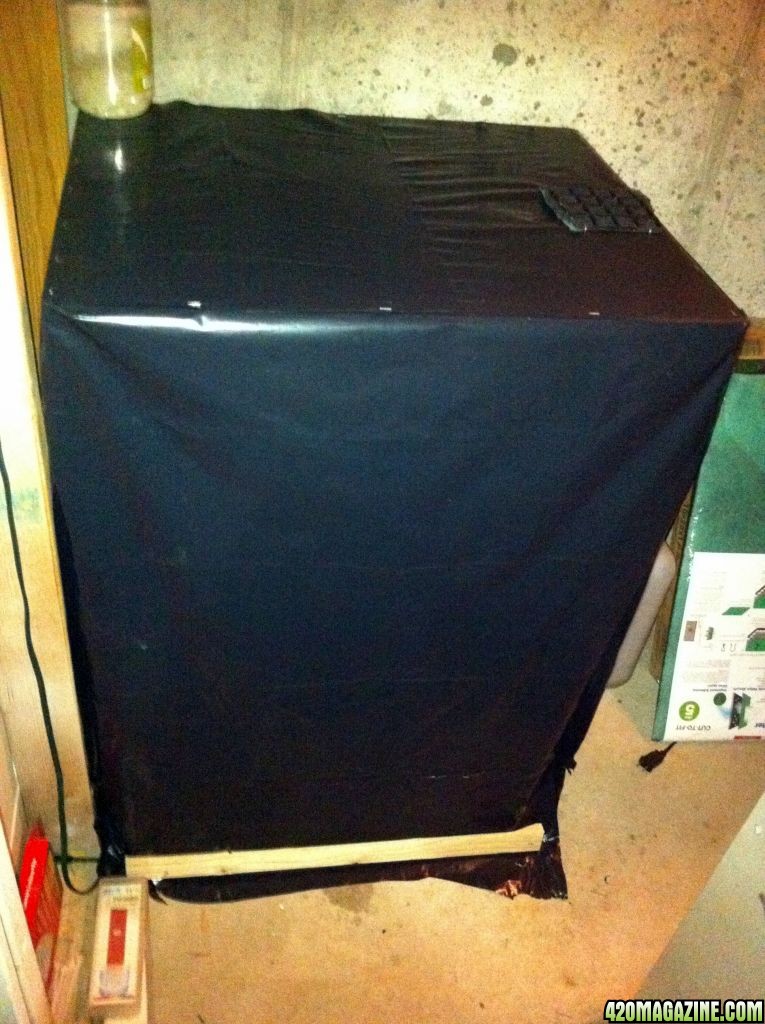
The outside tent is just a simple frame (like a clothes hamper). On the inside of the frame I stapled 6 mil Visqueen all around, while leaving some flaps on the front door area. Then I sprayed it with glue, and stuck some emergency blanket to it.

IMG_03845.JPG


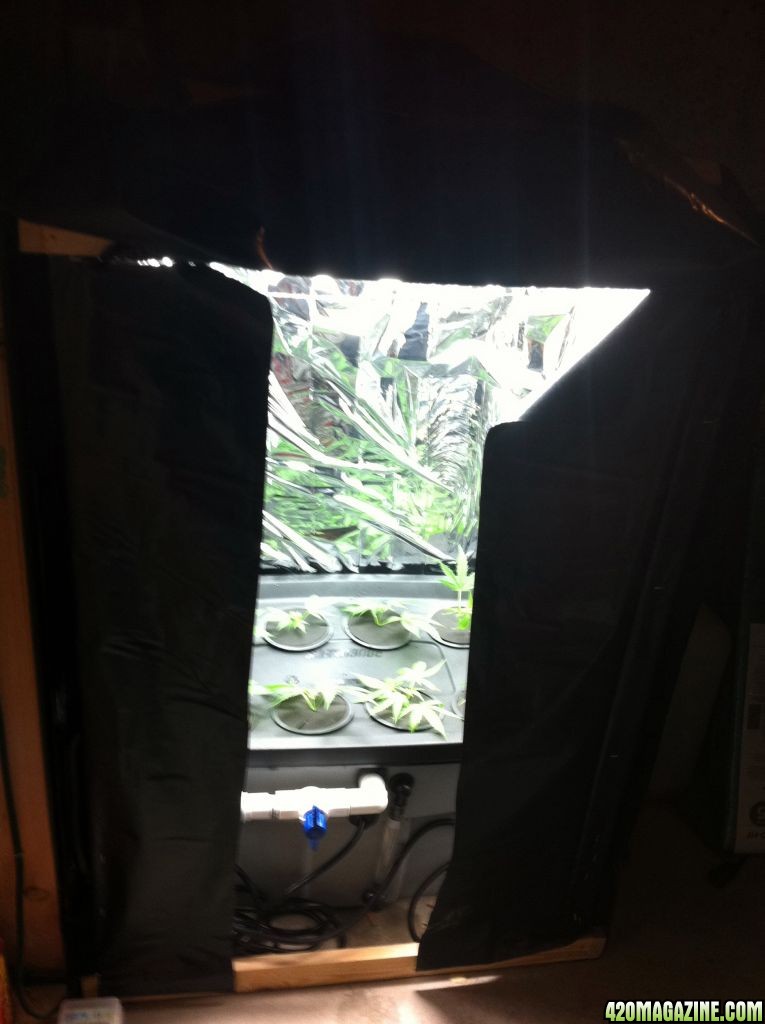
Then i covered the outside of the 1"x2" fame with another layer of Visqueen. That way there is a 1"-2" pathway between the two layers of plastic. I use this to make feed air to two holes that I made in the bottom right and left inside Visqueen. The air is drawn from the front panel, in between the plastic layers, to the hole on the inside layer, towards the top - where there is a 100 mm computer fan, going over to the other side of the top, again, in between the plastic layers, and then outside through the little grate you see.

IMG_03838.JPG


The front flap is weighted down by another piece of wood, and is a little over sized. The sides of the flap are tucked back into the 1 inch space which is created by the two layers of plastic, providing a light tight door.

IMG_03868.JPG


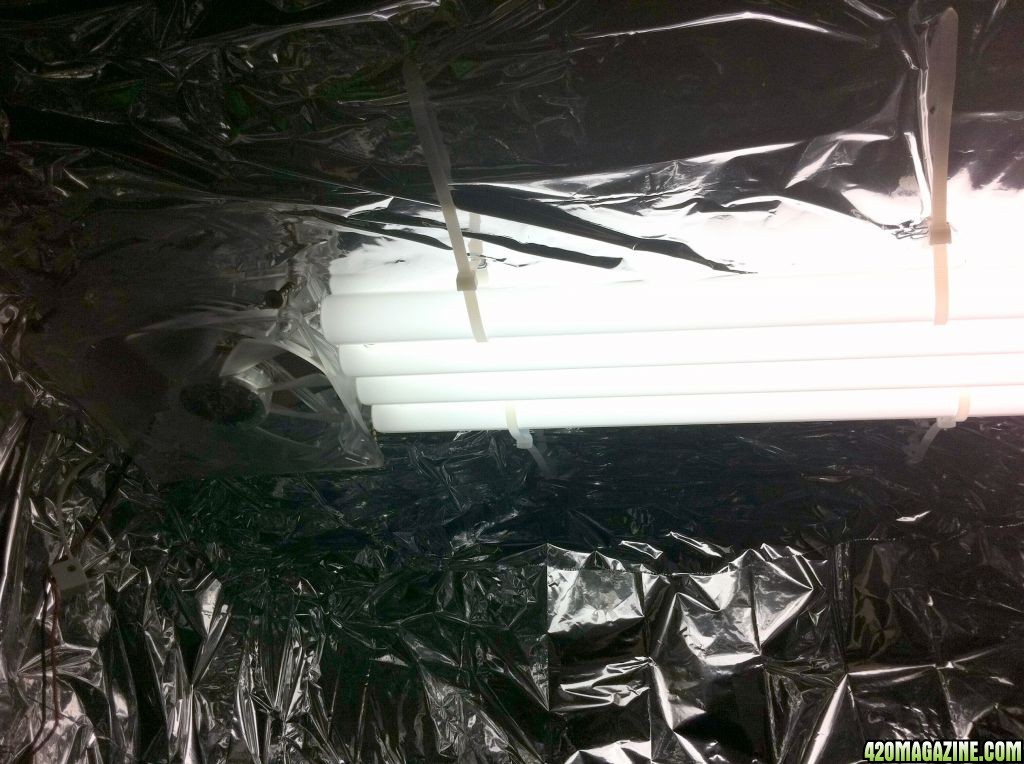
The light is a 96W power compact in 6700k (anybody have any idea on the lumens?) and you can see the little computer fan to the left. The light is on 24 hours for now, until I get another timer. Then I will do the 18/6.

IMG_03887.JPG


Oder control is done by a little jar of ona gel, with a tiny cpu fan above it.

What do you guys think?
 
Nice DIY project. I always like to build my own gear, although I did drop some money for a 60 site ezcloner (got a great deal).

:bravo:

Thanks Steve. Hey, if you can buy something for almost the same as building it - I would do the same thing. One of my considerations was that I wanted all the same size pots throughout the grow, and I only need a few plants for personal use anyway.

Thanks for stopping by and leaving a comment.
 
Hey Dutch,

I like that tent. I have an 8 site aero cloner I built that I have been looking for something to put it in and you've built it!

Great job Dutch!
 
Hey Dutch,

I like that tent. I have an 8 site aero cloner I built that I have been looking for something to put it in and you've built it!

Great job Dutch!

Thanks Ganja! So far it is working very well. The air movement is adequate as well. The only thing that I would change, and still might, is to make the front flap a little wider. Perhaps 12 more inches on each side - so that I can tuck it into the sides a bit better. The current 2" is just pops out too easily. Quick fix for when I feel like it :)
 
Cloning day: 15 The Emerald Jack cutting is finally showing roots:

P1020646.JPG
P1020646.JPG


So, I do not know what is going on with the cloner, but perhaps it is just patience. As you can see above, that is one of two clones who have roots now. If you recall the previous picture of the 8 clones - the ones that rooted are the upper left one (Jock Horror) and the lower right one (Emerald Jack).

The others really don't show much interest in rooting. They do look to have perhaps a few bumps, that is, if those are not just water bubbles. But, after all this time, there is a distict difference between these two, and the other six. Cut at the same time, about the same place on the plants, in the same manner, treated the same, etc. etc. etc.

I guess we will just see how the rest we behave - or not, but so far it is a mystery to me.
 
I just build version 2 of the cloner last night.

I moved to a new setup and two tubs for several reasons:
- I do not have to worry about root length, or how long I let them veg for
- It is easier to control leaks (ie it won't :) )
- I can hold about 12 gallons without effecting the ability to actually spray
- I wanted to move the valve over to the right, so that the connection is in more in the middle
- I was not happy with the amount of nozzles, and the spray pattern

So, here is the new spray bar. I went from 10 to 15 nozzles, but I was unsure if the 396 gph pump would wimp out with that many nozzles. So, I tested it:

IMG_04159.JPG


Looks pretty good, doesn't it? Nice height, nice coverage, nice pressure.

I also tied the evac nozzle down this time with a zip-tie. Should have done that to begin with :) This does give me a nice place for pH and ppm testing. Just open the valve a little bit when the pump runs, and catch it in a cup. It also has a quick connector on it for attaching the hose when I do water changes.

IMG_04169.JPG


This is the inside plumbing, not all that interesting, but you never know what people might need to look at. The first couple of elbows, and the ones outside of the tub are permanently attached with glue so that it won't leak. All the rest of the plumbing, including the spray bar are just fitted together, no need to glue. The connection to the pump is made by using the screw in nozzle that came with the pump, fitting some of the clear tube on it, and inserting the clear tube into the 1/2" pipe. This is pretty snug with no pressure loss that I can see.

IMG_04176.JPG


The spray bar installed. Notice that the spray nozzles are not pointing in the same direction as the one it sits next to. I have no idea if I should keep it off the bottom of the 10 gallon tub or not, but during the test, this gave the best pattern. I guess I can re-evaluated ones I have more roots. The length of the connection pipe is very easily adjusted, and like explained before, not glued.

IMG_04189.JPG


Two inch hole in the bottom of the 10 gallon tub, and the lid of the 14 gallon tub, then it just rests on top:

IMG_04196.JPG


The weak spot of the leak prevention - the level indicator. This is the only hole that sits below the water line. I cut a 15/16" hole, and put in a 1" rubber electrical grommet. I put some teflon tape on the threats of the "funny pipe" connector, then screwed it in. Pretty tight fit and it doesn't leak so far. The other end of the clear pipe just ends under the handle, to keep it from flopping around, and remains open.

IMG_04207.JPG


I also redid the lid because I had a change of heart after seeing how my first few cutting went. I think that I did figure out why they didn't stay green though. It is likely the fan that I had blowing on them 24/7. I read somewhere that they evaporate too much and can't replace the moisture fast enough without roots.

So, about that lid - I choose to do 12 two inch pots for the initial cuttings. I plan on doing 4 strains, so 3 of each strain. After three weeks, I will select the 2 best out of 3 for each strain, and put them in the 3.75" pots. From the 8 that I have to choose from, after three weeks I choose the best one of each strain and promote them to the flower setup. The other will likely be cut up into clones again.

IMG_04215.JPG


Installed, primed, and ready to grow!


IMG_042210.JPG


Please good people of 420, give me some feedback on this !

Am I missing something? Making mistakes? Not thinking it through enough? Anything!
 
I was interested on how this worked out. Did you end up flowering any in those 3.75 or did you move them to a similar type setup ? I am asking because just a few weeks ago i built my own 6 site in a 18 gallon tub to see if I could flower plants in it. I have 2 12 site cloners w/2" inserts which were made with 5 gallon buckets, they work so great that I figured I would try to build another to flower plants in. Heres mine
2011-08-02_16_45_19.jpg
 
I was interested on how this worked out. Did you end up flowering any in those 3.75 or did you move them to a similar type setup ? I am asking because just a few weeks ago i built my own 6 site in a 18 gallon tub to see if I could flower plants in it. I have 2 12 site cloners w/2" inserts which were made with 5 gallon buckets, they work so great that I figured I would try to build another to flower plants in.

Looks great! Got a pic of your 12 site cloner as well?

I have just started this process, so I can't tell you any results yet. Like I indicated above, I have rebuild the first cloner unit, and hence the lid of the 8 site unit became the first flower unit. I am waiting for my first grow to finish before I can move all the aero hydro stuff in my grow space.

Today I am 'upgrading' my tent to be 2" on each side roomier, and a different material. Not that the visqueen didn't work, but I love to tinker :)
 
This will be my next DIY project if the bubbler cloner failed on me, my second attempt at it. By the way, what is the water temp you have it at and what ph level?

I have been meaning to to put a temperature gauge in the solution, but I have not yet. I am fairly sure that it is a bit too warm at the moment, probably about 75. The pH is between 6.0 and 6.2 and I have put in GH3 in equal amounts at 300 ppm. Three of the eight are taking off, four are thinking about it, and despite having a tap root, I don't think the last one is going to make it. Pics to follow.
 
Looks great! Got a pic of your 12 site cloner as well?

I have just started this process, so I can't tell you any results yet. Like I indicated above, I have rebuild the first cloner unit, and hence the lid of the 8 site unit became the first flower unit. I am waiting for my first grow to finish before I can move all the aero hydro stuff in my grow space.

Today I am 'upgrading' my tent to be 2" on each side roomier, and a different material. Not that the visqueen didn't work, but I love to tinker :)

Thanks.Yeah here you go ! I have two of them & they are great. I hate myself for almost buying an ez cloner, I made two of them, got an extra pump that I used for the flower tub, & free clonex solution & gel & a NFT-1e timer for $95

I think my temps are high as well since my pump is in my res, the 1 on/ 4 off timer helped drop temps a little rather then running it 24/7. I have been using a frozen water bottle to keep them down the last few weeks as I cant afford a chiller.

I'm going to try to flower 3 in the tub soon in my greenhouse so I'll keep you posted. That will be in a few weeks when my greenhouse clears up a bit. I am very interested in this however, I see soo many Diy aero cloners but have not seen someone try to flower in one. I wonder what the best method is, to use hydroton ? Or ive seen some use perlite ? I simply cut the bottom of the net pots & am using neoprene inserts but I dont know how the plants stem will affect the neoprene as it grows. I've seen stems that will easily fill my neoprene insert so I'm anxious to see if this will fail

Anyways

2011-08-13_11_18_00.jpg
2011-08-13_11_18_10.jpg
2011-08-09_13_49_39.jpg
2011-08-13_11_22_09.jpg
2011-08-09_13_50_53.jpg
 
Stoned,
On my caramelicious grow I used the neoprene collars and no media, just the collar in a cut-down net pot. Worked awesome! Depending on the collars you use they should stretch to fit the plant. Some are stiffer than others, go with the softest ones you can find.

Nice cloner by the way, +reps!
 
Thanks.Yeah here you go ! I have two of them & they are great. I hate myself for almost buying an ez cloner, I made two of them, got an extra pump that I used for the flower tub, & free clonex solution & gel & a NFT-1e timer for $95

I think my temps are high as well since my pump is in my res, the 1 on/ 4 off timer helped drop temps a little rather then running it 24/7. I have been using a frozen water bottle to keep them down the last few weeks as I cant afford a chiller.

I'm going to try to flower 3 in the tub soon in my greenhouse so I'll keep you posted. That will be in a few weeks when my greenhouse clears up a bit. I am very interested in this however, I see soo many Diy aero cloners but have not seen someone try to flower in one. I wonder what the best method is, to use hydroton ? Or ive seen some use perlite ? I simply cut the bottom of the net pots & am using neoprene inserts but I dont know how the plants stem will affect the neoprene as it grows. I've seen stems that will easily fill my neoprene insert so I'm anxious to see if this will fail

Anyways

Those are some good looking buckets. Just proves again that we don't have to buy anything fancy, right? One of my other thoughts was to use two buckets on top of each other, but I could not deal with the total height. The reason that I went with a double stack for the cloner as well is that I noticed that the tap root very quickly was sitting in the solution itself, instead of being sprayed and getting air. So, I either could drop an air stone in, or since I wanted to keep the roots out of the pump anyway, I just got another tub.

The water bottle is indeed a good idea, and I will throw two in the freezer now. How long do yours last? Is this once a day for you?

Stoned,
On my caramelicious grow I used the neoprene collars and no media, just the collar in a cut-down net pot. Worked awesome! Depending on the collars you use they should stretch to fit the plant. Some are stiffer than others, go with the softest ones you can find.

Nice cloner by the way, +reps!

I think that these plants are strong enough to push that neoprene aside. Especially in a 3 3/4" pot. In a two inch pot it might get cramped. But, I also think that we are not shooting for tree sizes plants here, but rather a quick and steady turn-around with smaller plants. I am not even sure how many times I want to top them when I get to that stage. Taller, skinny, with a main cola - that is what I am thinking right now.

Also, I left my net pots intact. I don't know if that is going to help me or not, but my thinking was that the roots will provide some leverage in keeping the plant upright. Otherwise you would end up tying them up rather quickly before they tip over.
 
Here's what I did, I used bungee straps to hold them down, and they got plenty big:
DSC_8493.JPG
DSC_8767.JPG


As you can see, they got plenty big without any other support other than the half-netpot and bungee. The reason I cut the bottom off the netpots was that tehy went straight from a cloner into the NFT and there was no way I could get that rootball to sit in the 2 inch pot. Just needed the top part of the pot to hold the collar.
 
"The timer is a 50 second timer for 40 minutes and repeating. It is set to be on for two cycles (1 min 40 sec) and off for 4 cycles (3 min 20 sec)."

Dutch, can you tell me the brand name of the timer you are using and where you bought it, please? I love the concept of your timer and am not having any luck finding one.

Your new setup is awesome! The root development is really cooking! Keep up the good design work, you are an inspiration to me!

Thanks!
Ganja Who

Thanks for the reps Ganja. Do a search on flea-bay for "Repeat Cycle Timer 50 Sec. Intervals Aero/Hydroponics" and you will find it. It is green and orange and $19. Works like a charm. I did however go to 50 seconds on, and 5x50 seconds off. I don't know why, I just felt like it :) And I guess it will keep the temperatures down. . .
 
Some much needed new pictures to prove that it does work :)

Lessons learned:
- Do not put a fan on them 24/7 it dries them out.
- Next time, cut the last 1/3 of the leaf blades off, apparently so they don't sweat.
- Keep the nutrient level below 300 ppm
- Keep temperature of the water between 65 and 70

IMG_04529.JPG


IMG_04495.JPG

IMG_04487.JPG


And yes, I did make another "tent". I just wanted a bit more room, and like to build stuff, even when not entirely necessary :)
 
Back
Top Bottom