Amy Gardner's First Journal - Outdoor - Critical Cure & Chaos In The Forest

phooey! I'm posting that pic again... I experimented using the software to resize that other one for upload, and it lost some funky detail in the trichs... it's only an iPhone shot but... this one is better (same photo, not downsized by me)


:yummy:

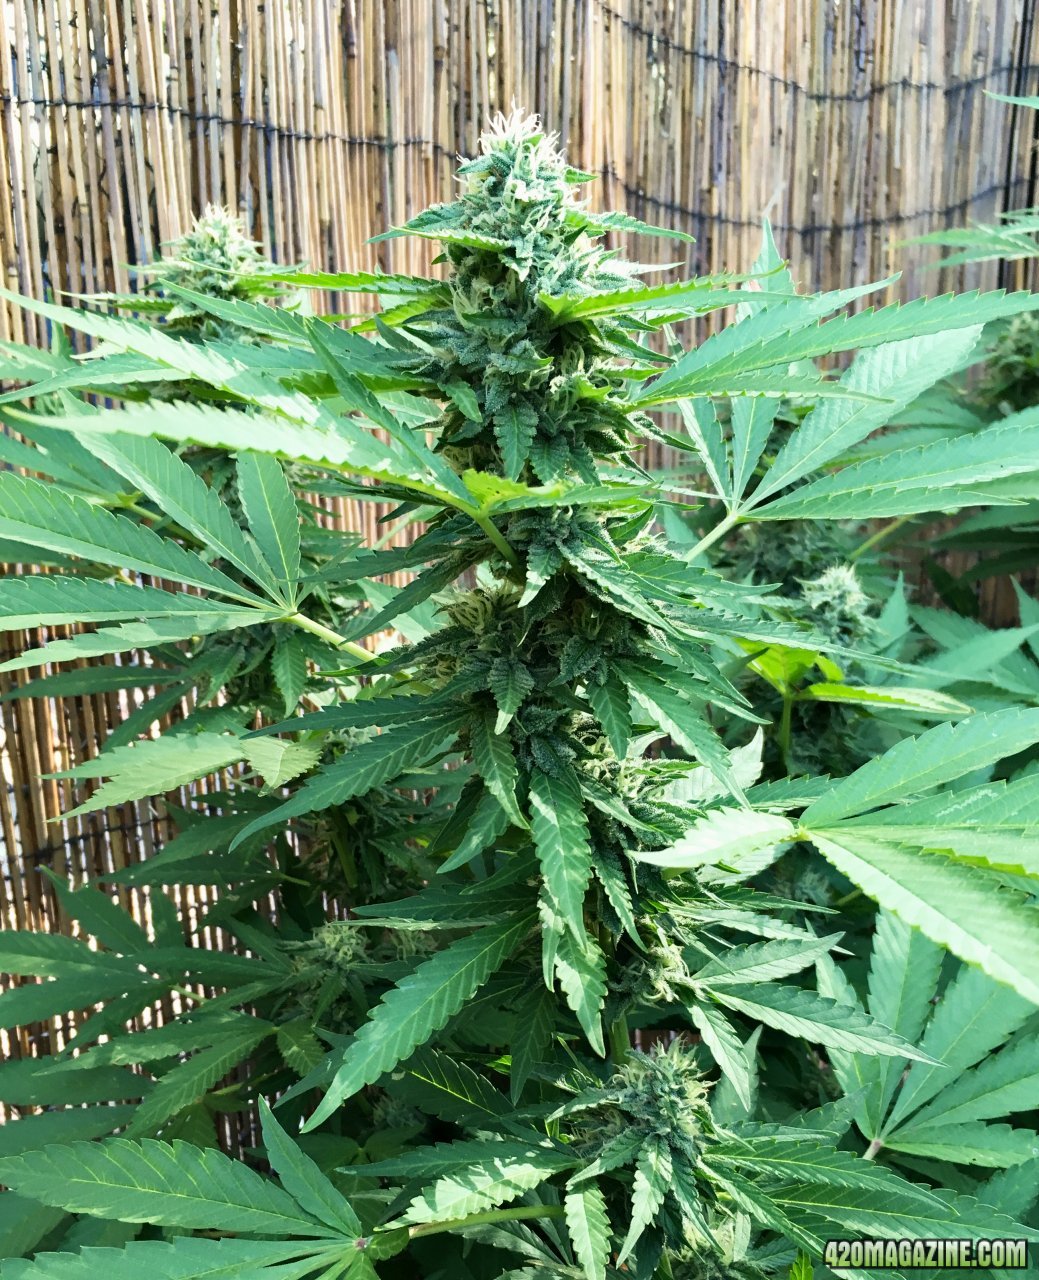
I visited the bush pod this morning to give it a water/feed and a little haircut (weekend goodies for me). Took a few snaps with my phone which i'll share later... coming along well

:Namaste:
 
Really great shot seen in both photos. :welldone:
Thanks G

yeah the second one isn’t much better - and it’s got heaps more detail on my computer than the file on site - which means the site is downsizing... will have to see how the new camera shots go. I’m almost using it. It’s a little overwhelming so I’ve just been playing with it in auto mode for a while.

How’s your day G?
 
SO I’m already thinking about the ‘off season’ grow I want to do in the little @SweetSue inspired DIY Tiny closet. Pretty sure the seed is going to be Blue Dream. Sourcing of beans is in the works :love:

I’ve moved on to thinking about the light. The little mars hydro 300 that began all this is a cute little light but very dated now and I want something more powerful, that I can adjust. Deciding on QBs of some kind, I’ve been looking at prewired Kits and other options and making a few enquirers and basically working out that it’s going to be cheapest to do it myself (not to mention, fun and gratifying), and that could take some time so i’d better get started. I was fortunate enough that when I decided to pay a first visit to @TheMadDabber ’s thread, the first page I decided to start on began an excellent conversation about building one’s own light set up. And @dynamo1 also sent me some info about parts you need so I was able to look into the different components a bit. From all that, I’ve worked out what I’m going to do, but I need advice on this first choice. I don’t think I can post much about it due to site restrictions around LED sponsors, there’ll certainly be no step by step or anything. I’m ok with that - there’re good reasons for the policy. I do need some input though from folks who‘ve done something similar, some advice, so I’m hoping it’s ok to post the following.

I know I want these boards (pictured below) just a choice between to options.

I know where I’m getting them too so there’s no need to discuss that. :thumb:

My space is effectively 2’x’2 but the area the light can sit in is a bit smaller due to support posts (this is illustrated in the diagram below - which is a 20:1 scale mockup of 2 options. I love scale models :battingeyelashes:).

So questions:

1. If i went with the 132s, is that physical space ok?
2. Are the 120s a better bet in terms of being better for flower and good enough for veg.


This is all I’m thinking about at the moment - the driver and frame etc. will get sorted out next. One thing at a time is necessary for my brain and my wallet.
:Namaste:
 
The only real difference between the two boards is the number of diodes and their density, and the voltage.

The 132s should run a tad cooler and you get more diodes, so that'd be my choice. 36 volts is a convenient voltage too - should be easy to match a driver. Are the 120s still 12 volts? It's a little more awkward to match a driver to 48 volts.
 
Pulling up a chair here. Your garden is looking wonderful! Took me awhile to get caught up but ive made it. Crazy, I have had plans to build something very similar to your bush pods for a few months now (got the idea from an old high times mag). Anything you would do different with them? Did I miss the process in which you make your LAB? Wasn't sure if you kept everything but the curds or just "siphoned" out the good clear liquid? Keep up the good work! :Namaste:
 
Hey there Amy! Finally made it over here. Congrats on another well deserved nomination, and thanks for all you have done to help acclimate members to the new forums!
:goodjob::thanks::thumb:

I just wanted to say it looks like you have a good plan for your light build! Be sure to opt for a dimmable driver because you likely wont need full power until flower (if ever). But the 4 panels will provide a more even coverage for your plant / plants.

I will say that if you are looking to save some pennies you can probably go with 2 120s and run them at full power.

I'm not sure if you ever plan on a bigger space, because then the 4 would certainly be more ideal :high-five:.

Anyways hope your day is off to a wonderful start.
 
The only real difference between the two boards is the number of diodes and their density, and the voltage.

The 132s should run a tad cooler and you get more diodes, so that'd be my choice. 36 volts is a convenient voltage too - should be easy to match a driver. Are the 120s still 12 volts? It's a little more awkward to match a driver to 48 volts.
I think the 120s are 24v. Still awkward and difficult to run full power
 
My 2 cents worth on the QB boards. To extend the lifespan, don't use them at full power, and instead of PWM dimming, find the sweetspot of the light output and solder a resistance instead.
Not that they do not last long, just LED's last way longer when running less than full power.
 
Hey there Amy! Finally made it over here. Congrats on another well deserved nomination, and thanks for all you have done to help acclimate members to the new forums!
:goodjob::thanks::thumb:

I just wanted to say it looks like you have a good plan for your light build! Be sure to opt for a dimmable driver because you likely wont need full power until flower (if ever). But the 4 panels will provide a more even coverage for your plant / plants.

I will say that if you are looking to save some pennies you can probably go with 2 120s and run them at full power.

I'm not sure if you ever plan on a bigger space, because then the 4 would certainly be more ideal :high-five:.

Anyways hope your day is off to a wonderful start.

thanks Dabber! Welcome to my garden :welcome:
Yep, I’ve got some good options and some fun ahead of me with the light build that’s for sure. And yes, dimmable all the way! :thumb: And you’re right about thinking ahead. Earier I’d thought about the 2, but I’m going with more panels so I can run them lower, and leave a little room for expansion, as you say...

My day nearly always starts with a visit to my garden so it will be a good one - hope yours is too
:passitleft:


Pulling up a chair here. Your garden is looking wonderful! Took me awhile to get caught up but ive made it. Crazy, I have had plans to build something very similar to your bush pods for a few months now (got the idea from an old high times mag). Anything you would do different with them? Did I miss the process in which you make your LAB? Wasn't sure if you kept everything but the curds or just "siphoned" out the good clear liquid? Keep up the good work! :Namaste:

High Laquerhead! :welcome: big 420 welcome to my humble garden!

i love the bush pod - glad you do too. You know if I was fully fit and healthy I wouldn’t change anything except to make them taller maybe. So if there’s any mobility issues then they need to have better/easier access in & out. I’m challenged gettIng into the pod as much as I’d like - and can only really get in there once a week, if that, and that’s when all my days are good days. Yesterday for example, I did a big feed/water and trim. After getting out and redoing the security I was looking at the pics I shot and noticed this funky leaf hanging out of one of the main colas...


... and I haven’t been able to go back for another look. To inspect that properly (for eveidence of budrot or something else undesirable) I’d need to get in there and i’m not up for that for a few days. So yeah - a ruddy great zipper entrance like a tent would be awesome! Probably I won’t do it again in a hurry for this reason - my old self would’ve been in & out of there every other day without care!

Good call on the LABs. There was a link way back in this journal to my buddy @MerryAnna ‘s recipe for it, but it was to a post in my blog and we don’t have those back yet (they’re coming). I’ve been planning to do another one and I happen to have a new batch almost ready so I’ll post the process with pics later today! But yes, its the clear liquid which you siphon or drain/strain out that becomes the LAB serum. The curd is apparently full of goodness too - people say you can fry it up and eat it (full of good bacteria for the gut) - but I’m not brave enough for that yet! We smash it up and add it to our green compost pile, it really helps to get things going in there apparently.

SO happy you’re enjoying my garden and journal. It’s the first time I’ve grown like this or been engaged consistently on a forum or ‘social network’ of any kind. I’m so glad I rejoined and hung around enough to start to get to know people. It’s turning out to be very rewarding on many levels - and mostly for my gardening, I’ve never grown plants like this before! It’s a lot of work doing the garden and keeping the journal as well but it’s very joyful work!

Hey - I’ll check out your journal too. ALways good to see someone into organic growing :rollit:

:circle-of-love:
 
My 2 cents worth on the QB boards. To extend the lifespan, don't use them at full power, and instead of PWM dimming, find the sweetspot of the light output and solder a resistance instead.
Not that they do not last long, just LED's last way longer when running less than full power.

Thanks K - yeah I’ll definitely run them low, more boards less watts per board! Will probably just to do the dimmable driver though so I can turn them up a bit for flower if needed. Definitely inspired by your upgrade that last run you just finished - next one should be a ripper!

:Namaste:
 
Ill be here waiting for em'! :thumb: thanks for taking the time to do so! Sorry about the health issues too, thats unfortunate. Glad to see you making the very best of it. Its truly inspiring!
How tall did you make your pods? I thought I would use the camoflauge cloth like some ghillie suits use for the "netting" part. Only in not real sure what percentage of light it would let through. I'm thinking at least %50 (it has many small holes throughout). Anyways, I suppose you'll see them eventually now that your all subbed up over yonder! Have a good one!
 
High @LaquerHead (I love that name - I see a well manicured wavy and jet-black coif that wouldn't budge in a breeze!)

OK, so i seem to have deleted the pics I took of the first 2 stages :eek::rolleyes: but I think (hope!) describing will work.

Wash rice or some other starchy grain. I use warm or hot water and the last 2 times I've let it soak for an hour or so and had better results. I usually use about half a cup of rice and about a cup or so of hot water (boiled). Swish it around a few times while it soaks. Then strain and keep the liquid. Put the wash liquid into a jar that you can cover without sealing. It needs to be protected from bugs and stuff getting in but needs to be accessible to the 'freewheeling' bacteria floating around in the air. I did this with a mason jar and some cheesecloth doubled over.

View media item 1508013
Once the ricewash is in this jar arrangement let it sit somewhere warm-ish with fresh air. Wait for anywhere from 2-5or so days - this process can depend a lot on environment. Sometimes it happens faster than others. What you will notice is that a lot of powdery looking stuff will settle on the bottom (sediment) and a very thin film will form on the top. This film should be pronounced but it is very thin, and may have some tiny mould particles in it, this is ok but if there's lots of mould you need to start again. Use your judgement here - if you think you can see a film on top, wait a day or so and you'll probably see it clearer. It should smell vaguely yeasty and sour at this stage.

The next step varies by person - some say to just strain it out, others say to siphon. The second 2 times I have siphoned using a syringe with a long plastic tube. This was much better. I got a cleaner liquid. What you're after is the liquid from the middle of the jar - not the sediment or the film.

Now add 10 parts fresh milk to every 1 part sour water - so if you have 100ml sour water, then add 1litre of milk. I use an organic unpasteurised from literally down the road but I think any milk will work (just not powdered or long-life, use fresh). This time you want to cover it so that no air can get in but air pressure can escape (that's important - imagine the explosion!).

Again, set it somewhere slightly warm-ish. And agin - the time this stage takes will vary depending on environment. Warm conditions will make it happen faster I think. At first it just looks like big jars of milk, but slowly over a few days it starts to separate. These have been 6 days in the jars and are nearly ready... (notice those lids - they're just placed on. If you use mason jars, for this stage you could use just the centre lid part without screwing it on - that's what I did last time and it worked well)

View media item 1507995
How great is that culturing!? My partner said the other night that it was really active - who needs a lavalamp - just make lacto!

Wait till they're fully separated. What you want here, is the whey - the clear-ish liquid left under the curd - that's the good stuff! I'll probably siphon it out using the syringe, because these jars are hard to scoop the whey out of. Or I might just strain it through 2-3 layers of chesecloth.

Store it in the fridge. You can keep it at room temp but only if you add sugar or molasses to it at a 1:1 ratio (for the micro-herd to eat). I did that the first time and didn't like it so much so nowadays I just store in the fridge and this seems better - the microbes go a bit dormant I think, and then wake up when you use them.

So there - apologies I deleted, or simply couldn't find, my pics of the early and middle stages. When we get blogs back, I'll do a new one and blog it for posterity (or until the next site upgrade! ;) ). I hope that's descriptive enough to help. Holler if you're trying it and need help!

Oh and you can use this as an accelerator for your fermented plant juices, if that's the way you're going, or just add it to your feedings and/or foliar sprays - it's a great anti-fungal.

MerryAnna's guide for use is this:
  • soil feed: 15-30ml /gallon of water
  • foliar spray: 15ml /gallon
  • compost activator: 30ml in the heap
  • making Fermented Plant Juice - add 30ml to the FPJ mix, quicker fermentation and less smelly by FAR.
  • Fermented fish & seaweed extract: add 30ml to yucky stinky fish mix to lessen odour
(I think i've used it a bit stronger 1:10 in soil feed and 1:20 in foliar - my plants seem happy. I've used it in nearly every feed since mid veg and nearly every foliar too. And it was used in the seaweed ferment and the stinging-nettle ferment that I made)

The LAB is an organic, anaerobic bacteria culture which quickly digests biological waste, so you can even use it to unblock your drains... I've tried it - it works. You can also use it as a diluted spray around the house to eliminate odours (it's the true odour eater!). I go though it - which is why I made a double batch this time.

:Namaste:
 
The next step varies by person - some say to just strain it out, others say to siphon. The second 2 times I have siphoned using a syringe with a long plastic tube. This was much better. I got a cleaner liquid. What you're after is the liquid from the middle of the jar - not the sediment or the film.
Perfect...I thought I'd seen it described both ways. Thanks for the detailed write up, pictures wont be necessary! :Namaste:
 
Ill be here waiting for em'! :thumb: thanks for taking the time to do so! Sorry about the health issues too, thats unfortunate. Glad to see you making the very best of it. Its truly inspiring!
How tall did you make your pods? I thought I would use the camoflauge cloth like some ghillie suits use for the "netting" part. Only in not real sure what percentage of light it would let through. I'm thinking at least %50 (it has many small holes throughout). Anyways, I suppose you'll see them eventually now that your all subbed up over yonder! Have a good one!
Hey - missed this question before... the remaining pod was originally just tall enough for me to stand up in in the centre, I’m 5’2”. to be in there now though I have to bend because she’s grown so much and because when we moved it recently to lay her back a bit into the sun, it got a bit squished, so it’s about 4.5’ in the middle. Unless you’re going to get in there and tie down a lot I’d make it tall! That camouflage net will block a lot of light I think. This black bird netting is pretty stealthy... but I don’t know what you’re situational ’needs’ will be. I’m looking forward to seeing it. So cool you’ve been thinking of something similar... I love synchronicity :high-five:
 
Back
Top Bottom