Arduino based room controller

OG13

New Member
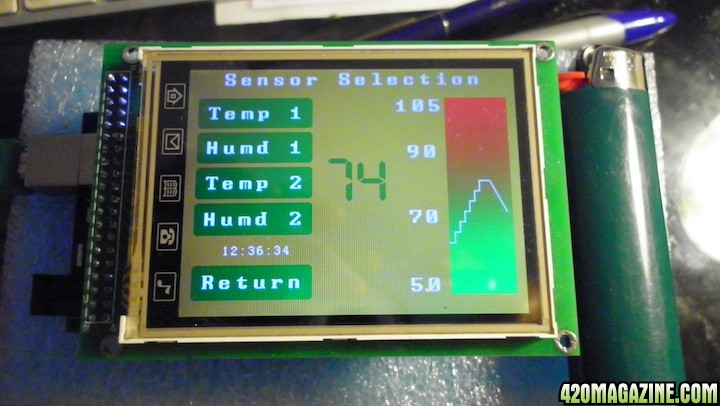
OK, I've had several requests on doing an arduino based room controller. I have been playing around for a few months now and have been bench testing one for a while. This tutorial will try to show you how I went about getting it all working. My controller is setup to monitor and log five different temperature probes, one humidity probe and a light sensor. It will operate two outputs based on these inputs (fans, pumps, dehumidifiers or whatever). I can view any of these inputs in realtime on a LCD display. I turn a knob to select which input I wish to view. I use the real time clock on the data logger to control relays for two different light systems (veg and grow).

What is an arduino? An arduino is a microcontroller (think mini computer) with analog and digital inputs and outputs, onboard memory and integrated communications protocol. You connect it to your computer (Mac, PC or Linux) and upload code. Once uploaded, the arduino can run autonomously.
I suggest you visit the authorized webpage.....Arduino - HomePage

What can you do with an arduino? Almost anything you can imagine. You can use it to monitor (analog or digital inputs), control (using external relays), log (onto a SD card), display (via LCD or touchscreen) and host (a webpage). Arduino - Introduction for more info.

You are wondering what you need to get started, right? Well at a minimum, you need an arduino (or clone), a cable to connect it to your computer, a breadboard, jumper wires and some LEDs and appropriate sensors. You can get all this and more in most arduino experimenter's kits. Check out these vendors (US based) for all you need.
Sparkfun https://ww.sparkfun.com/categories/103
Adafruit Arduino : Adafruit Industries, Unique & fun DIY electronics and kits
I started with Adafruit's $65 kit, but the $50 kit is just as good. You get the $30 arduino and all the parts you need to get learning. If you have some of the components, you may just be able to piecemeal it. Both vendors have great tutorials which detail the products they offer, as well as basic arduino and electronic concepts. There are some great sites just for arduino tutorials as well, try Arduino Tutorials « t r o n i x s t u f f

As you get more advanced, you will need some wire, electrical tape, wire cutters and soldering stuff. I just use a cheap soldering iron. We will get to that later. If you want to do more than I listed above, you will need a "bigger" arduino–a Mega. It has more inputs and outputs and twice the memory for bigger code (longer program). The basic arduino has about 32K of memory, which is pretty small. About what the Apple II had when if first came out in '78 or whenever–yeah we had one with 48K of memory and a 5.25" floppy drive. There are some other controllers like the Teensy that are faster/better, but not quite so easy to work with. I will start with those some other thread......down the road so to speak (may integrate CO2 control later, although the sensor is the expensive part).

I will do this tutorial step by step, so you can follow along if you desire. It is easier to debug programming work if you add new code in bit by bit to test it out. I will detail the parts needed, how to connect them up, give you the program(called a sketch), and run it to show the output. It will be in the form of lessons–looks like there will be eight at this time. It will take me a day or two for each lesson, so this won't be instant gratification.
 
Do you have to turn a knob or can it monitor multiple inputs at once?

My thought is to get an electrical box and mount all this stuff in there when the hardware is finalized.

Does analog inputs mean you can use cheaper K-type probes? What about milwaukee probes?
 
Do you have to turn a knob or can it monitor multiple inputs at once?

My thought is to get an electrical box and mount all this stuff in there when the hardware is finalized.

Does analog inputs mean you can use cheaper K-type probes? What about milwaukee probes?

It monitors all inputs all the time, you can only display one at a time due to the size of the LCD. If you leave it connected to a laptop you can see them all.

Yeah a box is needed in the end, this is just for the concept. You need to see what is going on now.

Type K thermocouples can be used, but are much more expensive than the sensors I'm using and probably not any more accurate. (You need to use an expensive buffer card Thermocouple sensor tutorial) I will cover the advantages of each sensor when I get to them. What is a Milwaukee probe's output? Probably something proprietary, that's why I'm using all open source parts....you should start doing some reading on the arduino homepage to be at the head of the class.

The arduino is already setup to use cheap off the shelf parts efficiently.:thumb:
 
OK The ethernet controller has a SD card, do you need the datalogger too (for the RTC?) Or can you query time from the computer.. or just log on the computer.. but that is less reliable I would rather log to SD, and have a live interface over ethernet. I plan to buy the MEGA 2560, ethernet shield, and the datalogger if I have to.
 
It monitors all inputs all the time, you can only display one at a time due to the size of the LCD. If you leave it connected to a laptop you can see them all.

Yeah a box is needed in the end, this is just for the concept. You need to see what is going on now.

Type K thermocouples can be used, but are much more expensive than the sensors I'm using and probably not any more accurate. (You need to use an expensive buffer card Thermocouple sensor tutorial) I will cover the advantages of each sensor when I get to them. What is a Milwaukee probe's output? Probably something proprietary, that's why I'm using all open source parts....you should start doing some reading on the arduino homepage to be at the head of the class.

The arduino is already setup to use cheap off the shelf parts efficiently.:thumb:

I found type K thermocouples for $26, they are waterproof, stainless steel, and supposedly very accurate. They also cover a wide temp range (-40 to 400).

The milwaukee probes are analog I think because they temp sensor says "double junction" (BNC connector), so does the ph sensor. The cool thing is the ph sensor is continuous and they have a tds sensor that is also.
 
I made a wish list:

Temp / Humidity sensors X 9 ( Canopy x 3, Lightbox x 2, AC air, top of room or spare, coolant temp, res temp)
pH sensor
tds sensor
dissolved oxygen sensor
CO2 sensor x 2

110 Socket controllers x 3 (CO2, AC, DH...)

I'm sure that's a partial list.
 
OK The ethernet controller has a SD card, do you need the datalogger too (for the RTC?) Or can you query time from the computer.. or just log on the computer.. but that is less reliable I would rather log to SD, and have a live interface over ethernet. I plan to buy the MEGA 2560, ethernet shield, and the datalogger if I have to.

I found type K thermocouples for $26, they are waterproof, stainless steel, and supposedly very accurate. They also cover a wide temp range (-40 to 400).

The milwaukee probes are analog I think because they temp sensor says "double junction" (BNC connector), so does the ph sensor. The cool thing is the ph sensor is continuous and they have a tds sensor that is also.

Haven't used the ethernet card, but my understanding is that the sd card housed on it is used for memory for the webpage. Probably won't work for data logging.

If you use a type K you also need a driver to "run" it Thermocouple Amplifier (MAX6675) breakout board [v1.0] ID: 269 - $17.50 : Adafruit Industries, Unique & fun DIY electronics and kits. Why spend that money when a $4 sensor will do the job? If you want water proof, they are like $12. Waterproof DS18B20 Digital temperature sensor + extras ID: 381 - $12.00 : Adafruit Industries, Unique & fun DIY electronics and kits

Most sensors are "continuous", but it all comes down to how fast you need an update, and how fast the computer can read them. In the real world, my "loop" processes about once a second. The more things you add the slower it loops. I don't have a schematic for the Milwaukee stuff, so you are on your own....BNC just mean they have a shielded 2 wire connection. It is probably possible to "hack" all these different components, but by the time you do, it would be cheaper to buy the stuff you desire.....Milwaukee has relatively cheap stuff.
 
I made a wish list:

Temp / Humidity sensors X 9 ( Canopy x 3, Lightbox x 2, AC air, top of room or spare, coolant temp, res temp)
pH sensor
tds sensor
dissolved oxygen sensor
CO2 sensor x 2

110 Socket controllers x 3 (CO2, AC, DH...)

I'm sure that's a partial list.

You better start saving your money. The CO2 sensors are $125 each. How many humidity sensors do you want, they are the $12 sensor (and they slow the loop down)? You may be able to fit that on a Mega, depending on how the pH tds and DO sensors work.
 
OG what else is there to say...........you're a genius dude!:high-five::high-five::high-five::Namaste:

Not really, just a mechanical engineer. This stuff is all open source and readily available. I learned about it from someone making a bicycle light flash.
 
I have a guess what Maer is thinking, but he hasn't come out yet......dosing pump controller. Would probably be its own controller. Room controller would be separate. The beauty of the arduino is that you can use it to program your chip, then remove the chip and put it on your own board. In effect the "2nd arduino" only costs $8, not $30. May be cheaper than buying a Mega.
 
Alright, has everyone got their parts yet? Just kidding....

Lesson 1-- Analog Temp Sensors

I will show you the basic setup and operation of the arduino. You need the basic parts before you can do anything, so have them in hand. You first need to download and install the "operating system" or environment from the arduino homepage. Select the correct program for the computer you are using. Follow the instructions supplied, since each version changes a little bit. Arduino - Software AND Arduino - Getting Started. If you work along following the instructions you will have a blinking LED on the arduino itself. Now you will understand the arduino integrated design environment (IDE), how to upload sketches and see them run. You can cut and paste code for your sketches from forums, via emails or thru tutorials. Grab the code, paste it into a blank sketch, compile and upload.

Now try the tutorial from ladyada to wire up a TMP36 analog temperature sensor on a breadboard. Temperature sensor tutorial - Using the TMP36 / LM35 You got one in your kit (if you don't have one just follow along, it's easy). Connect your wiring to the breadboard, upload the code and you have a temperature sensor that displays on the serial monitor (your computer screen). These analog temperature sensors are good and accurate enough for what we are doing. The disadvantage is that each sensor requires one analog pin on the arduino. There are only really 4 available (2 of the 6 are used for communications) and there are more useful things to use analog pins for, as you will see later. For lesson 2 I will introduce digital temperature sensors.

There is a TON of information on the web about arduinos. I'm trying to keep you focused by giving you the direct link to what I'm talking about. Definitely feel free to explore and play around some more. There is so much you can do with this technology.
 
I guess I was looking at the milwaukee because they offer ph, tds, dissolved o2. I didn't see those available on any of the web sites. This is cools stuff I cant wait to get some to play with.

My thought on the doser is to use the motor kit to make my own peristaltic pump. Since it is a stepper we would always know how much solution would be added. I also happen to have an Epilouge laser engraver / cutter that I can make the pump parts from. Or maybe I could find a pre made pump without a drive motor...
 
OK, I've had several requests on doing an arduino based room controller.

Very cool. This is what I've been playing with also. Though a bit more advanced (multiple units talking to a master unit).

I'm very glad to see others working on this. I had planned on posting here in the DIY, but life keeps interrupting me.

Haven't used the ethernet card, but my understanding is that the sd card housed on it is used for memory for the webpage. Probably won't work for data logging.

The Ethernet Shield's SD card it usable to write to in your sketches. So you can use it for data logging. I even keep images on it to put on my graphic LCD. Which has a SD card reader that I can't get to work).
SANY00081.jpg


Maer, there are ways to do pH and ECC, but a bit more advanced. I've seen an Instrucable for creating one. Look over atinstructables.com.

The beauty of Arduino is the low cost and some what simple programming. Lots of open source projects on the net to research on.

OG, there are ways to program the system (depending on the sensor) to keep the loop running faster and not get locked into a sensor waiting to settle down to read. Though none of what you are showing should be a problem.

Very good post, I'm in and willing to offer any help.
 
Do you have to turn a knob or can it monitor multiple inputs at once?

My thought is to get an electrical box and mount all this stuff in there when the hardware is finalized.

Does analog inputs mean you can use cheaper K-type probes? What about milwaukee probes?

Analog inputs means it can read a variable voltage at the pin. There are limits to what it can read and at what resolution (which I think is 10 bits). Digital inputs read 0 and 1, high or low. Digital sensors have their own electronics that fire up the sensor, wait till it is stable, read the sensor, and then send back the information. Usually done on serial, I2C or SPI interface, sending a group of 1's and 0's.

HTH
 
May as well use my double post..

I found a cheeeeeap dosing pump. The problem with this is it is likely controlled (rate) by how much current it gets, so not as accurate as the ones with their own micro controller and steppers.

Dosing pump, Peristaltic dosing pump for aquarium, lab

You can get peristaltic pumps used online or at surplus type places pretty cheap. Remember, the goal is not to reinvent the wheel.
 
Back
Top Bottom