Arduinos In The Grow Room: My Project

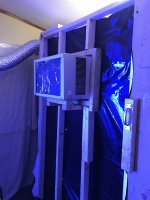
Yes, except it looks like that only extracts the hot air, and doesn't supply outside air to cool the condenser, you can see the vent on top, which will draw air from the room. So for all the cool air it makes, it uses it to cool the condenser, and blow it outside... In fact, his exhaust hose relies on the air conditioners cooling fan to pump all that air through the hose... I'm pretty certain he'll find that this setup isn't going to work very well...

I thought that as well... I kept asking myself "Is that really doing what he thinks it's doing?"

Like distilled water... Perhaps I should collect it in a bucket, and use it for watering?

I only used my condensate to water the lawn or ornamentals, never for the consumption stuff (veggies, fruits, smokeable, etc.), too many variables I just didn't like. You might be able to run it through an RO for sterilization/cleanliness. I'd never really considered what it would take to make it "safe" for consumption.
 
I only used my condensate to water the lawn or ornamentals, never for the consumption stuff (veggies, fruits, smokeable, etc.), too many variables I just didn't like. You might be able to run it through an RO for sterilization/cleanliness. I'd never really considered what it would take to make it "safe" for consumption.

Thinking back to the green swampy water that spilled out of my A/C unit when I took it out of the window, I think you are right... and who knows what it picks up from the metals etc...
 
I'm really getting ahead of myself... I keep thinking of things I want to do, but I'm not actually getting anything done.
Since getting over my 2 week long flu, I haven't accomplished anything, it's been a week.

Now I can add to the list.....

I'm going to build a proper DIY Grow Tent for the spare room...

Why?
  • Environmental Control
  • Stealth
  • Cleanliness
  • Light Discipline
The black/white plastic I used on the Veg tent I have is starting to come un-taped in hard to reach places, the door is not as light proof as it used to be, and I like change :) It currently is about 3.5' x 3.5' with about 2.5 feet of usable canopy (above the pots, below the light)

The flower area is just a 4'x7' open space along one wall, between the side of the veg tent, and the other wall. The floor, sides, and back, are covered with black/white plastic, white side showing.... There are 2 400w HID lights, one HPS and one MH over the flower area hanging from the ceiling.

The two areas take up half the room. I can't use the room at all once the lights go out, which means I can't access my Veg plants either... Light leaking from the veg tent is starting to become a concern.


So, I want to build a tent, actually, two tents joined at the hip :)

I envision the entire thing being 4' deep by 10' long, divided into two sections, which can be placed together, or even in separate rooms if you like. The Veg area will be 4' deep by 4' wide and the Flower area 4' deep by 6' wide.

Veg area will likely have shelves for clones. I am also going to probably move the 400w MH light in here, and get a new one for the Flower area. My MH ballast is just a transformer, and capacitor, probably over 25 years old, and only works with MH, but works like a charm.

Anyhow, this is just something else to add to my todo list....
 
Also have to switch nutrients, when I went to the grow shop today they said the stuff I had been using was no longer being made... it was the cheapest stuff there, so perhaps this is a good thing, I don't know.. It was premixed, so no "part A and B" just one for grow and one for flower...

Anyhow, I am trying Nutrient Plus, it has two part formula, or an A and B for Grow, and A and B for Flower... It's nearly twice the cost of the old stuff, I never really paid any attention to the nutes before, so lets see if I see any difference.

I never did get the auto-watering hardware all set up, so today, in my quest to catch up on some of my related projects, for the first time in about 3 weeks, I looked in the bucket (reservoir) Ewww! My old nutrients were sort of a chalky suspension, somewhat thicker than water... What was in the bucket was separated, and stinky! I know, I should have emptied it, but when you get sick, everything else is irrelevant! :)

Now, in actual use, that wouldn't happen, I'd actually be using the water (20L bucket) and the pumps would keep it stirred but it was yucky!

My new nutrients are liquid, like water, so the solution is not likely to separate.

As for the stinky part, I'm thinking an air stone would not only fix that, but would also make the plants happy....

I don't have one yet, so I'll add that on the next budget request...
 
I'm going to build a proper DIY Grow Tent for the spare room

I dunno man - for the time spent, and the trouble, grow tents are well worth their price!


I'm thinking an air stone would not only fix that, but would also make the plants happy

Consider injecting ozone? Very low dose timed to stop 30 minutes before feeding. I haven't used an airstone since my pythium issues several grows ago (also when I stopped doing DWC). I use ~10psi air flow rate connected to a microbubbler that gives me ~400mg/hr of O3 (ozone). Side benefit is when you feed after letting it dissipate, you get super oxygenated nutrient solution AND a sterilized feed reservoir.
 
Found a good library for the SR04 Ultrasonic Sensor, it's called NewPing

Much more accurate using this library. My I2C Water Depth module is now working, and will be mounted on top of the bucket so the pupms won't come on when there is no water, and the system can notify me when the water drops below a certain level.
 
I dunno man - for the time spent, and the trouble, grow tents are well worth their price!

I really did go back and forth on this one, and my decision to go ahead with DIY really is contingent on final price. I do suspect that to do it right, ie, thick poles etc, it might get pretty expensive. One big concern will be the duct ports, and the door(s). The weakest link on my current DIY Veg Tent is the door, I hold it shut with a plastic construction glueing clamp.

Perhaps a closer look at what it will cost will be enough to just go ahead and spend the money all at once, in one place, and buy a couple tents. At least I'd be fairly certain of getting something that works, and won't need replacing in a year.

Consider injecting ozone? Very low dose timed to stop 30 minutes before feeding. I haven't used an airstone since my pythium issues several grows ago (also when I stopped doing DWC). I use ~10psi air flow rate connected to a microbubbler that gives me ~400mg/hr of O3 (ozone). Side benefit is when you feed after letting it dissipate, you get super oxygenated nutrient solution AND a sterilized feed reservoir.

Never considered ozone. Like CO2, it's something I haven't researched, and it sounds a little complicated... air is free, and uncomplicated :)
 
Here's the I2C WaterDepth Module, mounted on top of the bucket...

The wood has small blocks glued to it to hold it in place against the lip of the bucket, don't want it falling in the water :)

1740228


I just mounted the Arduino Pro/Mini on the end of the board, and you can see the I2C wire on the left, the Ultrasonic sensor is mounted dead center in the middle of the bucket, and the small blocks will make sure it stays there... The visible pins on the arduino are for programming if needed, otherwise it gets it's power from the I2C bus...

1740229


Now to add the water pumps, then some water...
 
In the above picture, the Arduino is mounted in a socket on a DIY breadboard, and I've added the angled pins for the wire connections. I like that I can just replace the cables with longer or shorter as required (The sensor wire can certainly be shortened)

The I2C connection also has a 2 pin jumper, like you find on the old IDE hard drives for drive select, which is used to enable 5v power to come from the I2C bus. Remove the jumper and you can power it through the programming pins on the end.
 
Had to go into Markham (about an hour away) so got to visit Sayal Electronics today. I can't find these nylon terminal strips ANYWHERE near home... I could have ordered online, but I honestly didn't expect them to be so hard to find!


1741369


These are for the new Soil Moisture Sensors which use the stainless steel rods. There are 12 to a strip, I cut them into pairs, so can make 6 sensors from one strip. I am going to replace ALL my soil moisture sensors with these new ones.

1741370
 
Some pics of the Veg Tent and my new clones...

Here's the inside of the tent, the clones are under the dome, bottom left...

1741867


There is a mix of clones and Re-Veg plants here...

The clone humidity dome is nice and wet... I have a heated seedling mat under the tray...

1741868


The clones themselves are one week old today, 19 of them, all Green Crack. Looking Good!

1741870
 
14 new sensors, Stainless Steel probes and about 20 inch wire harness with male dupont pins. This allows me to create "extensions" to connect to a voltage divider, then into the Arduino (wire shown below)

Just need to add some shrink wrap and hot glue to seal it and protect from the moist soil, and label each one with the Sensor Id.

1742478


1742479
 
Black Heat Shrink, a label with the Sensor Id, and some hot glue in each end to seal out moisture. The glue on the top also provides strain relief for the wires.

1742625


1742626


And finally, some clear shiny heat shrink, purely for aesthetics, and to help hold the label on :)

1742628


That's it!
 
Looks awesome odam and love reading your thread.. In regards to the air conditioner cooling, this is something I have personally battled and feel I have figured out myself, you would do similar to what latitude showed in the picture he posted, except rather than sealing the sides of the unit, you want to pull air out of the side and top holes, and have a second hose attached to the rear vent/grill where the condenser is, and build a plate for your window with 2 duct ports, one will be for venting heat from the unit and the other will be to pull cooler air past the condenser, for better results on the outside of your window plate if you put a 90degree elbow on each port, hot port facing up with a chimney cap and the cold port facing down will help prevent from recirculating some of your hot air, and using this method if you go ahead with your DIY room, you can mount your AC right in your grow room, this is what I personally do
 
Looks awesome odam and love reading your thread.. In regards to the air conditioner cooling, this is something I have personally battled and feel I have figured out myself, you would do similar to what latitude showed in the picture he posted, except rather than sealing the sides of the unit, you want to pull air out of the side and top holes, and have a second hose attached to the rear vent/grill where the condenser is, and build a plate for your window with 2 duct ports, one will be for venting heat from the unit and the other will be to pull cooler air past the condenser, for better results on the outside of your window plate if you put a 90degree elbow on each port, hot port facing up with a chimney cap and the cold port facing down will help prevent from recirculating some of your hot air, and using this method if you go ahead with your DIY room, you can mount your AC right in your grow room, this is what I personally do

Thanks...

Wouldn't you want to blow air INTO the side/top ports? There is a fan that sucks the air in, and pushes it out the back, through the grill/radiator to cool the compressor?
 
Thanks...

Wouldn't you want to blow air INTO the side/top ports? There is a fan that sucks the air in, and pushes it out the back, through the grill/radiator to cool the compressor?
I’ve always gone off the concept heat rises, the other way may be more efficient, I’m honestly not sure, I thought the condenser worked passively and that the fan was only pushing the air thru the vents into the room itself
 
I’ve always gone off the concept heat rises, the other way may be more efficient, I’m honestly not sure, I thought the condenser worked passively and that the fan was only pushing the air thru the vents into the room itself
I also use a duct booster to circulate the air out the window I don’t rely on the unit cooling itself
 
Vents aren’t hooked up in this picture but I also did a DIY room with 2x3’s built 16 on center. Doesn’t take long to chill the room right down haha


Right, but the vents are not in the room being cooled... In my case, the back grill will be up against the screen, so basically outside... The side vents will be inside the room, and they need to get their air from outside, you don't want to use the cooled air in the room to cool the air conditioner that is cooling the room. AQn air conditioner produces more heat than the amount of cooling it does, so eventually, the room will get warmer....
 
Back
Top Bottom