

OldMedUser
Formerly Known as LabRat
Well here we grow I guess. After a few false starts and general screw ups on my part I am going to try to get my DWC grow technique out for your elucidation.
In 2001 I started on my own procedure to grow some really good cannabis using the information I had found. I had previously grown lots of pot under lights since 1977. My first foray into DWC was under 6 - 4' fluorescents with incredible results. Veg wise. Didn't flower worth a crap until I got a 400W HPS and a flower room then yahoo it worked like a hot damn!
My latest excursion like the last 20 or so is another experiment to see how far I can push this puppy to see if she can take it. So far, so good.
I took fourty seeds and ended up with thirty-three plants in the two tubs. Sixteen in the 12 hole tub and seventeen in the four hole tub. It's kinda crowded but I'm looking for a SOG kind of thing and they are a week or so from 12/12. My previous grow got one male out of nine seeds so I'm hoping for the same thing.
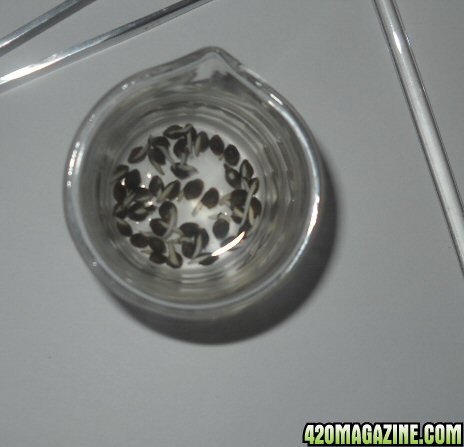
I got this bunch of seeds from a grower who swore they were Kush. The last batch sure had all the markers for Kush even up to big purple leaves and the stink! Oh my god, the STINK! The babies are only 6" tall now and not into flowering and are stinking the house up just fine.
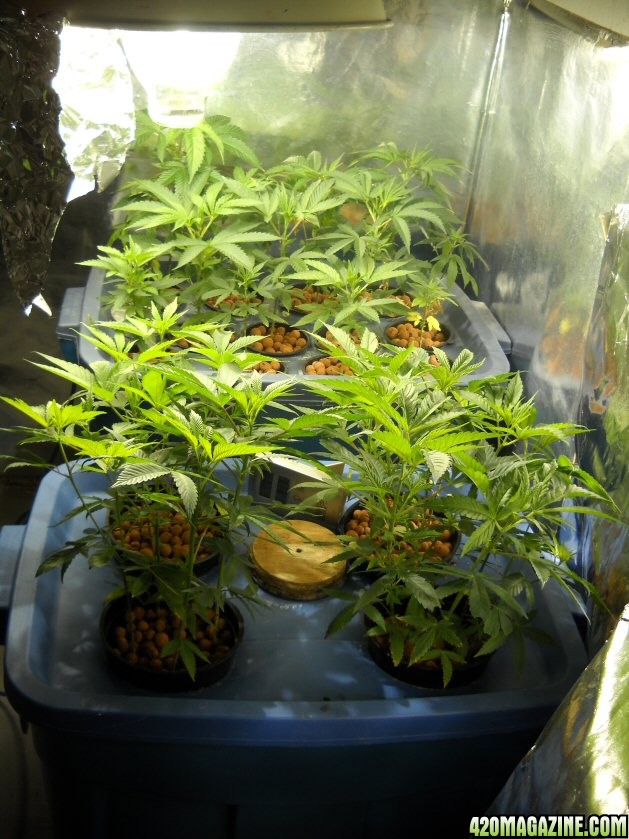
They're sitting under a 400W EYE Hortilux at the moment and will be joined with a 400W HPS a day or so after they go 12/12.
Enough of that now on to the How-To.
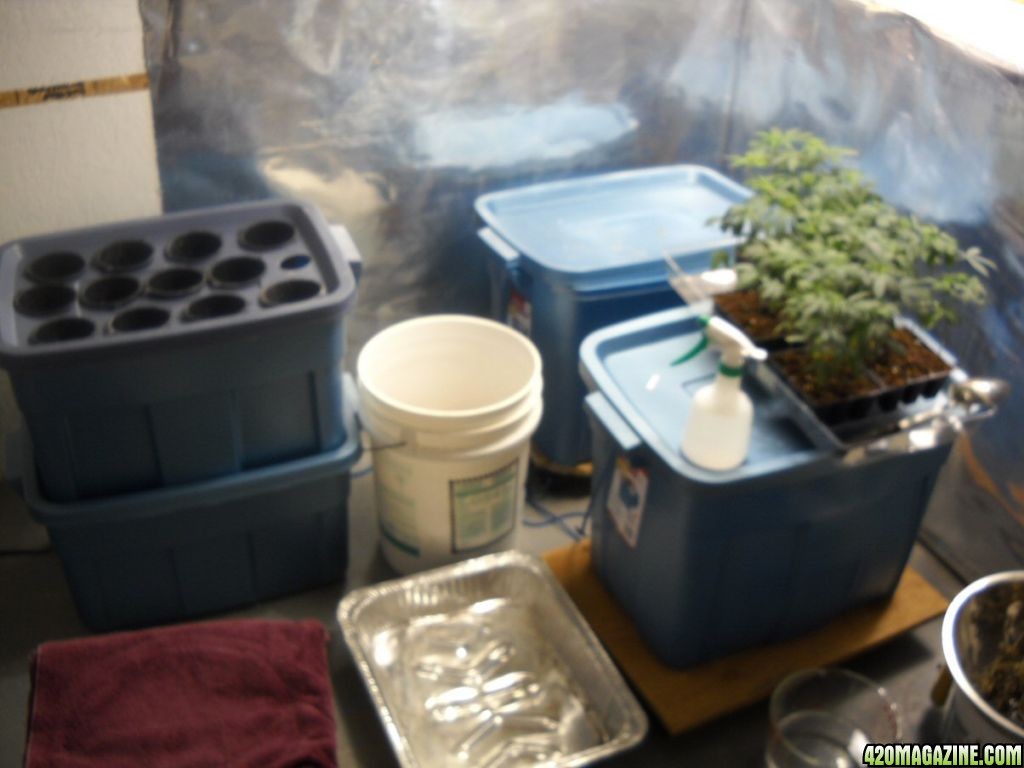
I don't use a main reservoir just nutes in the tub. Makes it easier (IMO), to run different strains or plants at different stages of growth. Plus if you screw something up you may only have to worry about one tub and not lose everything.
All you need to construct one tub is:
A Tub.
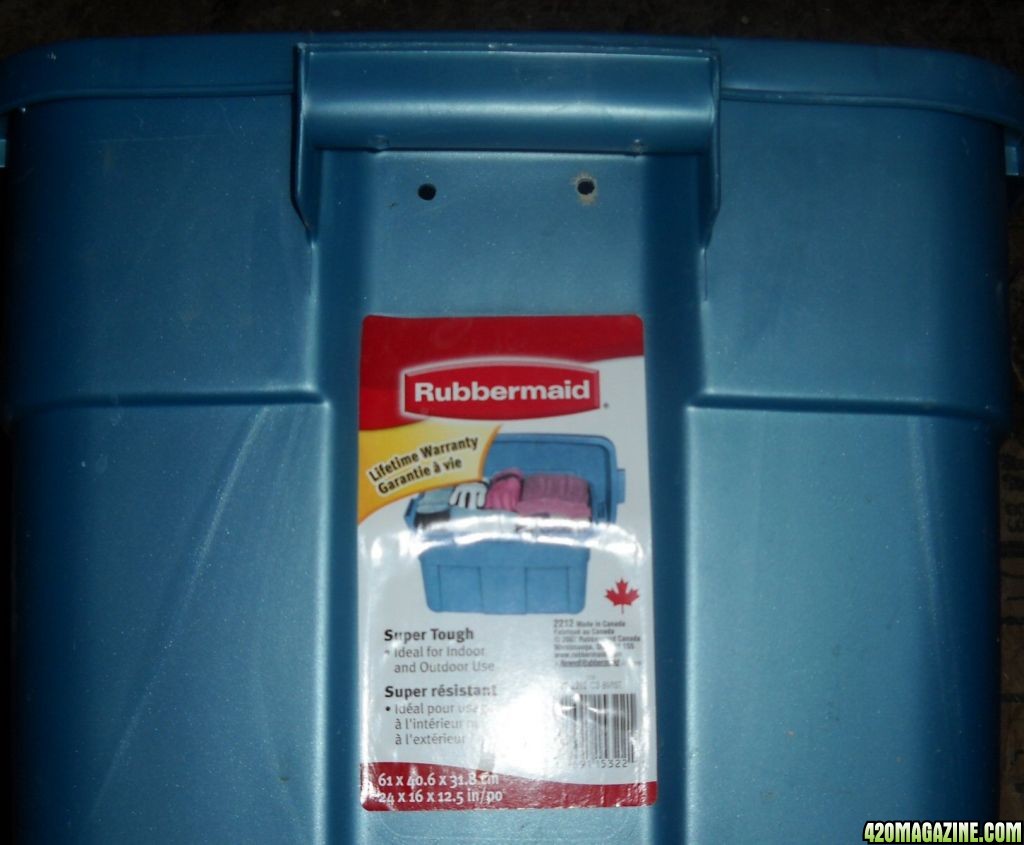
I like the Rubbermaid Roughneck type. They are made of soft plastic and not likely to ever crack. Plus they are made here in Canada and come with a lifetime warranty. That way you can get some money if one should burst and you lose some plants. NOT!
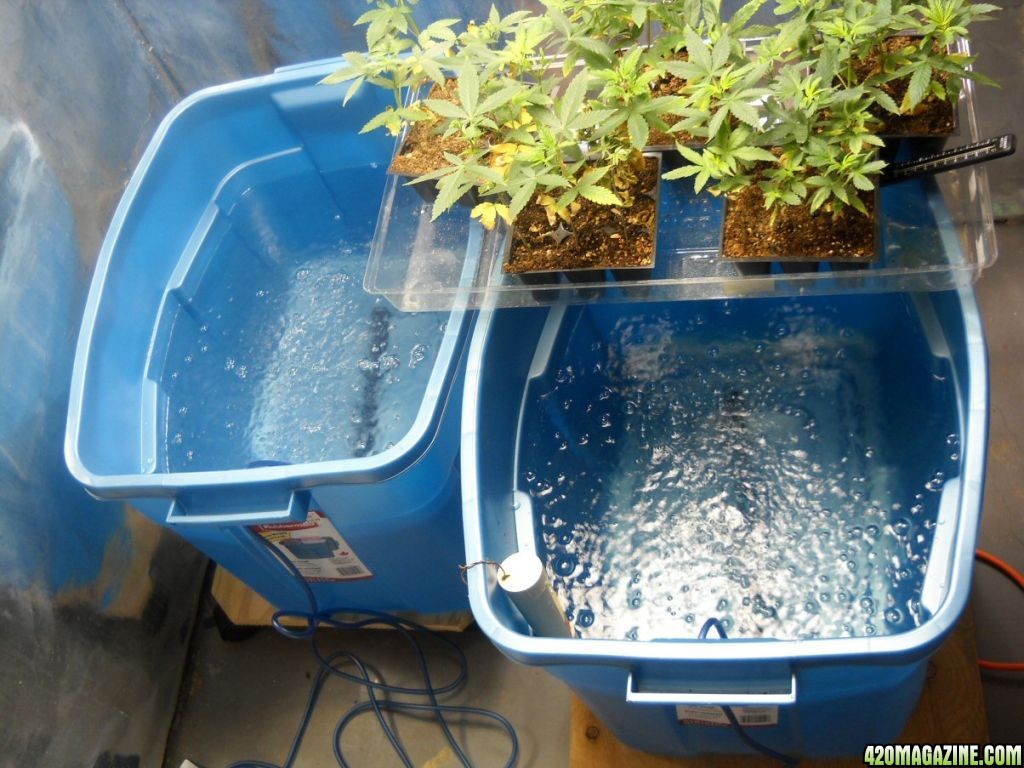
The medium size, 12" high hold 30 liters when topped up and the taller ones, 50 liters. The lids are the same size so you could always veg in a smaller tub, prepare the budding nutes in the bigger tub, pick up the lid with the vegging plants and drop it on top of the fresh tub. Plug in the air pump, flip the lights to 12/12 and you're done.
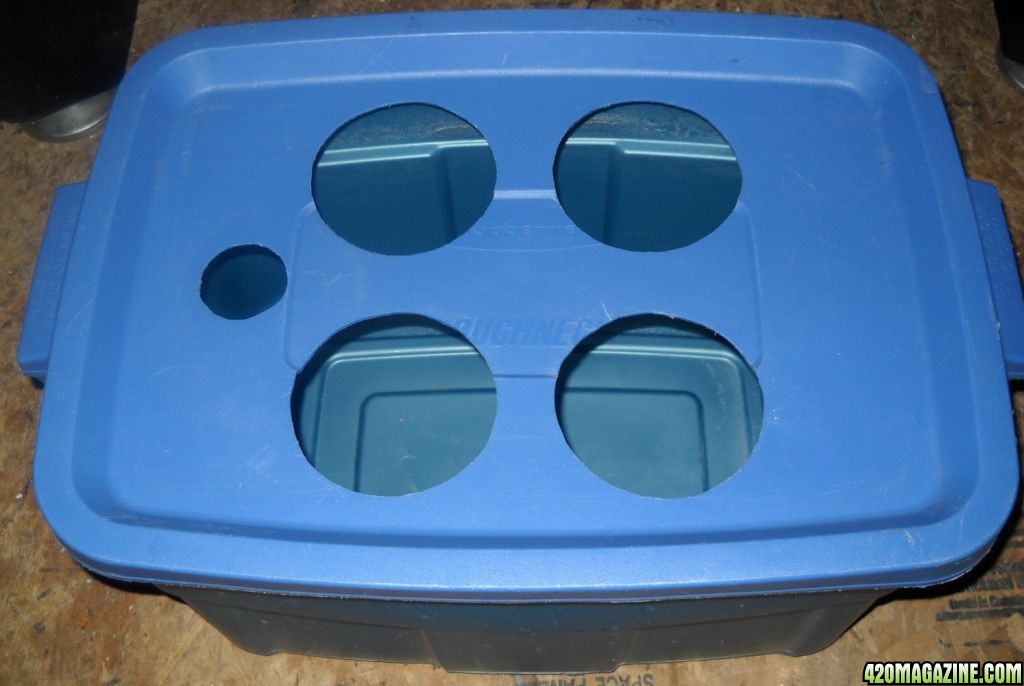
A Circular Hole Saw.
You can rent one to fit your net pots or if you're handy with a switchblade or utility knife you can carve your own holes. The extra smaller hole is for access to the nutes without having to lift the lid to top up, add nutes or take samples for pH and TDS testing. Use whatever you like to cover the hole.
Net Pots.
Whatever size you can get will work fine. If you can't get pre-made net pots you could make your own out of plastic tumblers by drilling or melting holes in them with a cheap soldering iron from Radio Shack. About 3/16th - 5/16th" is a good size.
I'm using 12 - 3" and 4 - 5" pots. The big ones hold 3X as much as the little ones.
Aquarium Air Pump.
A small single one will be enough for a single tub. I use a double outlet Mamxima-R that has a valve on top to control air flow. I just leave it wide open and the water looks like its boiling.
Aquarium Airstone(s).
So many styles and sizes are available that I'm not going to get into that.
I use one 12" long skinny stone per tub. A lot of folks might think you need more but I don't think so. The 12" one sits on the bottom and generates so many bubbles that the bottom of all the pots get splashed when the bubbles burst.
Step 1
Drill a small hole just under the handle of the tub for the air line. Make it slightly smaller than the air line so it doesn't move around and change the position of the air stone. This is the only hole that goes in the tub and is a few inches above the water level. Thus no leaks.
Step 2
Use whatever weapon of destruction you have chosen. Hole saw, switchblade etc. You could always lay the net pots upside down on the upside down lid and trace your circles then cut about 1/4" inside the circle for a tight fit. If you are going to use a hole saw try to find a piece of flat Styrofoam to drill your lid on. The plastic flexes a lot and a flat surface that can be cut into will help a lot.
Running the saw in reverse will likely give you a smoother cut as the saw may chatter as the teeth bite in going forward. As well, turn the lid upside down to lay out your holes and make your cuts. It keeps the top looking like new and adds that professional touch.

Step 3
Install air line and stone, add Water and fire up the pump.
Step 4
Add nutes. I add Pro-Silicate, (Liquid Rock, Silicon dioxide, SiO2) first then adjust the pH down to around 6 or 7 before adding nutes. The SiO2 helps build stronger cell walls and some other good stuff and I've used it for years. Then a tablespoon of Epsom salts and stir a bit 'till dissolved. I'll start with a lower dose of nutes. Say about 300 - 500 PPM to start. If you're not using RO or distilled water make sure you know the TDS of whatever water you are using and subtract that from the total to get your nute TDS. Finish up with 2cc/USG of 35% food grade H2O2, hydrogen peroxide.
Just add nutes. No stirring required!
I've only used Advanced Nutrients 3-part hydro nutes doing this but any good hydro nutes should work just as well. Maybe better but who am I to judge, I've only used the one brand. Some Dr. Hornby Big Bud gets tossed in during flowering but I'm almost out of that. Enough for this grow but I wanna get some of that new Kushie Kush (?) from AN and see what that's like for my next grow. You could probably use 20-20-20 with Bloom food from a garden shop at Walmart and still end up with really decent plants.
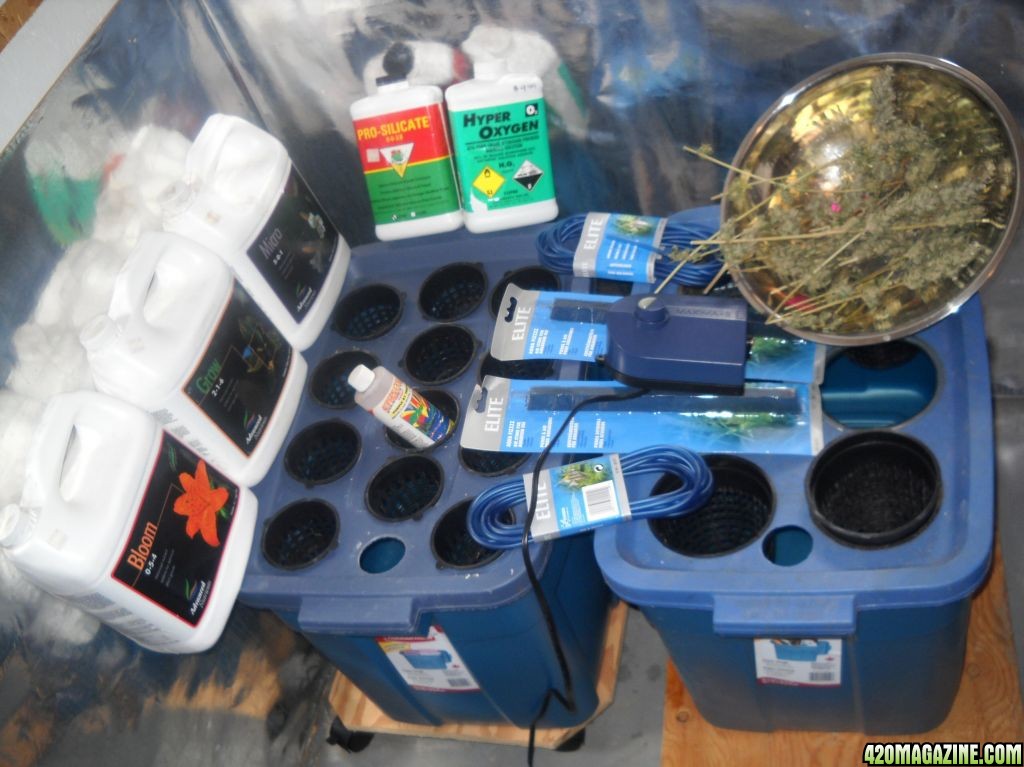
Most of the stuff you need to grow with.
pH might be hard to maintain as quality hydro nutes should have buffers built in that prevent radical pH drift. I've let mine run from 5.2 to 6.4 with no visible sign of nute lock outs. I like 5.5. Maybe cause I'm 55. :0) Let it drift and don't adjust unless it starts getting way off track. It's easy to spoil the broth when you keep adding stuff to it!
Then I adjust the pH to around 5.5 and start filling the net pots with babies.
Step 5
Moving the babies into their new home. This is easy and only took me a couple of hours to get this part done. I start my clones or seeds in Pro-Mix in little pots. 4-parts Mix and 1-part perlite. I like to let them get root bound then when they go in the pots the mix doesn't end up in the tub but if any does it will not be a problem. When transplanting I put the lid I'm going to use over an empty tub and wash a little water through each pot as I go. This knocks down any loose dirt and wets the root ball. A little thrive is added to the wash water to help minimize shock but I've done it without and not seen any signs of shock at all.
All ready for transplanting to the tubs.
A baby ready to plant.
Just set in the bottom of the pot and cover with hydroton or other suitable media.
Just keep going 'till they're all tucked in.
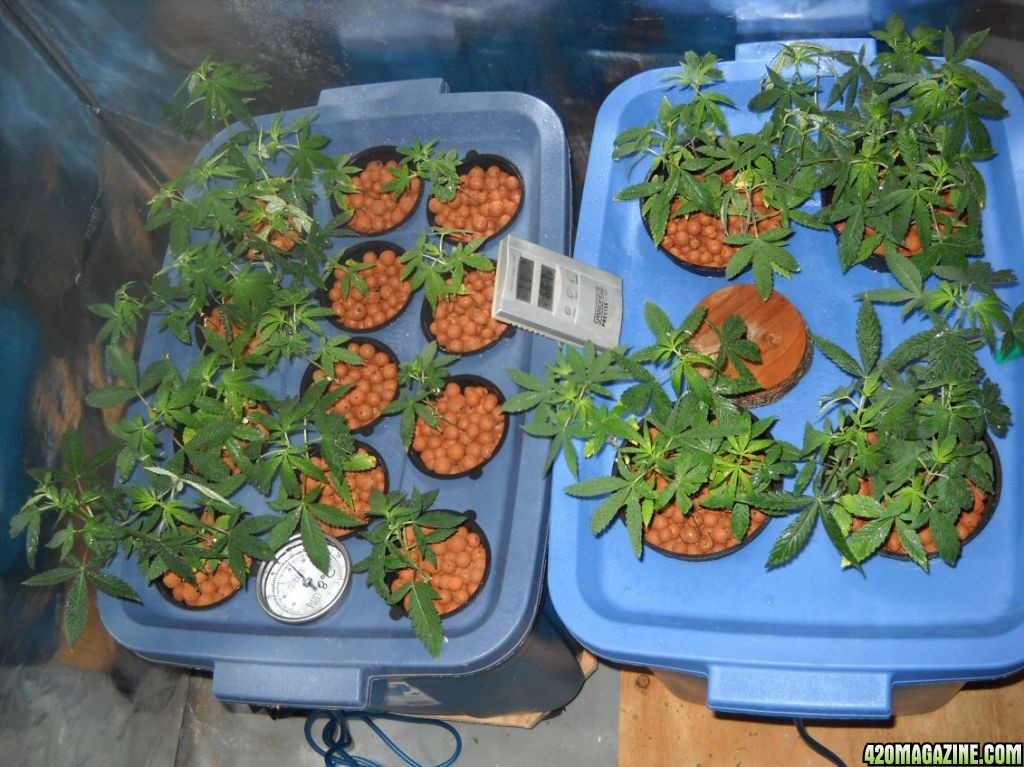
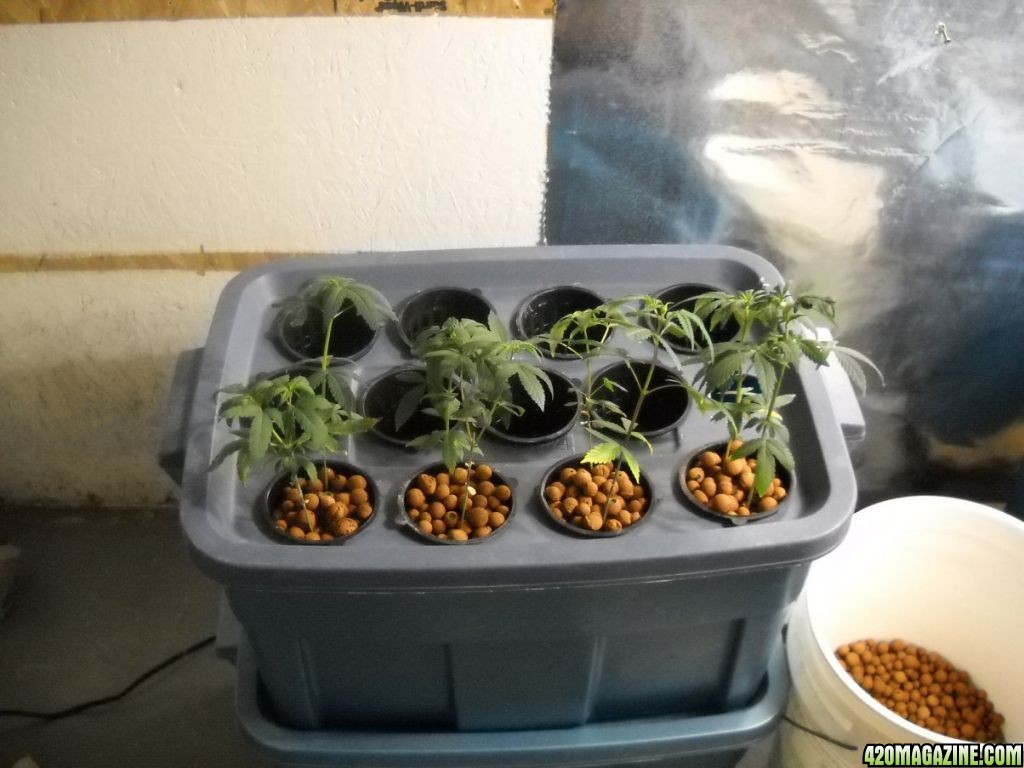
Both tubs ten days later.
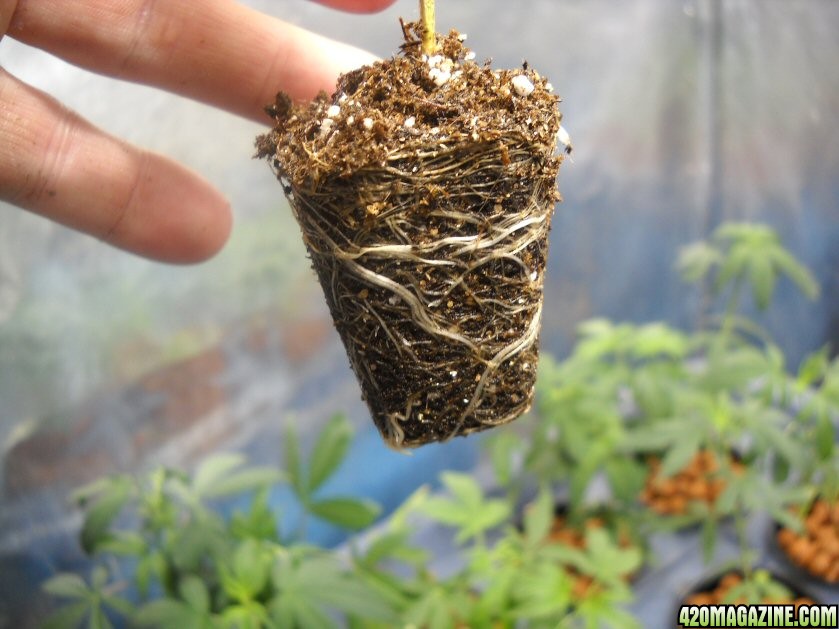
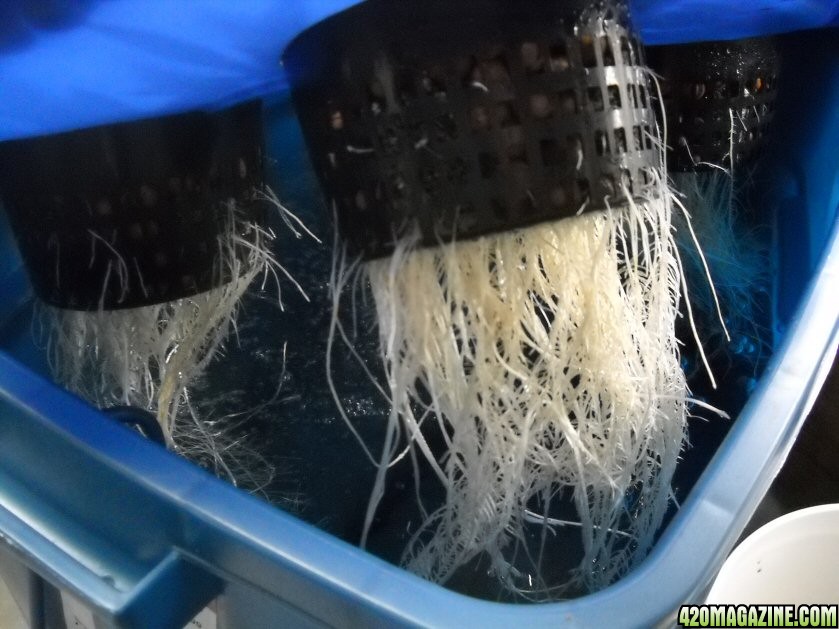
Ten day old roots.
That's it in a nutshell. Updates to this grow can be found in my journal. The link is below in my sig.
That concludes today's lesson. Class dismissed.

In 2001 I started on my own procedure to grow some really good cannabis using the information I had found. I had previously grown lots of pot under lights since 1977. My first foray into DWC was under 6 - 4' fluorescents with incredible results. Veg wise. Didn't flower worth a crap until I got a 400W HPS and a flower room then yahoo it worked like a hot damn!
My latest excursion like the last 20 or so is another experiment to see how far I can push this puppy to see if she can take it. So far, so good.
I took fourty seeds and ended up with thirty-three plants in the two tubs. Sixteen in the 12 hole tub and seventeen in the four hole tub. It's kinda crowded but I'm looking for a SOG kind of thing and they are a week or so from 12/12. My previous grow got one male out of nine seeds so I'm hoping for the same thing.
I got this bunch of seeds from a grower who swore they were Kush. The last batch sure had all the markers for Kush even up to big purple leaves and the stink! Oh my god, the STINK! The babies are only 6" tall now and not into flowering and are stinking the house up just fine.
They're sitting under a 400W EYE Hortilux at the moment and will be joined with a 400W HPS a day or so after they go 12/12.
Enough of that now on to the How-To.
I don't use a main reservoir just nutes in the tub. Makes it easier (IMO), to run different strains or plants at different stages of growth. Plus if you screw something up you may only have to worry about one tub and not lose everything.
All you need to construct one tub is:
A Tub.
I like the Rubbermaid Roughneck type. They are made of soft plastic and not likely to ever crack. Plus they are made here in Canada and come with a lifetime warranty. That way you can get some money if one should burst and you lose some plants. NOT!
The medium size, 12" high hold 30 liters when topped up and the taller ones, 50 liters. The lids are the same size so you could always veg in a smaller tub, prepare the budding nutes in the bigger tub, pick up the lid with the vegging plants and drop it on top of the fresh tub. Plug in the air pump, flip the lights to 12/12 and you're done.
A Circular Hole Saw.
You can rent one to fit your net pots or if you're handy with a switchblade or utility knife you can carve your own holes. The extra smaller hole is for access to the nutes without having to lift the lid to top up, add nutes or take samples for pH and TDS testing. Use whatever you like to cover the hole.
Net Pots.
Whatever size you can get will work fine. If you can't get pre-made net pots you could make your own out of plastic tumblers by drilling or melting holes in them with a cheap soldering iron from Radio Shack. About 3/16th - 5/16th" is a good size.
I'm using 12 - 3" and 4 - 5" pots. The big ones hold 3X as much as the little ones.
Aquarium Air Pump.
A small single one will be enough for a single tub. I use a double outlet Mamxima-R that has a valve on top to control air flow. I just leave it wide open and the water looks like its boiling.
Aquarium Airstone(s).
So many styles and sizes are available that I'm not going to get into that.
I use one 12" long skinny stone per tub. A lot of folks might think you need more but I don't think so. The 12" one sits on the bottom and generates so many bubbles that the bottom of all the pots get splashed when the bubbles burst.
Step 1
Drill a small hole just under the handle of the tub for the air line. Make it slightly smaller than the air line so it doesn't move around and change the position of the air stone. This is the only hole that goes in the tub and is a few inches above the water level. Thus no leaks.
Step 2
Use whatever weapon of destruction you have chosen. Hole saw, switchblade etc. You could always lay the net pots upside down on the upside down lid and trace your circles then cut about 1/4" inside the circle for a tight fit. If you are going to use a hole saw try to find a piece of flat Styrofoam to drill your lid on. The plastic flexes a lot and a flat surface that can be cut into will help a lot.
Running the saw in reverse will likely give you a smoother cut as the saw may chatter as the teeth bite in going forward. As well, turn the lid upside down to lay out your holes and make your cuts. It keeps the top looking like new and adds that professional touch.
Step 3
Install air line and stone, add Water and fire up the pump.
Step 4
Add nutes. I add Pro-Silicate, (Liquid Rock, Silicon dioxide, SiO2) first then adjust the pH down to around 6 or 7 before adding nutes. The SiO2 helps build stronger cell walls and some other good stuff and I've used it for years. Then a tablespoon of Epsom salts and stir a bit 'till dissolved. I'll start with a lower dose of nutes. Say about 300 - 500 PPM to start. If you're not using RO or distilled water make sure you know the TDS of whatever water you are using and subtract that from the total to get your nute TDS. Finish up with 2cc/USG of 35% food grade H2O2, hydrogen peroxide.
Just add nutes. No stirring required!
I've only used Advanced Nutrients 3-part hydro nutes doing this but any good hydro nutes should work just as well. Maybe better but who am I to judge, I've only used the one brand. Some Dr. Hornby Big Bud gets tossed in during flowering but I'm almost out of that. Enough for this grow but I wanna get some of that new Kushie Kush (?) from AN and see what that's like for my next grow. You could probably use 20-20-20 with Bloom food from a garden shop at Walmart and still end up with really decent plants.
Most of the stuff you need to grow with.
pH might be hard to maintain as quality hydro nutes should have buffers built in that prevent radical pH drift. I've let mine run from 5.2 to 6.4 with no visible sign of nute lock outs. I like 5.5. Maybe cause I'm 55. :0) Let it drift and don't adjust unless it starts getting way off track. It's easy to spoil the broth when you keep adding stuff to it!
Then I adjust the pH to around 5.5 and start filling the net pots with babies.
Step 5
Moving the babies into their new home. This is easy and only took me a couple of hours to get this part done. I start my clones or seeds in Pro-Mix in little pots. 4-parts Mix and 1-part perlite. I like to let them get root bound then when they go in the pots the mix doesn't end up in the tub but if any does it will not be a problem. When transplanting I put the lid I'm going to use over an empty tub and wash a little water through each pot as I go. This knocks down any loose dirt and wets the root ball. A little thrive is added to the wash water to help minimize shock but I've done it without and not seen any signs of shock at all.
All ready for transplanting to the tubs.
A baby ready to plant.
Just set in the bottom of the pot and cover with hydroton or other suitable media.
Just keep going 'till they're all tucked in.
Both tubs ten days later.
Ten day old roots.
That's it in a nutshell. Updates to this grow can be found in my journal. The link is below in my sig.
That concludes today's lesson. Class dismissed.
")
