

philthegeek
Well-Known Member
So, doing a rearrangement of the tent to take some clones to flower before i do my next grow from seed.
I had a watering system set up that gravity fed via a ball valve tap timer onto watering (felt) mat in trays. Bottom up watering into the pots. Worked ok, but had to get the timer set right.
Anyhow, for something different have now gotten an Autopot Smartvalve and connected that to my tank on the self. Feeds into a large tray rather than discrete pots as i want a bit of flexibility in # of plants and arrangements.
Other Smartvalve in similar setup in my nally bin "spacebox".
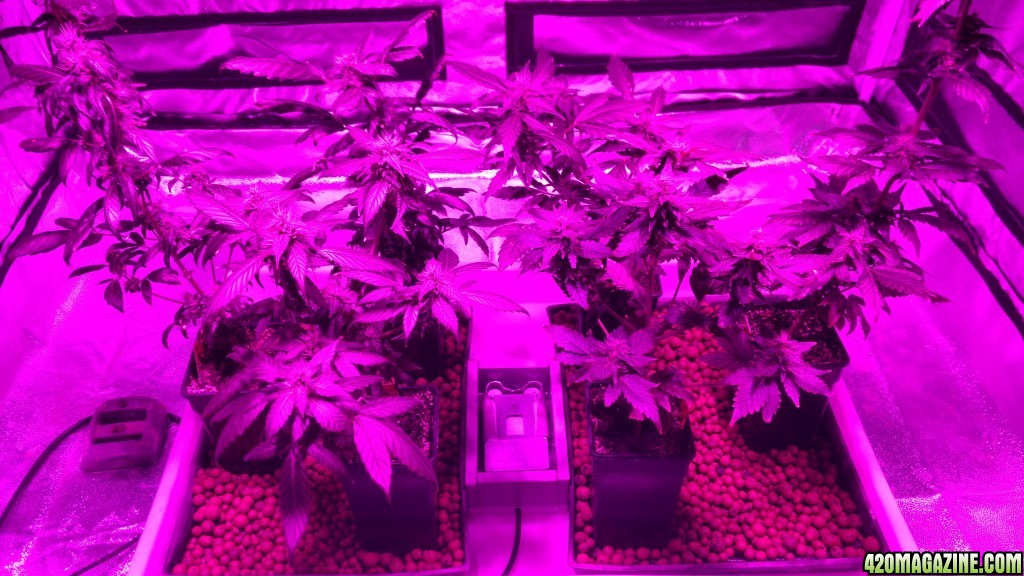
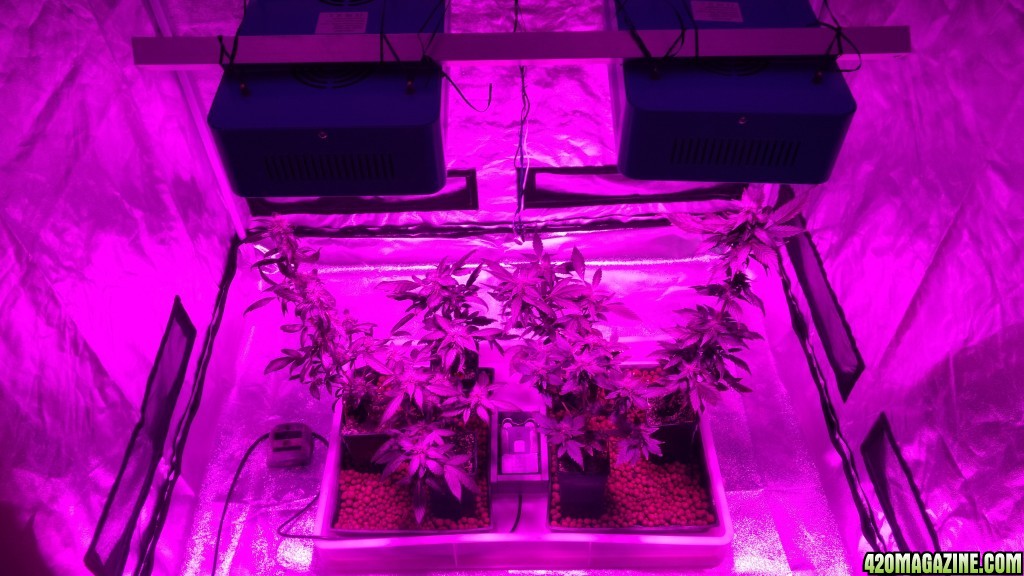
Seriously burple photos....did not look that way in real life???
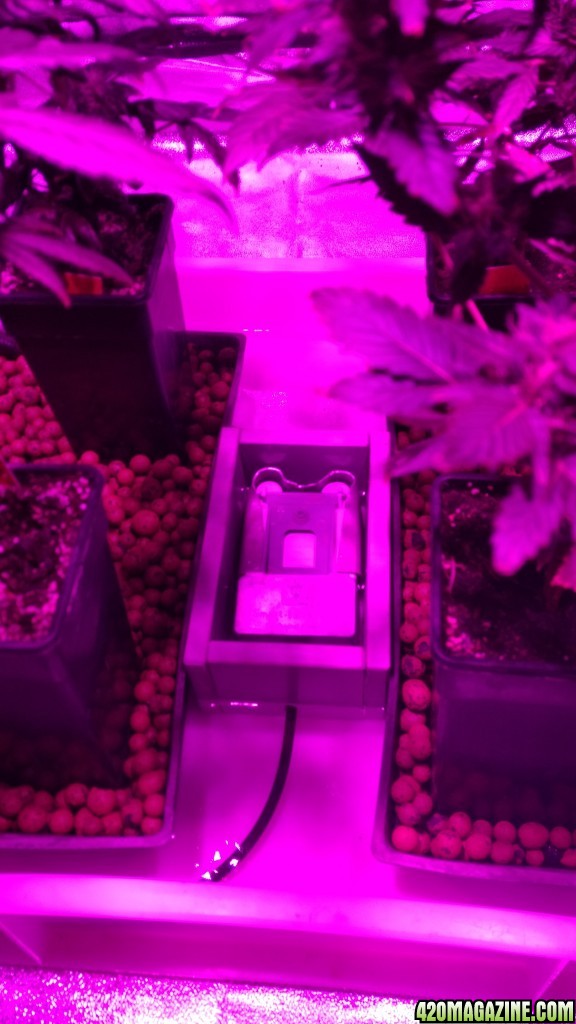
Issue i found was that at the moment i only have 6, small plants in small pots and since I have just switched to COB Leds from a 600W HPS , the tent is cooler and less evaporation AND transpiration happening. So.........too much water in the tray (volume not depth) when full and takes ages to do wet /dry cycle. Think have solved that by using seedling trays full of washed expanded clay to take up some volume in the tray. Less water per cycle should give a faster cycle time and better oxygenated root zone.
Bought the Smartvalves, but shop had no covers for them, and you need to somehow stop the units floating for them to work. I think in proper Autopots they click in?? Anyhow, some sheet lead wrapped around the back in such a way as NOT to interfere with the outside float worked a treat. To make sure no expanded clay gets in there i build a couple of enclosures out of 12mm plastic. Slots around the bottom edge for drainage and the one for the 4mm feed hose helps hold it down nicely as the plastic is quite dense and heavy.
Anyway, will see how it goes. Have some clones of the best female plant of my first grow in the box, hopefully growing roots at the moment.")
If they go ok, next setup for the tent will be 4 x 250mm pots in two black nally bins. Pots will sit in holes cut in the nally bin lids that i have made up (pot base will just sit on the bottom of the nally bin with its top rim on the lid). Filling port in each lid and a Smartvalve in each nally bin.
Will post some photos when i set it up.
One idea i had that i may apply down the track a bit would be to use the same lids and pots, but with the deeper nally bins and a couple of small pond pumps on a timer to have a recirculating hydroponics setup. The water level in the deeper nally bin would give me about 15-18l water capacity with the pot bases being always out of the water. The pond pumps lift the fluid up a pipe, into the pots and it drains back into the nally bin and recirculates.
At the moment i am finding soil growing easy and somewhat forgiving. Am very impressed with the Autopot Smartvavles and their simplicity.
I had a watering system set up that gravity fed via a ball valve tap timer onto watering (felt) mat in trays. Bottom up watering into the pots. Worked ok, but had to get the timer set right.
Anyhow, for something different have now gotten an Autopot Smartvalve and connected that to my tank on the self. Feeds into a large tray rather than discrete pots as i want a bit of flexibility in # of plants and arrangements.
Other Smartvalve in similar setup in my nally bin "spacebox".
Seriously burple photos....did not look that way in real life???
Issue i found was that at the moment i only have 6, small plants in small pots and since I have just switched to COB Leds from a 600W HPS , the tent is cooler and less evaporation AND transpiration happening. So.........too much water in the tray (volume not depth) when full and takes ages to do wet /dry cycle. Think have solved that by using seedling trays full of washed expanded clay to take up some volume in the tray. Less water per cycle should give a faster cycle time and better oxygenated root zone.
Bought the Smartvalves, but shop had no covers for them, and you need to somehow stop the units floating for them to work. I think in proper Autopots they click in?? Anyhow, some sheet lead wrapped around the back in such a way as NOT to interfere with the outside float worked a treat. To make sure no expanded clay gets in there i build a couple of enclosures out of 12mm plastic. Slots around the bottom edge for drainage and the one for the 4mm feed hose helps hold it down nicely as the plastic is quite dense and heavy.
Anyway, will see how it goes. Have some clones of the best female plant of my first grow in the box, hopefully growing roots at the moment.
If they go ok, next setup for the tent will be 4 x 250mm pots in two black nally bins. Pots will sit in holes cut in the nally bin lids that i have made up (pot base will just sit on the bottom of the nally bin with its top rim on the lid). Filling port in each lid and a Smartvalve in each nally bin.
Will post some photos when i set it up.
One idea i had that i may apply down the track a bit would be to use the same lids and pots, but with the deeper nally bins and a couple of small pond pumps on a timer to have a recirculating hydroponics setup. The water level in the deeper nally bin would give me about 15-18l water capacity with the pot bases being always out of the water. The pond pumps lift the fluid up a pipe, into the pots and it drains back into the nally bin and recirculates.
At the moment i am finding soil growing easy and somewhat forgiving. Am very impressed with the Autopot Smartvavles and their simplicity.