DIY LED Light Fixures

BTzGrow

Well-Known Member
I'm building a couple of double LED board racks with HLG QB120 Quantum Boards. I'm hoping to share some of my building technique and final testing results here.

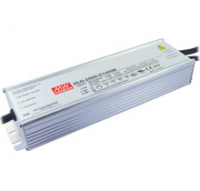
I used HLG 100 V2 4000K board and driver combo with great success with to grow a single UK Cheese Auto plant start to finish and harvested a little over 2oz's. My brother @FelipeBlu decided he would like to try a slightly more powerful setup. HLG had a really special price on 4 of the QB 120 boards for like $125ish. The ones purchased were 4000K light spectrum like the QB100 I used with the UK Cheese.

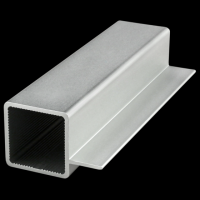
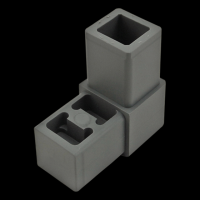
I've showing the 80/20 Quick Frame parts and the Mean Well Driver here.
 

Attachments

  • 1556911489456.png
    1556911489456.png
    295.4 KB · Views: 121
  • 1556911589632.png
    1556911589632.png
    241.7 KB · Views: 131
  • 1556911883906.png
    1556911883906.png
    38.5 KB · Views: 129
watching as i plan to build something one day. the racks in particular are an interest to me, and how everything mounts. these setups always looks so neat and tidy.
 
Starting with the frame construction. I used the Quick Frame series from 80/20 Inc. It's light weight and extremely sturdy and with the single inside flange allows a secure and safe mount for the boards.
View media item 1677218View media item 1677219
When putting together the corners require a little notching out so the pieces fit flush together. I used a scroll saw to make the cuts.View media item 1677221View media item 1677220
Once together they look like this.View media item 1677222 The nylon corners are really tight to get in and I had to use a nylon Mallet to hammer them into the extrusion. I still needed to clean off the excess nylon that curled up as the corners where hammered into place.
 
watching as i plan to build something one day. the racks in particular are an interest to me, and how everything mounts. these setups always looks so neat and tidy.

Pull up a chair. I spent some time working on the details before buying anything. My background is electronic and electrical engineering so I feel at home with this simple DIY project. More interesting, is I have a quantum PAR meter that I will be using to make measurements of the PPFD at different heights above the intended plant tops. Part of the idea of using multiple boards is to increase the side to side coverage as well as have some center overlap.
 
What did those frames cost, pretty sweet

What driver did u get?
The frames cost about $75 total. That of course include a rather expensive shipping cost and California tax. Google 80/20 Inc and check out their Quick Frame system. The Meanwell HLG-240H-2100B was about $70 including shipping. I guess I didn't quite get the cost above correct, because in the over all total of $200 to build I didn't include the cost of the boards. So about $320 for two - two board racks.
 
I have two setups of qb120s, two more with 132s, oh and a 288 timber setup

4 for flower, 320h-2100b driver
4 for veg 240h-2100b driver

All v2 bds

Love em.....

Those frames look nice, but think I'll stick with my $12 Home Depot one...lol
 
Next up was to wire and mount the boards into the frames. Drilled and mounted with #8-32 by 1/2 screws and nuts.
This was the original setup with the boards a little more recessed into the frames. View media item 1677223View media item 1677224
I used 20guage bell ringer wire from Lowes and I think I got the little connectors from there also.
View media item 1677232 These little plugs are really cool because they fit together without a so called male and female sides. They are kind of asexual so to speak.

In the top picture you can see the series wiring. Starting at the top left with a red wire into a positive terminal and out the negative terminal on the top right. A reverse on bottom starting with the bottom left the white wire goes into the negative terminal and a red wire to come out the positive terminal on the bottom right.

On the right side I have made a jumper wire to close the loop. It can be unplugged and a jumper placed between two racks as the are wired exactly the same. Power from the driver will come in from the left plug.

I will draw a simplified wiring diagram and include it in the next post.
 
I have two setups of qb120s, two more with 132s, oh and a 288 timber setup

4 for flower, 320h-2100b driver
4 for veg 240h-2100b driver

All v2 bds

Love em.....

Those frames look nice, but think I'll stick with my $12 Home Depot one...lol
It's nice to know you are using the same type of QB boards and liking them. Yes the frames are expensive, however I was going for a polished look and super durability. I'm hoping to see if I can find a local distributor in the future so I don't have to pay the shipping.

Part of this effort is to proof an idea that I might be able to use in the future with other fixture builds. Maybe even some Cob's.
 
Here's a drawing to show a series wiring for 4 light/boards. Consider each of those yellow dots as a board in my build.View media item 1677265This is flexible because it can work with either a single rack of 2 boards or both racks with four boards. Having a driver strong enough to push all four boards is the keep. I'm most interested to see what the out of wall wattage will be for each configuration. I'm hoping the wattage pulled for just two boards will be less. It will be measured to be sure.
 
Moving forward and finishing off the DIY QB LED project. This will be about the wiring connections.

I used a couple of different connectors to connect the Light Racks to the Driver. These are little solderless snap connectors that are for wire gauges 18-24View media item 1679763 Here they are used with the 20gauge Red and White Bell Ringer wire around the racks to create the series connect. I made a couple of jumpers with single connectors and a wire loop and also a jumper to connect the two racks together if all 4 QB's are going to be used. They were found on Amazon under LED solderless connectors.

This next wire and connectors are on what is called Thermostat wiring. It's 18gauge and three conductor. A solderless LED connector on one side to connect to the lights and an XT60 connector typically found with RC Batteries to connect to the driver.

Here is the other side of the XT60 connector that is connected to the DC output of the driver.

Here is the 100Kohm Potentiometer used with the driver to allow the lights to be dimmed. Yes, the light level can be adjusted.

I left the connections exposed to take a picture. My technique with the shrink tubing is a bit lacking because I used the Soldering Iron to shrink them. Meh! I will be wrapping all of the connectors with electrical tape to finish them off nicely.
 
With all the wiring finished, it's time to test the process and see if it actually works. First to light up one board.
View media item 1679786 Ta Da!! It's Alive!! I really had no doubts.

Next up is to light both racks with 4 boards in series. View media item 1679787 Wow! Amazing! It works

Now to tidy wires up and get ready for the actually testing of the units AC power consumption at the wall and then finally some PPFD light levels in a tent. Lots to do, stick around.

This is almost as fun as getting ready for a final yield weigh in of a grow.
 
Power consumption measurements. Drum Roll Please.

First started with no light racks plugged into the Driver. Driver plugged into AC at the wall: 13Watts less than .1amp
Very Impressive.

A single rack with two of the QB 120 boards rated at 65watts each. Actual AC measurement at the wall is 100 watts and .8 amps. This measurement was made with the Potentiometer adjust to it's highest setting.

Two Racks in series with 4 QB120 boards. Total AC wattage at the wall is 193 watts and 1.6amps. To be expected, double the lights, double the power consumption.

Final test was the wattage drawn with the Potentiometer set on it's lowest setting. - 18watts!!!
Not much more than without any lights plugged in to the driver.

With these measurements I feel very comfortable with the performance of the electronics and wiring. It should result in a very low temperature on the driver mounted outside the tent. The amperage draw is very low and the connectors should easily handle without any heat generation. That will be tested in following tent tests.

To recap:
A single Rack with two QB's draws 100watts AC from the wall. A double rack setup draws 193 watts from the wall. Actually much lower and better than I had expected. Excellent!!!
 
A most important consideration at this point is how to hang the racks in a tent. I have been very happy with the adjustable Y-Hangers that came with the Black Diamond Perfect Sun Mini's I have. I found almost exactly the same ones on the RapidLED Site under accessories. Here's what they look like kind of.View media item 1679790 I say kinda because I had to modify them slightly. They originally came with these hanging attachments on the end you now see the crimped loop on.View media item 1679791 They are a two piece metal cap that allows for a screw to go through the end and then into the ceiling or bar above. I thought for this application I would rather have a set up like the ones that came with the Mini's. So over to Lowe's and found the little crimps that allowed me to adapt and overcome.

Final purchase was #8 Metric bolt x 40mm long. Of course it is metric. Roughly a little more than 1.5 inches. This will allow for the bolt to go all the way through the 1inch aluminum frame with a nut on the top side to hold in place. Then the free ends seen here will screwed onto the metric bolt. Final pictures to follow once I have mounted in a tent for measurements of the light intensity.

Don't go away, that's where the fun really starts. The PPFD light measurements at different heights and measuring out from the center to see what the levels will be around the sides of the tent. I can tell you already these lights are extremely bright.
 
Lights delivered to brother @FelipeBlu and set up.
View media item 1683154
View media item 1683153
View media item 1683152
I’m leaving my Quantum meter with him for the time and let him do the measurements and post here if he chooses.

I’m not exactly happy with the tiny wiring connectors I used. Might be looking for more suitable and positive connectors.

Over all very happy with the outcome and choices made.
 
Back
Top Bottom