I'm building a new DIY RDWC build. Should it be:
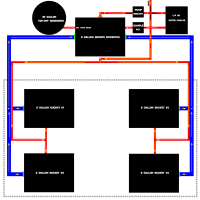
(a) just like the picture in the attachment...
(b) kind of like the attachment, but 2 bulkheads on each bucket
(c) more like a "Current Culture" kind of setup with an undercurrent...
(d) try this...
You have a very good idea of how to setup the rdwc system go with your design. Now for the return line I decided on black abs as white pvc let in a ton of light from my good flashlight, are you planning uniseal or bulkheads on the 2"? Other then that one thing I wish I had done was put a small permanent piece of pipe out of the bucket just enough for half of a pipe coupling like this
This is so it is easy to clean and take apart your setup and mine will have these eventually. I have built my own diy rdwc exactly like your drawing
oh and from your drawing move the intake and outlet for the chiller further apart if possible to avoid the cold water going back in the chiller before mixing with the rez
I've been revising yet again...
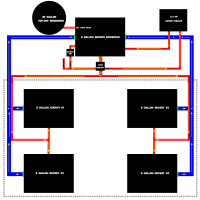
Here is my latest design for my 6'x6'x7' flower room:
• Moved 2" return & 1" waterfalls closer to the outer wall for more room to maneuver around plants.
• I removed the 400GPH water pump.
• Added a sample pot for testing pH, EC & water temperature.
• Added valves for the manifold system with drain.
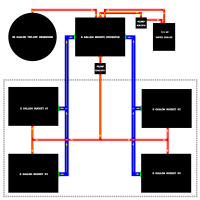
Revised the layout yet again...
Here is my latest design for my 6'x6'x7' flower room:
• Moved sample pot.
• Moved water pump.
• Moved drain.
• Moved manifold system.
My 2 cents is to axe the top off tank and sampling point, they aren't necessary and are only adding more places to leak from and drain. If you want more water in your system go for larger grow totes. I run 27 gallon Home Depot totes, they are only 2" wider in each direction than their 17 gallon ones but much taller, more water and room for roots. It sojnds like you have plenty of grow space for them, just not sure of their availability where you are at. Your sampling point isn't needed, you can use your reservoir for that. The 1" return line is too large of OD to get a good velocity through the pipe and you will have a hard time separating that flow between 4 totes. I have (2) 800 gph pumps on a 5/8" return line that manifolds into (4) 1/2" returns to the totes. Even then, I needed to add 4 valves because the velocity wasn't high enough causing 2 lines to have more flow than the other two. I'm not sure if your chiller has a pump (most don't) so run your chiller inline with you pump straight from your reservoir right to the grow totes. You want the cold water from the chiller to go straight to where the roots are, no sense in cooling the water in the reservoir first. Lastly, remove any unnecessary bends, elbows, valves, and fittings, they will only reduce your pump flow. Make your return line runs as direct as possible, I used Pex which is a good combination of ridged and flexible.
Edit: Sorry I originally said 800 gpm when it should have said gph. Here is where I start my DIY build if you wanted an idea of a simple setup. Keeping it simple is going to be your best bet. Adding things is only going to add more to drain and clean, as well as, places for leaks. I only thing I will be improving on for my setup this fall is a better pump for my return line and a sprayer bar with a tee to feed my Hydroton. I ended up hand watering my clones for 10 days until they had enough roots in the water to take off.
I’m currently designing with 8 Gallon EZ-STOR buckets that I’ve already purchased. Running 2” return lines. Suction lines are 1” ID black vinyl tubing that fits on 3/4” ID PVC.
As for separating the flow, inside each bucket there is a PVC tee with a couple elbows, PVC pipe with holes drilled and tapped (10-24) as well as end cap plugs. This creates lots of dissolved oxygen.
I also have purchased the 13 Gallon EZ-STOR buckets for my next build...
The reason I’m adding the top-off reservoir is so that I can go away for a week and not worry about my system. I can steer my system so to speak. When the plants uptake nutes the float valve opens and maintains water levels throughout all buckets....
The reason I’ve added the sample-pot is so that there will always be liquid in it, so my pH probe won’t dry and die when emptying and cleaning the system. Also, it’s less harmful to my bluelab probes as there is no mixing of direct nutes in it and less calibrating...
The chiller didn’t come with it’s own pump. I’ve read that having the chiller going to the remote epicenter is better for temperature differentials and gives a more accurate reading of the root zone water temps...


")