HighTechRasta's Recirculating Drip, Coco, 480W QB With Dr.Seeds LSD, Fem, Photo

HighTechRasta

Well-Known Member
:welcome:

And here we are with the Second runner up in my attempt at perpetual in a small 2in1 tent.
I started with Bagseeds, but my friends @ 420Magazine said:

"Are you sick Rasta? :(
Bagseeds are nothing but Stress! :thedoubletake:
You should see a Dr....."
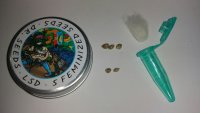
1768780

LSD Cannabis Seeds
$50.00 CAD - 1 tin containing 5 feminized seeds.

"Feminized LSD is an award-winning cross of Skunk #1 and Afghan Indica
that's claim to fame is a strong, trippy high that doesn't let up. If you've
always wondered why weed is considered a hallucinogenic, put these cannabis
seeds on your bucket list.
The high isn't LSD feminized's only appealing feature. It's extremely easy to
grow from seed and can yield as high as 700 grams per square meter after
about nine weeks of bloom. If you're growing in a challenging environment
that's prone to mold, mildew or other pests, feminized LSD seeds are up to
the challenge. They resist diseases that quickly kill less hardy plants. On average,
heights for this Indica-dominant hybrid range from 90 to 100 cm.
You'll enjoy this herb's taste and smell, too. Feminized LSD has a full-bodied
aroma that smells like old-school weed: smooth and musky with notes of hash.
The flavor harkens back to its Afghani mother with a sweet, earthy quality that's
accented by hints of roasted chestnuts. As long as you can withstand the forceful
mental high, you can't go wrong with LSD feminized seeds."


From the description, looks like I couldn't have picked a better strain.

I'm now running top feed drip on my coco, recirculating to a 68L size res with 40L .
Res is aerated with 2 stones and constantly stirred with a second aquarium pump.
Light is now a 480w QB on the Bloom side, 250w of Blurple ChinaLED on Veg side.
Veg side has 2 levels, 70w on upper seedling level, 186w on early-late veg level below.
Nutrients are currently Advanced, switching to REMO soon, full sponsorship from
the local grow shop I got my 2x2 flood tray from! Support your Local Grow Shop!
Feed schedule will be tailored through daily Ph and PPM measurements.
Water is from new 5 stage RO filter, Ph down is accomplished with Apple Cider Vinegar.
Entire irrigation system and res will be kept near spotless with Flying Skull's Z9.
Buds dripping with resin will be attempted with a custom Heisenberg Tea.
There will be no sudden Flush, they will get tapered 150ppm/day in the last week.
Enough with this list already, more details will come as we go...

Please ask anything within reason as we go,
especially Details, Extra Pics and Close-ups!


Ok, here we go.
1768861

With quality seeds, everything is about grower skill from the moment you pick the beans you want to grow.
By today's standards and knowledge, compared to what I grew 30yrs ago, my experience might as well be non-existent.
But I'm very confident in my ability to research, learn, adapt and effectively apply and produce results.

So, I picked the 2 smallest beans on the bottom of the pic above. One tiny, one tiny and slightly deformed.

Sunday April 7 @ 5pm, I scuffed the beans with the fine side of a metal nail-file,
then put the 2 beans in a 30ml cup with distilled water.
3 hours later they had both dropped to the bottom of the cup,
which is awesome! I've never seen that happen so quickly with floaters.
(some fat beans sink right away with a tap)
Next day @ 4pm, they already broke shell and were showing tap root tips!
1768938


1768939


How awesome is that, ready for first medium in 24hrs!
I 100% attribute this to the pre-scuffing of the seeds.
The scuffing removes some outer coating that protects the seed,
I do not subscribe to heavy sanding, as the shell is the seed's initial RO membrane!
I skipped the whole paper towel next thing and went right to peat pods.
Peat pods were soaked/hydrated with distilled water.
Seeds were planted tip down, 5mm below surface.
In a little Jiffy windowsill greenhouse, in a dark warm place...

This is off to a great start,
I'll be back shortly after they break soil...


Disclaimer:
Dr.Seeds is a 420Magazine Sponsor but this Grow is not sponsored by them.
I bought these beans to keep it real. I hope to get Free seeds, as per their offer, for this journal.
:peace:
 

Attachments

  • drseedslogo.png
    drseedslogo.png
    1.8 KB · Views: 161
  • 20190407_170029-1536x864.jpg
    20190407_170029-1536x864.jpg
    292.5 KB · Views: 162
I have grown and smoked this strain.

WP_20190410_09_11_49_Pro.jpg
Just by a different breeder, 10 years ago.
Lovely smoke, grows well, and honestly that pic dont do it justice.
Some of the stickiest resinous buds I have smoked.... Yum, yum.
The jar they were in, still smells like it, ... All these years later...

Grow well mate.
 
Looking good HTR! What do the air cups do? That's new to me. I'm assuming it's so the roots can get as much oxygen as possible.

You got it Mr...

It's my version of a mini air-pot.
From what I've learned, the roots should form a type of lattice
in the soil. The theory goes that, the roots detect the air and stop
then throw side shoots. Without the holes, the roots circle. Although
it does allow more oxygen to the roots, the coco keeps plenty enough
that I'm not concerned. I'm doing the air-cup strictly for the auto pruning
and root-lattice formation.

Now, I also learned that I want that cup pretty packed with roots before
transfer. So, I water them slowly on the outer edge with a syringe, to
encourage the roots to fill the whole cup, working good so far.
:thanks:

Have you tried it with autos too? I might bother you for some more info on this when I give it a shot. :thumb:
 
:thanks:

Have you tried it with autos too? I might bother you for some more info on this when I give it a shot. :thumb:

I'll tell you the secret right now...

Through my research, I have found that,
the best thing for autos, indoors, is a tall narrow air-pot.
The collective theory goes, the auto decides to flower
when it encounters root resistance sidewardly and/or
resitance downwardly by the main tap root. This resistance
would be the sides and bottom of a plastic/hard pot
or fabric pot at the bottom. It is said that this can be tweaked
easily with light medium made to allow for easy lateral and
downward root growth. It is said that this can be easily done
by using 2 air pots overlapped to make a really tall one,
with 1gal or 3gal size. They interlock nicely, they say, to make
a sturdy tall narrow pot.
If I were to do this outdoors, I would get a roll of landscaping
fabric and a roll of snow fence(thick plastic lattice) and a bag
of zip-ties. Both these rolls come in 4ft, perfect for cutting in half
and making your own bad-ass, tall-ass 2ft fabric auto pots. I'd put
a good amount, like 70/30, of perlite in my medium and suffer the
increased need for watering. This would give you the time to train
for some serious increase in top sites, they say.

So, light medium, tall pot, more watering as only consequence really.
I guess, outside one could dig a nice deep hole and fill that with lightened medium...
I should add, there are all the non-medium methods like hydro, aero, bubble, etc,
those methods are feeding the medium so much that the roots really meet no resistance,
I've seen huge autos come out of those methods but they come with complications
and the pics from those were competitive grows, so not your normal kinda thing...
:ganjamon:
 
The air pruning and root formation does matter, here is a pro air pruning pot that is corrigated to prevent root binding. 35L.

WP_20190413_13_01_07_Pro.jpg
 
I'll tell you the secret right now...

Through my research, I have found that,
the best thing for autos, indoors, is a tall narrow air-pot.
The collective theory goes, the auto decides to flower
when it encounters root resistance sidewardly and/or
resitance downwardly by the main tap root. This resistance
would be the sides and bottom of a plastic/hard pot
or fabric pot at the bottom. It is said that this can be tweaked
easily with light medium made to allow for easy lateral and
downward root growth. It is said that this can be easily done
by using 2 air pots overlapped to make a really tall one,
with 1gal or 3gal size. They interlock nicely, they say, to make
a sturdy tall narrow pot.
If I were to do this outdoors, I would get a roll of landscaping
fabric and a roll of snow fence(thick plastic lattice) and a bag
of zip-ties. Both these rolls come in 4ft, perfect for cutting in half
and making your own bad-ass, tall-ass 2ft fabric auto pots. I'd put
a good amount, like 70/30, of perlite in my medium and suffer the
increased need for watering. This would give you the time to train
for some serious increase in top sites, they say.

So, light medium, tall pot, more watering as only consequence really.
I guess, outside one could dig a nice deep hole and fill that with lightened medium...
I should add, there are all the non-medium methods like hydro, aero, bubble, etc,
those methods are feeding the medium so much that the roots really meet no resistance,
I've seen huge autos come out of those methods but they come with complications
and the pics from those were competitive grows, so not your normal kinda thing...
:ganjamon:
Thanks for the detailed info HTR. I knew about the theory behind the roots on autos when they hit the sides or bottoms, and that's exactly why I asked if you tried it on autos.

Again, great info!

Thanks.
 
My little LSD girl is all standing up now,
she still got a twist in her ankle but still in the race.
Pic from 2 days ago...
1772978


She's straitened right up now and kinda long in the leg.
I dug the other seed up and saw only a few mm of root
but it was white, so I buried it back in there, 3rd seed is
in a peat pod now too, it's got the same few mm of root
out of the shell, hoping these last 2 come up together.

We wait...
:ganjamon:
 
So, my leggy LSD has been moved to an air-cup,
buried deep in coco with a sprinkle of Myco.
1776640


The other 2 seeds aren't doing anything right now.
They've been in peat for 9 days now.
I dug them up today and what little there is, is bright white.
Covered them back up and we wait some more...
 
Back
Top Bottom