

it doesnt looks to wet to me tbhDo you have holes the bin, look very wet, and could be acidic, in that case worms would have a hard time in there.
Navigation
Install the app
How to install the app on iOS
How To Use Progressive Web App aka PWA On 420 Magazine Forum
Note: This feature may not be available in some browsers.
More options
You are using an out of date browser. It may not display this or other websites correctly.
You should upgrade or use an alternative browser.
You should upgrade or use an alternative browser.
InTheShed Grows Inside & Out: Jump In Any Time
- Thread starter
- #3,242
Oof! I don't seem to have any change in topography. Does your dent hurt? Have you been to a phrenologist?Oh my gosh! Yes I have that but it's above my left ear. Feels like a small dent
gr865
Well-Known Member
You can cover it with burlap, heavy type. That will help cut down on the flies. Have you seen black soldier flies? Their larvae are great for your bins, some people even use them to pre-breakdown the compost prior to feeding their waste (broken down compost) to their worms.
Sorry just read your entire post, so it was wet and you drilled holes and turned the material over. That is good. My worms feed on green waste compost, very little foods stuff go in, greens, veggie waste. I also add aged horse manure (get the worm treatment broke down, will kill you worm herd). So mainly it's green waste, grass/leaves.
When living in Nor Cal I raised composting worms large scale. I harvested and sold the compost and made compost tea for sale, that I sold at farmers markets.
At the time I left Cal, I had 50 plus stack-able flow through bins.
These are the bins I built.
Here is the path if interested.
www.vermico.com/wp-content/uploads/OscrJr-explained.pdf
Follow the link.
This was somewhere between 25 an 40 lb per bin, so 1,250 plus lbs of worms in the bins. Was able to get veggie waste from a couple of grocery stores and restaurants. When I left I gave most all my bins to the boys and girl scouts clubs, met with them and gave them instructions on bin maintenance and feeding. I brought a couple hundred lbs of worms with me when moved back here. Lost them all the first yr due to a hard freeze. But have a small herd now that I feed green waste compost, and make compost tea for my garden, house plants, yard and indoor garden.Big fan of composting worms.
GR
gr865
Well-Known Member
I have ¼" air holes along the top edge just under the lid for oxygen and obv to let all the flies and beetles in. Blew said they like a lot of moisture but not enough for standing water.
I was thinking drain holes in the bottom of the bin?
- Thread starter
- #3,245
Thanks gr8! A few weeks back when I turned the bin I noticed some water at the bottom corner so I punched a few holes just above the bottom to drain it. Seems to have worked. I remember Blew saying not to use green waste (like grass clippings and the like) because it gets hot as it breaks down and the heat kills the worms. I've just been tossing in tea bags (many many tea bags), potato and carrot peels, and broccoli. We're not big veggie eaters in our house and so they don't get much to eat. I try to blend it all first so it doesn't have to compost before the red wigglers can actually eat it, but as you can see, not every time.I was thinking drain holes in the bottom of the bin?
I'll try to get my hands on some burlap...good idea! I've been using yellow sticky cards. I have to figure out what's castings and what's just the soil I tossed in (mixed with rotting garbage
) if I'm ever going to actually use this as top dressing.No more than 25% green or it will cook. And I was told I wanted water.... phuckkkk should I drain it?? I just need to peek at them. What should I do to bring the ph back up? I'll just peek and if all is well let them go. I grabbed a huge tote so I could add fresh trimmings and flip the order stuff on top.
- Thread starter
- #3,247
I drained mine because it was starting to smell like a sewer! Now it's okay. I think thoroughly moist is best, and I have never checked the pH on mine and never will. If I have to start messing with the pH in the bin I'm just going to chuck it!No more than 25% green or it will cook. And I was told I wanted water.... phuckkkk should I drain it?? I just need to peek at them. What should I do to bring the ph back up? I'll just peek and if all is well let them go. I grabbed a huge tote so I could add fresh trimmings and flip the order stuff on top.
Yeah I just use a lot of coffee grounds that's why I was wondering? I'm not too worried, but will still check it out
- Thread starter
- #3,249
Blew didn't mention pH so I'd ignore itYeah I just use a lot of coffee grounds that's why I was wondering? I'm not too worried, but will still check it out
 .
.gr865
Well-Known Member
The reason it smelled bad is it spoiled for being too wet.
It should be damp but not wet, never wet.
Blew is right, you can't put green waste in to the bins directly, it must be composted first and let the worms finish it to complete vermi-compost.
But the moisture is the thing!!!! Look at this pic again, the completed system is to the right. It has two bins and two lids, the bin (grow bin) at the left with the mass of holes in it sits inside the first bin (which has a drain hole on the bottom on one end). Shredded paper goes into the lower bin with the drain hole, the bin to the left fits into the lower bin and the two lids are made to keep light out and allow air in. The bin to the left gets the composting material,
Once the bin is finished it is removed, the vermi-compost if harvested and the whole thing starts again.
My harvester
5 gallon bucket with coco/paper and the worms harvest from another bin
Just a few minutes after they were put in the bucket
Bucket of harvested worms added to the damp coco/paper in the bin
New bin with shredded paper,some coco and worms
They are checking out there new home
They are settled in and ready to have the first layer of compost food added over the top.
As you add feedstock and the 1st bin fills up to a point that a second grow bin with some finished compost and paper is placed over the top of the 1st bin. Feed stock is added and the worms will move up into the second grow bin and the process starts over. After a week or so most worms have moved up to the top bin and you can remove the 1st bin for harvest and begin the process again.
When it gets near finish it should be dark, not black wet goo, it should break up easily, not clump together like a mud ball.
This is what the finished vermi-compost looks like with the worms in it.
You can see the how the worms glisten but the compost does not look wet, just damp, that should be your goal to prevent spoilage and sour or anaerobic .
Will look for more pics of my that set up in Nor Cal, it was cool, a lot of work but cool.
GR
- Thread starter
- #3,251
Thanks Gr8! Gr8 description and pics.The reason it smelled bad is it spoiled for being too wet.
It should be damp but not wet, never wet.
Blew is right, you can't put green waste in to the bins directly, it must be composted first and let the worms finish it to complete vermi-compost.
But the moisture is the thing!!!! Look at this pic again, the completed system is to the right. It has two bins and two lids, the bin (grow bin) at the left with the mass of holes in it sits inside the first bin (which has a drain hole on the bottom on one end). Shredded paper goes into the lower bin with the drain hole, the bin to the left fits into the lower bin and the two lids are made to keep light out and allow air in. The bin to the left gets the composting material,
Once the bin is finished it is removed, the vermi-compost if harvested and the whole thing starts again.
My harvester
5 gallon bucket with coco/paper and the worms harvest from another bin
Just a few minutes after they were put in the bucket
Bucket of harvested worms added to the damp coco/paper in the bin
New bin with shredded paper,some coco and worms
They are checking out there new home
They are settled in and ready to have the first layer of compost food added over the top.
As you add feedstock and the 1st bin fills up to a point that a second grow bin with some finished compost and paper is placed over the top of the 1st bin. Feed stock is added and the worms will move up into the second grow bin and the process starts over. After a week or so most worms have moved up to the top bin and you can remove the 1st bin for harvest and begin the process again.
When it gets near finish it should be dark, not black wet goo, it should break up easily, not clump together like a mud ball.
This is what the finished vermi-compost looks like with the worms in it.
You can see the how the worms glisten but the compost does not look wet, just damp, that should be your goal to prevent spoilage and sour or anaerobic .
Will look for more pics of my that set up in Nor Cal, it was cool, a lot of work but cool.
GR
 How do I know when the bin is ready to be harvested? It's still full of half and uncomposted food scraps. Can I just dump the contents on a screen, shake, and whatever falls through is going to be at least better than what went in to begin with?
 I can only work with what I have now, which is a bin full of all sorts of things that need to be sorted
") .
.If Shed doesn’t mind, can I put a call out for recommendations for a good tent?
I’m needing about 2x2’ and 5-6’ tall.
Any recommendations? Advice? Things to avoid? PM me if you don’t want to post it on the boards.


I’m needing about 2x2’ and 5-6’ tall.
Any recommendations? Advice? Things to avoid? PM me if you don’t want to post it on the boards.
wow ... thats out of my league... .no way i can convince my commander-in-chief of letting me try that lol ...
gr865
Well-Known Member
Don't turn the bin, composting worms work in the top 12 or so inches of the bin. You may have too much waste in your container.
When you think your ready to harvest you can screen or just dump it into a pile. Worms want to stay out of the light so they burrow down, so scoop some of your finish compost and start scraping the compost off the pile and when you finish that pile the worm will be in a ball at the bottom of the pile. Put them in a container with some of the compost and start harvesting the next pile.
When you harvest you will run across much unfinished compost, separate it and add it back into the new bin.
Once you see finished vermi-compost you will know it is finished, if not to wet when screened most will fall through the screen. Each little worm turd contain microbes and broken down fertilize that is readily available to the plant.
- Thread starter
- #3,255
Ooh, jump into newty's thread...she just posted the same question this morning!If Shed doesn’t mind, can I put a call out for recommendations for a good tent?
I’m needing about 2x2’ and 5-6’ tall.
Any recommendations? Advice? Things to avoid? PM me if you don’t want to post it on the boards.
- Thread starter
- #3,256
Too much waste? I hardly add anything to the bin. I may have too much uncomposted waste, but I have no place to compost so all I can do is blend. If the worms are in the top 12", is what's underneath worm poop? I haven't really turned it too far down.Don't turn the bin, composting worms work in the top 12 or so inches of the bin. You may have too much waste in your container.
When you think your ready to harvest you can screen or just dump it into a pile. Worms want to stay out of the light so they burrow down, so scoop some of your finish compost and start scraping the compost off the pile and when you finish that pile the worm will be in a ball at the bottom of the pile. Put them in a container with some of the compost and start harvesting the next pile.
When you harvest you will run across much unfinished compost, separate it and add it back into the new bin.
Once you see finished vermi-compost you will know it is finished, if not to wet when screened most will fall through the screen. Each little worm turd contain microbes and broken down fertilize that is readily available to the plant.
Is that ¼" mesh on your screen?
Thanks for your help Gr8!
LaquerHead
Well-Known Member
@Amy Gardner. The mars hydro 27"x27" is pretty good quality...I just bought one for my veg area! I have zero light leaks and everything seems "tough". Only thing is, it has a 4" exhaust hole, which makes finding a fan a little more work....it seems there's higher quality in the 6" fans!
gr865
Well-Known Member
Yes, it is 1/4".Too much waste? I hardly add anything to the bin. I may have too much uncomposted waste, but I have no place to compost so all I can do is blend. If the worms are in the top 12", is what's underneath worm poop? I haven't really turned it too far down.
Is that ¼" mesh on your screen?
Thanks for your help Gr8!
If you build a cheap screen, you can screen what you have then add back the unfinished stuff.
The bottom of the bin should be vermi-compost, unless it is spoiled. I think you need some drainage holes in the bottom of you bin.
- Thread starter
- #3,259
I did punch some holes in the bottom corner where the water was (it's on a slight downhill) and the water was gone when I dug down there this weekend, so I think that problem is solved. The only time it gets liquid now is when I add blended veggies. Can't blend without liquid! Looks like I'll be building a screen on a frame soonYes, it is 1/4".
If you build a cheap screen, you can screen what you have then add back the unfinished stuff.
The bottom of the bin should be vermi-compost, unless it is spoiled. I think you need some drainage holes in the bottom of you bin.
.- Thread starter
- #3,260
Tuesday quickie update!
I watered the AK clone with 6ml cal/mag+ and 2 tsp Grow Big, and Sour G was really droopy so I gave it 3ml cal/mag+ and 2 tsp Grow Big. Brooklyn Sunrise Autos are alive with very little growth on days 9 and 11.
Here is the Auto Masszar on day 78:
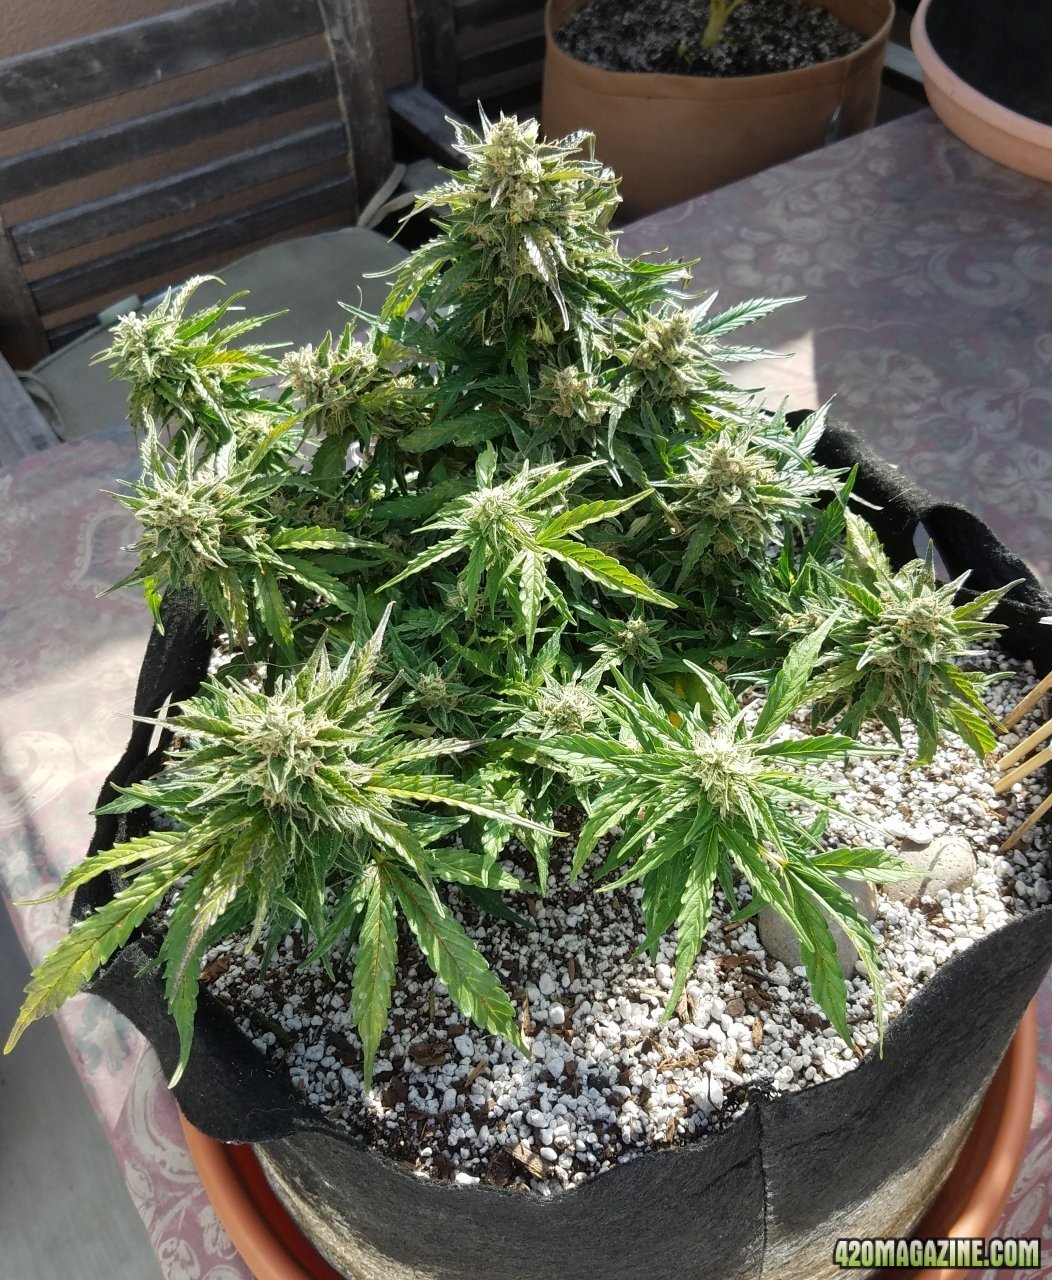
And the bud at bottom left:
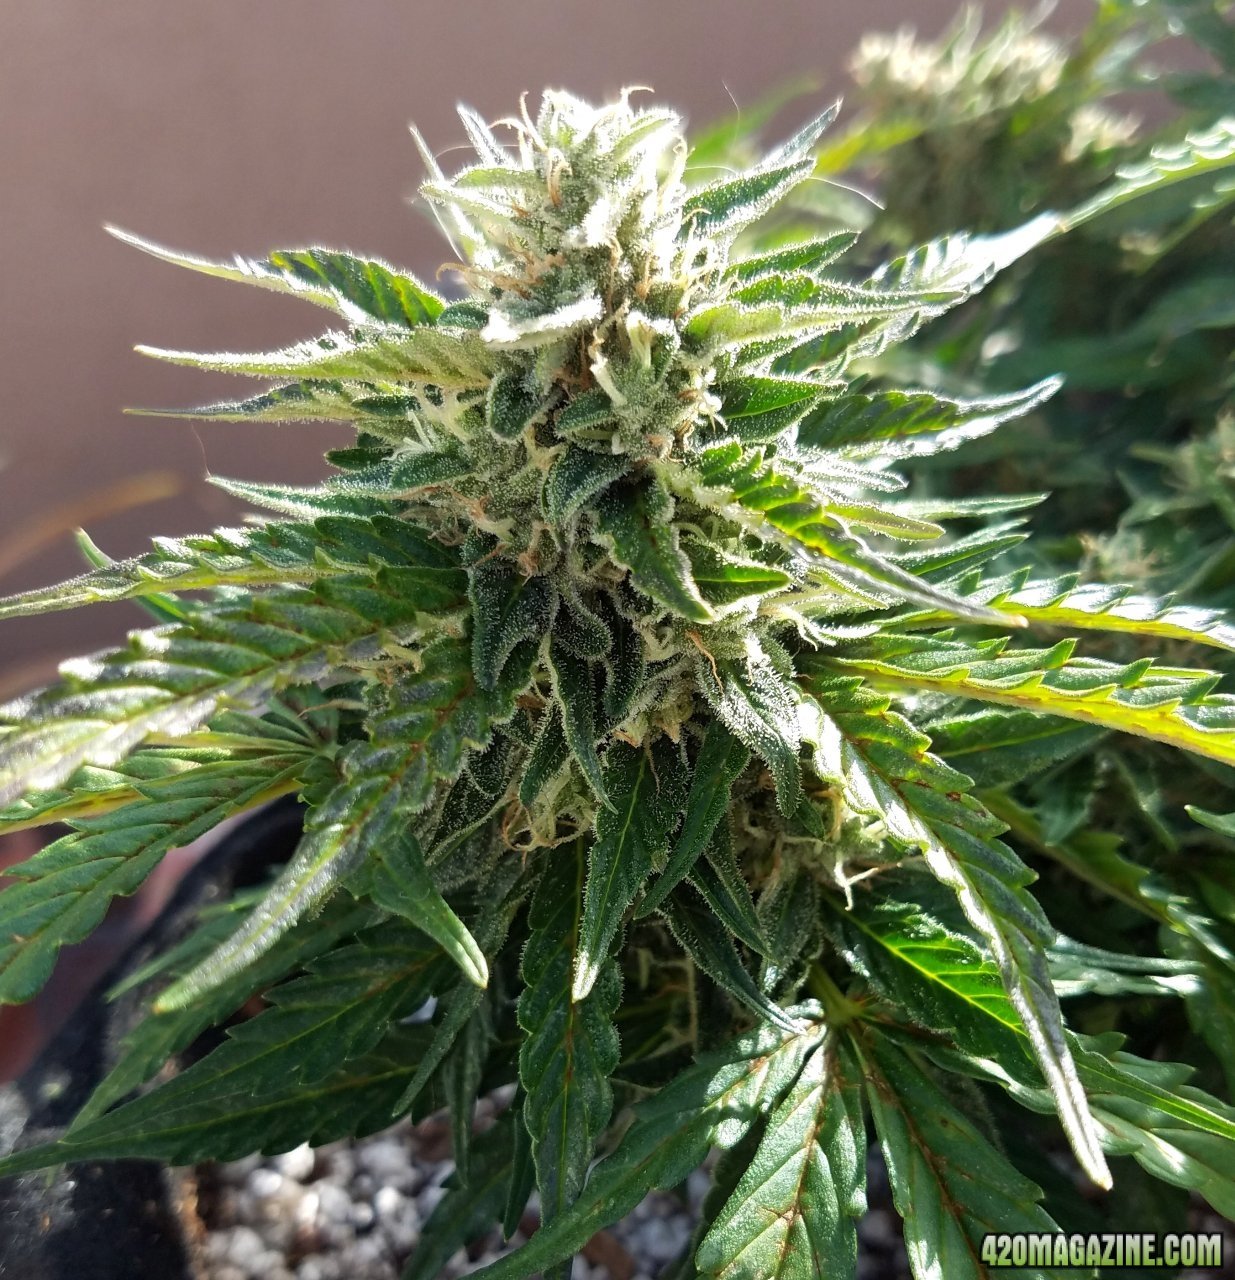
The leaves are getting really crunchy on the bigger buds so I'll be taking all of those off this weekend and leaving the healthier looking ones to ripen further.
AK was a constant 62% in the jars for the last 12 hours so they've been sealed for the cure. Three weeks before the first test comes so I'll let you know!
Have a great day all!
I watered the AK clone with 6ml cal/mag+ and 2 tsp Grow Big, and Sour G was really droopy so I gave it 3ml cal/mag+ and 2 tsp Grow Big. Brooklyn Sunrise Autos are alive with very little growth on days 9 and 11.
Here is the Auto Masszar on day 78:
And the bud at bottom left:
The leaves are getting really crunchy on the bigger buds so I'll be taking all of those off this weekend and leaving the healthier looking ones to ripen further.
AK was a constant 62% in the jars for the last 12 hours so they've been sealed for the cure. Three weeks before the first test comes so I'll let you know!
Have a great day all!
Similar threads
- Replies
- 1K
- Views
- 88K
- Replies
- 139
- Views
- 6K
- Replies
- 26
- Views
- 2K
- Replies
- 40
- Views
- 4K