

jojo677
Well-Known Member
Hey all!
I had a few requests for a tutorial for my Scrog bucket attachment, so I thought I'd throw something together. Instead of just covering my build, though, I'll list improvements and what would suit different growing styles/mediums. I'll start with the basics though.
Scrog = Screen of Green
The purpose of a Scrog is to provide a structure to make it easy to maximize the amount of bud that gets light from your light source. When a plant is grown without any training, it grows like a Christmas tree, and the lower branches do not get as much light as the top parts, especially in indoor grows. A Scrog allows the grower to keep all of the buds at the same level, to make sure they get the same amount of light.
There are lots of tutorials of how to do it, so I'll just tell you how I made mine, and what I'd do differently.
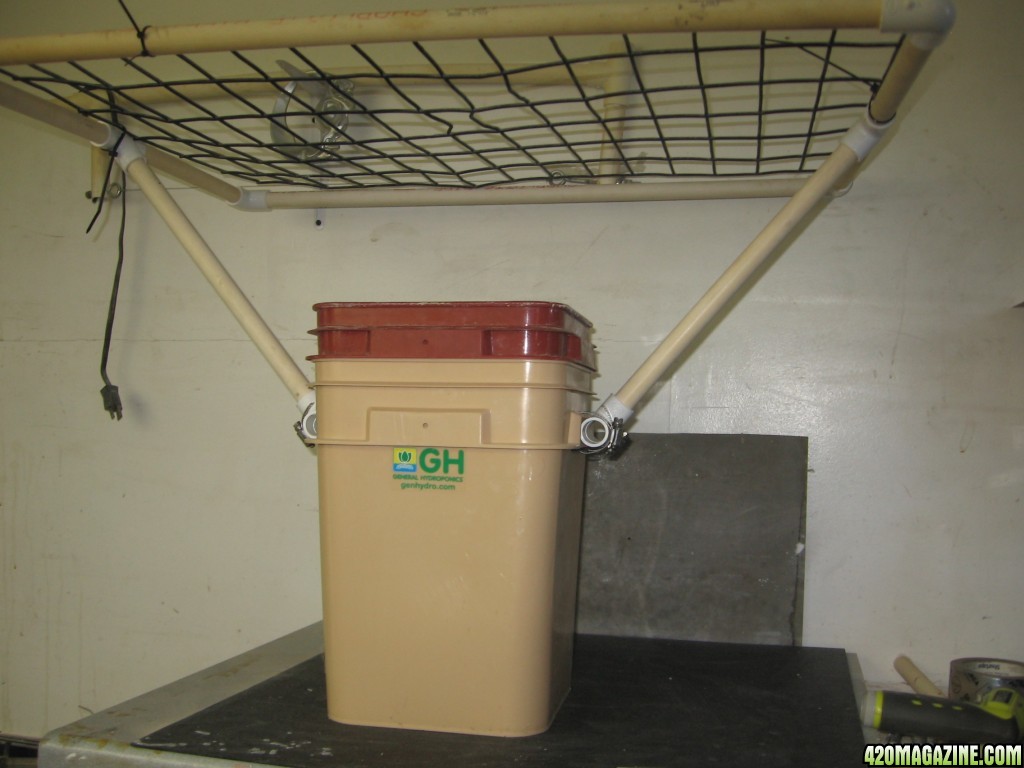
I planned on doing DWC but changed my mind to hempy after realizing I'd have heat issues. So the frame is somewhat designed around that. The frame is attached to the bucket lid so that in DWC, I could lift everything off and just change 5gal buckets for adjustments and water changes. The air stone would also come out with it.
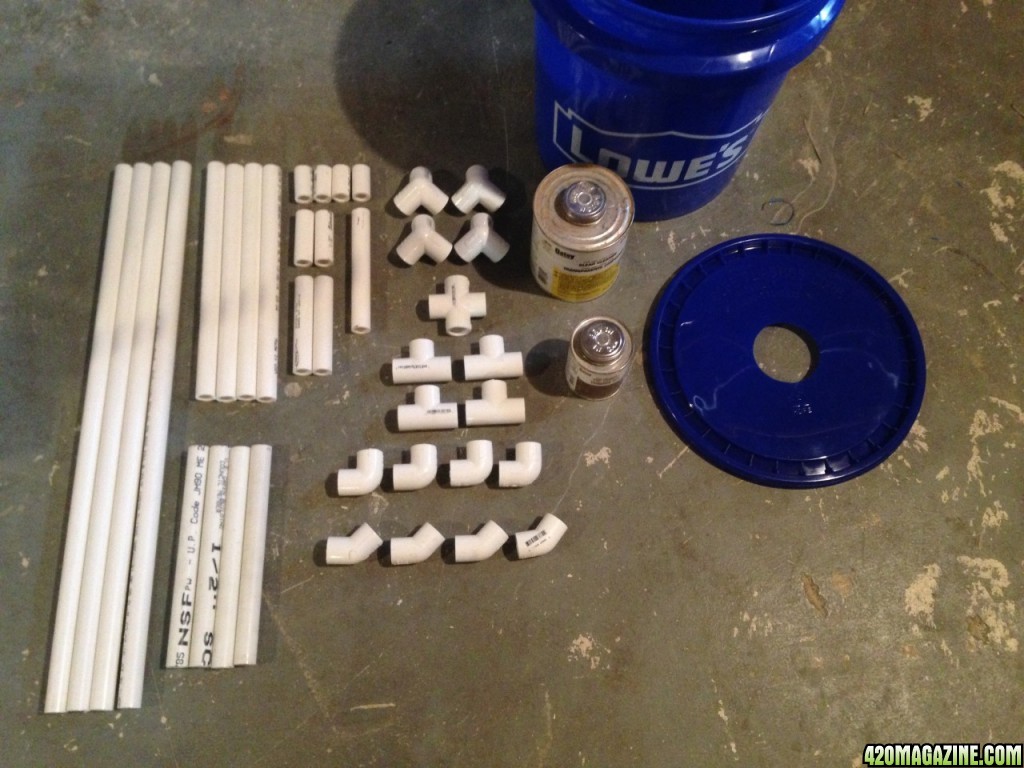
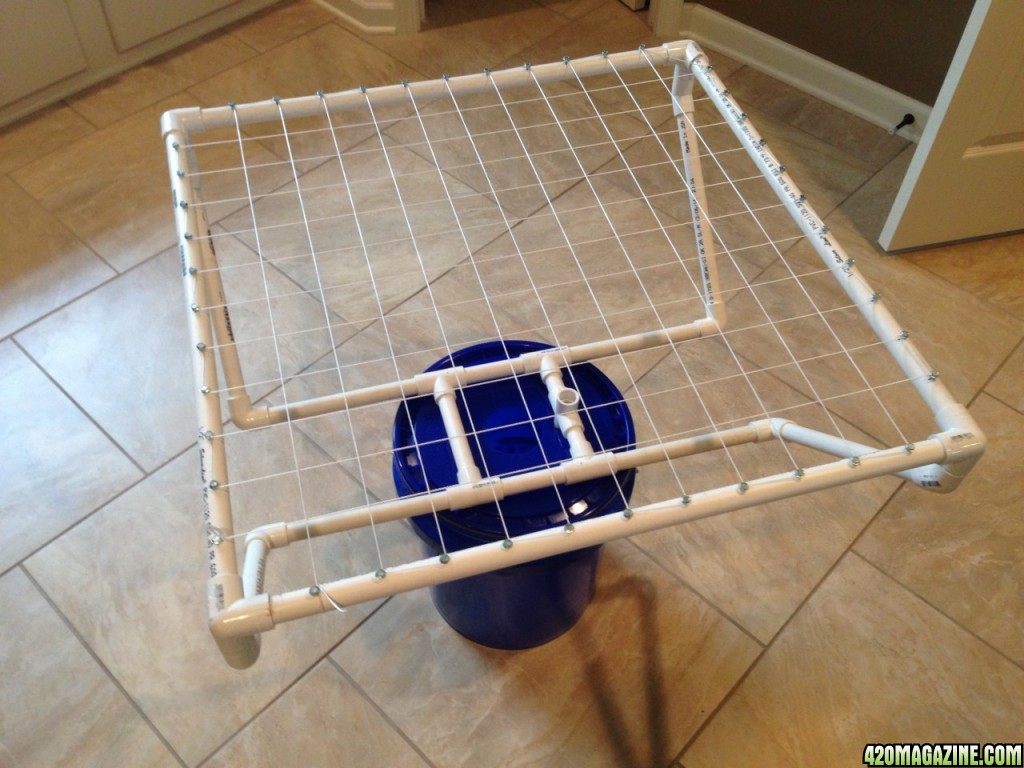
First are all the pieces. My screen is 24" x 24" inside, made out of 3/4" PVC pipe and fittings. All I needed was a saw and a drill with a few drill bits, etc. I think I used about 2 sticks of 10' PVC, but I'm not completely sure. I can detail it out if anyone needs me to. I also designed mine to be 12" above the bucket lid.
Dimensions and everything needed are listed below:
--------------------------------------------------
Pipe Lengths:
I used 1/2" PVC for this build. It is the smallest size available (that I know of) and is more than strong enough. You should need more than 2X 10' sticks to complete this project.
Qty.--Length----Desc
4-----24"-------Top pieces
4-----1.5"------Stubs for top
4-----11.5"-----Angled arms
4-----8.75"-----Horizontal arms
2-----2.25"-----X swivel pipes (plug these)
2-----4.5"------Sides of base piece
1-----5.75"-----Opposite swivel pipes
Hardware/Fittings:
These are all 1/2" fittings and the misc. stuff.
Qty.--Desc
4-----3-way elbows (90x90x90) for top corners
4-----45° elbows for angling toward the bucket
4-----90° elbows for going to bucket
4-----Tees for the base construction
1-----(Optional) Cross fitting
44----1/2" #6 Screws (self tapping are best)
4-----3/16"ish Screws + matching washers
1-----String/wire/etc.
Tools Needed:
-Saw (I used a oscillating saw, but a hand saw, band saw, etc would work)
-A Drill Bit (appropriately under your stainless screws size so the PVC doesn't crack)
-A Drill
-PVC Primer & Cement (optional, not necessary)
--------------------------------------------------
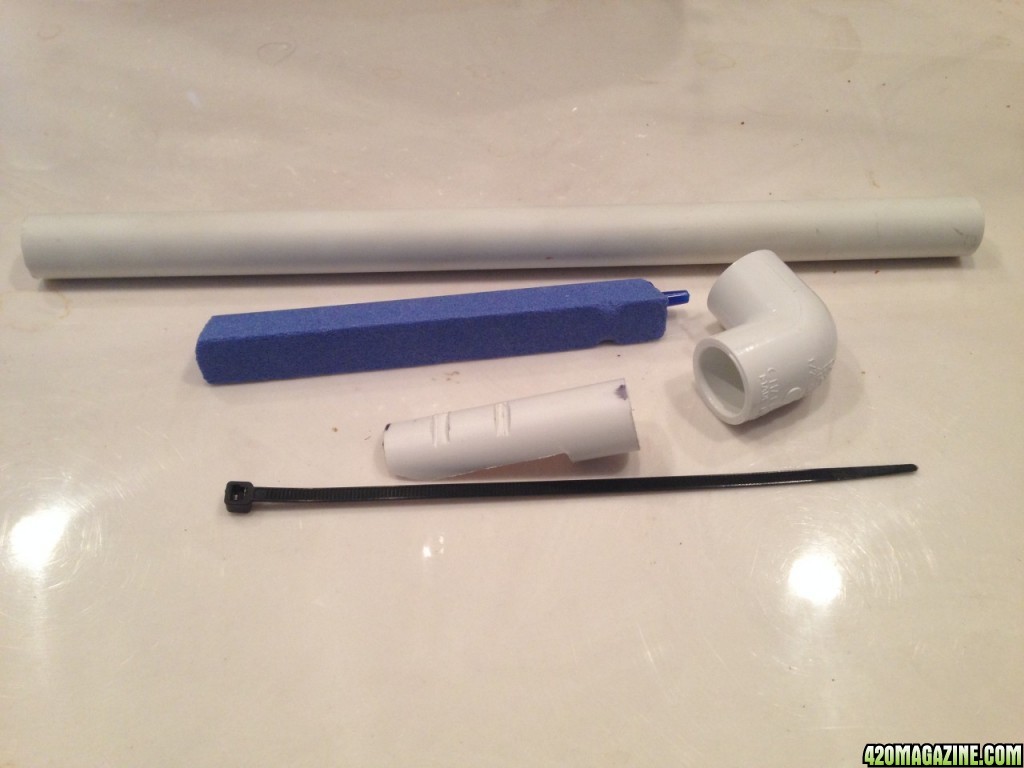
Now for the pictures and assembly!
I glued the "sub-assemblies" together, but the glue is completely unnecessary. I'll point out some better methods later.

Then I took the top frame marked 2" centers all the way around and then drove in self-tapping screws (#6 x 1/2" long) all the way around. This is what the string will wrap around.
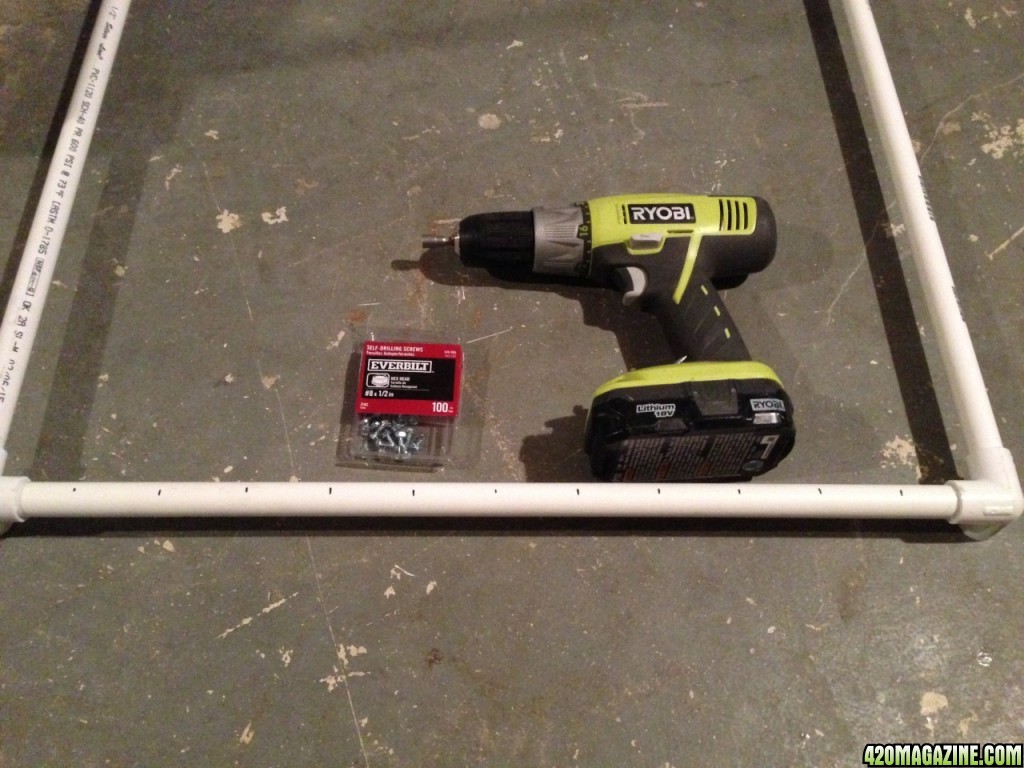
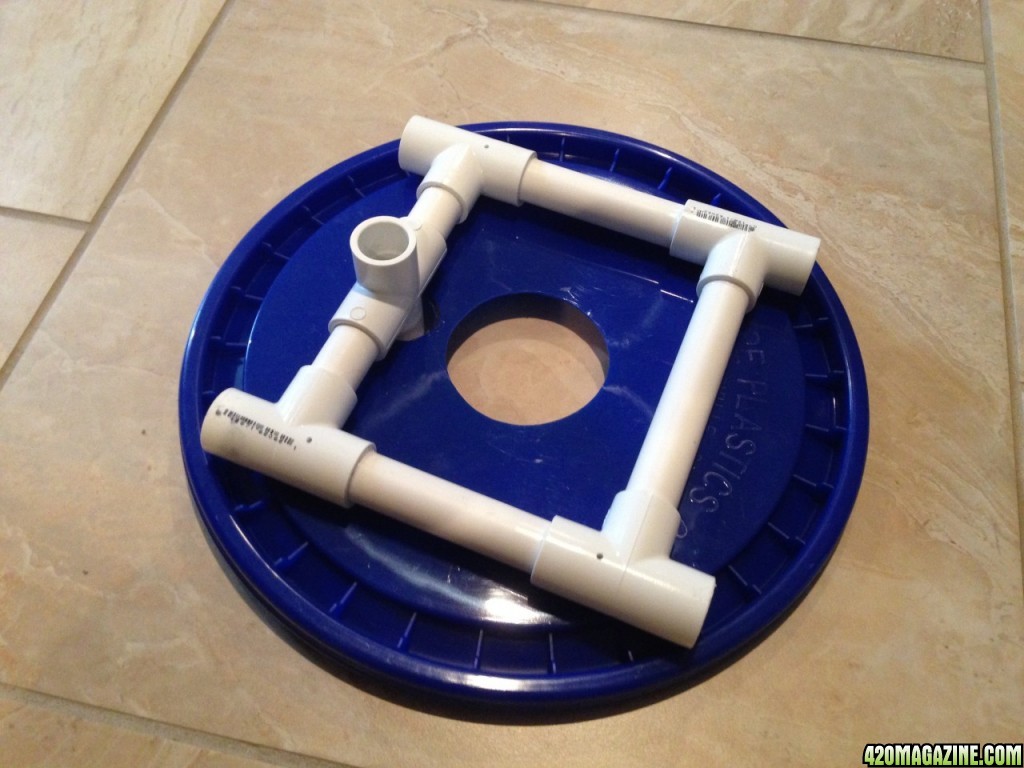
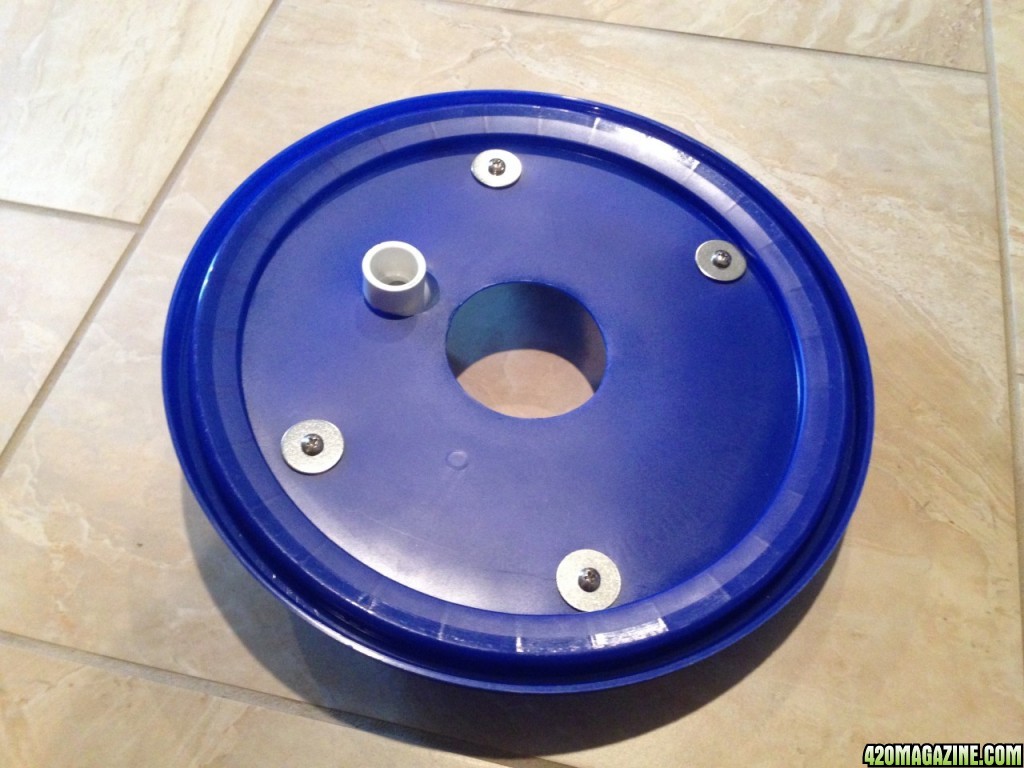
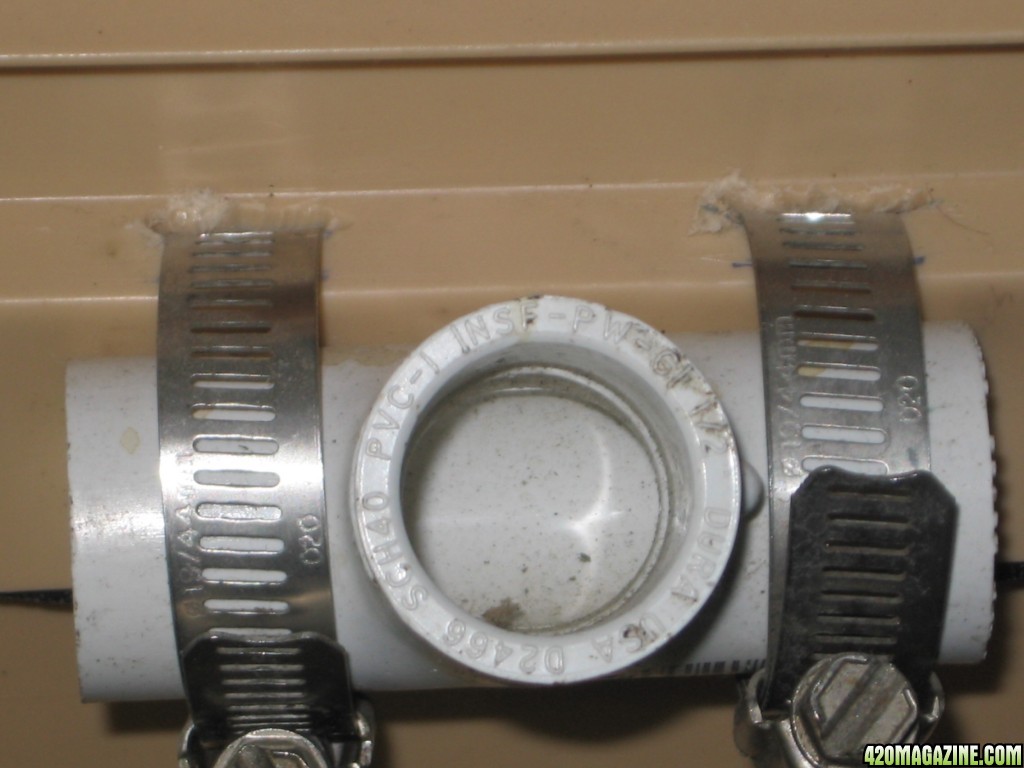
Next up is screwing the base to the bucket lid. Cut out a hole in the lid for the stem of your plant, and use *stainless steel* screws and washers to attach the two. Make sure you drill holes in the PVC fittings first, otherwise they'll crack.
Put it all together!
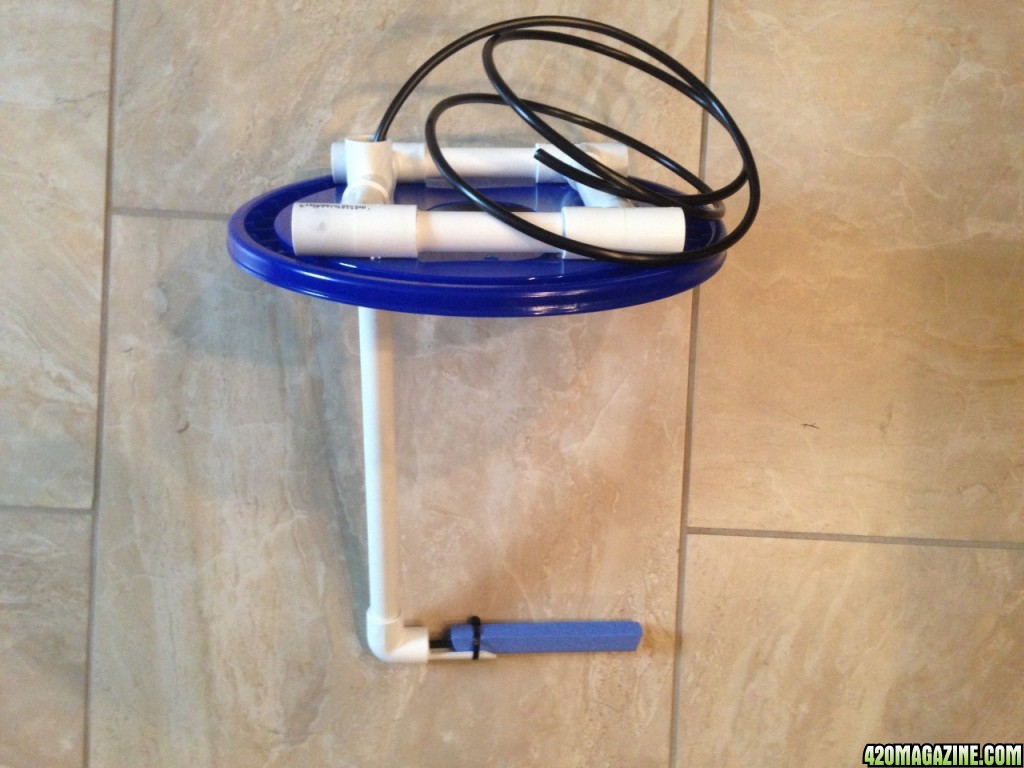
Break it down!

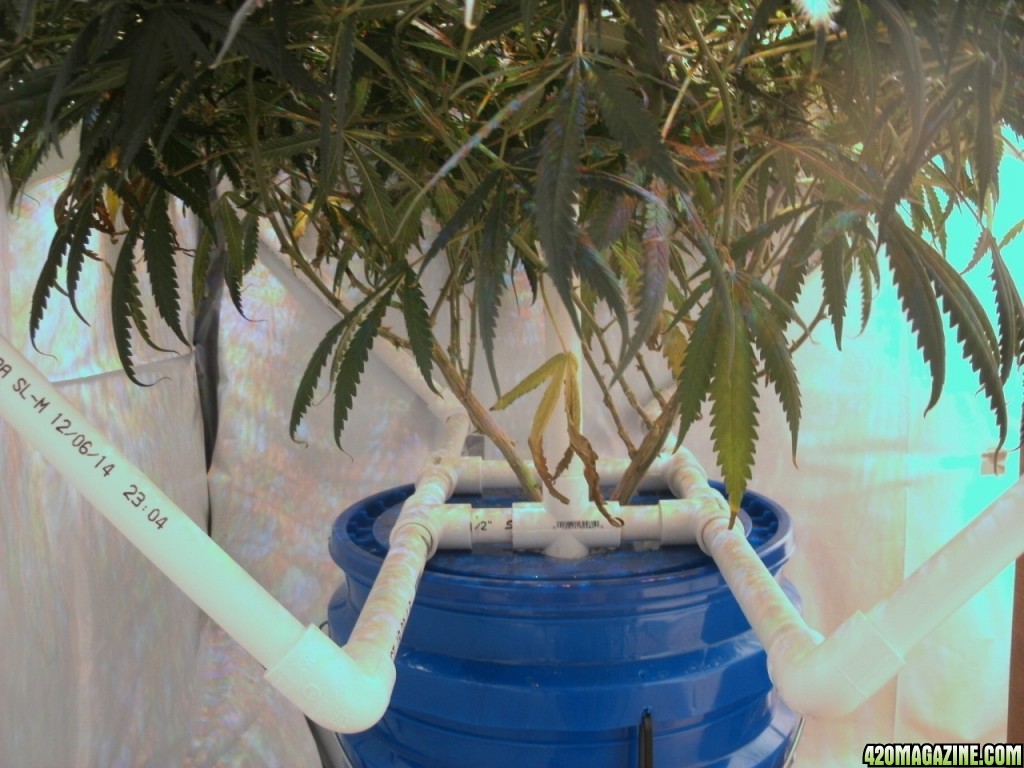
And now is why I went the way I did with my lid design. To hold all the DWC stuff to keep everything contained and allow you to lift the plant/setup out of the reservoir. I didn't end up using these additional parts for my Hempy setup since it is drain-to-waste, but I thought I'd share in case it inspires someone!
The up side to building my attachment method is the access for watering. I plugged the PVC pipes that plugged into the "X" fitting, so I could pour water in from the top, and it would all go into the bucket.
----------------------------------------------------------------------
That ends my part of the tutorial.
Now I'll use some images from growers that don't know I'm using them...
I'll just make a few recommendations:
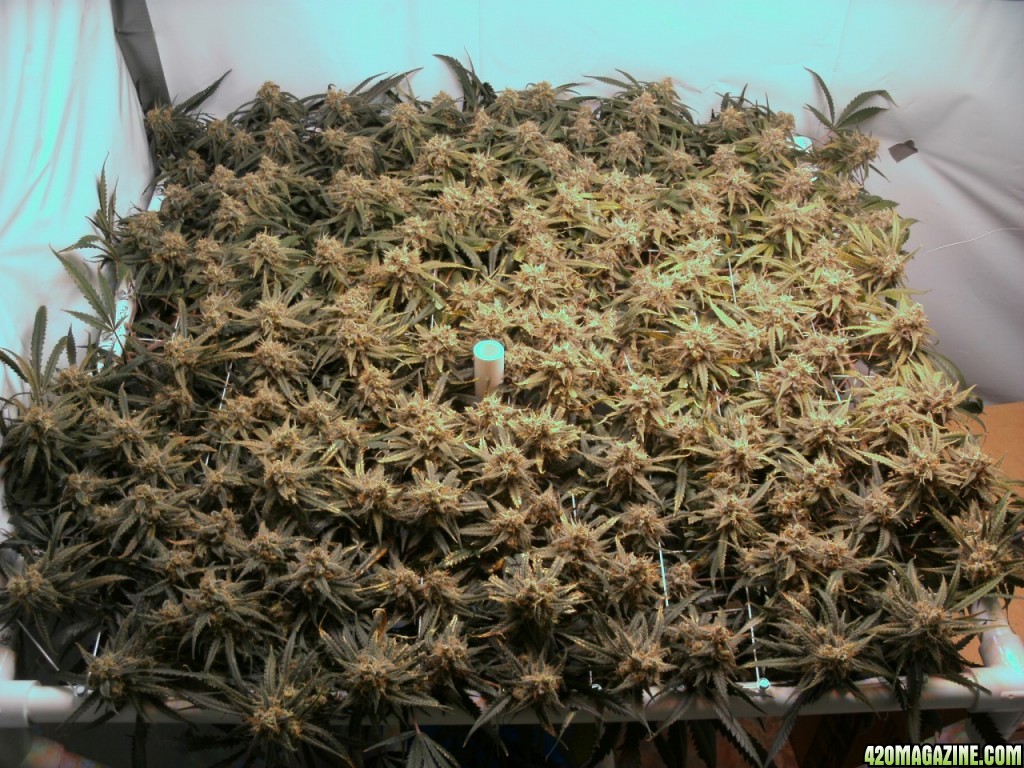
1. Make your Scrog appropriately sized and accessible. If you have a 4' x 4' Scrog covering 6 plants, you might not be able to maneuver around it very well and access all the plants. This may work if you have access to all sides though.
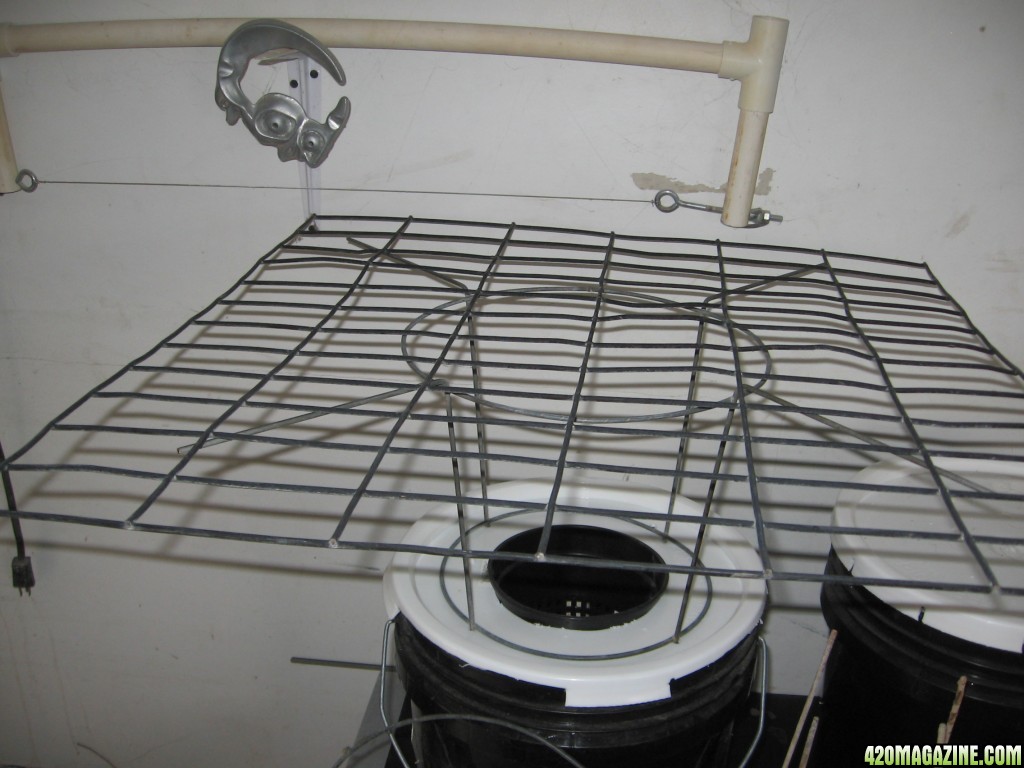
2. Use something semi-rigid for the mesh. I used nylon string, and it stretches too much. Maybe try wire or twine? Many use chicken wire, concrete wire mesh, wire shelving, etc. Some have luck with small mesh, some go up to 4" squares. 2" seems to be the most common.
3. It doesn't have to hold much. I over-designed mine, and it would stand up to someone kicking it across the room. It is only going to be holding a few pounds of weight... If you're lucky!
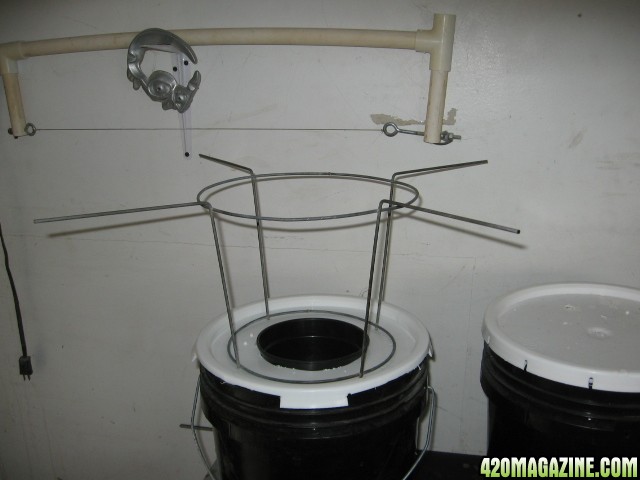
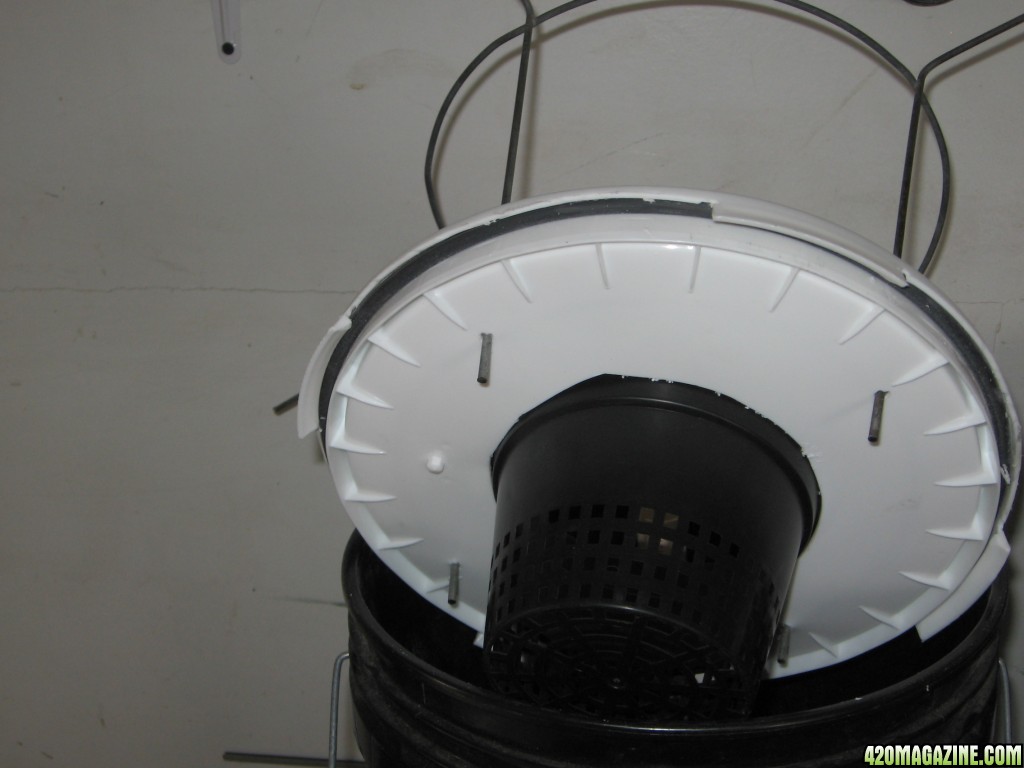
First up, Dr. Fish has the setup I wish I had made, just for the simplicity. I didn't see it until mine was complete, but I'd still probably use mine if I was doing DWC. Just attach T's and adjust your height by changing the 2 rod lengths.
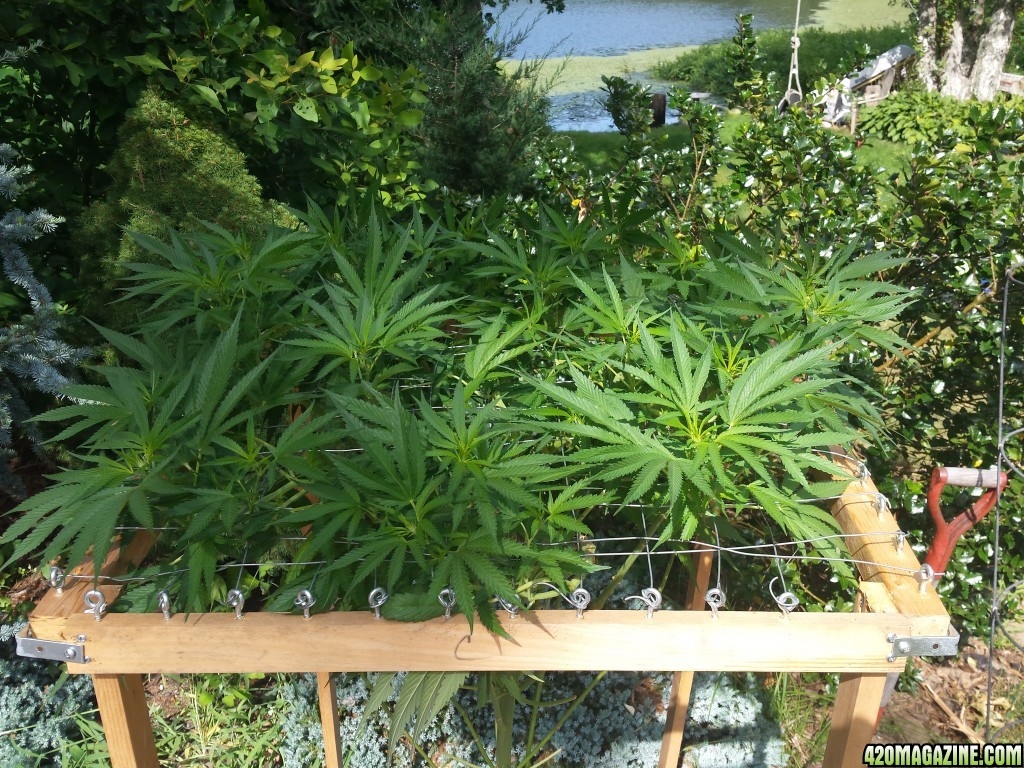
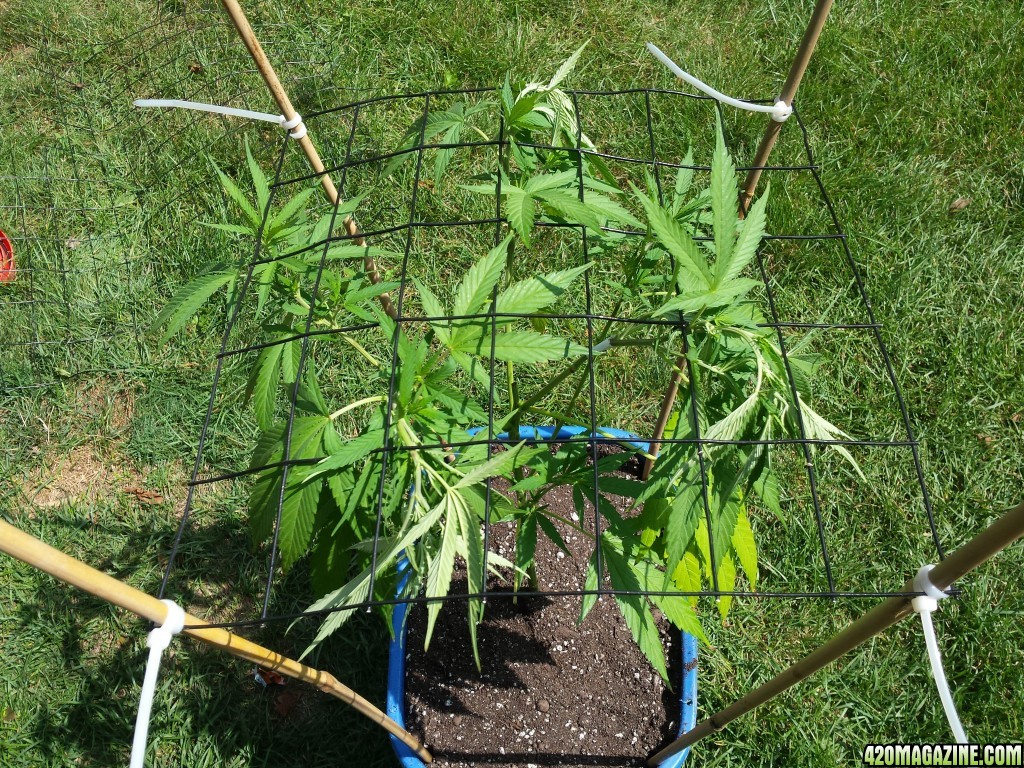
I've also seen plenty of resourceful growers who make their Scrogs from whatever they have laying around. The best advice I have is to make it modular, in the case that you can move your plants around to begin with. This allows you to rotate/work on one plant at a time. Here are a few setups from MassMedMan.
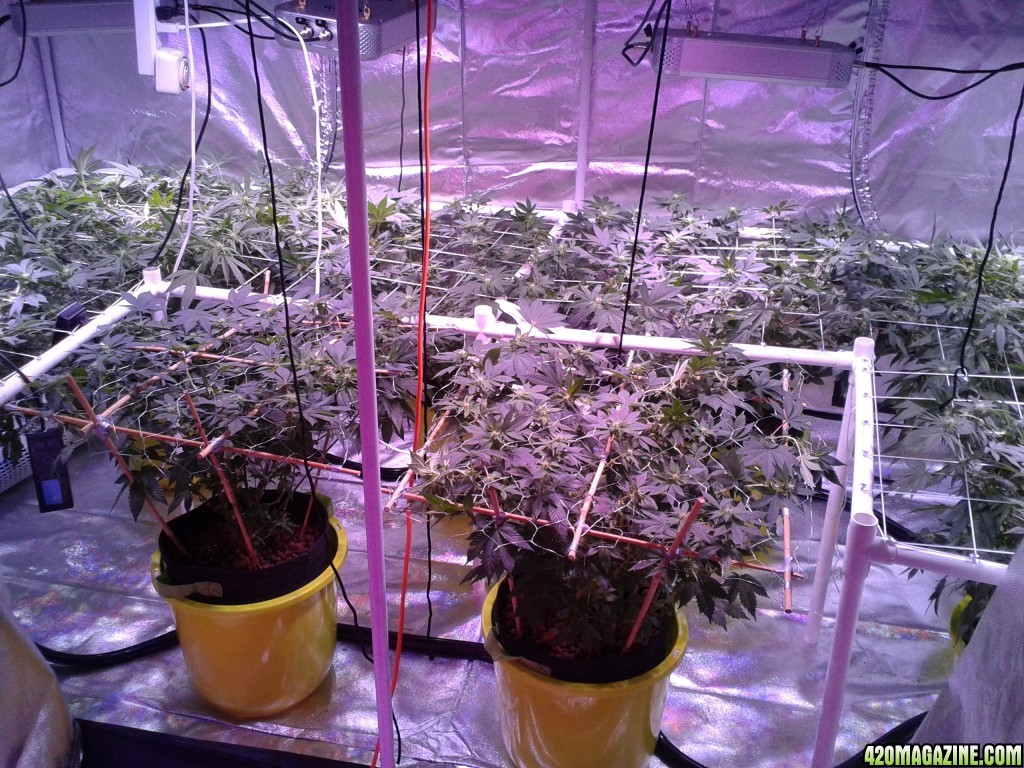
wizgrow also has a very nice setup. Only 2 of his plants move, but that allows him to get to everything else to keep the Scrog under control!
If you have any ideas or improvements, feel free to share them!
Sources:
MassMedMan's Monster SCROG - CBD OG in a Greenhouse
Waterfarm recirculating reservoir and scrog screen add on
I had a few requests for a tutorial for my Scrog bucket attachment, so I thought I'd throw something together. Instead of just covering my build, though, I'll list improvements and what would suit different growing styles/mediums. I'll start with the basics though.
Scrog = Screen of Green
The purpose of a Scrog is to provide a structure to make it easy to maximize the amount of bud that gets light from your light source. When a plant is grown without any training, it grows like a Christmas tree, and the lower branches do not get as much light as the top parts, especially in indoor grows. A Scrog allows the grower to keep all of the buds at the same level, to make sure they get the same amount of light.
There are lots of tutorials of how to do it, so I'll just tell you how I made mine, and what I'd do differently.
I planned on doing DWC but changed my mind to hempy after realizing I'd have heat issues. So the frame is somewhat designed around that. The frame is attached to the bucket lid so that in DWC, I could lift everything off and just change 5gal buckets for adjustments and water changes. The air stone would also come out with it.
First are all the pieces. My screen is 24" x 24" inside, made out of 3/4" PVC pipe and fittings. All I needed was a saw and a drill with a few drill bits, etc. I think I used about 2 sticks of 10' PVC, but I'm not completely sure. I can detail it out if anyone needs me to. I also designed mine to be 12" above the bucket lid.
Dimensions and everything needed are listed below:
--------------------------------------------------
Pipe Lengths:
I used 1/2" PVC for this build. It is the smallest size available (that I know of) and is more than strong enough. You should need more than 2X 10' sticks to complete this project.
Qty.--Length----Desc
4-----24"-------Top pieces
4-----1.5"------Stubs for top
4-----11.5"-----Angled arms
4-----8.75"-----Horizontal arms
2-----2.25"-----X swivel pipes (plug these)
2-----4.5"------Sides of base piece
1-----5.75"-----Opposite swivel pipes
Hardware/Fittings:
These are all 1/2" fittings and the misc. stuff.
Qty.--Desc
4-----3-way elbows (90x90x90) for top corners
4-----45° elbows for angling toward the bucket
4-----90° elbows for going to bucket
4-----Tees for the base construction
1-----(Optional) Cross fitting
44----1/2" #6 Screws (self tapping are best)
4-----3/16"ish Screws + matching washers
1-----String/wire/etc.
Tools Needed:
-Saw (I used a oscillating saw, but a hand saw, band saw, etc would work)
-A Drill Bit (appropriately under your stainless screws size so the PVC doesn't crack)
-A Drill
-PVC Primer & Cement (optional, not necessary)
--------------------------------------------------
Now for the pictures and assembly!
I glued the "sub-assemblies" together, but the glue is completely unnecessary. I'll point out some better methods later.
Then I took the top frame marked 2" centers all the way around and then drove in self-tapping screws (#6 x 1/2" long) all the way around. This is what the string will wrap around.
Next up is screwing the base to the bucket lid. Cut out a hole in the lid for the stem of your plant, and use *stainless steel* screws and washers to attach the two. Make sure you drill holes in the PVC fittings first, otherwise they'll crack.
Put it all together!
Break it down!
And now is why I went the way I did with my lid design. To hold all the DWC stuff to keep everything contained and allow you to lift the plant/setup out of the reservoir. I didn't end up using these additional parts for my Hempy setup since it is drain-to-waste, but I thought I'd share in case it inspires someone!
The up side to building my attachment method is the access for watering. I plugged the PVC pipes that plugged into the "X" fitting, so I could pour water in from the top, and it would all go into the bucket.
----------------------------------------------------------------------
That ends my part of the tutorial.
Now I'll use some images from growers that don't know I'm using them...
I'll just make a few recommendations:
1. Make your Scrog appropriately sized and accessible. If you have a 4' x 4' Scrog covering 6 plants, you might not be able to maneuver around it very well and access all the plants. This may work if you have access to all sides though.
2. Use something semi-rigid for the mesh. I used nylon string, and it stretches too much. Maybe try wire or twine? Many use chicken wire, concrete wire mesh, wire shelving, etc. Some have luck with small mesh, some go up to 4" squares. 2" seems to be the most common.
3. It doesn't have to hold much. I over-designed mine, and it would stand up to someone kicking it across the room. It is only going to be holding a few pounds of weight... If you're lucky!
First up, Dr. Fish has the setup I wish I had made, just for the simplicity. I didn't see it until mine was complete, but I'd still probably use mine if I was doing DWC. Just attach T's and adjust your height by changing the 2 rod lengths.
I've also seen plenty of resourceful growers who make their Scrogs from whatever they have laying around. The best advice I have is to make it modular, in the case that you can move your plants around to begin with. This allows you to rotate/work on one plant at a time. Here are a few setups from MassMedMan.
wizgrow also has a very nice setup. Only 2 of his plants move, but that allows him to get to everything else to keep the Scrog under control!
If you have any ideas or improvements, feel free to share them!
Sources:
MassMedMan's Monster SCROG - CBD OG in a Greenhouse
Waterfarm recirculating reservoir and scrog screen add on
")
