MVortex's Perpetual Thread For A 4x4 Tent & RDWC

Sorry, but for now I'm sticking with MegaCrop. I have more than enough for a years worth of grows, and I like it.

When I said calmag, I didn't mean because of a cal or mag deficiency. Far from it.

See, you have to watch your N->K ratio really close. Anything greater than like 1:3 and you can lock out your plants in a big way. If you check the silica supplement, you'll most likely see that it's something like a 0-0-2 ratio, maybe 0-0-1 if you're lucky. Either way, with a 1-0-0 dose of calmag in addition to the silica, you're keeping that 1:3 ratio in check, thus preventing your plant from locking out because of an N->K imbalance.


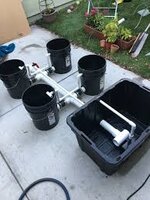
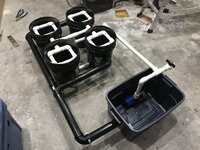
The return line is just that, a return. It's all gravity and fluid dynamics. No pump.

Now the supply side, yes, obviously there is a pump involved that will supply up to 100gph per bucket. I will most likely tweak it down a bit through a feedback loop to get it somewhere in the 50gph-75gph range. The supply lines to the buckets will have a waterfall effect, yes. Also each bucket will get an airstone, as well as 2 disks in the res just for good measure.

What I would have liked as well would have been a venturi option on my pump, but couldn't find one that worked for what I'm doing. Most of those were on the higher gph models, or were on submersible pumps.

If I were running a chiller, I'd have used a submersible pump and been done with it.

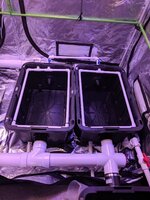
As far as filters go, I have an intake filter for the pump which is just a mechanical prefilter that should catch the majority of things. At least anything that could hurt it. I also have a mechanical filter on the return in the res, to catch anything there as well.

I'm even putting some baffles in the res to keep from having a direct path from the return to the supply, which will keep the res mixing through the process. I found some nifty silicone mats that work just right for that, so that will be good. Kind of a side to side and around the bend type of flow. No resistance to it, so no worries on that.

What I'd like to really do is have my pump intake on the bottom of the res instead of at the bottom on the side. However I'm not really comfortable with doing that, mainly because if I need to sit the res on something other than it's little riser. I may put a slight tip on it though, and raise the end opposite the return an inch, which would allow for better drainage when dumping the system out.

I also have a small battery powered stick pump to get water out of buckets that's left over when fully draining. after a run. I'll have to flush with some additional pure water when changing out nutrients, but that isn't a big thing. I can use the top off for that.
 
20190512_154944.jpgdownload.jpegthese are those aquarium fans for the chiller..However I may go with a/c axial fan but will c...IMG_20190815_203405.jpgIMG_20190815_203335.jpg15640343777654024895590910142572.jpg15640341175054894084382613826664.jpg
IMG_20190715_211220.jpgthis is from bloom just showing how I attached my return pump and used a union which is a great place for it it's threaded and slip on the other end..
So on my drain kits on the inside totes I use elbows for a pickup which is how I can drain everything so well..And like you know with the 27gal totes they bow up in the middle when empty which helps drain. It better
 
N-k ratios that's what hydrobuddy is for it does wonders...And I'm well aware about your calmag I was just giving a example of why I don't waste my time on it neither should you give you more problems than do good...Just get cal nit and epsom salt and done deal....
And for most rdwc setups the return line is ran on a pump which it is what gives the negative current in the system...
My mag drive eco plus the 750gph came with a venturi valve however I did not use it as it's for hose and I use ,PVC and no use for it...
However they make ones for 3/4 and bigger I think I even seen a 2in before and the 3/4 and 1" are cheap like $4-5 only which I have them for my add back kit for both setups its hooked up after my spin filter in the control bucket turn the ball valve put the hose in the nute mix and slowly mixes into the system and no plant shock...

So that pump will it suck it all out dry actually or would a shop vac be a better option for you instead of your stick pump? As maybe I'm wrong but I can't see it sucking all the water out of the system ...I have a dedicated inline pump for both my systems and then I just have a quick connect for the hose to attach to the pump push a button on the remote and the system drains...
IMG_20191007_135715.jpg
 
Sometimes you just have to make your own time, and that is exactly what I'm going to do with my afternoon. I'm going to tidy a few things up, then fake it and phone it in for the afternoon so I can get a couple hour jump on some more plumbing! Plus I have some seedlings to tend to as well. :D


So that pump will it suck it all out dry actually or would a shop vac be a better option for you instead of your stick pump? As maybe I'm wrong but I can't see it sucking all the water out of the system ...I have a dedicated inline pump for both my systems and then I just have a quick connect for the hose to attach to the pump push a button on the remote and the system drains...


No, the little stick pump is for the remnants that don't get removed when I open my drain valve and run all the water out. After that, there is still going to be a little bit of water in the bottom of the buckets, and res too. So this little stick vacuum pump thing will suck up that little bit that is left over. A shop vac would work too.
 
Made some progress on the supply lines, both main and isolation. With having the return lines on a different side than originally planned (they're on the back side of the bucket, instead of the right/left towards the middle) it has twisted around everything else and I've had to adapt and overcome.

That extended to the isolation return, and has now extended to the supply lines as well. Now the supply inputs are on the front side (6 o'clock position if looking at them) instead of the outside at 9 (left) or 3 (right). This means a change of plan, but I got it sorted without having to cross lines. It's a tick tough to explain and give a good visual, but I'll get some pics once it's fully hooked up and it will make sense.

The input to a bucket is a tee. That tee has a valve on the left and right, and pipe going straight down into the bucket. On the left side buckets, the isolation valves are on the left, main on the right. On the right side buckets, the main are on the right, isolation on the left. (Of the tee.)

So the way the lines will run, so they don't have to cross, will be that the isolation comes into the tent, and turns towards the back. It then makes its way around the tent clockwise to hit the isolation valves which are all towards the outside edge. The main supply comes in and keeps going towards the right side. It hits a tee to supply the left side buckets, then on into a 90 to supply the right side buckets. With the main supply valves being on the inside, this part is like a U with a tail on the left, if that makes sense.

Thinking ahead, I have 2 different kinds of 3/4" valves. Blue handle, and black handle. Black handle for the isolation lines, and blue handles for the main lines. (The 2" return valves are also blue.) This will make it easier to identify main and isolation valves, as any black handled valve will be closed during normal operation.

The only exception to this scheme is when the main supply hits the cross right after the pump, and the drain and feedback valves will also be black handled (since they are normally closed.) But since the cross is right out of the pump, it will be easily identifiable as being a part of the main supply.
 
Man, don't ya just hate it when your parts list is short by a factor of 1?

Ugh. While I'm at the store I guess I'll pick up a couple odds and ends, along with the damn elbow I miscounted on. :rolleyes:
 
Well, shit. Part I needed: $1.98; odds and ends: $209.27. :rolleyes:

To include 6 bulkhead fittings (2 of which are for the top off res), giant 50gal trash can for nute mixing, another ratcheting pipe cutter (that goes up to 2.5", where my current one only does half that), some other stuff I needed for some honey do's, and then parts and pieces to build out:


a 4-buket, dutch bucket setup. (For my lab tent to play around with, and I may move it outside next spring.)

Heck, I should have built one of those for my main tent. Would have been a whole lot cheaper. :laugh:
 
So you haven't used megacrap for a rdwc setup before correct just Coco?...As it makes one hell of a difference between the two...Now doing rdwc nutes in coco is fine just not so much from Coco to rdwc just FYI..Also it is going to stain your roots brown which isn't major however easier to see a problem when they are pearly white and days ahead of what you would see if they were stained...Just saying and only trying to help...Not to mention it doesn't fully dissolve!!!! Plus it stinks awful which also will mask any potential issues with your water you maybe having too..As my nutes don't smell at all and they are all white which makes a difference especially in a rdwc setup....
Also those 2in bulkheads u bought if you want filters for them the current culture ones will fit..Well they fit on my abs bulkheads from my 1st rdwc setup and they fit better than on the c.c ones do actually as they are a few bucks each and well worth it as I run one on each bucket on the return line and may do one on ea b.h in the future but will see..Also the 2in and 3in bulkhead filters are the same they fit each other which is nice..
I found 2 4 sites that might give u a idea on yours since your still in the process of building urs there might be something u like on one of them..The flood sensor is great to have as well they have ones that will alert you by phone as well...And my veg setup with the test plugs and lldpe lines for top off etc...
 

Attachments

  • images.jpeg
    images.jpeg
    26.1 KB · Views: 93
  • wbk4f1fk0or21.jpg
    wbk4f1fk0or21.jpg
    624.7 KB · Views: 95
  • IMG_20190828_190923_01.jpg
    IMG_20190828_190923_01.jpg
    651.4 KB · Views: 87
  • 15643295519377104410805649415034.jpg
    15643295519377104410805649415034.jpg
    313.3 KB · Views: 90
  • IMG_20190716_153522.jpg
    IMG_20190716_153522.jpg
    780.3 KB · Views: 93
Thanks. I've got all my parts, and in the building phase now.

You can see a general diagram (not an exact blueprint) of the overall system, give or take back in post #2.


I'm in the plumbing phase now, and about 60% completed with the main plumbing runs.

- Main return: 100%
- Main supply: 30% (valves in place, connected to buckets)
- Main drain: 0%
- Main feedback: 0%

- Isolation return: 90% (have to glue 4 joints, and cut one more section of pipe)
- Isolation supply: 40% (valves in place, one side of tent run)
- Isolation drain: 0%

- Tent overflow: 0% (still debating exact run for this)


For the overflow, which I haven't written much on, I'm considering a different approach than originally planned. Originally it was just going to be an overflow to the drain. Gravity, blah blah. However, I'm thinking I need a different approach for two reasons.

First, the amount of water that could be dumped into the tent in short order if a supply line broke. Gravity may not be able to keep up without at least a 3" pipe run.

Second, the height of the flood pool insert vs where the height of the bottom of the drain pipe would be. Not exactly a good match, and water would be flowing out of the tent by that point.


What I'm considering is in essence a pretty simple concept. People use it all the time. What? A sump setup, at its heart.

I can pick up a float switch that will activate a pump once water triggers the switch. Pump won't have to be huge, but enough to keep up. I have a couple laying around that are bottom suction and run 400gph-600gph. Should be enough as the head height won't be but a couple inches. It probably won't contain everything completely in every scenario, but even the worst case (supply breaks and sprays all over and gets under the flood liner) it would still get a good bit of it.

I would simply connect the in-tent pump to the main drain line, which will be running right beside the tent anyway. Basic up and over, and out it goes. Main drain line is 1.5", and will run to an existing drain. Would really like to just hook it into the drain line that is 5ft from the grow space, but I'm not going to make permanent modifications to any structure for this grow space. (Although I've tried to reason to myself that it could be turned into a "clean out" spot. :laugh:)


Got the isolation bucket drilled and set earlier, and will maybe get the isolation return done at some point today. Not going to have as much time this weekend to work on it as I wanted. We have company and well, you know, ain't none of their business and it's tricky to just wander off and make noise without raising curiosity. I'll have to see how it goes I guess.
 
Wasn’t able to get on it until late this afternoon. Did get all the returns completed, and a little more progress on the supply. I’m guessing I have another 2-3 hours left (in low and slow gear) of supply plumbing left to do, including the feedback and two drain branches.
 
ya I'm waiting to see some pics of your setup that's for sure as the drawing is a lil confusing so will be cool to see the pics for it...
So for your drain from the pump in the tent that you want to run to the floor drain then why don't u either run like a PVC pipe to the drain and build a lil box for it to slide over or sumthn to cover it if it's a huge deal...Or do what like what I did which I got a metal hose quick connect and use a lay flat hose and connect it as needed or leave it on if you want it for your back up drain system...Hopefully maybe tomorrow u can post some pics
 
The "sump" setup in case of flood will hook into the drain line that also serves the primary and isolation drains. Those 3 inputs join together, and then into a garden hose that will run to an existing drain about 30ft away.

I was going to hard plumb that 30ft line, but have decided against it in case I need to move it for whatever reason.


I noticed I'm a valve short as well. I need 5 to finish off (2 for the isolation, 3 for the main) and only have 4. So a quick run to the parts gettin store tomorrow morning, then breakfast, then I should be able to finish up the rest of the plumbing. At least I'm hoping to get the plumbing finished anyway.

Then it will need a water test, and probably a good filter run as well. I'll probably just put a mesh bag on the end of the return in each loop. Damn dog hair. :laugh::rofl::laugh:

There really isn't that much left to plumb, but I tend to only work in 15 minute spurts then take a 15 minute break in fresh air so I'm not totally bombed on pipe glue. :rofl::Rasta::rofl:
 
I'm sure you already know this but Amazon has electronic ball valves they are about 35ea tho if you want to go that route ever as well...And well a lil late now to tell ya but gorilla glue now makes a PVC primer and glue all in one and it's low voc so no smell and won't get high off the fumes.. I like that it's clear too they also have joint PVC for abs to PVC as well...Ace hardware carries it around here anyways.....
 
0A08BC59-DD1F-4E21-8240-BA4401673380.jpeg


A90524CD-AC9D-4086-869F-7A82B14CA036.jpeg


There is a pic of the supply lines. Isolation comes in and runs around the outer edge, main supply runs around the inside.

Could have run the main straight across, but wanted that gap in between for access to work.

No time today for plumbing. Maybe in a few days. Still have to plumb the pumps, drain lines, and the feedback loop.
 
Pics are looking good nice work..So for the supply piping above it how are you planning on cleaning all of that?.. as just running bleach or something through it is not going to be sufficient esp over time..... However if it was me 8 would get PVC orbit 3/4 couplers for it they also have elbows and tees as well.. like I have for my setup..As they have a tool that slides inside the fitting and releases the pipe so you can easily scrub the PVC and keep your system running and plants happy...Good thing about them is you can still add them so you won't have to replace it however only will work for the couplings of course...Unless you cut your other fittings off which I can't see happening...And when you build your isolation lines if ur going to use 1/2-1in I would highly recommend and suggest you get the orbit fittings for your elbows and tees and if you need to add a coupler for a long middle section as you know this...Home depot sells the orbit fittings you can check online on what your local store carries.. but trust me it will save you a lot of headache in the future.....
And for your isolation lines they will run. On the outside of the buckets and will connect too the 2in tee correct?.. so the only hole at the bottom of your bucket will be the 2in return line right?...As if you have a smaller hole for like a drain you will need to use a elbow or have some type of filter on the end or they will be clogged with roots and be worthless....
Which speaking of which those 2in will still be able to get clogged esp at the tee when they go into the drain line....Which your using 2in uniseals on your buckets right?..And the 2in it's PVC not abs and is it thin or thick core...As abs 2in is thin walled and I just checked that the current culture bulkhead filter will attach to the end of abs as it's thin walled but the thick walled PVC I have 2 or 3in it will not fit on the end of....But the filters will fit on abs bulkheads even ones that's not the current culture ones....And since you only need 4 of them it would be $22 shipped as they are $5.50 each I believe or $5 even for the 2in I got mine from unisealwarehouse.com or you could even do Amazon or eBay I believe they are the same price and the current culture ones you can find for $9ea...But tbh I wouldn't run that system without the filters as it will only cause you problems and when ur plants are like 6wks in flower and one of the back plants return has clogged the plants are scrog in a net and u will be Sol getting to that drain to unclog it...
So ya for under $40 u can save your crop before there ever is a issue ...as the filters are $4ea btw...And some orbit fittings possibly as always just trying to help so sure hope it does ...Looking forward to see it up and running as your setup is different than anything else I've seen that's for sure so keep it up... Hopefully it works like on paper of course..Best of luck...
 
Well, thanks for all that. I'm now so paranoid that the system I've had in the works for better than 9 months is total shit. I've wasted an entire day freaking out and second guessing every minimal detail that I'm now going to put it all on hold, grab some fabric pots, perlite, and do a quick grow while I get over myself and get the paranoia out of my system while I use run-on sentences.

Thankfully I have most of the parts to put that together. So yeah, best of luck to me I guess.
 
I really hope that I wasnt the one that made you do that bro...Like seriously I'm just trying to help not make it worse or so bad that you want to hold it off for months and months now..You spent all that money and all that hard work don't give up now like for real please do not go to Coco...
As the suggestions I made are cheap and easy to do and is a easy fix to change out..
When I built my bloom setup I kid you not I spent 4 months designing it and pry 30x diff variations of the x4 site I made actually..I based mine off of current culture but made a few changes to it...Mainly like the drain kit however now they have their own buckets that they made not re labeled ez store buckets like they did prior...And now they have the false bottom so there is a drain well so the entire system can drain which I might switch too I'm also considering a hpa setup as saving 90% water if not more would be awesome but will c as sprayers can fail and ruin ur crop in no time vs rdwc even if ur air and water pumps would fail and as long as ur plants had a air layer w the roots they would be okay for days even...
So what are you 2nd guessing now and freaking out about on your setup exactly....
So if there is some PVC that you glued that you want to redue depending on how much glue you used but sometimes you can get them off either by cutting or a torch I've also seen ppl get PVC primer they will prime the inside of the piece they need off and then light it on fire until it goes out use pliers and chisel possibly to get it off..Doesn't work for every project but it can however if your taking a fitting off I would be worried about the pvc left over as the glue does melt it so not sure if it could be used again tho is the only thing....But that's one of the reasons I use orbit fittings among many many more....
Also on your isolation line I wonder if you would put a ball valve right after the tee for the vertical pipe going up to the buckets on if it would give you better water flow esp for the furthest buckets..I also wonder on that isolation line on how it is that will have it filled with water but it won't have anywhere to go so I wonder if it will be a place to collect buildup and or be a breeding ground for bacteria also u will have to cover the PVC too as it's not light proof...They have the foam insulation at h.d and Lowe's for copper pipes like I used in my veg setup and it works great the fittings are light proof tho so that's nice....
So for my bloom setup I did waterfalls only no air stones in It now I was going to use a single pump for the waterfall only put it in the middle of the buckets and the outer buckets was terrible so I had to use a h2o pump per side as its in a 8x4 tent so 2 plants in a 4x4 and 1x 350gph pump per side anyways....
Were all here to help well I am anyways so I'm sure we can work something out so u can confidentially run. Your setup you worked so hard to build as I understand how it is put so much time and research and energy plus money into it and just want it to work so let's figure it out so u can use your rdwc like you planned...Also not sure why you couldn't run it year round either run. Your h2o pumps just need to be ran inline and problem solved
 
Hey u might want to put something underneath the 2in supply lines to help support the PVC esp when it gets water in it that's gna be a lot of pressure on the uniseals and buckets so you can use wood or if you have scrap 2in PVC just cut them all the same height I'd pry put them under the 2in tee and pretty much all the 2in fitting for that matter...And the 90° brush from home depot will do wonders for your 2in as you will def want to be able to scrub every inside inch of the PVC that nutes flows thru as it's just impossible to clean it with any type of cleaner and not have to scrub it as well..Just like anything you clean you can't just spray something on it and not scrub it and it come out clean just not possible and esp if there is buildup..You will want to scrub it all when it's still wet and setup...Also they make unions and even ball valve unions those get quite pricey but if you need them in order to keep your system clean and as sterile as possible as cleaning the entire thing between grows is a must have and allowing everything to dry out before u start another crop is major esp if there was a issue ....
But for the love of cannabis don't give up on your rdwc for a cpl minor things that can be fixed it sucks but it's life sometimes.. Tbh Im on my 3rd system for both veg and bloom as I made plenty of mistakes esp my 1st rdwc setups..As my 1st hydro was dwc and well I only used it for veg as bloom I built it for a 8x8 and then came to find out it wasn't gna work and needed a chiller so rdwc and then I also downsized to y 8x4 and I have the same amount of plants still the 8x8 I did 2in PVC used elbows or a long elbows even etc and veg went from dwc 5gal buckets with hydro farm rings then I got my current culture 4 site and while I was building the 8x4 setup with the drain kit etc I decided to change the veg tent too did no elbows , switched to test plugs, and no hoses PVC hard lines only and airline is even lldpe r/o line which is 3/8 from 1in air manifold and then I have these r/o bulkheads which they call them unions for some reason although they are not..Anyways they are 3/8 × 1/4 and then on the inside of the bucket I tee it off and add 2 popcan size air stones and done deal........
 
Back
Top Bottom