Oh so wet: Simple RDWC build

we got a pile of stuff here


full


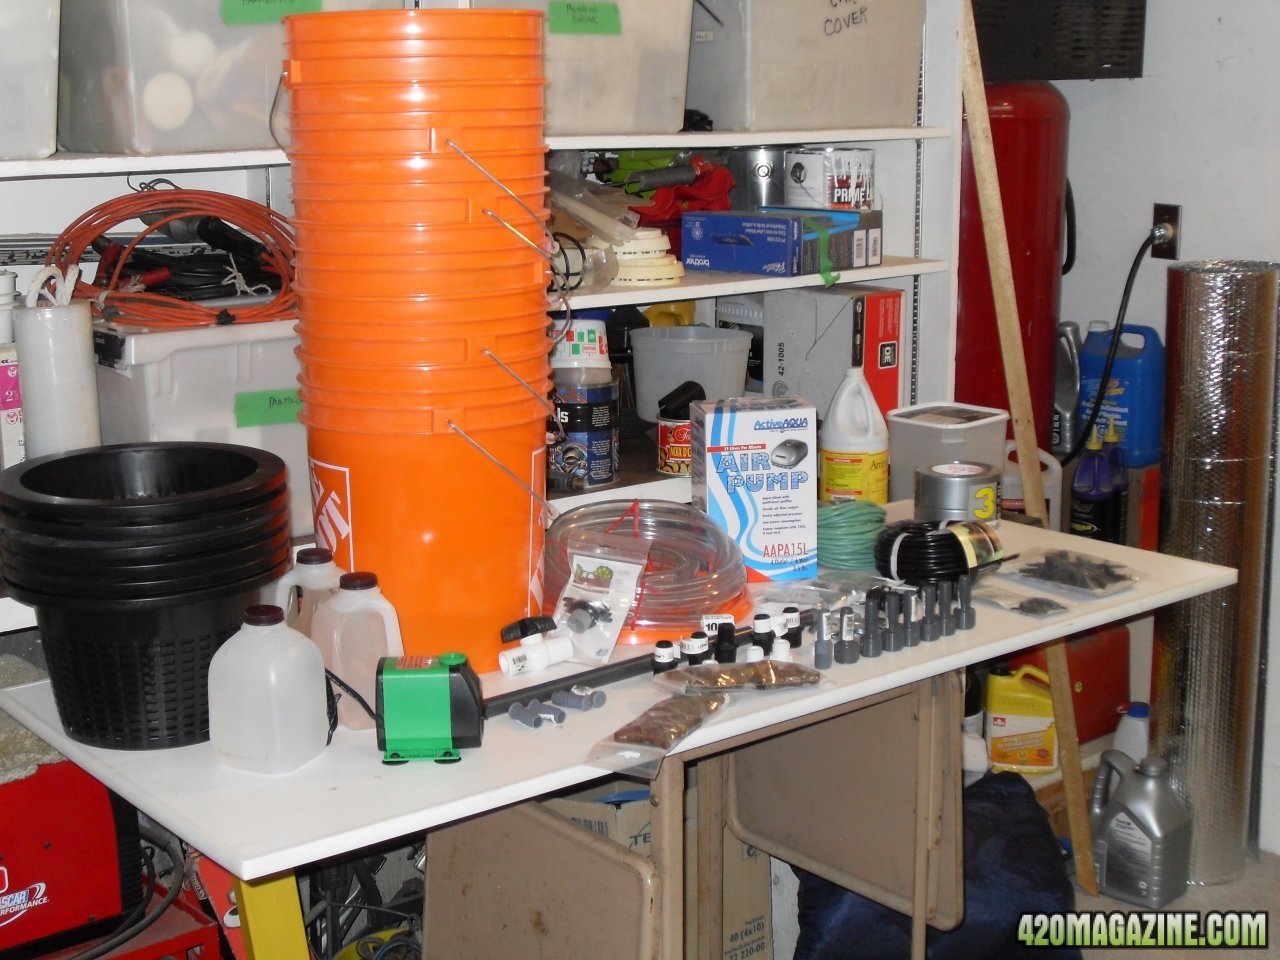
this is a dirt - er water simple rdwc system that you can piece together wherever you live. it is built to be expandable from one or two bucket sites, up to six or more, depending on pump size and distribution manifold. it is a very old design, and has been copied by most hydro suppliers in one form or another, over and over again.

this build will focus on the most basic set up, and will use a four bucket system for an example, to keep things nice and legal for the new norms being set in canada. the great thing about this system is it is infinitely adaptable and customizable once you understand the basic system. sites can be added or subtracted, extra reservoirs or chillers piped in, and it can be adapted to different spaces. it does use up space tho, and rdwc is not for everyone, newer techniques are replacing this style of hydro more and more.

this is an easy way to do it if you like doing stuff yourself and wanna give it a try.

first a word on cost.

hydro shop systems are coming down rapidly in price as attitudes change. it may not be worth it $$ wise to even build this system for some people if an off the shelf system works for them. i don't really keep track of the cost as some of this stuff i generally have on hand, but it costs about $200 cdn to piece this together. it can be done for less i'm sure with a little judicious shopping. the good news is the cost to make this stuff has gone down with the availabilty of new home irrigation systems, and their hardware.

if still on board here we go. so whatcha gonna need .....

the bucket site parts list :

each bucket site requires

full


1 - 5 gallon bucket. standard hydro shop or hardware supply store stuff
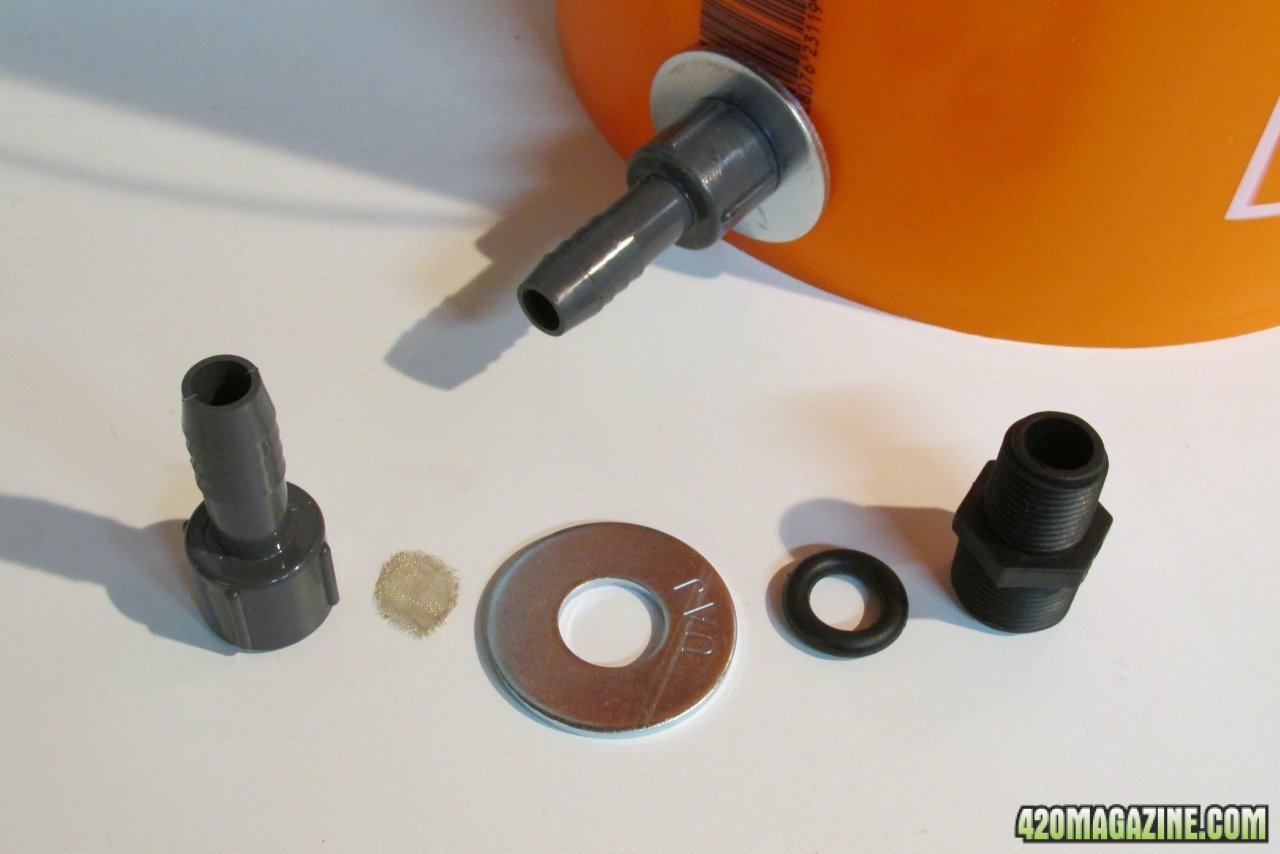
1 - 1/2 " pvc female threaded / barbed fitting. very standard fitting
1 - big ass washer. 7/16" inner diameter. pretty standard washer. fits over the skinny end of the black fitting in the pic
1 - thick rubber garden hose washer. you can get expensive o-rings, but the garden hose washer works the best for pennies
1 - 1/2" threaded to 3/4" threaded union. home irrigation part from a hardware store
2 - large brass hash pipe screens. you can use faucet screens but these work better
1 - 1L empty milk or yummy chocolate milk container. cleaned well and aired out
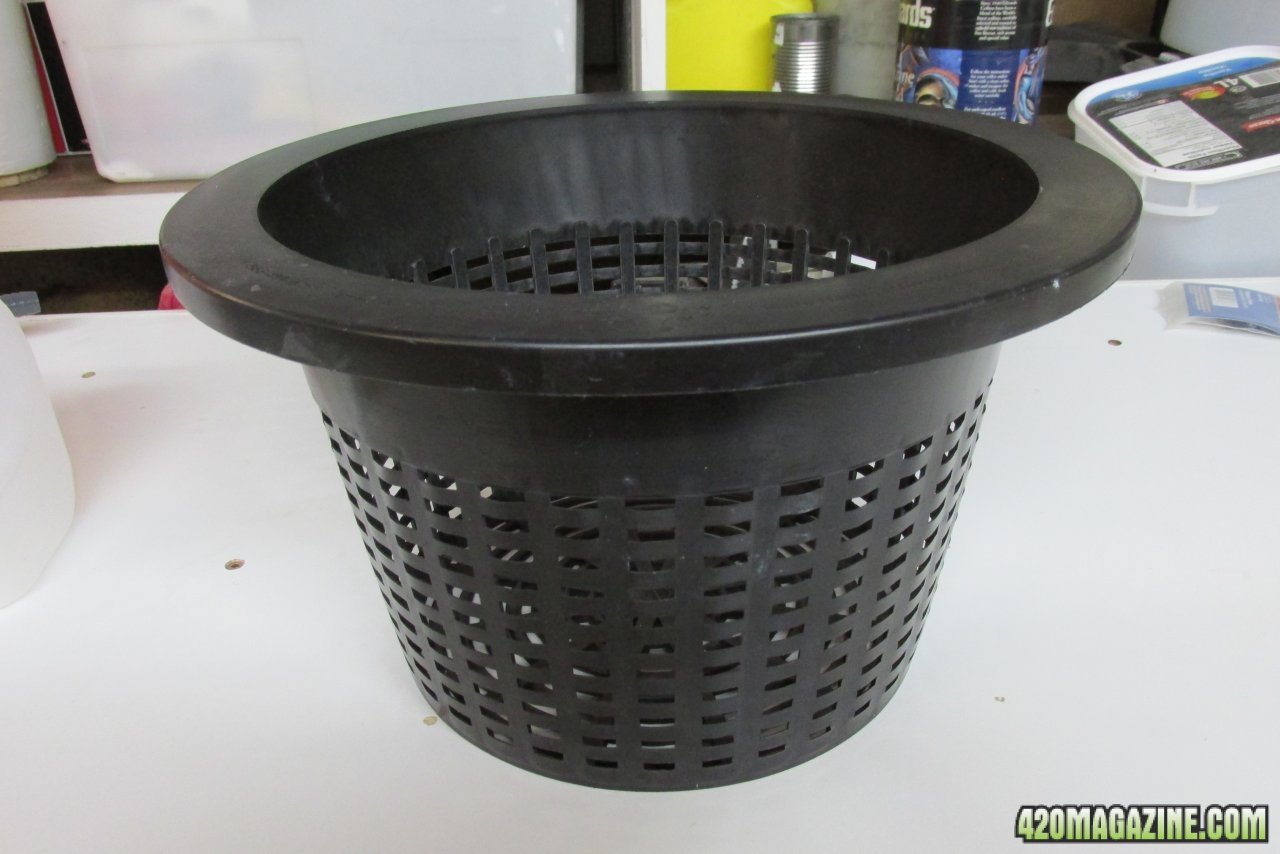
1 - net pot basket. hydro shop or amazon. mine are the largest, do that or one size smaller

way too big net pot gratuitous photo

full


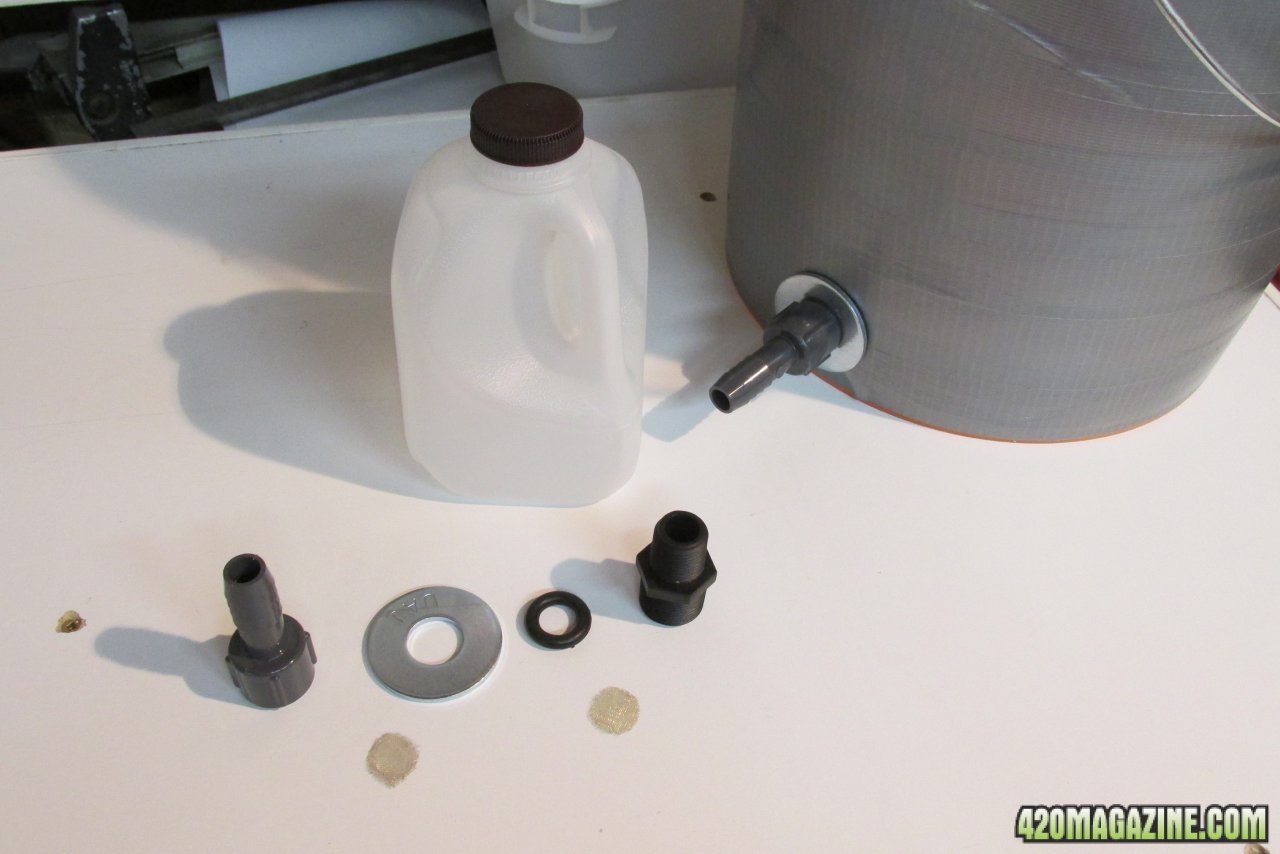
you'll need everything here for each bucket site. 4 x each of the above for the example build. completed bucket in the background above. don't mind the duct tape . we'll chat lol . of course you're gonna need more but we'll get to that.

the reservoir site is a bit simpler. for the most basic system :

reservoir site parts list

full


1 - 5 gallon bucket
1 - 1/2" female threaded / barbed fitting
1 - large hash pipe screen
1 - big ass washer
1 - rubber garden hose washer. round ones work best but you can use the flat too btw
1 - 1/2" to 3/4" threaded union.
1 - 5 gallon bucket lid. not in the pic

now that you have the bucket sites and resevoir sorted we'll get to the rest of it. when putting these together it's best to think of what you need for each site or system, rather than as a whole list.

this system uses 1/2" fittings as they are super easy to resource, are ubiquitous, cheap, and are the largest size that forms a decent seal on the bucket without having to resort to pricey bulkhead fittings.. these sytems will not leak if built correctly.

procede at your own risk tho, i am not responsible if you soak the basement carpet etc lol

gonna post this bit then show then how to build the bucket and reservoir sites before moving on. from there the rest is really easy.
 
ok. now i need a hoot .


let's start putting the buckets and reservoir together. first we need to paint lol.

start by choosing a bucket for the reservoir. take one side and make rough 2L measurements by pouring water a litre at a time from one of the milk jugs. i usually choose a site under the bucket handle.

full


paint it up


full


after it's dry


full


while that's drying, measure a mark 1 3/8" from the bottom of the opposite side. do this on each bucket.


full


drill a pilot hole on each bucket. do this all at once to save time. this is what i use to drill all the holes -


full


the minmum needed is one small drill for the pilot holes and one 7/8" step drill with a 3/4" position. the 3/4" hole is the only crucial one. i use a 3/4" max step drill and a 7/8" max just so i can run them to the end without having to stop or worry. you only need the one.

there is a 1/2" npt pipe tap in the pic. i find this useful. you don't have to go to the expense of getting one tho.

after drilling the pilot hole in the bucket, drill one in the milk jugs using the bucket as a template.

full


using the pilot hole to guide step drill the buckets to 3/4"


full


and step drill the milk containers to 7/8"


full


more soon
 
moving forward..

the fat end of the threaded union will get stuck inside the milk jug hole. the other end will evenutally come through the bucket.

full


while the drills are out set up the reservoir, add to the parts list


1 - 5 gallon bucket lid
1 - 1/2" threaded pipe stand 18" long
1 - submersible aquarium / fountain pump


full


my pipe stand was too long at 2ft. i was not worried as i could cut and thread it myself, this is not an option for most, so stick with an 18" pipe stand if possible. the pipe stands come pre-threaded. you can also easily make a pipe stand with some pvc pipe and a couple threaded/barbed adapters.


quick test fit


full


start with a pilot hole then drill a 7/8" hole in the center of the bucket lid with your step drill. wind up with this at the end


full


the pipe stand you choose should be shorter at 18"
 
next we are gonna tap the buckets. this part is important as it ultimately helps seal the water in from leaking, and helps to avoid costly bulkhead fittings. i use the 1/2" pipe tap and turn it by hand only. the plastic you are working with is soft and will not require a tool or power tool.

full


if you don't have a pipe tap don't worry.. the threaded end of the pipe stand will work nearly as well


full


go slow when tapping and make sure to get it in the hole even. it can be a bit difficult with the curvature of the bucket. tap all the buckets including reservoir. tap only the 3/4" holes, not the reservoir lid or milk jugs.

next step is adding a bit of light blocking to the bucket sites. root zones need to be kept dark for proper developing plants. this is why all the hydro shop buckets are black. hardware store buckets are typically half the cost of hydro store fare, but are not usually dark enough to block the light.

i recommend painting the bucket with black plastic paint. krylon is a popular brand here. it sticks to plastic and will not peel off. paint is the best light blocker there is. yup can't recommend paint enough.

i did this


full


ummm, that's ghetto duct tape wrapped mummy style. do a couple layers. this is only acceptable if you can't paint or have the fumes around while drying for whatever reason. mine wound up wrapped because of the latter.

i leave the reservoir unpainted / wrapped so i can see the water level.

man, can't beat that paint tho
 
next start putting the bucket sites together. first add a couple brass screens to the fittings, one in the threaded end of the barbed female fitting, the other in the big end of the 3/4" union


full


next a garden hose washer goes over the small end of the union


full


screw the union through the bucket from inside

full


turn it by hand. if it gets difficult use a large socket over the end of the union


full


continue turning by hand. do not use a ratchet. tighten until you see the rubber washer begin to flatten out. do not try to tighten the fitting until it stops turning. a seal will be created long before that, and you run the risk of stripping the threaded bucket, making a seal much harder to achieve.

if you are really uncertain a 1/4 turn by ratchet after hand tightening is acceptable. i usually try to water test the buckets first tho.

once it is thru and snug, add the outer hardware. use teflon plumbers tape around all threaded male fittings.


full


put the washer on the outside then the female fitting. hand tighten only


full


once hand tight, a 1/4 turn with a pair of pliers is acceptable. do not go further, and do not try to tighen until everything stops, as you might break the seal. the washer slightly flattens the contact area, helping to spread the force and make a better seal.

next you'll need to add to the parts list

1 - 1/2" barbed blank plug
1 - 10ft roll of 5/8" id clear food grade pvc hose
1 - bunch of small zip ties

id stands for inner diameter. all available at your local hardware store. the hose usually comes in 10ft rolls. you won't need near that amount usually. use 5/8" as 1/2" is near impossible to get over the fittings. test the hose with a fitting at the hardware store before purchase. sometimes the hose wall is so thin that 1/2" is required. i usually try to find the 5/8" thicker stuff.


full


a pvc hose cutter or good pair of sissors is all you need to cut the hose. cut about 2 1/2" of hose and insert the plug in one end.


full


use a zip tie as a hose clamp. warming the hose with a hair dryer or heat gun on a lower setting will make the hose a bit easer to work with.

full


i usually make at least two plugs. next find a suitable place like a large sink or bathtub to do a wet test. put the plug on a bucket and fill the bucket about 2/3 full of water.


full


wet test each bucket anywhere from a few hrs to overnight. periodically check on them for leaks or sweating. if they sweat snug the fitting with a pair of pliers by 1/4 turn.
 
set the reservoir up the same way. only one brass screen in the female barbed fitting will be needed. the rest is the same.


full


while waiting for the wet test to finish get an awl


full


and murder up the chocolate milk jugs


full


the milk jugs are gonna go inside the bucket sites and are a root guard. you won't need one for the reservoir. between the jugs, and the added brass screens, there should be no problems with the return lines becoming plugged by roots or other debris that collects in the system.

after the buckets pass the wet test the milk jugs will just press on to the inside of the union.

full


next we'll build a simple manifold for the return and start putting the system together.

back soon...
 
the return manifold and drain are built as one. this limits the number of sites in the system that can potentially leak. the whole system is built with limiting leak potential in mind.

the return manifold parts list is

1 - 1/2" nylon threaded valve. these can be pricey.
2 - 1/2" threaded/barbed fittings
4 - 1/2" barbed tee


full


one barbed tee is required for each bucket site when building a manifold. it makes it simple to figger out when planning and buying parts. 4 tees are needed for this build. the tees used in home irrigation are a fraction of the cost over standard plumbing tees. and work just as well,

full


i only needed one pack for this project. here is the manifold laid out.


full


all together.


full


hooked up to the reservoir.


full


it's easy to customize the manifold by changing the hose lengths, and the tees will twist easily without breaking the seal.


full


it's a good idea to check the system for fit in the chosen space before building the manifold. the easiest way to configure the system is simply keep the reservoir at one end, and arrange the bucket sites around the manifold. you can keep the reservoir out of the main light to maximize light usage.

of course my space didn't allow me to do this, but even the basic system is flexible enough that you can make it work.

i came up with this


full


this is a rough fit, but good enough to finish it up.

now for water distribution.
 
the final stuff you need for the parts list is


1 - 1/4" roll clear plastic or solid color vinyl tubing. usually come in 20 or 30ft rolls
1 - open flow drip irrigation manifold. recommend rainbird
4 - 1/4" barbed tees. home irrigation system stuff is the best and cheapest
4 - aquarium airstones
1 - large bag of hydroton
1 - large air pump with 4 outlets or use / build an air manifold
1 - pack of drip irrigation stakes. need 2 to 3 per bucket site. 12 total max for this build


use this 1/4" hose if you can find it. it costs a fraction of the clear stuff and will work for everything.


full


i also used some hard black plastic drip irrigation soaker hose for this build as i got a great deal on it. it is not necessary, you'll only need the one kind of 1/4 " hose. you can use it for everything.

the manifold brand is not crucial. just make sure to use a non adjustable open flow manifold. the adjustable ones restrict flow placing extra strain on the fountain pump, which could greatly reduce it's lifespan.

full


make sure you keep those blanking caps for the manifold. they can come in handy if you add/subtract bucket sites.

these are the cheapest tees and work about the best. you need 1 tee per bucket site. 4 for this build.


full


standard airstones


full


minimum 1 per bucket site. it's not a bad idea to add one to the reservoir as well.

it's a good idea to wash up the hydroton and soak it ahead of time.


full


make sure to get enough air pump for the job.


full


stakes


full


this will finish up the project. the only other thing to consider is some spaces/risers to lift the bucket sites, which increases the reservoir capacity. will touch on that after.
 
with the system in place, choose a spot for the air pump, then measure out how much 1/4" hose is needed to supply the air/ water to the bucket sites. cut equal length hoses for both water and air to ensure the pressure remains the same between all sites. each site will recieve the same amount of air/ water that way and make adjustments easy.


water line


full


air delivery


full


feed the air line through the net pot. you can also drill a hole in each bucket site above the water line to accomplish this.


full


install the airstones. try to place them about the middle of the bucket.


full


in place


full


once in place add hydroton. fill to about 1" to 1/2" from the top of the net pot.

now we'll build some drip rings. i used the black plastic soaker hose for this. measure them out so they are all equal length. you want them to sit about 1 inch from the inside of the net pots.


full


join the ends with a barbed tee


full


pic for reference


full


add the manifold line


full


next do a wet test with the fountain pump to adjust the soaker lines. you will need a large sink / bathtub / or bucket for this. if the pump has adjustable flow do the pump test with the pump wide open. always run everything wide open to avoid extra strain on the pump.

start by adding 4 holes approx equidistant to each other pointing straight down. too much of an angle will send the water over the edge of the bucket site. i use a furniture tack for this. it seems to make the holes just the right size. you can use any small sharp instrument, experiment.


full


next add another 4 at about a 30 degree angle.


full


all of the holes will be oriented down on install. once done all the holes hook up the wet test.


full


keep adding an equal number of holes to each soaker until you are happy with the water flow and pressure. then install.


full


system is pretty much set. cut a door in the reservoir lid to run the pump cord.


full


and that's the basic system. now it can be easily customized if you want to make it the best for your space and use.
 
ultimately i did not like the way the system sat in the grow space. the basic system can be adapted as is for most spaces, it can be easily improved tho.

lifting the bucket sites will increase water capacity, and helps to keep the pump submerged in the reservoir. they are not necessary if you are on site and can check water levels at least daily to adjust. shoot for 2" - 4" risers, best if they are 2" and can be stacked. simply cutting some 2x3 or 2x4 to stack will work. i had some old styro insulation that worked good for this project.


full


the reservoir will sit under the bucket sites. reference pic


full


2" risers are almost always enough, so go with that size if you don't wanna stack stuff.


i did not like the access to the drain valve, or the overall fit in the space. once the basic system is built it's easy to mod. i added a second manifold site to the reservoir, and split the return manifold in two. it takes very little hardware to tweak the system once built.


repeat of the manifold hardware


full


one 1/2" male/female threaded elbow. this one is home irrigation supply


full


one 1/2" barbed elbow


full


pic of the reservoir with the split manifold for reference


full


1/2 hour later with the two new elbows and risers added to the sites


full


ready for plants / timers / water/ nutes...


now get to try it out.

:peace:
 
I like the plastic jug for root guard... Its always a good idea to have a few of those hose plugs on hand, for when you need to cut a water filled hose.
I've had a long time relationship with Waterfarms... I have a finished thread below that deals with constant top drip waterfarm type systems...
I've modified the drip system on mine so the each grow bucket/WF circulates its on water from the reservoir.. It uses the drip ring itself to move the water.. No submersible water pump..
 
I've modified the drip system on mine so the each grow bucket/WF circulates its on water from the reservoir.. It uses the drip ring itself to move the water.. No submersible water pump..
i will have a look. think i'd like that idea. it looks very much like a hydrofarm, it looks like a pile of older systems actually. i started building these over 20 yrs ago. there was hardly any off the shelf stuff then. i don't run mine constant, i run about a 1/3 duty cycle for daylight (20 min per hr) and leave it static for night with just the air on.

Interesting indeed
So water level is controlled by the height of the res bucket and total water in all units??

yes. called equilibrum system or standing column system.

Yes, it's called a standing water column.. It's been used to move water, with air pressure, from a distance reservoir, for a couple hundred years.. Almost too simple.

thats exactly how i used to build them as a dribble system with air pumps.
 
Great build man !!! Very similar to how i did mine i posted in the DIY thread, so much better then uniseals imo. Super great loved seeing this !! You should take a look at how i put my res outside of the grow space you might like it, i definitely like the milk jug idea inside the buckets. cheers mate definitely following you
 
there are some really nice novel ideas here and I am all for that but with a word of caution to new growers. Expect floods and prepare more. I spent a year off and on trying and succeeding IN THE END to construct my own ebb& flow fittings. They work fine but on reflection I got off easy. I wasted a lot of time but decided early on that I would use 'water' parts such as grommets, elbows and tees, and using black vinyl 1/2" hose or the blue air hose (as it transmits blue light in a fiber optics inefficient manner INSIDE to the roots where you do not want white light BEING MADE up of red, orange and yellow along with all other colors, (white light is a combination of all light) but all any blue might do it reacts with the roots like green in the grow AND UNISEALS. All I am saying is get Uniseals, the PROPER grommets that are made to MATCH the hydro elbows & tees. I some cases it may not be critical but for the damage water can do, either getting the right parts to begin with for the water items is just like buying insurance and it REALLY is not much if any more expensive. BUT UNISEALS if I can emphasize any other. I just thought of new Canadian (and others) can have their enthusiasm and have less trouble I think being careful. I DO like some of the neat ideas in this article too so......but I feel beginners should not err on those critical parts. Good article! Unfortunately Manitoba & Quebec do not allow recreational growing, (unless medical) which I believe in Manitoba needs only to be challenged, but having success, trouble free results, make those decisions thoughtfully.
 
ultimately i did not like the way the system sat in the grow space. the basic system can be adapted as is for most spaces, it can be easily improved tho.

lifting the bucket sites will increase water capacity, and helps to keep the pump submerged in the reservoir. they are not necessary if you are on site and can check water levels at least daily to adjust. shoot for 2" - 4" risers, best if they are 2" and can be stacked. simply cutting some 2x3 or 2x4 to stack will work. i had some old styro insulation that worked good for this project.


full


the reservoir will sit under the bucket sites. reference pic


full


2" risers are almost always enough, so go with that size if you don't wanna stack stuff.


i did not like the access to the drain valve, or the overall fit in the space. once the basic system is built it's easy to mod. i added a second manifold site to the reservoir, and split the return manifold in two. it takes very little hardware to tweak the system once built.


repeat of the manifold hardware


full


one 1/2" male/female threaded elbow. this one is home irrigation supply


full


one 1/2" barbed elbow


full


pic of the reservoir with the split manifold for reference


full


1/2 hour later with the two new elbows and risers added to the sites


full


ready for plants / timers / water/ nutes...


now get to try it out.

:peace:
Nice work my friend :goodjob:
 
Back
Top Bottom