The Absolutely Incredible And Bulky RDWC 750w LED Dr. Krippling Incredible Bulk: 2019 Indoor Feminised

Aroxol

Well-Known Member
This journal will chronical single Dr. Krippling Incredible Bulk DWC grow from seed. Starting out in tent under Advanced LED XML350 and then will transfer to 2x2x3 BCNL Roommate (DWC Grow Box) with a 400W Super HPS Hortilux to flower. Incredible Bulk is an indica made up of super skunk, green spirit, and big bud.

Starting the journal a little late, I’m currently on day 17 since initially soaking the seed. Right now the seedling is in rockwool inside of 5” net pot being hand watered until I see root growth from bottom, then I will move into DWC. Current environment in tent is average 74 degrees Fahrenheit with 50-55RH.

Nutrients: Botanicare PBP, Cal Mag Plus, Silica Blast, and still debating on either DutchMaster Zone or HydroGuard for DWC.

Here are some photos to bring you up to speed. You’ll notice some burn on tips from the latest
photo latest one - long story short I was running an experiment, and got the results I was after. Overall she’s happy and healthy, so no concerns at this point.
DB6ABDDF-C779-4F82-9BAE-3A70BE28D16A.jpeg98B6ADDD-F12C-43E5-AAD1-0513BA131E87.jpeg33C04BA5-90EC-48FD-BFB5-F269A2073389.jpegC46BC24B-8885-4035-AA0B-AA5F1329B5D8.jpeg6EBC8D93-A675-4F9C-9027-3894942245D2.jpeg49C9F6A0-23FB-48E9-BBDD-CDA59361B0BB.jpeg3DA12358-0AA8-4721-BB26-38751A5A87EF.jpeg761C07FF-0C7A-4459-80D6-4159092B4B39.jpegC0674D48-D064-4D76-85C4-092EC80A245A.jpeg
 
Thanks man! The photos are all of a single plant, due to space my thought was it would be better to run one and train/ spread the canopy instead of crowding a bunch of plants. So far I’ve only given Cal-Mag Plus and a splash of Silica Blast (which is when I saw the burn), but I had also tried a light experiment which I think is what resulted in the tips. Anyway, she’s doing great so far.

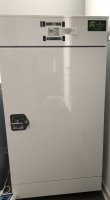
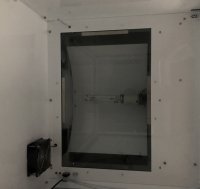
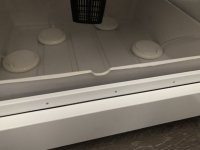
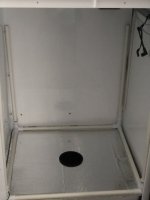
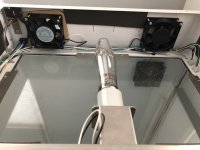
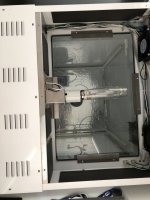
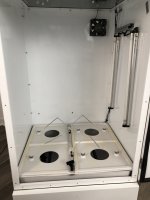
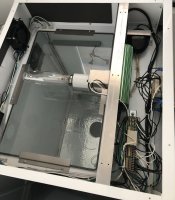
The grow cab (inside space) is 28w X 25d x 37h. It’s 37” from top of net pot to the glass pane of the 400w HPS. Originally the box comes with 4x5” net pot holes; however that felt way too crowded so I built a new lid designed for a single plant trained to maximize yield. I absolutely loved how you structured your bulk plants and this is where I’m really interested in your opinion on what would be the best plan of attack - manifold, scrog (are buds too big?), topping with lst, etc.. here are some pics of the cabinet, and thanks again for your time/ help!

CC65ACC3-A9C8-423A-85E8-870201EC7DDF.jpeg497EC90C-8EC6-4121-8A25-0932053EB26E.jpeg0B7D1B95-159F-497F-B58C-B6FD0C9C9DA5.jpeg83CEB8C0-5131-4895-9085-8E178C6FD8DC.jpeg
 
Love your box, is the light hood vented with a fan? I used topping and some LST to achieve the little fat plants, but they need to be topped just before flower so the only thing that grows are bud, there is a learning curve involved. Do you have any experience with topping?

A SCROG with some pruning works well also and may be your best option to fill your box for max yield, it is basically the same as LST but the fixed height and grid helps a lot. You have some time to discuss and decide, but one thing for sure is you will have to top soon
 
Yeah it has intake and exhaust fan, here are pics of the top of the box. Got it in mint condition for a smoking deal from a guy who did one grow, and although I’ve had to modify it quite a bit, it should be awesome. The fan in the grow chamber also directly exhausts to a CAN filter on the back, it has a built in line for CO2, and power outlets for 3x 2’ T5s. Perfect little stealth ecosystem, just need to build a stand for it. The BIGGEST concern I have based on other users feedback is res temp issues. This will be my first DWC grow, so I’ve tried to be proactive by wrapping the new lid with a heat shield and then reflective covering; however my paranoia of temp problems to come is high.

With topping and LST, fairly familiar, but guidance from more experience growers is always appreciated and well received! FIMming and manifold, no direct experience but understand the theory. By the looks of it, the third node is coming in now, and I keep hearing different opinions about how early to cut - some ppl I know say let it grow to 5-6 then chop down to 3, but my preference would be to start earlier...6454607E-8FE2-40F4-BC54-068D827C0D25.jpegimage.jpg
 
some ppl I know say let it grow to 5-6 then chop down to 3, but my preference would be to start earlier...


That's what I do, build up a bigger root system 5-7, cut back to 2-3 and watch it explode with new growth. The top is just the right size for a clone as well. I also veg under a 400w HPS and it's a question of days once they take off.

That is a really nice piece of hardware never seen that box before. Does it have an integrated air pump?

If res temps are an issue, why not leave it down on the ground probably save a degree or two.
 
You’re the third person who’s given that guidance, so I’ll be patient and just wait for more nodes before topping. Plus an extra clone is never a bad thing.

It does come with an integrated air pump and submersible water drain pump attached to the din rail/ brain; however I’m not using either. The air pump in the unit I grabbed was pretty loud and the lines were dirty, so I’m using a GH Dual Diaphram air pump connected in from the outside. The water pump they provide is designed to connect to the original factory lid (which I removed), so I pulled that out as well. My plan for draining is to install a bulkhead on the bottom of the reservoir with a filter, connected to a hose and let gravity do the rest by draining to a bucket below. Then I’ll use a water transfer pump to refill and flush. Most guys who own the unit install a chiller to cover the res temp issue, I just don’t want to start there if I don’t have to due to electricity costs.

The only problem with leaving it on the ground is that I’d be on all 4s for every res change, pruning, etc. which will destroy my back. Lol it’s out of my selfish desire for comfort and laziness that the stand comes in. That said, the approach for the stand is to use a vanity/ bathroom sink cabinet with no top so I can run lines, drain directly into bucket, store nutes, etc.. The IB plant is currently in my fruit/ vegetable garden tent while I have to hand water, so I’m trying to prep/ streamline im much as I can in the meantime.

Getting to a fully automated setup like you were running is the dream. I’m going to use a BlueLab monitor for PH and temp, but it doesn’t have auto dosing.

My hope is all of the work will pay off with an awesome grow.

Factory Lid (which I have but not using):1C445FAC-8B4E-4F0C-A6AF-92C44E013A26.jpeg

Din Rail/ Ballast/ Air Pump:
08A1B0CA-C3C4-4CCD-89FC-F6612BED4DEB.jpeg

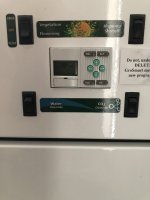
Switches in front (at this point I’ll only use light and CO2):
62CCC9EB-8079-48C4-AB1F-55C44A8DB633.jpeg
 
Ok you definitely have my full attention. Not familiar with RDWC, but if the reservoir was in the bath cabinet below heat would for sure not be an issue so I’m very interested.

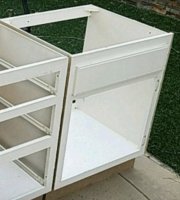
Here’s the cabinet I’m getting today, has a front door, but no top
46016A5F-2E61-41B0-B5AC-E5A7585B6341.jpeg

I’m also due for a hardware store trip today... so if you have time to educate me with a shopping list, I’m happy to adjust my DWC plans and adopt RDWC because it sounds like that would eliminate the biggest potential headache (heat in res).
 
It's recirculating DWC like I run, You run at least twice the nutrient solution so it's more stable, eaisier to adjust, flush or whatever and runs cooler usually. You need a reservoir underneath that holds at least twice what the one up top has, so the question is how much water does the box hold with a water level 1" below net pots? That sizes the tub needed to fit in the cabinet and then go from there.
 
The recommended fill line for the BCNL res is 4.5 gallons, so the tub in the cabinet below would need to hold at minimal 9 gallons with additional slack space.

Since I’d be circulating from the bottom up, the main questions going through my mind are:

1. Where are the entry/ exit points on each
reservoir?
2. Would PVC be the preferred media or hose?
3. Do you use a transfer pump to get water up
and then just let gravity work it down?

Sounds like you have a solid method down which may save me from reinventing the wheel. And again, thanks for all of your time and help today, very kind of you and much appreciated.


4.5 gal is not a lot, so in your case it would be easy to find a Reservoir to fit in a cabinet and RDWC would benefit you a lot. No need for slack space it is included.

The idea is you have, let's say, a 60 liter tub in the cabinet, you mix up 50l of solution in it and pump up the solution to your table which holds 17l leaving 33l in the reservoir, once the predetermined level is achieved the water flows back down to the reservoir by gravity constantly recirculating. If something goes wrong all the water goes to the res avoiding any spillage.

As for entry point it is over the edge of your table and the drain depends on how your table is made, do yo have a drain already?
 
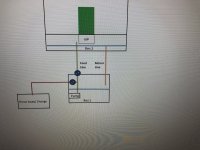
So far I like it and I think we’re on the same page. Below is how I’m thinking about it, but can adjust as I’ve never done RDWC.

There’s currently no drain, but I can add bulkheads anywhere I want on the res to act as entry or drain points. My plan with regular dwc was to drill and add a bulkhead in the bottom, but idk if that would drain too fast or still work with an RWDC design? Do you have a better concept in mind? I’m a visual learner all the way so even a pen on a napkin helps me :)

55E4B923-10FC-4DB6-A90C-4B3B8958EA06.jpeg
 
Exactly, bulkhead on the bottom is the best it allows for full drain and the overflow goes in it, bulkhead must be over the reservoir in case of leaks. You can use a small bulkhead as the entry or go over the edge. Submersible fountain pumps are in the reservoir.

It's a completely different spin then on the standard RDWC setup and you can also do ebb and flow.

I build them like this:


IMG_3245.JPG
 
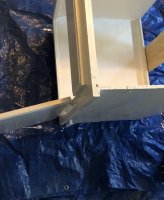
Ok I think I got it now, I just picked up the sink stand, reinforced it and hit the outside with a coat of paint. It’s definitely a POS, but it’ll serve its purpose for now until I custom build a stand later.
DAF1EA15-BC1F-4F49-8EC5-DB9FD19C011D.jpeg

I like your design with the two shutoff valves so you can empty the reservoir! Only question on your drawing is the overflow tube - how is working in this setup? I know of them from toilets, but is that acting as your main shoot down main or is it serving a different purpose? When I was thinking about the design before I saw your pic, I was imagining installing a bulkhead with a 1/2” threaded PVC adapter and then running a single piece of PVC back to bottom res, but I guess you set that overflow tube at a specific height to ensure there’s always a set minimum water level? Apologies if that’s a dumb question, just want to make sure I understand/ measure twice and cut once.

Overall I’m really digging this idea and like it A LOT more than a stale DWC reservoir with air stones. This seems like it has potential to eliminate a ton of the challenges most ppl associate with DWC!

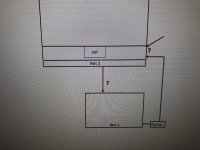
EDIT: When I redrew out what YOU built, it registered. Man, what a great design, feel like this will work sooo much better. Below isn’t to scale because I know you don’t want to have water entering right next to net pot, but this is how I interpreted your drawing. Awesome stuff.


A456BACC-2EAA-4F10-AEA9-411DBDDEB246.jpeg
 
You still need air stones in your tub

The tubes are the main drain and serve to set the desired water level for the roots, the same level you would have run your system at. You can switch tubes for different levels. 1/2 inch is too small, 1 inch plus works well, the tubes fit into the bulkhead fitting. They don't have to be tubes, for example I use peanut butter jars on my big tables, they also sell them pre-made at the hydro shop. You can come up with anything you like as long as it's removable to drain the table. Since you are a visual here are two examples


IMG_3252.JPG


IMG_227014.JPG
 
The plan for today is get to the design from yesterday using the gear I already have (at least for this grow).

-build a simple support frame over the sink stand as I don’t feel too confident it can support the cabinet weight with water.
-grab a few 1” bulkheads, new tub to be the reservoir in the bottom cabinet, 1” tubing, some valves, T’s, 1”PVC and a series of connectors.

There’s a local hardware store going out of business/ liquidating by my house so I want to head over and load up :)

On the main reservoir in the cabinet, the only hole I’m planning to make is a single one in the bottom for a 1” bulkhead that will act as the drain/ return line, and for the feed line I’ll come over the top like you do (there’s actually a perfect spot for it in the front of the res).
image.jpg

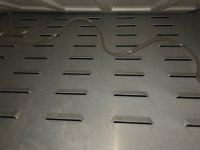
When drilling through the BCNL cab res, there’s also a vented sheet of aluminum that acts as the base that I’ll also need to drill through. I could remove it entirely and replace it with a a customized piece, but may be more work than I’m feeling up to today. In the future though, that opens up a whole world of possibilities.
A9594E39-8843-4FB9-97C3-06CAA7073ABA.jpeg

I’m still noodling on a creative way to do the overflow tube that will be very easy to remove. Peanut butter jar was certainly clever.

Here’s the lady as of this morning, first 5 leaf set is in:
ACF5870A-DE5E-4FEB-967C-D642A506703F.jpeg
 
Back
Top Bottom