

- Thread starter
- #41
The Happy One
Well-Known Member
This next hurtle probably deserves a thread of it's own, however, in adhering to my "keeping it real" mentality, I'm determined to include whatever real life hurtles we run into, and this one is a doozy.
It is also a long read, but I've done my best to explain the theory. .
I previously had mentioned an issue with our 1 hp (11,000 btu) chiller barely being able to maintain a 69-70 deg reservoir. It IS doing the job, but when we crank the lights up in bloom we are going to run into problems, plus I have several more flower rooms to bring online.
Also, first and foremost money is always the issue and when you don't have a lot of it and refuse to give in, you find a work-around. Here is mine.
I need a 4 ton chiller, and 4 ton chillers aren't cheap so I began to research chillers. Now, I am an HVAC contractor, and know my way around air conditioning blindfolded, but chillers? So I went to calling on chiller manufactures. What I have found out is chiller manufactures don't like sharing their knowledge with the outside world and even tend to size their equipment in KW and not tonnage, and refuse to share trade secets. OK. I get it, but that won't stop me. Google has the ability to provide a crash course in just about anything your heart desires, so I enrolled a few evenings in research and came up with a gameplan.
I'm going to take a used 4 ton Dichlorodifluoromethane (R-22) condensing unit and make a chiller. How hard can it be?
(Not as hard as you may think)
Lemme offer a scenario. In most homes you have a condensing unit that sits outside and a furnace/evaporator inside. The condenser pumps refrigerant into the evaporator with a fan blowing across the evaporator effectively cooling your home. To create a chiller we keep the outdoor section, (the 4 ton condenser) and perform two modifications to it.
1. Add an accumulator. Think of this as two liter sized reservoir placed just in front of the compressor suction line. (the big one) It acts as a liquid reservoir to catch any liquids before the vapor enters the compressor, and can be found on most heat pumps. It's required on heat pumps and chillers because the outdoor unit runs both summer and winter, and in the wintertime the head pressures are far lower than on a hot summer day and liquid refrigerant can migrate back to the compressor....and liquids don't tend to compress that well. This will prevent compressor failure.
2. Add a suction or low side pressure switch. This will cycle off the compressor on very cold days when suction and discharge pressures are too low. (I might incorporate a variable speed controller for the condenser fan motor, as it needs very little air movement across the condenser in the wintertime)
That's it for the outside anyway. Now lets move on to the indoor section. First up, we have NO USE for a furnace, air handler or conventional evaporator which is pretty much EVERYTHING in the indoor section, so what do we do?
We'll put together the parts we need, and it isn't all that much. First thing we need is a thermostat/controller. It's job will be to maintain the 175 gallon reservoir to the mid to low 50's and control the 24 volt signal to the outdoor condensing unit. The far best way I found was to take notes from those fella's that make chillers for home brewing, and that's using one of these.

This little tool cost right at 15 bucks, and will operate the condensing unit as well as maintain temps in the 175 gallon reservoir. It comes with a temp probe, but I purchased a stainless steel version for dependability. It aslo cost about 15 bucks

I also need a way to shut the system down and provide a safety lockout. This solution cost me about 5 bucks on Amazon.

I'll end up gutting the box for the switches, and install them in a scrap piece of aluminum I have for the unit cover.
You don't have to do this step, but I am going to simply because I'm in the mechanical room throughout the day, and I'm seldom outside with gauges connected to the condensing unit, and I like to see how the high and low side pressures are operating at, and do so at a glance, so I'm installing suction and discharge gauges on the indoor control unit. These gauges panel mounted and are liquid filled, far more accurate than my refrigeration gauges.


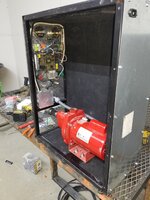
I may add a few light indicators on the front panel, but besides the chiller evaporator coil. that's about it. I DO have to spring for a chiller evaporator, so I went on the search for one that flowed 4 tons. The first issue I ran into, was they were rated by KW, and not by tonnage so I had to do a little math to find the correct evaporator. The one I've chosen is rated right at 17.5 kw. Converted it brings me right at a 10% over my 4 ton requirement, perfect for our needs. Hard to believe a 4 ton chiller evaporator in a brazed plate configuration is only around 4 inches by 12 inches and about another 4 inches deep, so designing a box shouldn't be too bad.

This isn't the actual coil, but you get the idea. Now, I need to start putting stuff together, so I hit the scrap bin and came up with a piece of aluminum plate big enough to hold the controls as well as the heat exchanger. After a measuring and marking, I went to work cutting two 2.5" holes for the gauges and holes for the key on and safety disconnect.

My wife thinks it looks like a smiley face. The price I pay to be so OCD. Oh well. Once the parts are jammed in, it takes on a functional look

Next up: Outdoor condenser mods, running a lineset and buying an evaporator....
It is also a long read, but I've done my best to explain the theory. .
I previously had mentioned an issue with our 1 hp (11,000 btu) chiller barely being able to maintain a 69-70 deg reservoir. It IS doing the job, but when we crank the lights up in bloom we are going to run into problems, plus I have several more flower rooms to bring online.
Also, first and foremost money is always the issue and when you don't have a lot of it and refuse to give in, you find a work-around. Here is mine.
I need a 4 ton chiller, and 4 ton chillers aren't cheap so I began to research chillers. Now, I am an HVAC contractor, and know my way around air conditioning blindfolded, but chillers? So I went to calling on chiller manufactures. What I have found out is chiller manufactures don't like sharing their knowledge with the outside world and even tend to size their equipment in KW and not tonnage, and refuse to share trade secets. OK. I get it, but that won't stop me. Google has the ability to provide a crash course in just about anything your heart desires, so I enrolled a few evenings in research and came up with a gameplan.
I'm going to take a used 4 ton Dichlorodifluoromethane (R-22) condensing unit and make a chiller. How hard can it be?
(Not as hard as you may think)
Lemme offer a scenario. In most homes you have a condensing unit that sits outside and a furnace/evaporator inside. The condenser pumps refrigerant into the evaporator with a fan blowing across the evaporator effectively cooling your home. To create a chiller we keep the outdoor section, (the 4 ton condenser) and perform two modifications to it.
1. Add an accumulator. Think of this as two liter sized reservoir placed just in front of the compressor suction line. (the big one) It acts as a liquid reservoir to catch any liquids before the vapor enters the compressor, and can be found on most heat pumps. It's required on heat pumps and chillers because the outdoor unit runs both summer and winter, and in the wintertime the head pressures are far lower than on a hot summer day and liquid refrigerant can migrate back to the compressor....and liquids don't tend to compress that well. This will prevent compressor failure.
2. Add a suction or low side pressure switch. This will cycle off the compressor on very cold days when suction and discharge pressures are too low. (I might incorporate a variable speed controller for the condenser fan motor, as it needs very little air movement across the condenser in the wintertime)
That's it for the outside anyway. Now lets move on to the indoor section. First up, we have NO USE for a furnace, air handler or conventional evaporator which is pretty much EVERYTHING in the indoor section, so what do we do?
We'll put together the parts we need, and it isn't all that much. First thing we need is a thermostat/controller. It's job will be to maintain the 175 gallon reservoir to the mid to low 50's and control the 24 volt signal to the outdoor condensing unit. The far best way I found was to take notes from those fella's that make chillers for home brewing, and that's using one of these.
This little tool cost right at 15 bucks, and will operate the condensing unit as well as maintain temps in the 175 gallon reservoir. It comes with a temp probe, but I purchased a stainless steel version for dependability. It aslo cost about 15 bucks
I also need a way to shut the system down and provide a safety lockout. This solution cost me about 5 bucks on Amazon.
I'll end up gutting the box for the switches, and install them in a scrap piece of aluminum I have for the unit cover.
You don't have to do this step, but I am going to simply because I'm in the mechanical room throughout the day, and I'm seldom outside with gauges connected to the condensing unit, and I like to see how the high and low side pressures are operating at, and do so at a glance, so I'm installing suction and discharge gauges on the indoor control unit. These gauges panel mounted and are liquid filled, far more accurate than my refrigeration gauges.
I may add a few light indicators on the front panel, but besides the chiller evaporator coil. that's about it. I DO have to spring for a chiller evaporator, so I went on the search for one that flowed 4 tons. The first issue I ran into, was they were rated by KW, and not by tonnage so I had to do a little math to find the correct evaporator. The one I've chosen is rated right at 17.5 kw. Converted it brings me right at a 10% over my 4 ton requirement, perfect for our needs. Hard to believe a 4 ton chiller evaporator in a brazed plate configuration is only around 4 inches by 12 inches and about another 4 inches deep, so designing a box shouldn't be too bad.
This isn't the actual coil, but you get the idea. Now, I need to start putting stuff together, so I hit the scrap bin and came up with a piece of aluminum plate big enough to hold the controls as well as the heat exchanger. After a measuring and marking, I went to work cutting two 2.5" holes for the gauges and holes for the key on and safety disconnect.
My wife thinks it looks like a smiley face. The price I pay to be so OCD. Oh well. Once the parts are jammed in, it takes on a functional look
Next up: Outdoor condenser mods, running a lineset and buying an evaporator....


 Anyway, here's the permanent power supply for that section. About 9 bucks with 1 day shipping. Love it!
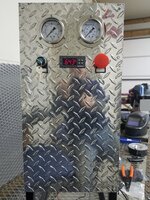

 kidding aside, everything looking great. Girls look like they about to explode. Are they in flower allready?