The Happy Cola Company's Official Ground Up Medical Cannabis Grow Op

The Happy One

Well-Known Member
Honestly, I had planned to start a build thread nearly a year ago, however we have been SO busy trying to pull this dream of ours off, time has literally flashed by. Now that the building is up, it's time to start to document this biggest venture of either of our lives .
I guess I need to offer a little background. I began growing "out on the farm" in the 70's. I'd dig a hole, toss a few dead fish in the hole, cover it up and use it the following year. Grew some great outdoor buddage using cow manure and dead fish. After losing a few crops I decided to move it indoors. Back then, all that was available was a 1000 watt HPS and magnetic ballast, which drew a good 1 kw per hr. I nearly got busted a few times over electricity.
Anyway, the years went by and the dream fairly sprinkled some magic fairy dust over Oklahoma and Shazam! Just like that we were thrust into this venture as if destiny had taken hold. We were going to grow the same top shelf bud we had been growing, and we were going to do it legally.
First up, we needed a place to grow, and after a lot of research and a few rental horror stories we decided we simply needed to purchace a place and not rent.
After a few months of looking, we decided we really couldn't get what we wanted, and it would be pricey to convert a building to what we needed.
We decided to purchase land and build ourselves. This is our story.
20190410_140249.jpg


We found a 5 acre spot next to a winery that met the criteria on location and we sealed the deal. First step was to get a road put in, and as much clay that is there, it was pricey, but we had to be able to get heavy equipment in without getting stuck. This little road set up back a solid 10k, but I can drive anything on it forever now. Oh yay. Moving on.
20190430_110346.jpg


We have planned a 10,000 sq ft facility with 5000 sq ft downstairs and 5000 square foot upstairs. We are doing this in stages as we can afford it, and we are two old country boys pretty much doing everything ourselves and thus far we have managed this far without having to bring in outside investors, but we have a long way to go.
Enjoy the ride along.

20190502_143234.jpg


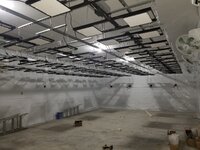
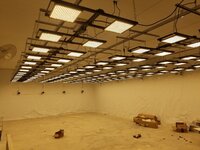
We farmed out the building construction and concrete work. Once the shell was up and concrete was down, we shewed everyone off and began the interior transformation

20190505_141537.jpg

20190513_191216.jpg


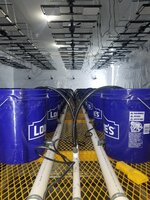
Once the building was up, and before concrete was laid down, we had to put a lot of stuff underground. The goal is to carry electric to each grow room with their own breaker boxes and run tap water as well as R.O. water to each grow room under 40-50 psi. We used PEX for all the water lines
20190513_191304.jpg


We have a 400 amp service, so we need to be smart about how we distribute and use it. You are seeing red and blue 1/2" water lines which look pretty standard by most, however in each grow room, blue indicated tap water and red indicates R.O. water. More on how the distribution system works upcoming.

20190523_095136.jpg


You wouldn't know it just looking, but there is a lot going on under the flooring. Even the concrete crew was scratching their heads...

20190526_183407.jpg


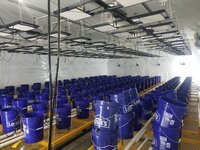
Once the concrete was down, we ran everyone off and began to lay of the rooms. The downstairs consists of four 22x40 flower rooms and four 22x40 rooms upstairs and living quarters, bathroom, shower and locker room and office
 
20190608_150953.jpg


We made the hallway a full 6' wide, and I'm designing an elevator to get heavy items upstairs. I'm too old to be honking things up and down stairs. More on the elevator later.

20190622_133816.jpg


The entire downstairs is designed on 10' ceilings. Upstairs we only went with 8' ceilings, so flowering duties are downstairs. We'll have clone, veg, cure and processing rooms upstairs. The 6 foot opening between rooms are temporary, and only wide to allow movement of plywood, sheetrock, ect.. Those walls get closed in.

20190702_144824.jpg


There is a conventional stairway that leads from the garage to the upstairs. The elevator will be located in the mechanical room. More on that later


20190702_144835.jpg


The upstairs is phase ll. We'll finish the loft/kitchenette and living quarters, and finish the upstairs growrooms as time and money allows.

20190630_162113.jpg


For cooling duties, we are using Samsung Invertor mini-splits. With the use of LED's, we can get away away with right at 50 tons of cooling. The only better way in my opinion to pull this off any better would be to use a large chiller. I'm a Samsung Authorized Dealer, so this is the direction we went.
20190711_205023.jpg


20190722_221114.jpg


Each grow room has it's own floor drain (upstairs and down) and has their own work sink...with a twist. I don't need hot water in our grow rooms, so if you see blue and red PEX, it's blue for tap water and red for R.O. water. More on the distribution system later.

20190726_140116.jpg


We don have an office with a sink, bathroom and shower as well as a small kitchenette upstairs, so a small on-demand hot water heater is all we need.

20190726_182951.jpg


This room is right at 22'x40'. We will have four 4' wide rows 32 feet long and will house 128 female plants when complete. The ceiling outlets are all 220 volt and all tied into a 32 light flip-box I built. The room directly behind this room is also 22'x40' and is tied into the flip box in this room. When the lights are off in here....they are on in the room behind us. All dedicated flower rooms have been done this way.

20190919_182617.jpg


Here's a closer look at one of my 32 light flip-boxes. I did incorporate an adjustable time delay relay to allow staging of the lights as they come on. The box itself is just a cheap breaker box I gutted. Eventually I plan to replace this control with solid state relays and Arduino control, but that's gonna be another story.
 
20190722_221153.jpg


This will be the mechanical room. That's a 330 gallon reservoir. I have room for one more next to this one. This will be the reservoirs for the R.O. water, and will give us over 600 gallons of 5 ppm or less R.O. water, distributed into each grow rooms by an automated well pump, delivering a solid 40-45 psi of R.O. to every grow room.

20190728_194748.jpg


I had to fire it up, even though I have to add a few more items. I also realize this isn't a truly commercial setup, however the R.O. 1000 does deliver it rated claims, and this will work for a few grows anyway. The prefilter is a little small as well, however we got both of them on Amazon in an open box format, giving less than 50 cents on the dollar. The only issue? The cheap plastic canister wrench was broken. Big woo.

20190807_161926.jpg


Here it is in it's finished form. R.O. feeds out into the wall, into a distribution manifold and is fed under the slab into each grow room, both tap and R.O. water feeds.

20190823_183724.jpg


You cant see it, but under the Panda film is sealed sheetrock and under the sheetrock is a plastic vapor barrier followed with an R-13 insulation followed with a 3 inch air gap and another R-8 insulation that also functions as yet another smell barrier. This is a truly sealed grow room with carbon scrubber and Co2. It should keep the smells where they belong. In the room.

20190910_182336.jpg


We needed to get started on our tables, and since we are trying to take advantage of every square inch and still be able to work, we opted for rolling tabletop tables. Now, I get you can buy these ready made for 300 bucks or so, but I was able to build these at about 100 bucks a table, so being the poor Oklahoma country boy I am, I donated my time and just built them.

20190912_175649.jpg


No, that's not Santa in the background. That's my partner admiring how fluid the tables are. The more you load them, they easier they move!

20190912_181432.jpg


This gives you a little idea on how this is going to look. I welded nuts to each leg so we can adjust the height perfectly

20190914_171916.jpg

20190918_162606.jpg


Once four rows of tables are in place, we'd never be able to get around without being able to move entire rows around. These tables will give us 18" either way or a total of 30" of isle space when spread out. We also scored a real deal on some Rustoleum oil based paint for the tables. The only catch? It's Caterpillar Yellow, so our tables are gonna look like school busses... Oh well.
 
20191005_192007.jpg


Once we got the tables ironed out (we had to build 16 of them), it was time to move onto the lighting, an area I have spent more time on during this build than any other subject, and one that goes way back to how much electricity we had available to go around, so I LOT of thought went into how to distribute our 400 amp service.

My partner bought out a few Colorado indoor grows, so we ended up with a LOT of equipment, one of which was way over 100 magnetic 1000 watt HPS ballasts. After doing some math and calculating electrical and HVAC costs, LED easily proved to be our best option in spite of having the HPS lights. Whatever we chose would consist of 32 lights per room, and 220 volt was the only way to pull it off, but even before that, I needed to contend with yet another issue that was sure to prove to be a daily pain in the you-know-what. Adjusting lighting, and the mere thought of that on a larger scale was more than either me or my partner have ever participated in. It was sure to be a daily daunting task, so here is what I came up with.

20191006_102335.jpg

20191006_102321.jpg


I had some left over 1x2 square tubing for the tables, so I began to devise a cable operated light wench of sorts. I found some cheap boat winches, figured the lighting row centerlines and fab'd a rail to hold all 4 of the winches.

20190930_231019.jpg


Having to save money anywhere we can, I took some of our 1x2 table material, bought a handful of garage door 3 inch pulleys and went to town. Each row would end up needing a total of 6 pulleys each.

20191001_164219.jpg


The puley's had to be lined up perfectly for the cables to operate properly, so good old string to the rescue...

20191007_181638.jpg

20191007_182138.jpg


To get the right perfect height of all the cable pull points, I had to pre-load them. All I had was our Caterpillar Yellow Rustoleum, but hard times call for hard measures...
20191010_165633.jpg


The railing is made of 10 foot sections of 1 5/8" Unistrut. Every joint has a reinforcement plate and a vertical pulley and cable.

20191010_173819.jpg


This gives you an idea what it will look like. What you cant see is what happened on my first attempt, attaching only one light to the rail. It pulled out and a 150 lb rail with a rather pricey LED light came crashing down. That happened before this photo was taken. We engineered an entire beam between the ceiling and the upstairs floor. This also prompted a redesign on those four pulleys you can see by the wall.

20191026_144225.jpg


Compare this photo to the one before it and you can see what I had to do to each of the the transverse pulleys above the wench. What happened was the horizontal load was trying to horozontally pull the pulley away from the wall. I ended up welding four new pulley carriers and used two ceiling joists for support of each. Rock solid now., and it needs to be. Each row, with lighting is just under 300 lbs.
 
20191017_175503.jpg


Here's a view of how it will be set up. This offers us adjustments in the form of 1/4" increments, and does so with one handed ease!

20191023_191102.jpg


Here's a birds-eye view from above

20191102_174119.jpg


Here's a shot with all the lights in place. This will make light adjustments so much easier.

20191102_174157.jpg


Getting close, but we still have Co2, carbon scrubber and dehumidifier to contend with.
More to come!
 

Attachments

  • 20191102_174134.jpg
    20191102_174134.jpg
    659.8 KB · Views: 298
  • 20191102_174209.jpg
    20191102_174209.jpg
    719.1 KB · Views: 302
Insane Grow op. Very nicely planned and executed. I wish you the very best in your new endevour.
 
Time for another update. With the lighting out of the way, I welded a brace to get the dehumidifier up and out of the way. Space is a cherished commodity.

20191120_154157.jpg


From there we started to bring the tables in. Without the ability to roll the tabletops we couldn't get around. No wasted space here!
20191120_154034.jpg
 
Amazing journal so far! Thank you for sharing with us. I look forward to the rest of this journal.
I'm curious, Is each post of the main structure of the building sitting on top of a concrete sonotube?
Here on the east cost of Canada we call this a Poll Barn. It's a very popular structure design among farmers around here.
Great building, and great plan. I'm very jealous.
 
After getting a few tables put together, and though I can move them, however that's at the side of the table, somewhere that already needs to have had the table adjusted so that particular isle can be accessed. The easiest way is from the front of the tables.
Here's what I came up with. First, I hit up our metal pile for another stick of 1x2, then picked up a 10 foot stick of 20 gauge 1 1/4" I'd mild steel pipe and designed a hand crank
20191121_162416.jpg

20191121_162423.jpg

20191122_112418.jpg

20191122_112430.jpg


Once I got them welded up I dropped a 6 inch 3/8" bolt for the handle and welded the backside

20191122_113848.jpg

20191122_113856.jpg


After slapping some loud red down, I took a piece of 1/2" PEX I had laying around and made a rolling handle. I then added some cushion in the event a knee shin come in contact...
20191122_171306.jpg


This allows me to move 30 feet of heavy rolling tabletop with ease.
Time to put this one to bed!
Moving onto the next hurtle... Stay tuned!
 
Amazing journal so far! Thank you for sharing with us. I look forward to the rest of this journal.
I'm curious, Is each post of the main structure of the building sitting on top of a concrete sonotube?
Here on the east cost of Canada we call this a Poll Barn. It's a very popular structure design among farmers around here.
Great building, and great plan. I'm very jealous.
Yes. Each post used a concrete reinforced sonotube. This was the most cost effective design we could come up with.
 
Great read so far. My question is, what brand of lights did you go with, and do you have a dedicated dry room?

As far as lighting, we went with Atreum Lighting based upon the Samsung 301b chips. These clocked factory at right at 490 watts at the plug. I overclocked the drivers to draw right at 550 watts at the plug.
With our floorplan, this will give each plant their own board.
Before choosing our lights, we were sold on the Samsung 301b's. Matter of fact after seeing a Quantum setup at the local hydro store, I bought a PAR meter. After seeing what the Samsung 301b's could do under the PAR meter, I was sold.
What set Atreum apart from the other guys were primarily two things.
1. They could deliver our needs in a timely fashion
2. The frame they use is akin to a grown up Erector Set. I can slide the boards in, out or wherever I want, then lock it down with ease. Talk about dialing a perfect spread. I've yet to see a better setup. Period.
Mike at Atreum really worked with us, and the one time I was unable to reach him, he was caught at a Hong Kong airport, stuck waiting to fly back to the states while a riot was taking place outside.
So what's he do?
He calls me from Hong Kong. Standup guy. Standup company.
If this room goes like we are thinking, Atreum will be our primary supplier for lighting for many years to come.

Dedicated drying room. Yes. It will be located upstairs next to the cure room.
 
With the tables setup and leveled off, the hand cranks worked out so well, Ingelt we needed to implement them on the backside as well. The only issue is limited space, and my partner brought up the shin high cranks. Though I put cushions on them, there is more room up front than in the rear, so a small design change wa sin order, and since it takes very little effort to move 30 feet of heavy tabletop, I improvised with a short, low profile "spinner" handle.
20191124_161844.jpg

20191124_165120.jpg
20191124_164605.jpg

20191124_164638.jpg


Next up: Design and layout of the hydroponics. Our flower room will consist of top fed constant flow recirculating buckets. Each plant will be grown in expanded clay in 10 inch net trays made for standard 5 gallon buckets. There's 128 buckets in this room.
Stay tuned!
 
Today we got started laying out the hydroponics. Each bucket is top fed with 1/2" tubing (Yes. Half inch. No tiny feeder tubes to get clogged here)
Each bucket has a 3/4" drain that drains into an 1 1/4" PVC trough. I've seen Dutch buckets set up similar.
20191125_171825.jpg

20191125_171925.jpg


There are 1 1/4" returns on each side. This will allow quick swapping buckets. Each top fed fill tube has it's own shut off valve. The two 1 1/4" returns come together and dump back into the reservoir
20191125_172000.jpg
 
20191126_135858.jpg


With the buckets laid out we began running the fitting for the top feed.
20191126_184449.jpg


We did a trial run and adjusted the feed flow to each bucket. Seems good to go.
The chiller for the 4 reservoirs is located on the 2nd floor.
This will provide cooling for all four reservoirs. The supply and return feed will be ran through the ceiling and be supported by unistrut. This will allow the chiller distribution manifolds to drop down going into each reservoir. This keeps hoses, lines and electrical cords from being ran across the floor. More on that upcoming.
 
Ran into my first issue with the hydro setup. First off, we had calculated that a 660 Echo pump would be enough to feed our buckets.
It wasn't. Not that all buckets weren't receiving water, just not enough. I also feel the drain needs to be larger.
I swapped the 660 pump for a 1056. That delivers what we need, about a gallon a minute over each bucket. It has also prompted us to increase the drain size from 1.25" to 1.50".
Next week I begin plumbing the chiller lines. We moved the idea from housing the chiller upstairs to placing it in the downstairs mechanical room. Gotta run a good 40 feet of supply and return, but it gets the chiller and reservoir where it needs to be.
Frankly I'd have thought we'd have plants in the room by now, but it's been one thing after another to get to that point.
Maybe next week?
 
We keep plugging along, but one thing leads to another so it's been a slow road to reach the finish line.
We did get about 100 feet of chiller line installed. This was time consuming because we had to run the lines between floor joists....which meant drilling two 2.5 inch holes every 19.5".
20191129_224726.jpg


Once the long runs were in, I began plumbing the four loops for each reservoir.
20191129_224559.jpg

Each loop has it's own shut off valve so each reservoir can be isolated from the system for easy maintenance.
I used 5/8" unistrut spaced between two joists to support the cooling lines. These lines will be insulated all the way back to the chiller located in the mech room

20191129_224551.jpg
20191130_110958.jpg
 
The lines are ran and insulated for the 1 hp chiller in the mechanical room. I need to build another wall mount in the mech room to mount the chiller.
20191130_150012.jpg


Once that was done, we began filling out the canopy with buckets.
20191130_193623.jpg

132 plants doesn't sound like a lot, but this gave me a perspective I didn't yet have. This is gonna be a fun. Funner still is we have 5 rooms to go... AARRGG!
 

Attachments

  • 20191130_150423.jpg
    20191130_150423.jpg
    879.5 KB · Views: 281
  • 20191130_193612.jpg
    20191130_193612.jpg
    842.8 KB · Views: 282
We finally finished grow room and put her through a trial run for a day, then finally began bringing plants in.
Our first run consists of Jack Herer (3 different genetic specimens), Green Crack, Velvet Bud and a few I can't remember.
We have them labeled, but we will be tagging them with barcodes for tracking throughout their lives.
I pulled the 550 watts per light at the plug down to right at 200 watts per light. This will be the only one grow where our ladies are vegged in this room. We have begun setting up a mother room and veg room now.
20191216_172441.jpg
 
Back
Top Bottom