Vortex's Dev Lab: A Perpetual Thread For Developing Young Plants

I can hear it now, "Yo, mV, what's with another one of these?!?!?!"

The answer is simple. I needed a space to sprout seeds, start clones, and initially veg some babies until they're ready to go into either the Lab, or into the RDWC. That's the big picture.


Prior to putting this together, I was sprouting seeds in a bathroom, then moving them into what little sliver of unoccupied space I could find. Whatever. I also needed a place to dry harvested buds, give runt plants a chance, etc. The end result is the newly minted "Development Lab".

It's primary mission statement is, "A dedicated area for the development of young plants from seed or clone in order to better prepare them for their growth to maturity."


A general list of its duties includes:
- seed sprouting
- clone starting
- mother keeping
- care of sick/injured/stunted/runt plants
- early vegging in preparation for moving to Lab/RDWC
- available drying space, as needed
- other functional space as required


It will be a nursery for baby, runt, stunted, sick, or injured plants, seedlings, and sprouts. The side mission will be for very early vegging of plants, as needed, especially for the RDWC and letting them get a root going before moving them in. For this I will be using a semi-DIY build aeroponic setup, that is also able to convert into a flood/drain, DWC, or even RDWC setup. We'll get to that down the road, but I have a few details about it in my other threads. (Probably the Lab thread.) I will also be keeping mother plants in the bottom of the small side as things move forward.

This is what we're starting with (manufacturer image):

cool-grows-4x3x6-jpg.2018545


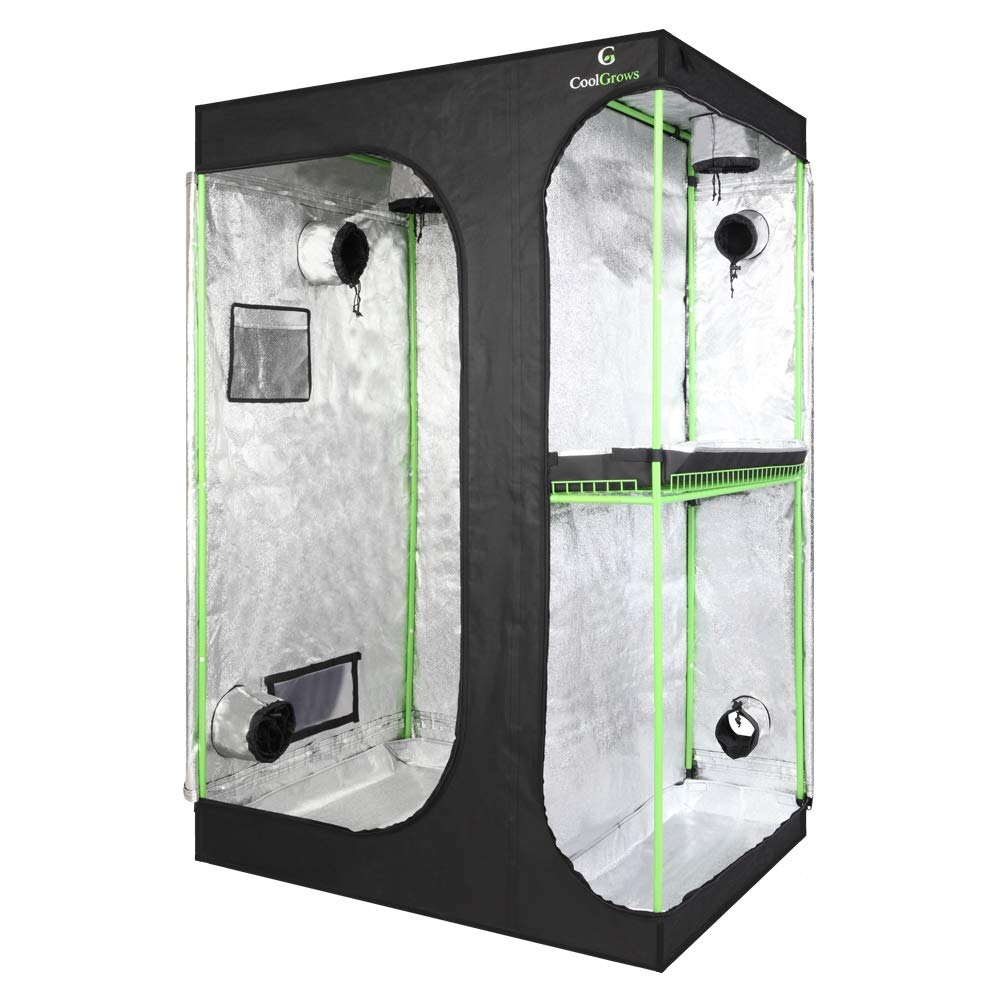
Overall it is a 4ftx3ft tent, that is 6ft tall. The primary space is 3x3 (this is important, as my multi-use setup is 34inx26in, give or take) with the shelf space on the end being 1x3. The vertical height is split evenly between the two levels. If one so desired, they could remove the shelf and use the entire end space.


In the next post, I'll start with some real pictures.
 
This post will be more (current) setup detail, and I will explain more about the plant in the next post (image limit and all.)

You'll also have to forgive me for a lack of pics for most of the build, but it is what it is. I was focused on the task at hand,


First pic I managed to snap during the install phase was the exhaust in progress.

0085B57A-B249-4C5A-A24F-4E38A309E538.jpeg


As there are two sides to this tent, there is the need for two exhausts. So what I've done here is put a 6" HVAC ducting tee with it's branch into the top duct of the smaller side of the tent. I hooked up another line into the top duct of the main side.

After this pic was taken (note you can see the RDWC in the back left, and the Lab in the back right) there was another ducting trunk connected to the tee, ran across the ceiling, and over to the Lab tent where it was connected to one of my intake trunks.

The effect of this is a piggyback of the fan/filter/exhaust of the Lab tent. It's drawing nicely, by the way.


Each input to the tee also has an intake fan which is pushing 250-300 cfm into the trunk, in conjunction with what the exhaust is sucking through. The intake fans probably aren't needed, but I wanted to ensure each side was being vented, and not just the easiest path getting the most love.


98F7F4C1-B926-4B09-B91E-3F7DE747121E.jpeg


For the main side, it's first assignment will be to handle a runt GDP. This was originally earmarked for the RDWC, but was just so far behind the others it wasn't funny. No way she was going to catch them, so I opted to pull her out and replace her with a second Strawberry Lemonade. The GDP was then moved into a solo cup with perlite, and started on the path towards a (recirculating) dutch/bato/hempy bucket.

More on the plant and her history in the next post. For now, I'm going to cover the setup for her.

Using a 3gal bucket (I think it's closer to 3.5, but whatever) as the base for our dutch bucket, I gave it a hole at about the 2.5in mark for the overflow.

In the pic above, I'm checking the height and fit of the riser for the bucket. In order for the height to work for the necessary gravity drain back to the reservoir (5gal bucket). I used a combination of a riser for the entire tent (4") that I already had built, and then an internal stand of 8" that was also already built.

I had to add some blocks under the legs, and in the end also had to add blocks under the bucket as well.


D8F7C059-828C-4659-AE60-F1E99C5648D9.jpeg


Here is the reservoir in progress. I came up with the valves on the fly. I can close the one to the bucket, open the other, and pump out the solution in order to change out the water.

I will first pump out the bucket, then I will add new solution to the plant bucket and let it overflow a good bit back into the res. I will then pump out the res again, and then top it off. (Opening/closing the valves as required, obviously.)

The pump is a small 132g/hr ecoplus, that can be adjusted down if needed. It is hooked to a timer which will circulate nutrients 3x per day during the daytime cycle. The cycle is 18 hours (6am to midnight), and the water kicks on at 9:30, 15:30, and 21:30. Right now it's on a mechanical timer that can only set in 30min increments. This will be solved by the end of the week as Mr Bezos was kind enough to schedule a drop-off of a couple more digital timers so I can better control the time for this. However I will say that in the couple of days it's been running, 30min isn't hurting anything, and probably ensuring a good mixup of the solution in the bucket.


The res also has a small air pump to keep the water fresh.

You can see the bulkhead at the bottom for a sight glass, so I know if/when the res needs a top-off. I also zip tied the pipe to the bucket, just before the elbow into the res. This keeps it at the right angle to let gravity to its thing.


093A2167-9A75-4685-9003-3CEA57773C06.jpeg


Here is a pic with the setup almost complete. You can see that in the end I needed some blocks under the bucket, and that I also put it on a saucer/riser combination as well. It works, it's stable, and will get the job done.

As there is no pressure on the line, I didn't glue anything together. This is good and will allow me to reuse the parts later on.

The light is a simple 300w (draw) blurple that is my "in case of emergency" light. It's currently set on just the "veg" channel, to keep the spectrum more blue and those nodes closer together.

So far she seems to be enjoying the light, and is doing well.

In this image you can also see one of the oscillating circulation fans, my "rigged up" contraption to hook the fan to the pole, as well as the intake/supply fan previously mentioned.


6655D60D-BA7E-495E-BF21-597E6DBF1344.jpeg


The final addition to this was to add a floraflex matrix drip tray. These things are fantastic. I didn't really need one for this, but I really wanted to evenly distribute the water down to the res. This is for several reasons. First, to avoid any channeling through the media. Second, in hopes to better push out the older solution. Third, as somewhat of a light barrier to the perlite below. Although light shouldn't reach the water below, I'd like to prevent that algae stain on top of the perlite if possible. To try and counter this, I added a 1" layer of hydroton on top, and then the drip tray.


As for the smaller side of the tent, I don't have those pics at the moment. Right now my cloner is sitting on the bottom, and the clones look like... clones. Not real perky, hanging on to try and make roots. For the first several days I try to not screw with them much, and just leave them alone in peace.

I did take a peek this morning, and noticed the stems under the neoprene have all now bent to a 90* angle, so the overall stem shape is an "L".

On this side I have 4 LED strip lights, 2 per level. They aren't super powerful, they are 5000k spectrum, and maybe 6800 lux each? They're bright for what they are though, and for $10/pop, not a bad deal.


Now we'll be on to more about our first guest, and some more pics of her and her history.
 
Now for some more quality bird cage lining.

Originally I had GDP planned as one of 4 strains selected for the current (and inaugural) run of my new RDWC setup.

The other plants went into the RDWC around the 12th of December. Our GDP girl wasn't ready yet, and just wasn't tall enough for her netpot to be filled up enough to block light. No bueno! She remained in my Lab tent for another week before finally being just barely tall enough to make it.

A564B1FF-5F06-4A0D-9DB7-4763C14983F0.jpeg


0821F916-3D5E-468D-A83E-4E6377437610.jpeg


See what I mean? Tiny, tiny baby.


A week later?


14E75361-B37E-45BE-963B-97CBDF920D86.jpeg


Finally, the last weekend of December I made the call to move her out of the RDWC and replace her in there with a second Strawberry Lemonade I had on the side just in case.


A94A18E6-CB76-47BD-8421-3B27E6AB4E91.jpeg


Here she was, just after I pulled her out. Even an ant was chiming in, "damn, that's small!" (At this point she was just over 3 weeks old.)

I moved her into a solo cup with perlite. Poked 2 drain holes in the side about an inch from the bottom, and started trying to figure her out. I kept the cup inside the RDWC tent, just to see what would happen (if anything.) I started off with manually cycling the water every morning.

Within a few days, we had this:


38871E4B-79E8-46BB-93C9-57F3F9955E07.jpeg


Well alrighty then, she seems like she may want to grow after all. I then started to wet the cup twice a day (morning and early evening.)


05E1D47F-56B2-4421-B3D2-7AA7CD62DBC0.jpeg


And she grew bit.


A56D54A8-1DE7-4AD7-8064-2BBDD8F7211C.jpeg


My, she's grown a decent bit now, in just a week. Ruh roh! Looks like somebody is in need of some new shoes!

What to do, what to do?

Thankfully, I had a plan already brewing and things had been set into motion which could not be undone!


After spending all of a Friday evening and all of a Saturday Putting together and initially setting up the new Dev Lab, on Sunday morning it was time to put her in her new digs.


26E9AAF4-18CE-4419-A819-EA1D081719BF.jpeg


Fresh from the RDWC tent, and no idea what is about to come her way.


938F94C4-EC8E-4F04-86C0-F6D76C5F8E6C.jpeg


Let's clean up those bottom leaves, and go ahead and take off nodes 1 & 2 in preparation for her quadline training.


33B10544-C0B8-4438-972C-80F60F6CBE59.jpeg


There we go. That's much better! Now we also have a little room to work with on planting depth, too!


Let's get her into her new shoes, huh?


d3703917-d727-4486-941a-9a4031105ed3-jpeg.2027383


She certainly needed 'em. This wad of perlite was a solid wad of roots. I didn't even wet the perlite down before getting her out of the cup.


38d4d845-f55a-45b1-b4d4-9f91efe2be80-jpeg.2027384


And here we are. Freshly popped into her new home for the next few months. (Move-in day.)


6655d60d-ba7e-495e-bf21-597e6dbf1344-jpeg.2029797


Finally, she's all hooked up for an automated buffet of tasty treats. (This is 3-days after moving in.) She's not quite ready to top, but getting really close.


It seems she's taken to her new home alright. Trying my best with these to wash out all the blurple lighting, but be prepared that at times it just won't be quite as well as it should be.

I may have to get creative for pic lighting for her, and I have a couple ideas. Unfortunately it isn't quite as easy as just turning off the light and letting the light of the room take over. It ends up being too dark as the light in this area is pretty much right over the tent and is blocked from the inside. But I have ideas to play with soon.


So, there is the GDP. She may make a go for maturity yet. Her leaves seem happy with the light (it's about 18" above her right now) and she is responding well. The drip tray is working out fantastic, and I'm very pleased to have them. Granted I have 12 of them now, but I will put most of them to good use over the coming months. I had held off on these a month or so ago as I couldn't find them for a decent price. However I finally came across them from BG Hydro for $30 (for a 12-pack.) That was good enough by me, and these things are great. Not quite as thick of material as I thought they would be, or they look, but they will certainly last a good while if handled properly.


Now for a few quick words about the clones.


They're still in that droopy phase, but ok for now. We'll see how they turn out.

What I've done is taken 2 cuttings from each of the 4 plants in the RDWC in hopes to end up with a single, strong, viable option to become a mother plant. Kind of bass ackwards, but it will hopefully do. The goal here is to keep them initially, and if I like the end result then keep a mother if it would be worth it (to me) for the genetics.

If I decide I'm not interested in the strain as a mom, then I'll toss them, give them away, or maybe even just flower them out. No telling what fun may be had.


So there we have it. Welcome to the new Dev Lab and the adventures it will surely bring. :D


:snowboating:
 
Well, everything looks to have survived for now after a 5 day hiatus. Wasn't planned, so had to scramble over the last couple weeks to get things setup and prepared for the absence.

For the Dev Lab, here is what I was greeted with last night by our "runt" GDP:

83E95214-1DE5-4A9C-A7CE-A6409289DD29.jpeg


She has grown!


Definitely ready for her topping, and I'll need to start making sure her environment is ready for the flip as she won't be too far from it at the rate she is growing.

That bucket is 12" across, so you can kinda get a feel for her size. Effectively she's doubled in size while I was away.

I will be getting her topped and her training started today at some point.


Pic from a few posts above, just 10 days earlier:

6655d60d-ba7e-495e-bf21-597e6dbf1344-jpeg.2029797


I'd say she's moved into her new home really, really well.
 
And so the training begins...

25837948-4C68-44B2-9BBE-554198A74C14.jpeg


She seems to be pretty happy for the time being. I haven't really detailed much about the light, but I'm going to have to be honest here. It's my backup "in case of emergency" light. It draws just under 300w from the wall with both switches on. Yes it has a veg and bloom switch. Yes, it's labeled as a "1500w" light. Yes, it's also a blurple. (If that hasn't been blatantly obvious yet. lol)

Anyway, for what this light is I've thus far actually been surprised at just how nicely it's performed, and I've yet to turn on both switches. I've intentionally kept the more blue "veg" channel on, leaving off the additional red spec that comes with the flower switch, in order to try and keep the node spacing a little tighter. Thus far, I think she's doing pretty well, all things considered. The filter on the camera makes her a little darker green in the leaves than she is, but she's that nice verdant color that she should be with mega crop. :D


In other news, the floraflex tray is working extremely well and I'm loving it. So much so that I'm going to take the risk and see if I can pull off the square trays on the girls in the main Lab and replace them now with the round ones. May work, may not. I'll have to see when I get into it. At the worst case I'm going to clip in the round drip rings that go on the trays. Those work better than what I've got going on at the moment.

As for ease of use, so far so good (so what) is the word. I'll be doing a res change for her tomorrow, and bumping her up to the 6g/gal level, which is where the RDWC will be at with a res change tomorrow as well.

However on that note, I need to go scrounge up some dinner and then get to lollipopping some plants in the Lab.
 
E25BDED7-C35C-4ED3-87D3-858A1E5F5EB9.jpeg


Our little GDP is growing up. She got a fresh bucket of nutes yesterday, and seems pretty happy where she's at. She is probably 3-4 weeks from getting flipped. She has a 3x3 to herself, and I'll eat up a good bit of it with her. I'm not 100% sure how I'm going to rig up for her. So far the most interesting issue I'm having with this particular tent is the vertical poles which provide the separation between the 3x3 and 1x3 side are sealed off to the 1x3 side. I may just end up using one of my 2x2 screens and also allowing growth to come up around the outside edges as well.


Clones?


5 had mush stems, and the other 3 weren't too hot either...


Oh well. It is what it is. Better luck next time I guess.
 
Sorry about the clones, but the link did make me laff! :thumb:


Thanks. I tend to use the phrase "defecation occurs" when thinking of it. Who'd have thought you'd get mushy stems in an aero cloner. Oh well. Maybe I can get one or two in the next couple of days, but not sure I'm going to mess with it for now.
 
I mentioned in passing previously that I'd done the first change out of the res (5gal) for this single dutch bucket run in the 3x3 portion of the tent.

Holy crap that was easy. For once one of my off the cuff ideas panned out. :)

The extraction was simple. All I had to do was turn on the water, and water the bucket. However, with a simple turn of two valves, the water drained right into the waiting empty bucket. Soon as the pump sucked it all dry, that was that. Let it finish dripping while I mixed up a fresh 5gal bucket of goodies.

Once that was dripped out, I opened the valve to the res, but left the diversion valve open. Flipped the drain pipe up, stuck a funnel into the end of the pipe, and filled er up. :D

Originally I was thinking I needed a fill pipe for the bucket, but this worked out just great. One less hole in the bucket, even better.

As for this setup overall, I'm really digging it so far. Over watering? Not a problem. Watering schedule? Stick it on a timer. Too much runoff? Doesn't happen. Water temp too high with low oxygenation? Not an issue.

The list goes on and on, and I'm looking forward to putting 4 buckets into action in the coming months in the main Lab.

The only downside is rinsing the perlite. That shit gets everywhere. :rofl:


Other than that initial pain, the rest makes up for it! The plant is growing well, and has been pretty hands free over all. This automation stuff kicks ass. :laughtwo:
 
The only downside is rinsing the perlite. That shit gets everywhere. :rofl:

Maybe Shed's quotes below will help you next time. You can always PM him for more info if it sounds confusing.

Rinsing perlite indoors sucks. Outside it's easy. I pour it into a big plastic plant pot and put that in a bucket with holes in it (you might have one of those) for quick drainage. Then I just grab the hose and start spraying down the perlite.
The bottom of the plastic plant pot fits in the top of the bucket but doesn't go all the way in. It keeps the perlite pot off the ground and makes it drain faster as it's suspended in the bucket. The perlite rinse water flows out of the holes in the plant pot, into the bucket, and out of the holes in the bucket.
 
Maybe Shed's quotes below will help you next time. You can always PM him for more info if it sounds confusing.


Thanks! I'll give that a shot next time over my sketti strainer I was using. :D
 
6C5E3231-F261-49FB-A7A1-9987B0E9F1D7.jpeg


Hard to see through the fog, but I assure you there are 6 new clones in there. Took 2 cuts each from the Durban Poison, and both Strawberry Lemonades from the RDWC tent. Skipped out on taking cuttings of the Blue Dream again. She's been finicky enough that meh, I'll pop it from seed again sometime down the road.


Anyway, these seem so far (24hrs in) to be doing better than the last batch. I went back to the basics with these, so maybe we'll have success. I took out my aero cloner, and stuck these in peat pellets. They're in my seedling dome, and the self-wicking mat is under them.

Fingers crossed for some future mama's.


E0226B04-C968-4599-8BCC-995924217C2E.jpeg


Here's our little runt GDP. She must be genetically predisposed to red stems on her leaves. I keep looking for other signs of a mag deficiency, but the leaves are solid, healthy, and verdant. :D

She's getting pretty close to the edges of her bucket, and I see her flipping in a few weeks. Going to have to build a light trap for her intake though. Won't be fancy, but will get the job done. I've got a ton of cardboard laying around, so there we go.
 
8BDC85FC-ED91-4FF6-8388-48AC2A2A8D61.jpeg


The clones today are at least perky. Last batch were droopy AF within a couple hours and never recovered. At least these are trying.


3F1310F6-A1D8-4AD0-8256-7A116CDA61B2.jpeg


GDP after an adjustment to her restraints. The bottom main nodes are just a hair shy of the edge if they were to turn up. The top main nodes are maybe an inch or so shy.


Onward we go.
 
Clones still kickin, and look decent at the 5 day mark. This is a positive sign! :D

I didn't mark them directly, but I know what I put where. Good enough for me. Took 2 each from Durban Poison, and both Strawberry Lemonade's. Skipped Blue Dream. She's been a bit finicky, so whatever. I have more seeds if need be.

GDP is doing well. Not overly flourishing, but she's been a slow grower from the git go. But that being taken into consideration, she's well and growing. I will be adjusting her straps later on today (on the long list of things to do this afternoon after work :rolleyes:) and she is almost to the edge all around.

She's at 5g/gal of MC, and doing fine with that. Will be leaving her there until she gives me reason otherwise.
 
Noticed a little bit of yellowing on a leaf on one of the clones. I may have cut the humidity back a tad much on them, so I bumped it back.

Nutes are light at 1g/gal of MegaCrop.


GDO got her training adjusted. Tips are past the edge now, and another half inch and they could turn up well. With the space available, I'm not 100% sure if I want to flip her at that point, or let her veg longer. While I'd hate to waste the space, I also don't want to take her past what the light in there can reasonably do. The light is giving about 33 watts/sqft of blurplely spec, but I can't say for sure what the exact readings are for it from edge to edge.
 
Clones perked back up. Not that they were bad, but adjusting the dome on them back to in between where they were and what I set it to was probably a good thing.

GDP hanging in there just fine. She's not killing it in terms of speed, but that's ok. She has the space and whatever time she needs to get it done.
 
Everybody seems ok. A couple clones are yellowing a bit. They're going to get transplanted into some soil later this evening/tonight.

GDP is happy and growing. Her tips are anywhere from 1/2"-1" past the rim of the bucket. Going to let her get to about the 3" mark and then let her head up. Being heavy indica, I'll let her get a few inches up from there and then give her a flip.
 
Earlier than expected, but clones have been moved into quart containers and are soaking up a little water to get them started.

More later.
 
Back
Top Bottom