warezaholic

Well-Known Member
Hello from S.E. Michigan. I'm new to the electronic journal keeping and am in the middle of my first successful plant grow.

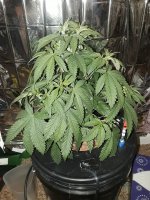
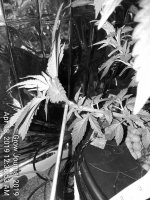
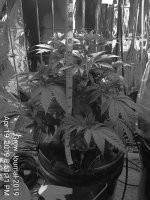
I have one autoflowering sativa in the oven now 6 weeks. It's doing pretty well in spite of all my mistakes (such as topping an auto!WOW!). It's in full veg right now with the Pre-Flowering nodes in definite start mode. I had to give it the first good trimming today, it was so dense with big leaves you couldn't see inside.

I have the Bubbleponics system going on and a new shipment of beans (all auto's) in the can and should get some (or all) in the pots as soon as this one goes into full flower, my current room is functionable but That's when im upgrading my large 4x2' closet with 2 1000 wtt LEDs closet with more light (1 or 2 more) and hoists.

When remodeled, it should be possible to grow 4 or maybe 6 pots in there since auto's are small.

That's when I'm starting a complete journal; till last week my journal was this waterlogged paper notebook.

I've been mentored the whole way by PENNYWISE and Camero in my thread "Seeking Sympathetic Guru"


Here's some pictures to try to bring you partially up to speed.


1555259079849.png
IMG_20190414_134522.jpg
20190404_155732.jpg
20190328_220315.jpg
20190328_220246.jpg
20190410_230422.jpg
20190413_183410.jpg
20190412_210211.jpg
 
Tiny though it will be! She's barely 14 inches tall. Im hoping for an oz but my bio is 64yo widower on SSD and a Small VA. So my grow is one of poverty and growing out of necessity. This is the first plant I didn't outright murder but 420 has mentored me for the past 6/7 weeks.

Next monthly pay and tax return will hopefully equip my closest grow in style and maybe even a small tent in the spare room in case one plant misbehaves and has to sleep on the couch...

I'm hoping to connect (philosophically) with dedicated autoflowering growing individuals. My next grow is maybe a little too ambitious for me weak experience. Got one bucket for each bean if I do 2 or 3 outside in soil. This is when things will get intense!

Wish me luck...
 
Here begins my odyssey.

I'm building up a simple closet size Bubbleponics setup "4'w X 2' deep"; with 2 to 4, 1000w LEDs (2 now, 2 later this month). Lined with mylar. Could easily put 5 buckets inside.

My nutrients of choice are General Hydroponics "Flora Trio" and CalMag and HydroGuard water conditioner.

My current grow is just one Killer Nuke Autoflowering in full veg, Her "Born-on Date is 3/1/2019 and her Sell-by date is still to be determined!

PH is controlled with the acid PH down and simple baking soda to raise PH.

Co2 is supplied by "1 tbsp PH down in a jar and a dash of baking soda"!!

IMG_20190415_123542.jpg

In a couple of weeks, the first radical grow will begin with 6 or 7 beans from Colorado Growers online. All are Autoflowering..--

3 of OG Kush
3 of Russian Roulette
1 freebie of Nuke Daddy from Nukeheads (either their own strain OR it's a way of giving false advertising).


I'm considering 4 or 5 inside and the rest out in soil. If my geometry is correct by 5 buckets in a staggered M formation side by side
" _ / - \ _ / - \ _" (where the horizontal lines are th buckets), and there's still plenty of room to reach and maintain so many.

My buckets require 3 gallons HOWEVER mycurrent water/nutes mix formula is calculated for just TWO gallons until flowering comes around (at the moment it is in preflower, veg) to help prevent over feeding.

Every evening I do nursing rounds and at full veg I maintain the water at 2/3rds nutrients.

PH 5.7 to 6.0.
Nutrients at or somewhere around the high side of 500ppm. Then Flowering will get ?different? attention.

This will be my continued regimen with the next grow.
 
I just thought of a grow experiment; if one is to want several small plants in one 5 gallon res (like 2 or 3), so if these girls are gonna live in one dorm room, they are gonna "co-mingle" no doubt. In 3 or 4" premade hydro net pots; No chastity belts" loose and free. I can almost Invision 3 autoflower's as one bush, one root system, One organism .

Question!

Would keeping it hydrated and fed be a problem?!?
 
They will smother each other and not grow big, not a good idea

I've been doing some in 3gal buckets, works real well, less water, easier to handle
 
Six weeks old. Decided to put the lights on 24 trying to help conquer vegetative as fully as possible. Move the nutrients from 2/3 to 3/4 vegetative formula (ppm to mid 600ish).

Im anxious to see the next stage of growth. This is a strain that's (so far), un- google-able; Killer Nuke.


IMG_20190416_173730.jpg
IMG_20190416_173452.jpg


And I spy my first little mutent leaf!
 
I'm thinking about an easy type of training method using long leader line stainless fishing hooks and snip of the barbs. Hook around any branch and tape or double end the hook to the edges of the basket lid (watch out for booboo's). Even penetrating a branch with a hook should cause no permanent harm. Time to pull out the tackle box.

I think it better than tying wires all over the place.

I'm posting as often as I can remember, so bare with me if I spare myself/you all the humdrum stuff by missing days and publish more of the lean than the fat.
 
I've seen grow room videos and noticed some complain about corners not getting enough light in the corners; and you might notice my current LED lights are hanging at an angle. Purposefully together with the mylar, it's throwing light in more directions. I'll try the same thing with 4 lights during the upcoming remodel.

20190412_210211.jpg
 
DIY water maintenance help. This method keeps each reservoir apart/quarantined from each other and no water transference.

Part One:
Knowing the water levels at a glance!

IMG_20190416_193504.jpg
Finished item.

I was wanting a way to know, maintain and top off the water and nutrient levels without lifting the plant. FIRST: Have your water filled to optimal level and follow the pictured and subtitled directions

Cost each - $1.50
Materials and procedures:

1- 36" inch length of 1/2"OD, 3/8" ID, dark plastic pipe cut in half (must reach well below the water line when complete).

1- 3/8" rubber O-ring. Fitting snugly over the pipe as a stopper. And

1 each- 15" length of 1/4" square, hobbyist grade balsa wood. Again one long peice cut in half. (Very fragile). Then, Paint the balsa wood with dark oil or water resistant paint to stop water logging; cure the paint well. the balsa is still very buoyant.
IMG_20190416_193245.jpg
IMG_20190416_193315.jpg


3- Drill a half inch hole in the edge of the bucket in hydro basket.
IMG_20190416_193400.jpg

4- place the O-rind over the pipe one inch from the top and drop the pipe in the hole!
IMG_20190416_193423.jpg

Mark that level at the edge of the pipe with visible paint. THEN drop the pipe 1/2" and mark it again and leave it there! You're Done - - -
IMG_20190416_193504.jpg


And as the upper mark reaches the pipe, the oil is about one quart low!!!

5- drop the balsa stick inside the pipe. Mark the stick, Drop the pipe 1/2 " and mark again...

(The water should be at optimal level) mark the stick at both points and when it reaches the upper line you're about a quart low.

I've also simply created a 3 inch movable "FLAP" for adding fluids without lifting the plant! A better version will likely follow.
IMG_20190416_203257.jpg

IMG_20190416_203302.jpg

Part 3

I have a $1 water siphon of 1/4" air hose, INSTALLED (not supposed to move from res to res). For siphoning water at regular med-check's. Drains over 1 oz in about 15 seconds.

IMG_20190416_203315.jpg

Now my autoflower is running on auto-res! And less need to torture the plant with lifting the roots out of the water so often, just twice a week average(one check and one partial water renewal) !!!!
 

Attachments

  • IMG_20190416_203633.jpg
    IMG_20190416_203633.jpg
    287.6 KB · Views: 207
Midweek root check is good, no issues noticed. Putting in a second airstone at next water change as the roots are getting into a big knot around the airline.
IMG_20190417_133402.jpg


Staying true to my SkidRow engineering.

I Started some Experimental stress training using Barbless hooks and wire fishing leaders.

20190417_170911.jpg

Instead of tape to use as anchors, I'm substituting sticky dots. Keeping all anchors attached at the bucket/basket lids.

All my additions to my grow pots allow fast, unrestricted lifting of the plant, and then only when necessary.
 
Day 49 and beginning to wonder how much longer till flower and fruit. All my inquiry to the vendors have gone unanswered so far.

Killer Nuke, from Nukehead seeds.

I'll try to hack into their forums and sniff around.

IMG_20190418_003653.jpg


IMG_20190418_003554.jpg
 
You are in the right place. There are so many good and helpful folks on 420mag that you will be cooking with gas quickly.
 
Hi Happy, nice of you to join in. Im planning on a bigger grow of several strains. Just as soon as I can get this one finished, I'm going all out with my grow room.
 
This update on the Killer Nuke

Today marks 7 weeks after germ.

It's barely more than a week since I seriously trimmed up most of the big leaves and nobody could tell it was done.

BEFORE 1st TRIM


AFTER 1st TRIM


TODAY
 

Attachments

  • 20190414_010125.jpg
    20190414_010125.jpg
    849 KB · Views: 215
  • IMG_20190418_003653.jpg
    IMG_20190418_003653.jpg
    624.5 KB · Views: 187
  • IMG_20190419_205111.jpg
    IMG_20190419_205111.jpg
    715 KB · Views: 204
I'm not really sure but she looks like it probably has another 3 to 5 weeks SO I've gone balls-up and I come to realize that a 4 foot grow area is might be overcrowded so I opted for "FOUR AUTOFLOWERING"

2- Russian Roulette
2- OG Kush

(and maybe one "Nuke Daddy "for the outside dirt grow)! Not sure about how I'm gonna budget in all that free grow lighting!

Soaked the beans this morning for 8 hours started germinating this evening. Wil check in after 4 days (Tuesday night).


THIS CONCLUDES DAILY UPDATES ON K.N. STARTING WEEKLY'S EVERY FRIDAY.
 

Attachments

  • IMG_20190419_205111.jpg
    IMG_20190419_205111.jpg
    715 KB · Views: 189
IN FOUR DAYS - - -

Warezaholic's
Skid Row Closet Gro JOURNAL;
"THE REAL BEGINNING!"
 
DAY 2: PROLOGUE TO DAY 4:

The 5 beans are in a dark damp place I had to ramp-up their nursery for the first stage of life.

I took a Small vinyl garment bag (see pictures).

I Just happened to have a perfect size Tupperware;

Then filled it 2 inches with glass marbles (no roots with cling very much);

and put one inch of Rapid Start treated water; as well I treated the awaiting rockwool with the same water!

(And placed a tiny aquarium heater to help up the humidity while rooting). Will add a little HydroGuard and 3 drops of bleach to the water to condition the water just prior to transplant).

As soon as the beans are ready, so is the DIY Humidity Dome Nursery!

20190420_230524.jpg20190420_230334.jpg20190420_224443(0).jpg20190420_224443.jpg20190420_224357.jpg20190420_224336.jpg20190420_224247.jpg20190420_224219.jpg20190420_231224.jpg


Day 3 of birthing new beans! Waiting for new eggs to hatch is the worst part because you can't open the paper towel to observe Progress! After this, and we put them into the medium, we're able to watch them grow up!...
 
Back
Top Bottom