Window AC conversion for an enclosed space

ledtester

New Member
Thanks to Monkeybusiness...Well since i had to convert a window AC unit to use inside an enclosed area, i figured I'd try to document the process since there seems to be quite a few misunderstandings about the concept.
Now I'm going to explain the theory/concept and then show how i decided to convert mine but it's going to be one of those, 'do as i say, not as i do' demonstrations. Frankly, i don't recommend you do it exactly as i did because i was battling space and supply factors. Basically i wanted to use supplies i already had and I had to install it into a very confined space so I made a pretty tight conversion. I'm comfortable with that because i have a dedicated exhaust fan with plenty of CFM's to make sure heat is sucked out of condenser. You'll have to decide whats best for you.

Anyways...
on to the show:

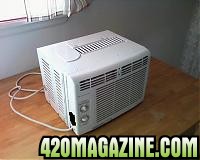
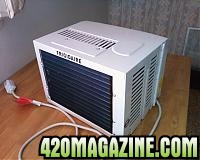
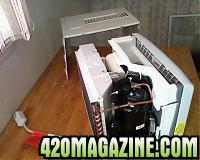
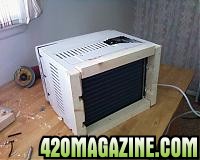
As you can see in the pictures, an ordinary window AC unit with vents on the back, sides, and top. The air is suppose to flow in through the sides and top and out the back. This is the most important thing. (I've seen where people just put the ac in a room and blow a fan across the back and that won't work. It might seem to work for a while but even if it does bring the temps down it will shorten life of your AC)
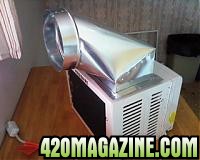
So, you will have to figure out a way to funnel air in, then out the back. I've seen where people build a box to enclose the top and sides and funnel it into an intake hose, as well as building a box on the back to funnel out to an exhaust hose. I'm going to close off the sides completely and funnel fresh air thru the top and out the back.


Photo-0051.jpg


Photo-0052-9.JPG


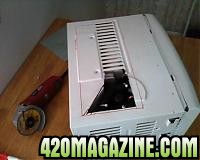
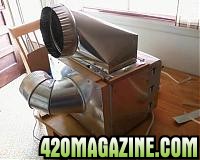
So i have a big ole vent connector that will work great. I just set it on top and make sure everything lines up ok. Once i have it where i want it, I trace the inside with a marker so i know where the opening sits compared to the inside.


Photo-0053.jpg


Photo-0054.jpg


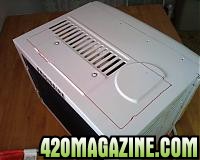
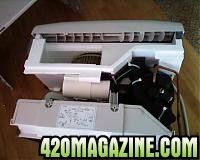
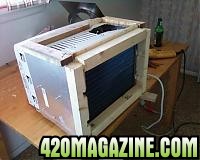
Then i pull the cover off to see where the hole lines up (don't want to just cut the entire outlined rectangle open before making sure there aren't any conflicting items. And as you can see, there are conflicting areas)
We don't want to cut it all open and pump are into the front and the back. We just need to open up where the compressor is and the other thin channel through the middle. The thin channel already has the vent over it so i only cut open an area over the compressor.
Now while it's open, double check your game plan to make sure no screws are going to puncture anything or stuff like that, etc. (I strongly recommend you screw from the inside to the outside to avoid accidentally puncturing something important)


Photo-0055.jpg


Photo-00571.jpg


Photo-0058.jpg


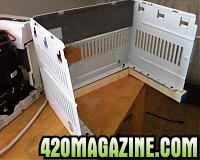
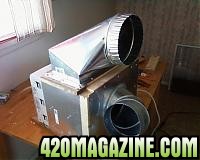
Then i encased the back with a face frame made out of 2x2's and the top with 1x2's (screwing from the inside out and trimming/sculpting wood as nessasary) You will also see that i used some cheap sheet metal to cover the sides

Photo-00591.jpg


Photo-0060.jpg


Photo-0061.jpg


Then i screwed the vent connector on top and put on a piece of sheet metal that covered the back entirely. After i cut an access hole in the back i install the hose connector and that's basically it. ( I apologize, i was pretty stoned at this point and completely spaced taking pics of this step)
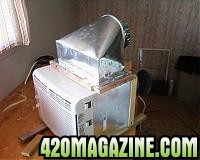
I would have normally built the back out more for extra breathing space but then it wouldn't have fit in my particular area.

I have passive fresh air going in the top, and the exhaust fan sucking hot air out the back. Been up and running a few weeks now and seems to work like a charm.Oh i forgot to note, you'll have to drill a hole for condensation drainage. I drilled a small hole in the plastic case (under the condenser (back area of unit)) and connected a 1/4 inch hose to drain it to a container.

Hope this helps!


Photo-0064-9.JPG


Photo-0065.jpg


Photo-0063-9.JPG
 
Beautiful job! I'm an HVAC contractor, and you've addressed EXACTLY what needs to be addressed. Real cool! The only potential concern I might have is if the built in (rear) portion of the motor (this is the same motor that pushes the cool air inside, ie a dual shaft motor) has enough "oomph" to carry the exhaust outside. At a potential minimum, the head pressures will go up, and so will cost of operation. Usually, there is a high pressure switch incorporated into the high side. If this DOES create a problem (longer the duct getting the hot air outside) you can install one of those cheap inline duct boosters. In one who works with sheet metal, I'm very proud of your job. It reeks of professionalism, and when I see that, I have to take my hat off for the creator, and let them know they've been noticed. +reps

You've made my list.:welldone:
 
He could always get a bigger take off MrPeabody. Instead of using what looks to be a 10 or 12 inch, use a straight square to round 14 with an adjustable elbow. (And use insulated flex, not the cheap non-insulated stuff I see all the time)
Should be enough air flow.
Is a nice job, professional looking and good idea.

Figure if I ever need to cool a grow room, I'll just split one and mount the condenser in the window, and run a line set with a condensate pump. Figure it would be a lot cheaper than a mini-split.
 
Excellent job mate!

On top of that, this is quite possibly the ONLY DIY tutorial on the web for converting these units. I had a hard enough time finding information that even hinted at how to do this safely and effectively...or do it any way at all for that matter. I'm in a house with no AC and every window is casement style, with neither the funds nor the permission to modify the windows themselves....I plan on converting the doggydoor to an exhaust port, heh. Thanks again for taking the time to share this modification with everyone.
 
Windows that slide or crank? Can you lift the panels out? If so, the total width of the hole might easily be wide enough for a regular window unit. You'd have to build a panel around it to fill the hole, of course.
 
What size hose do u hook up to them vent 90`s?

Also so this unit can just sit on a table whatever and give ya cool AC to ur room now?
 
I realize this is an old thread but I don't see many a/c unit conversions so I thought I would share mine. I looked over this demonstration quickly, to see what kind of ideas other people had.

For my project you will need:
-Eye Protection!
-Leather work gloves!
-measuring tape
-metal shears
-pliers
-two 10" wide side-facing ducts (with "tabs" that you can fold) ducting piece number is under part #412 here in Canada.
-two 10' foot long 10'' wide flexible rigid tubing (usually comes compressed and can be stretched to 10')
-20" sheet metal (depending on model, measure the back for dimensions)
-aluminum foil tape
-small metal screws 3/8'' (1cm) long
-drill + metal bit for drilling pilot holes... or what I ended up using was a self tapping bit and a screwdriver to drill my holes... I didn't have the right side bit to drill pilots, so I used what I had. you will also need a bigger metal bit 1/4" to 1/2" (1cm) in diameter, I'll explain why later.
-a radio and a friend for company
-knife
-(optional) Metal File, or grinder.

*NOTE: for ease of building, you might want to start the back-plate/outtake side, before the top/intake side.


Start off by taking the back off the a/c, unscrew all the retaining screws and then where the sides meet the front there are clips in the plastic holding onto them, so you'll want to be careful and slide a knife between the front plastic cover and the metal side plates to pop them off, (there is a "shadow" or space where the clips are).

Once you have the back cover removed, grab a tape measure and measure the distance from the back of the unit to the "void" where the air gets sucked in from the top. you'll want to have your duct as centered as possible but also incorporating the existing air passages because we will be blocking the sides later and we will need as much airflow going through the top as possible.

Here is a Photo:
NZvDZZO.jpg


You'll want to have your top vent centered over that "void" in the middle as much as possible, using the existing passages. I have also sealed up any potential places for air exchange with foil tape as you can see in the picture. I also took off the crappy piece of weather stripping they had sealing over the Styrofoam and replaced it with a wider piece. There is also this little "tongue" at the front of the a/c that you can pull in and out, which opens a little door and is what normally allows the user to create an air exchange... seal that up too.

Now, trace the outline of the duct onto the top of the frame (if you haven't already) and then grab you protective eye wear, leather gloves and a pair of metal sheers. BE CAREFUL WHEN CUTTING METAL IT IT EXTREMELY SHARP AND LEAVE JAGGED EDGES! (you can file them, or use a grinder to get rid of the edges or put foil tape to cover it.) Cut counter clockwise if you have right handed scissors, (clockwise for left handed scissors) (if you are left handed and have right handed scissors, still go counter clockwise), start to cut out the general shape of the duct, make it smaller than needed at first and enlarge as not to accidentally overshoot. Bend the scrap metal up with your hand as you cut to move it out of the way. I made my duct face left, but you can face it to the right if you like, however bare in mind that if you face it to the front or back, you might not have enough airflow, so I would advise against it. Once you have your hole completed, slide "fins" of the duct into the hole and them bend them outwards using a pair of pliers. Once those fins are nice and flat, you can proceed in taping up the inside and outside seams with foil tape.

What it should look like now:
YCAhbPD.jpg
OMjlS19.jpg


*HERE is where you would start from NOTE*

Now onto the harder part of the build... the back plate. you'll want to have the a/c on a flat surface and the back-plate in it's normal position (screws lined up and everything snapped back together). Take the 20" sheet metal and put it against the back of the unit, tracing a line across the top where you will have to cut, (unless already cut to desired spec). Once your piece is cut to fit against the back, you can take off the clips again... (yay!) and the cover. The cover sits on the top of the unit and when standing up is actually shorter than it's on the unit, so what you'll want to do is line it up with the top of the piece you just cut when doing further measurements... Now that you have once again removed the cover, find the exact location of the fan, and them mark the outline on the sheet metal, mine was offset so yours might be too. Ideally you want your outtake to be right in front of the fan and not just anywhere on the back for optimum airflow. Once the outline is marked, (you don't have to be super precise, you just want the duct to be centered over the fan as conveniently possible. If you wanted to, the duct can be angled upward which now in hindsight I probably should have done.) So angle the vent the way you want really and then trace the outline onto the sheet metal. Here is where that 3/4 inch bit comes in, you need to drill a pilot to allow a starting space for your sheers. Once you have your hole cut out, slide in your duct once again bending the flaps, tabs, whatever I want to call them, and then seal up the seams.

Take the frame of the ac and measure the length of the back "legs" of the unit (measuring from the top down). Mine were 1 foot and I decided 3 screws each side should suffice, so every 4 inches starting from the top, mark it. Drill your pilots about 1/4" or 5mm from the side edge so that you won't have trouble screwing... that didn't sound right, and probably not time for a picture, but here's one anyway...

3rK3XAQ.jpg


I know it's hard to see, but I screwed from the inside outwards, just so that I wouldn't have to worry about puncturing any freon lines. This is the reason for the given space when drilling pilots. I wasn't really expecting to turn this into a post so I don't have any pics of the frame un-plated.

Once you have your pilots, line up the back-plate with the top again, and now mark on the sheet through those holes with a pencil. Pilot those holes too. ALSO IMPORTANT: remember those screws that hold the back of the frame to the a/c? You will need to drill holes in the sheet metal at those locations as well. Now you can screw the back of the frame to the sheet metal using the proper screws. You can file/grind the screw points down, or... you can do like my friend and add decorations... LOL PICTURE TIME!

2ju8Rgj.jpg


He even added a handle! It was the most stoner moment, and I laughed so hard when he was adding all the safety nick nacks.


K back to serious. Again, you will want to tape all the seams inside and out to make sure no air flows past the plate once it's on the unit. Once you have the assembly ready, you can go ahead and slide it back onto the unit, being careful and making sure nothing has to be "forced" into place. it should be a bit harder to put back on but not extremely hard. If it doesn't slide on properly, check for conflicting areas...

The problem I encountered the first time was that my back plate was actually sticking out the bottom slightly and was resting on the table, the frame was being restricted, so I had to cut off that hanging lip, then it fit on beautifully. Once you have it all snaped in, go ahead and put back in the screws we took out, you might need longer ones for the back as we added a piece of sheet metal.

When you have it all back and assembled, block those side vents with aluminum tape, (overlapping it slightly as you go). You can seal up any places you think might potentially leak as well, however I think I have covered pretty much everything. As for the tubing you'll just have to wake up your friend at this point and get him to stretch out the tubing with you. Then just foil tape around the tube where it meets the duct and have them vent outside the room. If you would like to know the reason for using 10" tubing... no inline fan required. You can use smaller tubing but you will need an inline fan if you go under 8". Even at 8" you might see a difference in cooling power without the inline. If you want to use an inline, I would suggest still using the 10" connectors and then a reducer to the side of the inline you want to use. As for any questions, I hope I have answered them already, I might not check back very frequently, but I'll try to stop by soon. Here are some pictures of the final result:

2bGoEZH.jpg


Q8Qw3D7.jpg


6b4SXWW.jpg


hhgXLTj.jpg


YyJHaZy.jpg


Well I hope I covered everything.

I know it's just an a/c but... ISN'T IT FREAKEN AWESOME!? I MADE A SPACESHIP OUT OF AN A/C! My gf told me it looks like a time machine. Either way, once you build one, you'll see what I'm talking about.
 
I can see how this works but I have a question. My room has about 220 cubic feet of air space. It has gotten up into the low 90's on occasion. The siding is corrugated metal so framing an A/C in is doable but I would rather not. So, how hard would it be to attach a duct to the front of the A/C, use a short run of insulated ducting and relocate the thermostat sensor to inside the room. I won't have heat problems again until July so I will have time to work on this. Seems like it should be easy and cheap and work well as long as you don't introduce any back flow.

Just looking at the picture of the A/C, I saw the lower grill on the front. Can I assume that I would need to duct that into the room as well? I am guessing if I don't I will be working the unit harder as I won't be in taking cooled air, always warm. Now it may be easier to just frame it in.
 
Did you extend the back of the unit at all or just screw the boot directly onto the back of the ac unit? Have you encountered any issues as of yet?
 
Back
Top Bottom