Question about TDS w/ RO water

No, not really complicated. I have a 250pgh submersible pump in the res feeding a chiller loop through a 1/10hp chiller. This just gives me two 1/2" tubes into the lid of the res (feed & return) and two air lines (one for each air stone).

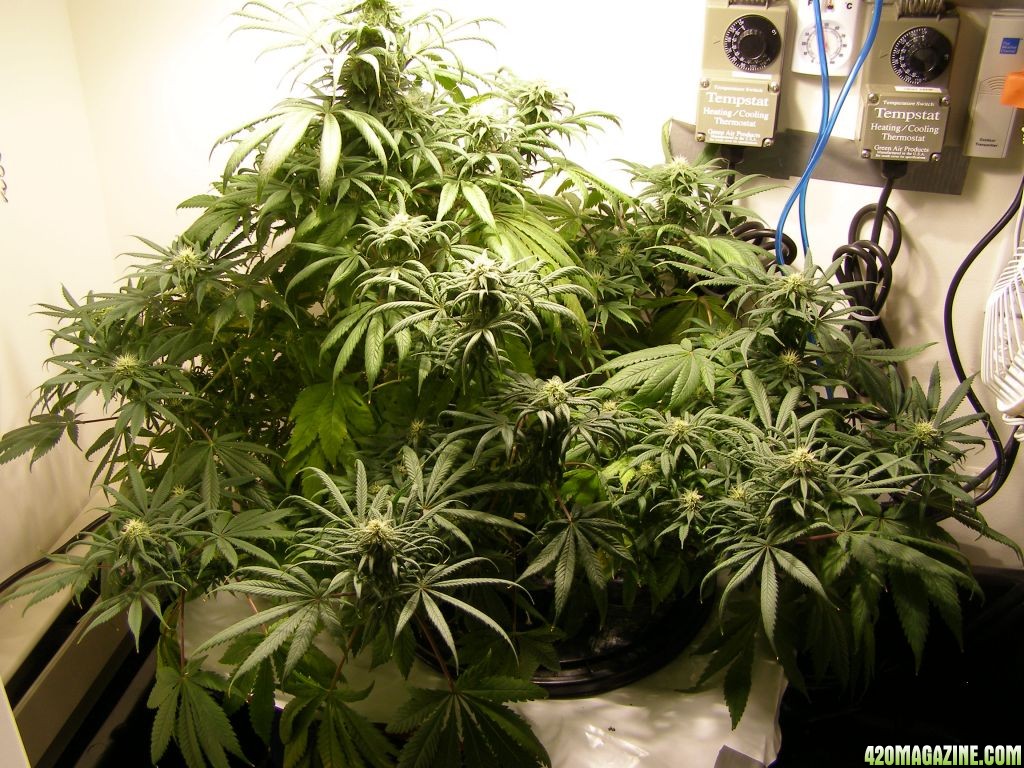
I added the chiller a few weeks ago when the early spring hit and my closet temps started going way up, which also drove my res temps up into the high 70's, even bumping 80. I freaked and knew I had to chill the solution somehow. I was putting frozen bottles in every evening for about a week and that got old quickly. I looked at rigging up a chiller solution with an old fridge or cooler (even a stainless steel wort chiller for home brewing). But when I looked at the $$, the effort involved, and the ability to keep it stealthy, I knew I wanted a real chiller. So I started looking for good prices on a small one and I sure as hell wasn't going to pay almost $400. I looked at aquarium units, everything I could find. Then I stumbled upon a great deal on an Active Aqua 1/10hp unit for $269 so I jumped on it. Knowing I'll be doing larger multi-plant grows in the future I knew it wouldn't be a waste so now I have it to be able to set up larger reservoirs in the future.

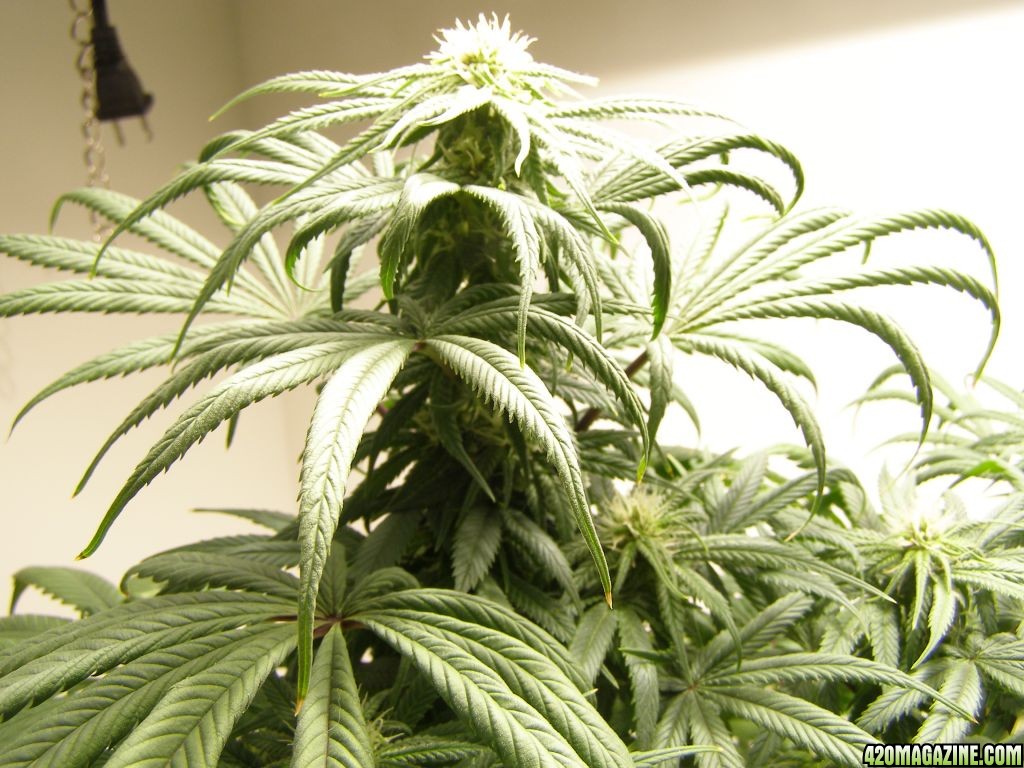
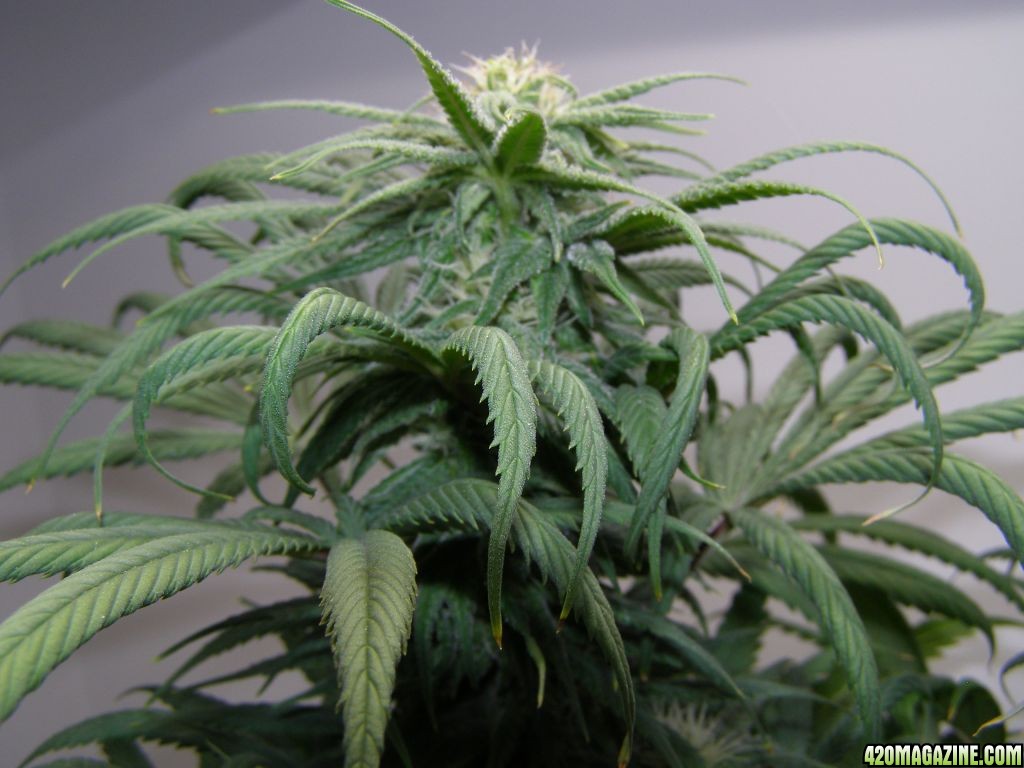
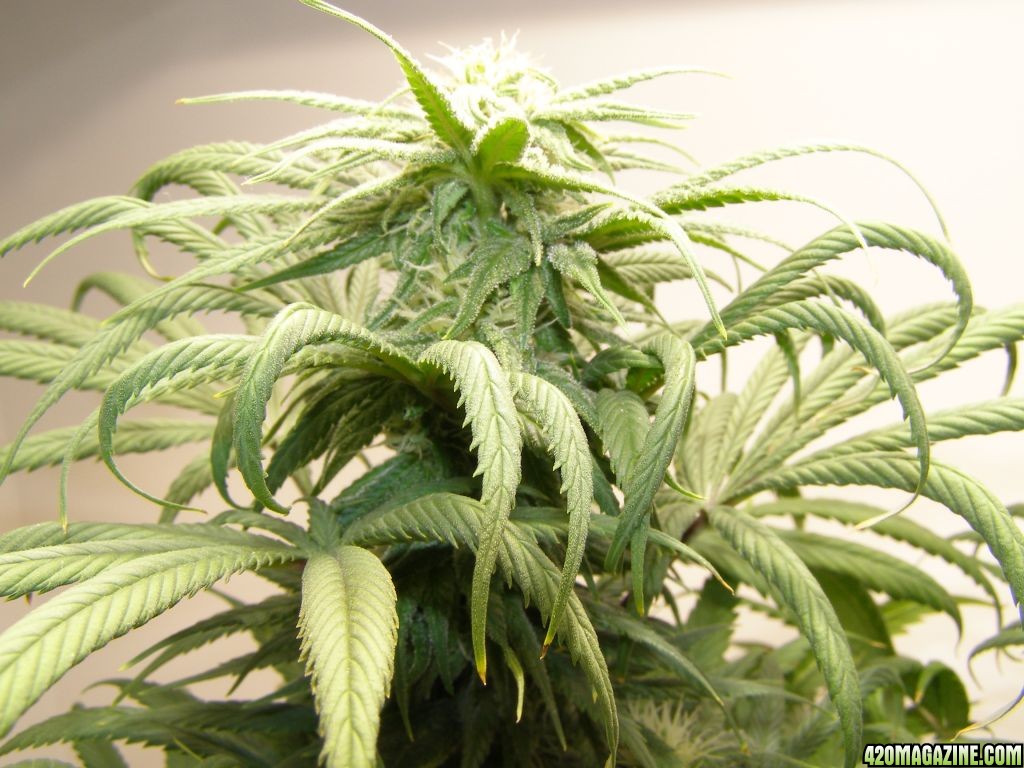
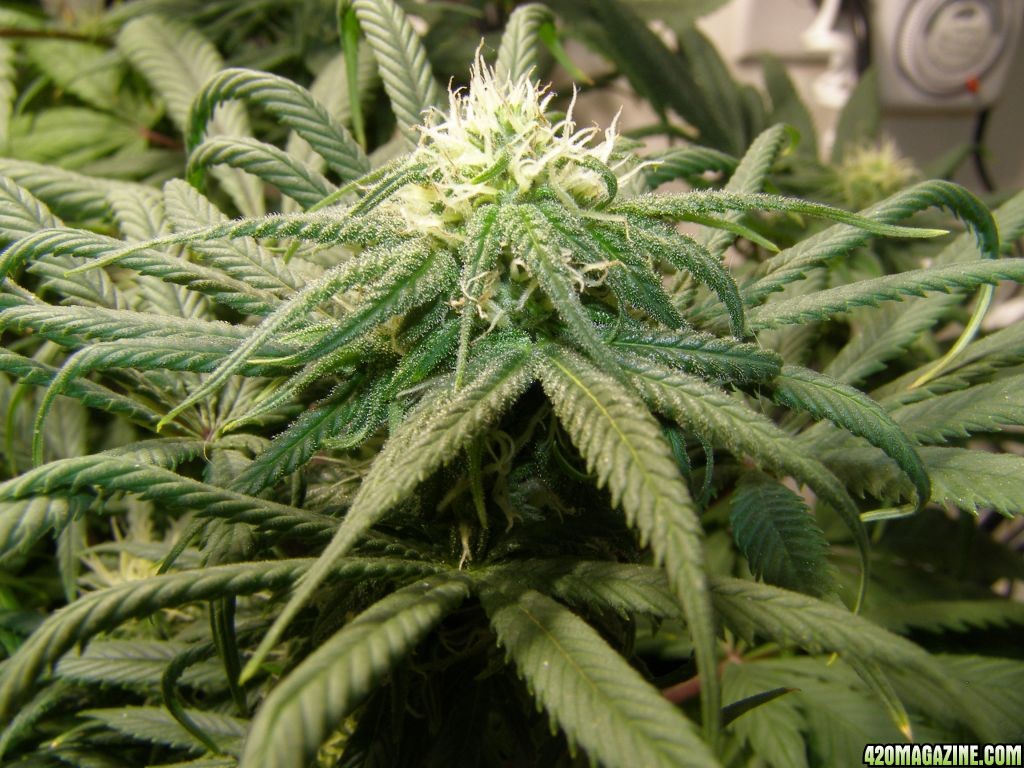
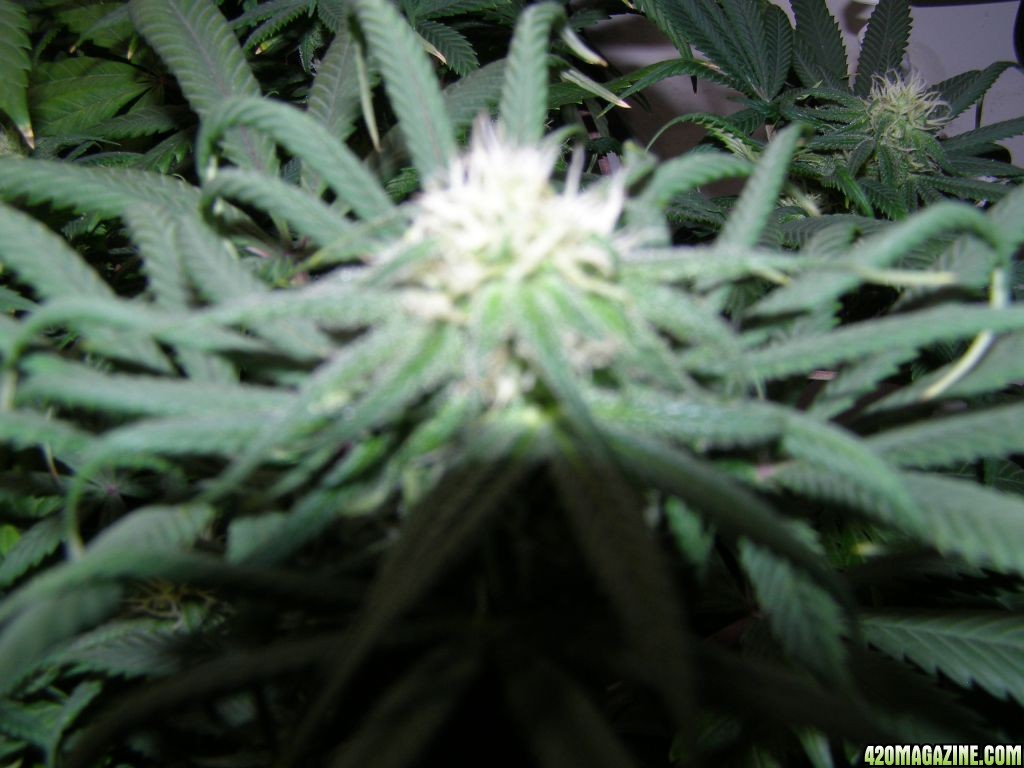
I hear ya on the tea. I've considered it and if I need it, I'll use it. Things seem to have stabilized though with 3 days in a row of slightly rising or steady pH & dropping nute levels. I think what may have caused me some issues were the dead roots from the male plant that I chopped a few weeks back. The roots of both plants were intertwined and when I chopped the male, I just "ripped" his roots out of the root ball. I'm sure that there are still some male roots in there that are dead and may be causing pH issues. I know that some people have talked about "pruning roots" before but that doesn't sound like anything I want to attempt. At this point, I just want to keep this girl moving forward toward harvest in about 4-6 weeks. The flowers are really thickening up and I'd like to keep things headed in that direction.

:thumb:
 
It works great! I don't even bother to check reservoir temps at all anymore. The chiller maintains a constant temp at whatever I set. I currently keep it at 68 and all I ever need to do is look at the front of the chiller to see what the reservoir temp is. It's absolutely one of the best investments I've made. I ran the lines through the wall of the closet and the chiller is on the other side of the wall just outside the closet since it generates heat when it's working. Only took a minute to drill through the drywall with a 2" hole saw and run the 1/2" tubing through the hole. It's just a loop... a feed & a return. Then stuff some insulation in the hole around the tubing to block the light.

All I need to do now is check water level, top off if necessary, and check/ adjust pH, & TDS. Even the reservoir level will be out of the pic soon because I have a float valve in the new one, I'll be setting up a replenish res in the next few days which is just a rubbermaid tote with a bulkhead fitting, a ball valve, and a hose to the float valve on the reservoir so it will maintain a constant level. The refill res will sit about a foot above the the main res (off to the side) and just a simple 1/2" vinyl tube to the float valve, gravity feed. I'll keep it filled with about 10 gals of RO water so I won't have to monitor solution levels, just check pH & TDS.

Trying to make my setup as automatic as possible. Won't be able to do that with pH & TDS but at least I can keep a constant solution level so my pH & TDS readings should be consistent and allow me to spot issues more quickly.

The whole replenish res & float valve arrangement is pretty cheap. Rubbermaid tote for $8, float valve was $5, tubing was $4, valve & barbed fittings another $5. This is all part of trying to get everything set up for going on a 4 day trip at the end of the month. This way, I won't have to worry about pH changes & TDS concentrations from changing water levels while I'm gone. The only changes will be a result of what the plant is doing which (assuming she's nice & stable) will be of much less impact during those 4 days that I'll be gone. She'll be at 6 weeks into flowering at that point so it sure would be nice to keep her stable. I'll take some pics of the setup once I have it completed.

In the meantime, the girl was fine this morning. pH was about the same as 12 hrs ago when I put her into the new res and TDS has dropped from 750 to 637 which could have been nothing more than everything being fully mixed over 12 hrs. I'll check again tonight when the light turns back on. That will be the real indicator on how she's taken to her new home.

:thumb:
 
OK, she's all moved. After adding nutes, the pH settled in nicely (RO water) at 5.88 so no adjustment was needed. The ppm was a bit higher than I wanted at 750 but it was also against a base of 20 which was most likely residual old solution from the chiller loop since the RO went into the res at 5. Worst case, if the girl isn't happy I can remove a gal of solution and replace it with fresh RO water to bring the ppm down.

It was a bit of a PITA since I have the chiller pump in the reservoir along with the airstone of course. Not so much fun trying to do everything in the closet! After shutting off the pump I removed the tubing from the pump outflow & thoroughly blew all of the old solution out (through the chiller) into the old bucket, then attached it to the new reservoir's pump outflow nipple. Then I removed the chiller return line from the old bucket and attached it to the return line on the new reservoir. I turned the pump on to get everything going and there is about a 4' gap between the return line and the solution level so the water splashes quite a bit coming in from the chiller return. I also now have two air stones in the new reservoir so there is lots of air, looks like a white water rapids run in the res now. Additionally, I added 50 ml of H2O2 into the new res to hopefully offset any bacterial issues. The root mass has a ton of room in the new res so it's nice not having everything (pump, air stone & root mass) crammed into a 5 gal bucket as before. The mass is huge, almost like a basketball, about 10" in diameter.

So now, I wait & see. I'll continue to check her twice a day, first in the morning just before light out and again in the evening after light on (run the light 8PM-8AM). The morning will give me some kind of indication on how she likes her new home.

:thumb:

Sounds like a plan!

You know your on target when you need no ph adjusting after mixing your nutrients. The fact that you landed on 5.8 with out the need for ph up or down is EXACTLY what you want to strive for. Let it float all the way down to 5.2 and all the way up to 6.3 in the coming days/weeks and do not adjust ph unless it goes beyond this range. Most excellent!

One way to keep that balance is about the day before you do a drain and refill of your tanks, add the H202 29% at the rate of 3ml per gallon and let it run overnight before the change out. This makes for a great "maintenance" program to have. If needed you can also do the application (same dosage rate) at the beginning of a tank change if your running a sterile program and not adding bennies. For a sterile program, it is suggested to apply the H202 29% at 3ml per gallon at the start of a tank change and then again at the end the day before your next changout.

Exceptions to this is if you go longer than 14 days with out a change out. For a sterile program you probably need to add the H202 29% at 3ml per gallon every 7 to 14 days depending on water source and the environment. One of the downsides to using air stones and air pumps is they can suck bacteria (good & bad) out of the air and into the water. Depending on how polluted the air quality is will determine if this is going to cause issues or not. In really bad polluted areas on the globe, air purification measures are needed.


Make sure your air gap is not to wide. You should be getting good saturation (splash) from the bubbles breaking the surface water. Usually about a inch is plenty but more is not really a bad thing as long as enough water is getting up into the lower portion of the net pot to keep the roots that are in the net pot moist.

Some extensive testing on top drip in DWC or RDWC with various type fruiting plants. I should mention that the testing data is based on over 5 years of using a design almost identical to the UC systems (Under Current).

What was found was keeping the water level high enough to submerse part of the net pot during early stages developed better more efficient of a root mass than when we used top drip and kept the water level below the net pot.

What was observed is that when top drip was used with a lower water level the roots developed a "rope" like structure as opposed to a ones that are known as "feeder" roots. These are the very thin kind. The rope like roots do not really uptake nutrients and you want to try and avoid this.

When we kept the water level high on the net pot the root structure grown was ALL feeder roots and none of the "rope" like root structure was found.

Then in flower; drop the level to about a inch below the net pot to help induce flowering and growth spurts.

Moral of the story, if you can try to wing the plants off of the top drip as soon as possible, the better more robust root mass will develop.

Try and keep the top drip going only for the first week that the plant is introduced into the DWC system.

If you plan to continue growing this style I would strongly urge you to eventually upgrade your design to the UC design. We tested every "hydro" design available over a 8 year period of time and the only thing that came close to the UC design was a high pressure aero system which is super expensive to even operate IMHO.

The UC type system is a different animal from any other form of DWC and RDWC. It is so super efficient that you use even less nutrients than you do in a normal DWC or RDWC design.

If you do ever decide to start upgrading I would be more than happy to help if you needed it.

Great job so far! You turned things around rather quickly on your current grow. Well done!!
 
Thanks for the kind words. I don't have a top drip though. I've been running a pure bubbler from the beginning (Bubble Boy 4 banger). The top drip just didn't seem necessary since I had the water level up into the net pot at the start of veg. I also have a float valve in the new res so in the next day or so, I'll be putting in the top off res (actually tonight once the lights go back on, they're off at the moment) and setting the valve so I can maintain a constant level. I already have the top off res assembled, just need to place it, connect the tubing to the float valve intake, and fill it with RO water. This is a must since I don't have a way to check the level in the res without taking the top off and with a plant this size, that means raising the light, and basically just making a mess. It'll be nice to be assured of a steady level. I still plan to install a float to show the water level as a means of assuring that the level stays as it should in case the float valve needs to be adjusted from time to time.

There should be about a 1" air gap at this point. With both air stones going, the air bubbles are tiny and everywhere in the res right now. It's fizzing like a tank full of soda water and the chiller return adds even more splashing water, the roots have a ton of room in there. Using 3% H2O2 from Costco at this point because it has no additives like some of the chain drug stores carry. And it's very cheap at $3 for 2 litres.

One thing I do know, no more 3" net pots for me (nothing smaller than 6" from now on) and no more than one plant per bucket if using 5 gal buckets.

Once this grow is completed in the next 4-6 weeks, I'll be done until after June when we go on vacation for a week. Then I'll be starting up an AK47 auto flower grow with (hopefully) 5 girls. I've got a batch of feminized seeds to start with. All five (assuming complete germination) will be in a 27 gal res though so no more small containers. Thinking 8-10 gals per plant on future grows.

But first things first, I need to get through this grow successfully before doing anything else!

Hard to get good pics this close to the light but I love the way the tops are all filling in and bit by bit frosting up. BTW, no new burnt tips for about a week now. The burnt tips you see have been there for a while now.

:thumb:

P41000032.JPG
 
Looking like your making progress for sure. New growth does not look like it is clawing up anymore so that is great! The ones that were already showing claw will likely keep the tips curled down but that is of no worry at all. All the new growth and young growth looks good now.

Another suggestion is to keep detailed track of your changes and your feeding schedules with dosages if you are not already. This way you have a guide for next round and to make sure and execute all of what you learned from this one. You will also be amazed at how much easier over all it is to maintain your nutrient solutions at these lower levels. Once you develop a proper feeding regiment that is customized to your growing environment (as each one is different) you are well on your way to the level of "Jedi Master". At your current rate you should have all this down by round 3 and be pretty accurately "dialed-in".

This is totally optional of course but a good size to go by that will allow ample root space for a single really big plant or a couple of smaller plants is a 18 gallon sized container filling it with 10 gallons to reach the bottom of a 8 inch net pot. This way each single big plant would get 10 gallons of water or 2 smaller plants would get 5 gallons each per 18 gallon container. Get extra lids for them if needed so you can have different lid configurations, i.e. for cloning or for one tree, or SOG with multiple small plants....

Cheers!
 
OK, haven't taken any pics in a few days. She continues to do well in the new bigger res. I let the pH drift between 5.2 & 6.1 and only adjust when it drifts outside this range. Current TDS is sitting at 670 ppm (tonight's reading) and she's drinking about a quart of water every day. At least 150 ppm of the 670 is cal-mag. She's doing very well, flowers are developing beautifully and all of the buds are frosting up like crazy. Here are some pics from tonight. I just love looking at the way they're frosted and can't wait to see those final few weeks when the calyx start to swell and the buds put some serious weight on. I love the way they look as they frost up and it progresses further down the branch and on the small leaves surrounding the buds. Every day, I have to trim off a few more fan leaves as they turn yellow & brown and die off. Pretty soon, it'll be all budding branches and flowers at this rate.

Here are some pics from tonight, both the main cola and some of the lower buds as well as the entire plant.

Entire plant, today is day 76, end of week 4 of flowering:
P4140020.JPG


Main cola:
P4140009.JPG

P4140017.JPG


Lower buds:
P4140015.JPG

P4140016.JPG

P4140011.JPG


:thumb:
 
Back
Top Bottom