SmokeyMacPot
New Member
Configuration
This type of fixture is very versatile. There are many different ways it can be configured:
*hanging or mounted on a chamber wall
*open-ended drawing air from the grow or ducted to a separate intake
*passively or actively cooled
Tools Needed:
*Power drill with 1/8" or 3/16" drill bit
*4.25" hole saw
*pop rivet gun (optional)
*flat head and Phillips head screw drivers
Materials:
Keep in mind that the full list of materials you will need depends on the type of glass you get and the configuration you're looking to build. Here's the materials list with some pictures and approximate pricing:
· $3.99-- Glass, either 4" Pyrex tube (approx. 12" long, 4" diameter) or "hurricane" lamp glass ($3.99 at Hobby Lobby, is 11 3/4" long and 4 5/8")
· $2.99-- 4" H/C venting starter collar
· $4.50-- 5" to 4" venting pipe reducer (for use with hurricane glass only)
· $3.00-7.00-- High-temp foil tape
· $5.00-- Thermal pipe wrap (looks like woven fiberglass tape with no adhesive)
· $8.00-- 4" aluminum "dryer" ducting (hanging configuration)
· $2.00-- 1/2 wood screws (box wall mount only)
· $3.00-- pop rivets or small sheet metal screws
· 4" (dryer ducting and/or Pyrex tube only) and/or 5" (hurricane glass only) hose clamps
· "S" hooks (for hanging)
a. Hurricane glass tube
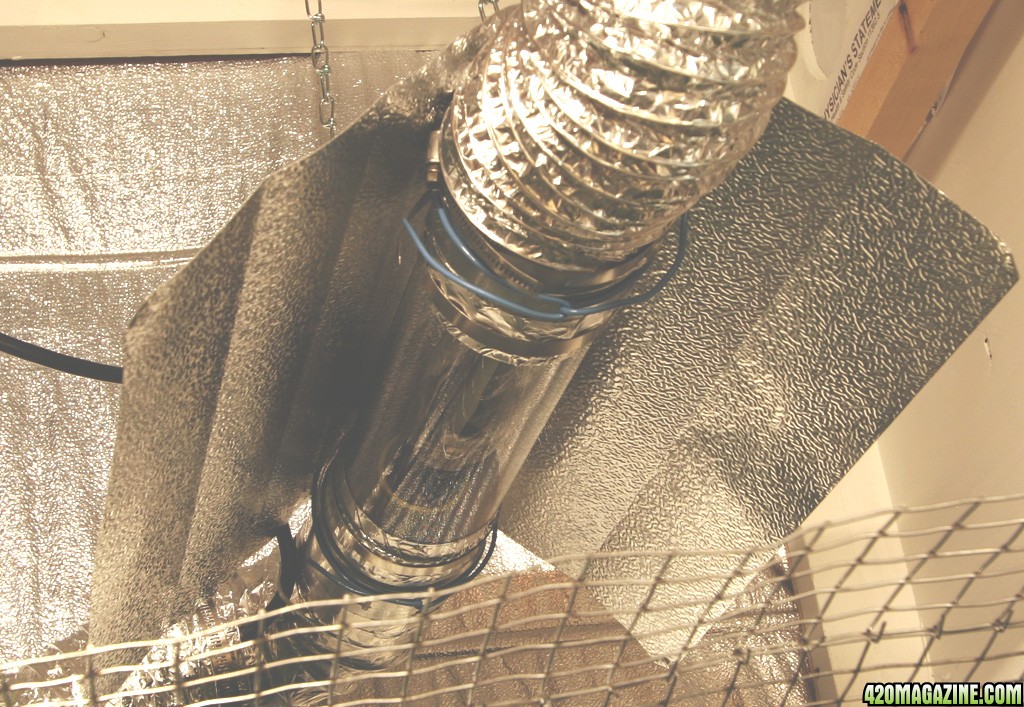
When working with the hurricane glass "chimney," the irregular shape needs to be overcome so that it can be attached it to a reducer collar that will make up one end of the fixture. You may attach a reducer collar to a single end if you want an open ended design, or you can attach one to each end if you will be running ducting to both intake and exhaust ports.
The graphics concentrate on the exhaust end to which the bulb socket is also anchored. On this end of the glass (at the narrow "throat") numerous wraps of thermal pipe wrapping are wound around the glass and secured with a couple of wrappings of foil duct tape. The wrapping should build up the throat to the same diameter as the opening in the glass - where it snugly fits inside the larger end of the reducer.
This will allow us to use a 5" hose clamp to secure the edge of the reducer collar to this tape wrapped "cushion." (Note: you can use foil tape alone for building this "cushion" but the thermal wrapping makes for a neater seal, and is less susceptible to heat. Also, if a hose clamp isn't available, the reducer can be secured to the glass with foil tape.
If you use a hose clamp, you will need to make some 1" slits in the edge of the reducer collar the glass fits in to allow the hose clamp to compress it enough to hold the glass securely)
Mounting the socket inside the tube
In the graphic, a length of pipe strapping bent in a "U" shape is used to hold the socket far enough inside the glass to place the bulb roughly in the middle of the glass. This glass, $3.99 at Hobby Lobby, is 11 3/4" long and 4 5/8" at each end. Notice this glass is symmetrical. Don't try to use the asymmetrical hurricane lamp "chimney's" available at Lowe's or HD; they're too small and aren't shaped in a way that permits good air flow.
The socket is either screwed or pop riveted to the bottom of the pipe strap "U." My light was made from a 150w HPS security light which used a "medium" base socket; this socket has two little screws in it that more or less lined up with the holes in the strapping.
As for the mogul base sockets used with bigger lamps, I don't know what they have on the bottom of them so you may have to improvise a solution for mounting them. The ends of the strap are bent around to "clip" over the edge of the glass and then secured with a couple of wrappings of foil tape. If you'd like, a more permanent mount can be had by drilling a couple of small holes in the tapered throat of the reducer and attaching the ends of the strap with a couple of pop rivets.
Running the wires
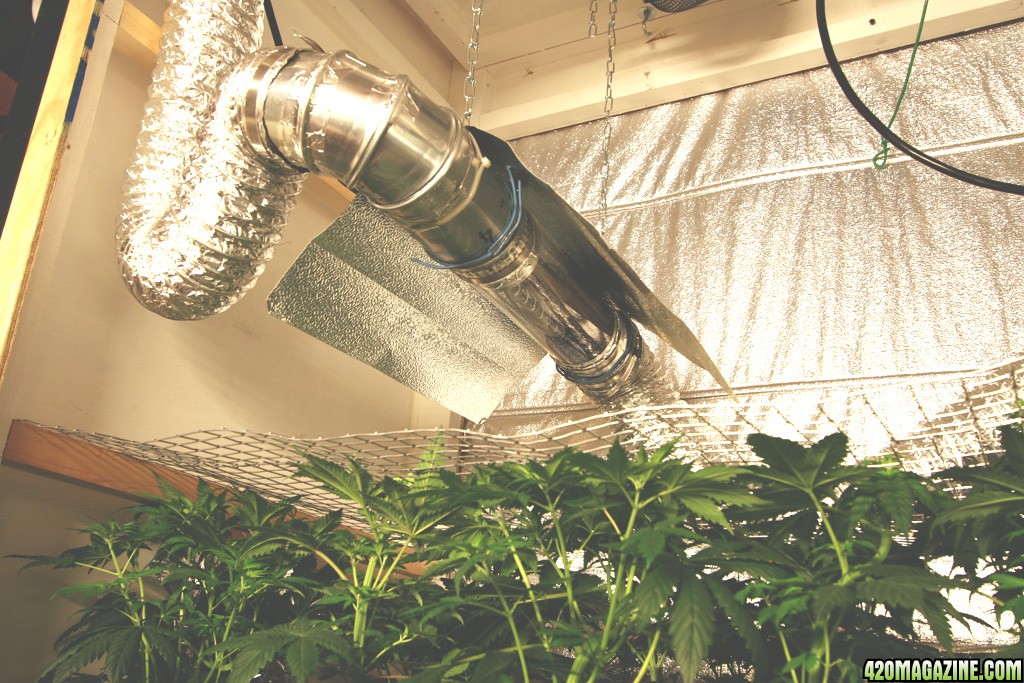
The wires from the socket can be either run through your 4" ducting which will attach to the other end of the reducer or you can drill a hole in the tapered part of the reducer to run the wire out of the fixture to the ballast.
Here's how I actually have it done in my box. There's no venting, it just mounts to a 4.25" hole in the side of my flowering chamber via a starter collar which fits snugly inside the 4" side of the reducer collar. I've got them held together with four pop rivets for a permanent connection. The tabbed end of the starter collar fits into the hole where the tabs are bent around the edge of the hole and anchored with wood screw to the box wall. (In my box, on the other side of this wall is my utility room with a 4" 115cfm computer case fan sucking out the back of it.)
One could just as easily connect another reducer collar onto the other end of the glass exactly as the first side was with "S" hooks for hanging from above. This fixture could then have both intake and exhaust from outside the box.
Originally this is what I would have preferred to have, but as my flowering chamber is only 2'Dx2'Wx3'H, the wall mount actually did better for me.
b. Pyrex baking tube
(NIMBY) "Using a Pyrex (borosilicate glass) tube obtained from a glass blowing supply house or using a "Bake a Round" (eBay had a dozen for sale the last time I checked) one utilizes either one or two (pictured) 4" starter collars instead of the 5" to 4" reducer collars. They are 14" long and 3.75" in diameter."
"I stretched the aluminum ducting out and measured 16". I then snipped the metal "ribs" and cut the ducting open. The glass tube will now just drop into the long run of ducting. The electrial wires run to the remote ballast through the intake part of the duct (exhaust could also be used depending upon the location of the ballast). I measured 2" from each side of my original cut and snipped the metal ribs again but this time didn't cut the aluminum foil. This allows me to open the ducting up like a "wing"."
A couple of wraps of pipe wrap sealed with foil tape on each end you want to put a collar on should be used to keep from biting the metal directly into glass with the hose clamp (pictured). The socket is mounted inside the tube with pipe strapping just as in the hurricane style fixture. It can either be "clipped" and taped over the edge of the glass or better, pop riveted to the inside of the starter collar.
Simply stick the glass inside the end of the starter collar an inch or so past the bottom of the tabs to measure how far in to drill two holes 180 degrees apart, then use two pop rivets to attach the strapping
A note about pipe strapping: don't get the thin wimpy stuff. Get the thicker heavy-duty strapping. The heavy stuff is still relatively easy to bend but holds it's shape better and will hold the bulb and socket straight without sagging. At Home Depot they even have some copper pipe strapping (also known as "pipe tape" or "pipe hanger") that is quite stiff.
Ventilation Performance
There are many different ventilation options available, since standard household ducting is used in the construction of the fixture. For those folks with bigger boxes or rooms, ducting in and out, "inline" duct fans are probably the best option.
For my little NewGanjaBoy-style setup, using the Hurricane fixture as part of the ventilation system of my box, a 115cfm computer fan does the trick. As for actual performance specs for different blowers/fans and light wattages, I'm afraid you'll have to experiment. Here's mine just to give an example:
Box:
-NewGanjaBoy-style three chambered box
-4 20w flouros in the mother chamber
-150w security HPS in the flowering chamber in original metal fixture with holes drilled in the top
Ventilation before Cool Tube installed:
-115cfm fan exhausting box
-4"x8" intake port in the bottom of the veg chamber
-Two 2' runs of 1.5" PVC pulling air through the wall between veg and flowering chambers
-Two 1' runs of 1.5" PVC pulling air from over the HPS fixture into the utility room where it's exhausting out the back.
Ventilation after Cool Tube installed:
-Two PVC runs between flowering chamber and utility room replaced with Hurricane Cool tube fixture
-ballast moved to utility room and housed in the original security light casing
-everything else is the same
Temps before Cool Tube mod:
Ambient temp: 80°F
Flowering chamber 1 hour after HPS fires up: 95°F (in direct light)
Flowering chamber 6-12 hours after HPS fires up: 100-105+°F (ouch!!)
Temps after Cool Tube Mod:
Ambient temp: 80°F
Flowering chamber 1 hour after HPS fires up: 85°F (in direct light)
Flowering chamber 6-12 hours after HPS fires up: 90°F (in direct light)
SAFETY NOTICE:
Please note that the wire to the bulb base must be a high temp fiberglass type, or the heat will eat up the wire and cause a running short. The thermal tape is a fiberglass electrical tape from most hardware stores. High temp fiberglass wrapped wire is available at any hardware or electrical store. It is imperative that you use it, as a smoking ballast is a real bummer to relight.
Authors: johnstone, NIMBY, Don'tTreadOnMe, sanclem and Smokey D Dope
This type of fixture is very versatile. There are many different ways it can be configured:
*hanging or mounted on a chamber wall
*open-ended drawing air from the grow or ducted to a separate intake
*passively or actively cooled
Tools Needed:
*Power drill with 1/8" or 3/16" drill bit
*4.25" hole saw
*pop rivet gun (optional)
*flat head and Phillips head screw drivers
Materials:
Keep in mind that the full list of materials you will need depends on the type of glass you get and the configuration you're looking to build. Here's the materials list with some pictures and approximate pricing:
· $3.99-- Glass, either 4" Pyrex tube (approx. 12" long, 4" diameter) or "hurricane" lamp glass ($3.99 at Hobby Lobby, is 11 3/4" long and 4 5/8")
· $2.99-- 4" H/C venting starter collar
· $4.50-- 5" to 4" venting pipe reducer (for use with hurricane glass only)
· $3.00-7.00-- High-temp foil tape
· $5.00-- Thermal pipe wrap (looks like woven fiberglass tape with no adhesive)
· $8.00-- 4" aluminum "dryer" ducting (hanging configuration)
· $2.00-- 1/2 wood screws (box wall mount only)
· $3.00-- pop rivets or small sheet metal screws
· 4" (dryer ducting and/or Pyrex tube only) and/or 5" (hurricane glass only) hose clamps
· "S" hooks (for hanging)
a. Hurricane glass tube
When working with the hurricane glass "chimney," the irregular shape needs to be overcome so that it can be attached it to a reducer collar that will make up one end of the fixture. You may attach a reducer collar to a single end if you want an open ended design, or you can attach one to each end if you will be running ducting to both intake and exhaust ports.
The graphics concentrate on the exhaust end to which the bulb socket is also anchored. On this end of the glass (at the narrow "throat") numerous wraps of thermal pipe wrapping are wound around the glass and secured with a couple of wrappings of foil duct tape. The wrapping should build up the throat to the same diameter as the opening in the glass - where it snugly fits inside the larger end of the reducer.
This will allow us to use a 5" hose clamp to secure the edge of the reducer collar to this tape wrapped "cushion." (Note: you can use foil tape alone for building this "cushion" but the thermal wrapping makes for a neater seal, and is less susceptible to heat. Also, if a hose clamp isn't available, the reducer can be secured to the glass with foil tape.
If you use a hose clamp, you will need to make some 1" slits in the edge of the reducer collar the glass fits in to allow the hose clamp to compress it enough to hold the glass securely)
Mounting the socket inside the tube
In the graphic, a length of pipe strapping bent in a "U" shape is used to hold the socket far enough inside the glass to place the bulb roughly in the middle of the glass. This glass, $3.99 at Hobby Lobby, is 11 3/4" long and 4 5/8" at each end. Notice this glass is symmetrical. Don't try to use the asymmetrical hurricane lamp "chimney's" available at Lowe's or HD; they're too small and aren't shaped in a way that permits good air flow.
The socket is either screwed or pop riveted to the bottom of the pipe strap "U." My light was made from a 150w HPS security light which used a "medium" base socket; this socket has two little screws in it that more or less lined up with the holes in the strapping.
As for the mogul base sockets used with bigger lamps, I don't know what they have on the bottom of them so you may have to improvise a solution for mounting them. The ends of the strap are bent around to "clip" over the edge of the glass and then secured with a couple of wrappings of foil tape. If you'd like, a more permanent mount can be had by drilling a couple of small holes in the tapered throat of the reducer and attaching the ends of the strap with a couple of pop rivets.
Running the wires
The wires from the socket can be either run through your 4" ducting which will attach to the other end of the reducer or you can drill a hole in the tapered part of the reducer to run the wire out of the fixture to the ballast.
Here's how I actually have it done in my box. There's no venting, it just mounts to a 4.25" hole in the side of my flowering chamber via a starter collar which fits snugly inside the 4" side of the reducer collar. I've got them held together with four pop rivets for a permanent connection. The tabbed end of the starter collar fits into the hole where the tabs are bent around the edge of the hole and anchored with wood screw to the box wall. (In my box, on the other side of this wall is my utility room with a 4" 115cfm computer case fan sucking out the back of it.)
One could just as easily connect another reducer collar onto the other end of the glass exactly as the first side was with "S" hooks for hanging from above. This fixture could then have both intake and exhaust from outside the box.
Originally this is what I would have preferred to have, but as my flowering chamber is only 2'Dx2'Wx3'H, the wall mount actually did better for me.
b. Pyrex baking tube
(NIMBY) "Using a Pyrex (borosilicate glass) tube obtained from a glass blowing supply house or using a "Bake a Round" (eBay had a dozen for sale the last time I checked) one utilizes either one or two (pictured) 4" starter collars instead of the 5" to 4" reducer collars. They are 14" long and 3.75" in diameter."
"I stretched the aluminum ducting out and measured 16". I then snipped the metal "ribs" and cut the ducting open. The glass tube will now just drop into the long run of ducting. The electrial wires run to the remote ballast through the intake part of the duct (exhaust could also be used depending upon the location of the ballast). I measured 2" from each side of my original cut and snipped the metal ribs again but this time didn't cut the aluminum foil. This allows me to open the ducting up like a "wing"."
A couple of wraps of pipe wrap sealed with foil tape on each end you want to put a collar on should be used to keep from biting the metal directly into glass with the hose clamp (pictured). The socket is mounted inside the tube with pipe strapping just as in the hurricane style fixture. It can either be "clipped" and taped over the edge of the glass or better, pop riveted to the inside of the starter collar.
Simply stick the glass inside the end of the starter collar an inch or so past the bottom of the tabs to measure how far in to drill two holes 180 degrees apart, then use two pop rivets to attach the strapping
A note about pipe strapping: don't get the thin wimpy stuff. Get the thicker heavy-duty strapping. The heavy stuff is still relatively easy to bend but holds it's shape better and will hold the bulb and socket straight without sagging. At Home Depot they even have some copper pipe strapping (also known as "pipe tape" or "pipe hanger") that is quite stiff.
Ventilation Performance
There are many different ventilation options available, since standard household ducting is used in the construction of the fixture. For those folks with bigger boxes or rooms, ducting in and out, "inline" duct fans are probably the best option.
For my little NewGanjaBoy-style setup, using the Hurricane fixture as part of the ventilation system of my box, a 115cfm computer fan does the trick. As for actual performance specs for different blowers/fans and light wattages, I'm afraid you'll have to experiment. Here's mine just to give an example:
Box:
-NewGanjaBoy-style three chambered box
-4 20w flouros in the mother chamber
-150w security HPS in the flowering chamber in original metal fixture with holes drilled in the top
Ventilation before Cool Tube installed:
-115cfm fan exhausting box
-4"x8" intake port in the bottom of the veg chamber
-Two 2' runs of 1.5" PVC pulling air through the wall between veg and flowering chambers
-Two 1' runs of 1.5" PVC pulling air from over the HPS fixture into the utility room where it's exhausting out the back.
Ventilation after Cool Tube installed:
-Two PVC runs between flowering chamber and utility room replaced with Hurricane Cool tube fixture
-ballast moved to utility room and housed in the original security light casing
-everything else is the same
Temps before Cool Tube mod:
Ambient temp: 80°F
Flowering chamber 1 hour after HPS fires up: 95°F (in direct light)
Flowering chamber 6-12 hours after HPS fires up: 100-105+°F (ouch!!)
Temps after Cool Tube Mod:
Ambient temp: 80°F
Flowering chamber 1 hour after HPS fires up: 85°F (in direct light)
Flowering chamber 6-12 hours after HPS fires up: 90°F (in direct light)
SAFETY NOTICE:
Please note that the wire to the bulb base must be a high temp fiberglass type, or the heat will eat up the wire and cause a running short. The thermal tape is a fiberglass electrical tape from most hardware stores. High temp fiberglass wrapped wire is available at any hardware or electrical store. It is imperative that you use it, as a smoking ballast is a real bummer to relight.
Authors: johnstone, NIMBY, Don'tTreadOnMe, sanclem and Smokey D Dope