

This will be one of what I hope will be a series of posts about which methods work for me. I'll updated them as I learn from doing or from others, but everything here will be the results of my personal testing.
Cloning in Soil:
Day 1 -
Started with a cutting from growing mother plant. About 6" tall with about five nodes (leafsets).
I couldn't stop myself and sprayed the foliage with distilled, in addition to the inside of the plastic up.
Day 9 -
In addition to my spraying the inside of the cup every few days. I added one cup of distilled water.
Day 14 -
Removed the cup; Started feeding nutes.
Note that this may have been a dumb idea: I wanted to use some flower nutes to encourage roots, but also add veg nutes to support the foliage growth. I believe the veg nutes limit root growth and flower nutes encourage it, but I could be wrong.
1/2 cup veg nutes (as mixed above with FF GB and FF BB) and 1/2 cup distilled.
Day 25 -
Very nice new growth. 1c of veg nutes, and this clone is now a plant.
Day 28 -
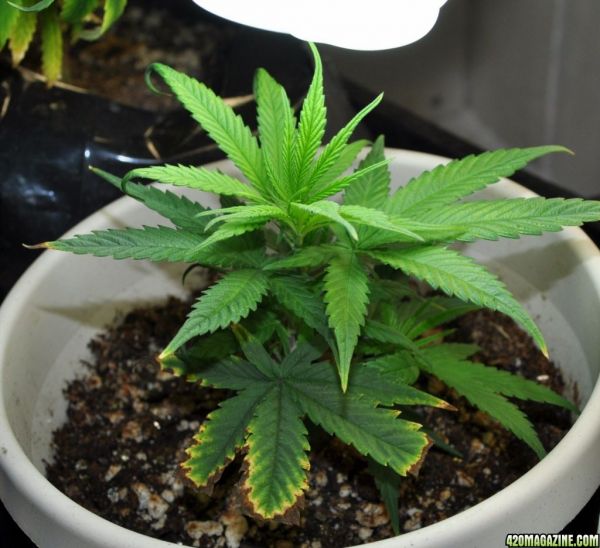
Cloning in Soil:
Day 1 -
Started with a cutting from growing mother plant. About 6" tall with about five nodes (leafsets).
- Stripped - Pulled off all but the top three nodes.
- As I pulled them down, I tried to strip off the outer stem. I ended holding the removed leafset connected to what looked like a piece of thick dental floss a few inches long. This was discarded.
- The goal was to create a surface where roots would grow out from.
- Scraped - Razor scraped the bottom 1"
- Using a sharp and cleaned razor blade (cleaned with peroxide), I gently scraped off the top layer of the stem to expose the inner surface on the bottom one inch of the stem.
- Hint: Angle the blade so sharp edge is facing toward the top of the plant as you drag it down the stem. If you drag the blade toward the direction you are scraping (angled toward the bottom), you will catch and cut through the plant. (been there, dumb that)
- Rooting hormone - I rolled the stem through some Rootex gel spread onto a small dinner plate. Never dip them into the jar, as you can contaminate the entire container.
- Bury enough stem - I planted them far enough down to cover all of that scraped area and one full leafset that was not stripped (but was cut off blunt to about an eighth of an inch from the stem - basically crating a hump on the stem where that node used to be).
- Soil mix - I used FF Light Warrior soil, mixed six parts soil to one part vermiculite.
- I spayed in some distilled water as I mixed the 6:1 ratio, so the soil was moist but not clumpy wet.
- Trim leaves - I wait until the stem is buried before I trim the big leaves (really any full leaf). I just cut them in half width-wise, half way up the leaf so about the 50% of the original surface near the stem still remains.
- Distilled water only - I then water with one cup of distilled, closer to the stem since there are no roots at this point.
- Moisture dome - I use a translucent (normal milky clear plastic) plastic cup with a few small holes cut into the bottom (the part facing up as the cup is put upside down over the plant). Since the plant cant hydrate itself at this point, i want to minimize the lost of moisture through the leaves.
- Mist the cup - I'm not sure if this helps or makes me feel better, but I use a mister to spay water onto the inside surface of the cup to increase humidity. I will do this misting every few days for the first two weeks.
- This also helps me fight the urge to mist the leaves, which I also occasionally do but know it can cause problems.
- Lighting - I use a CFL in the range/color of 6500 kelvin.
- If you look at CFL bulbs you will see the "full spectrum" or bright white (blueish) bulbs are closer to 6500k or at least above about 5300kelvin. This is the color spectrum used by plants when they veg. The lower numbers, say in the 2400k to 2700k are more red/orange, and are better for flower.
- I set the CFL bulb as close as possible to the cup, with my goal being about 1/2 inch away.
I couldn't stop myself and sprayed the foliage with distilled, in addition to the inside of the plastic up.
Day 9 -
In addition to my spraying the inside of the cup every few days. I added one cup of distilled water.
Day 14 -
Removed the cup; Started feeding nutes.
Note that this may have been a dumb idea: I wanted to use some flower nutes to encourage roots, but also add veg nutes to support the foliage growth. I believe the veg nutes limit root growth and flower nutes encourage it, but I could be wrong.
- 1/8 cup FoxFarm Tiger Bloom nute solution (mixed at 1tsp/gal)
- 1/4 cup FoxFarm Grow Big nute solution (mixed at 1tsp/gal), and FF Big Bloom (mixed at 1Tbsp/gal)
- Added distilled to the above to make one full cup of brew
- Brew poured near the bottom of the stem, but also out a bit further so the nutes would be in the soil and she could reach for them.
1/2 cup veg nutes (as mixed above with FF GB and FF BB) and 1/2 cup distilled.
Day 25 -
Very nice new growth. 1c of veg nutes, and this clone is now a plant.
Day 28 -