High Pressure Aeroponics

I haven't posted pics because I had 2 set backs, and I am not sure why- other than it has nothing to do with HPA. Quite possibly I mixed the nutes too hot (700+) for the young age of the roots. Keep in mid recommended is 300 for early veg. GIGO :oops:

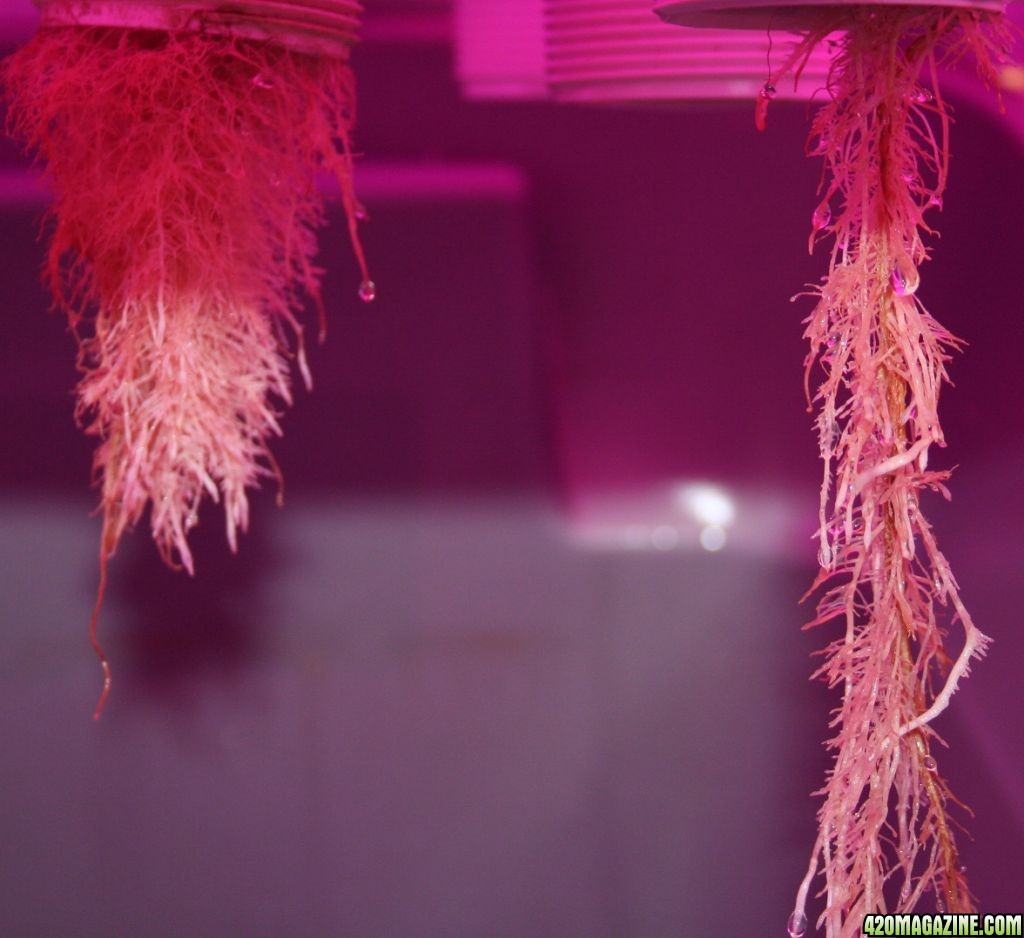
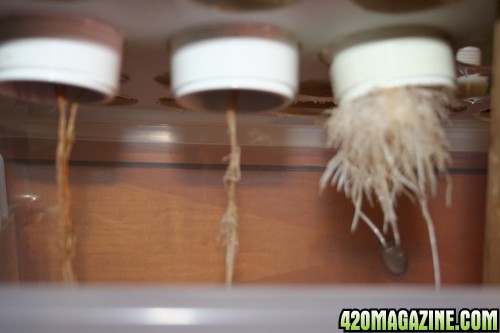
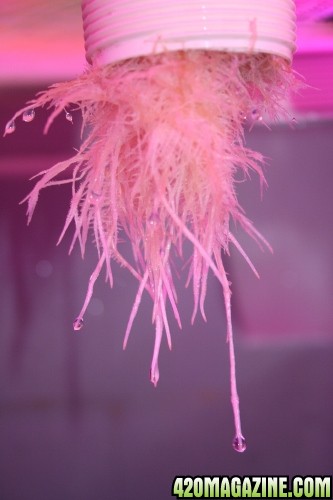
It could have been the shock of leaving the fan on all night (wasn't on a timer). 2 of 3 plants severely wilted, one recovered, only to wilt again. Two days ago I mixed H2O2 + colloidal silver and have been spraying the roots, plant, and starter cubes a couple times a day. One of those two is mostly back, the one on the far right finally showing some signs of recovery this morning.

The seeds I germed afterwards didn't make it either. I doubt it was the seeds, as all sprouted. I probably set the sprouts too deep into the S2G starter cubes. S2G is a maze of man-made fibers cut to size. It probably made it too difficult for them to push through. I tried to clear the way, but it was too late. S2G does work though, just be careful not to set the sprouts too deep.

I do know LL/S works great. The plant that did not wilt was the smallest of the 3, and it looks really healthy, with leaves reaching for the light above.

Maybe I'll take a pic just to show how human (dumb) I am. This will show what LL/S can do even with a beaten up plant. OK. I talked myself into it.
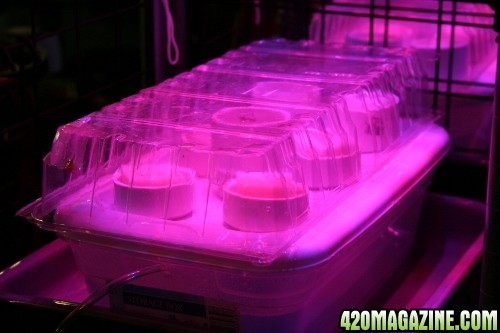
PHOTOS

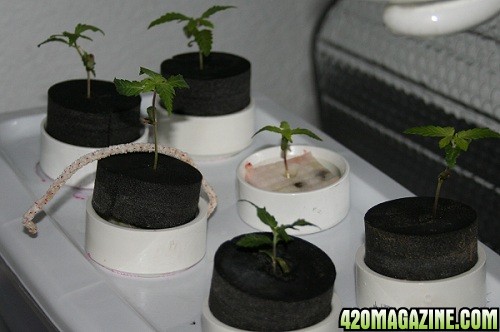
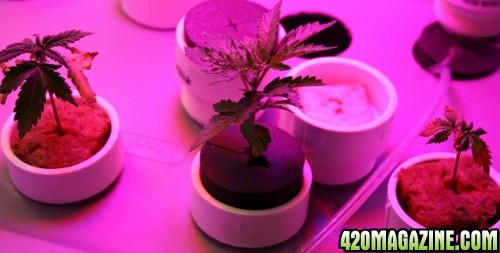
Note the leafs on the center plant are reaching toward the light. This WAS the runt. The other 2 wilted from a night under the fan. Make sure your fan is on a timer. No more than say half hour at a time until the babies are strong. In any case, do not fan 24/7
IMG_0737_600x261_.jpg


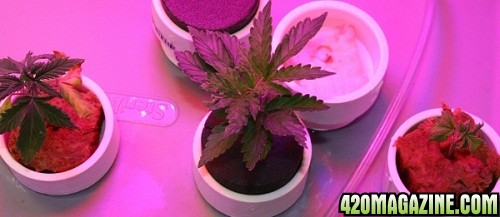
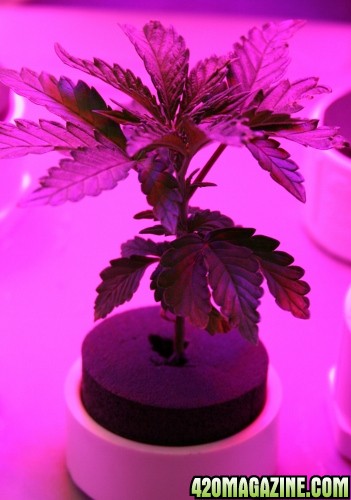
Closeup of plant on left from above with the lone survivor from the second batch of germed seeds that I pushed too deep into the S2Gstarter cube
IMG_0736_600x322_500x268_.jpg


Note the plant on right was my biggest. It has wilted TWICE. Today after ~ 10 days in the infirmary, it is finally showing signs of recovery. Only took it out for the photo.
IMG_0735_600x304_500x253_.jpg


Alas, such setbacks bring growth to a screeching halt. If the seeds were readily available I would simply start over and be way ahead of where they are now.
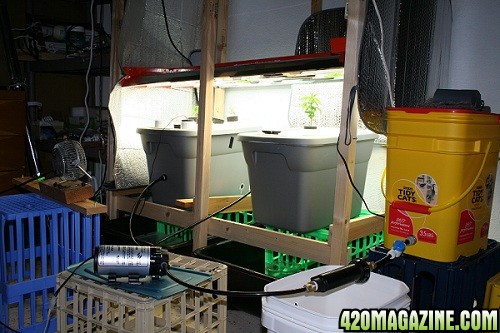
 
Sometimes I amaze myself how long I can overlook the obvious.

One of the reasons I tried S2Gstarter cubes was because of the problems I had with rock wool. RW cubes stay too wet around the young developing roots, and are prone to fungus, mildew,and mold. I usually cut the RW starter cubes in half, but this time I kept the full size and pushed all the seedlings deep into both cubes (RW & S2G). Not a good idea.

Several grows ago, when my system was morphed from drip to spray to high pressure, the RW starter cubes caused a problem. As a last resort, I removed it under running water. The plant fully recovered.

So around 1:30 today I took the 2 sick babies out. The roots were brownish and were mostly dried out, as though they were dehydrated. The lone healthy plant roots are bright white and plump, like fresh cooked pasta.

I soaked each plant twice, 2 hours apart for 5 minutes in 3% H2O2. I may need to repeat a few times before they fully recover.
 
It's a Sad Day

The proof that HPA works is in my lone survivor, which was started in a S2G starter cube. If it's a female, I will post pics from time to time.

Pilot Error.

This is my 3rd HPA grow. Although I have the HPA part fairly well sorted out, I am still figuring out the best way to start seedlings. Starting with clones eliminates this delicate phase.

S2G vs RW

As HPA feeds the seedlings more frequently, though with very little nutrient per feeding, you do not want a medium that retains too much moisture, as full size rock wool cubes (rw) do. Neither do you want a medium that breaks down and collects on the bottom of the pod where it can become a breeding ground for fungus, mold..., as most other starter cubes would.

Having experienced issues with rw in the past, led me to try S2G starter cubes.

S2G has several positive features over rw. It is pH neutral. The airiness of the man-made fibers provides pockets for moisture retention. As the fibers do not absorb moisture, the majority of the moisture stays on the bottom of the cube. This forces the upper fibers to pull apart, creating a better environment for developing roots. Since S2G does not wick 'up' you must make sure roots are protruding at least a half inch before moving to the HPA pod.

The problem with either of these materials is that once used, they do not bio-degrade. I suppose you can burn the rw, but I doubt you can turn S2G into a bio-degrading ash.

Any ideas?

Things I Have Learned During THIS Grow

1. I figured out that S2G in the wrong PVC coupler is S-NOT-2Grow.
2. Although they all look alike, there are distinct differences among PVC couplers (see photo of the 4 different types I have), but only one of them is good for seedlings. That's huge.

The lone healthy surviving plant looked like a runt, due to the fact that it was placed in the wrong size PVC coupler. That coupler had a narrow opening and a much longer thread area, which combined to make it difficult for atomized nutes to reach inside, but once I figured that out, the plant has responded nicely.

I recall reading where one should soak their rw in H2O2 prior to use. I have never done this, but it is good advice.

5 seedlings were started in rw. Having similar bad experiences with rw in the past, for the last grow I cut them in half; this time I did not. (If you cut them in half, make a hole in the long side for the seedling to insure adequate depth for rooting).

The follow up batch of seeds, I used all S2G, but buried the cracked seeds too deep. They had trouble pushing through all the tough fibers. The tiny plant is the lone survivor, but it is not doing well.

These lessons will (should) resolve the biggest problem I have had with HPA. So it should be smooth sailing from now on.

Clones

Clones eliminate the seedling problems, as you simply put a neoprene puck around the rooted stem- no medium ever to be a potential problem, but this strain does not form many side branches, and it is an auto-flower. Can you clone autos?

Pull It

In the now infamous words of one Larry Silverstein (will he and his co-conspirators ever go to jail?), I am going to "pull it"- the journal that is.

As I only have one healthy plant, it makes little sense to keep the journal going just for it.

I will take one more pic of the plants, and the roots. At least you will see what healthy roots fed via HPA are supposed to look like. Plus it will provide evidence for any skeptics that HPA is viable, but like any other grow method, it requires a bit of a learning curve.

2 Recovering Plants

Oddly the plant with the driest, deadest looking roots looks closer to regaining its health than the plant with the plumper, whiter roots, but it's only been 2 days since I started soaking the roots in H2O2. I spray them 4-5Xs a day with regular 1/3 strength foliar spray, and every 3 days with LL/P.

New Seeds Soaking

I started soaking 6 new seeds 24 hours ago. When they crack, I will put them in my new mini-starter pod, probably 4 in the S2G starter cubes, the other 2 in the half size rw cubes. under a 14 watt Sunshine Systems LED. Its a 12 x 12 fixture blending reds and blues.
 
I don't think you can clone autos... once the seed germs, it's counting down the days to bud as far as I know.

I hear you on pulling the journal plug - it's tough to lose a crop like that.

I can see how HPA has advantages - for a while I thought the holy grail of growing was finding a way to do it without media, and I like that aspect of HPA.

On the downside - you are running a balancing act the entire grow - one flipped switch that's not supposed to be flipped, and it's doom. I think a UPS would be very important, especially once the plants get large and would die quickly if the power went out to the pumps and not the light.

One guy who used to run aero systems here, Pan4Gold, had his tubs set up so the roots would still have some water on the bottom of the tub in case the pump failed - said it saved his grow a couple times.

I think clones are the only way to run this type system - you've got to have a steady supply of material to take advantage of the fast growth rates, and backup in case of disaster.

Thanks for sharing with us PetFlora... would you like me to have the admins move this to abandoned?
 
Thanks OB.

The problem with having nutes in the pod is that plants poop through their roots. If one utilizes D2W, as I am, this is not a problem. Most likely in early veg with small roots, you can add the nutes back to the rez, but not for long.

I have a new idea for a small bubbler inside the pod, using a small plastic utensil tray that is just big enough for a 10" air stone. It will sit on a table so it is close to the young roots. The vessel should not need nutes, just pH balanced water, which will need to be pH checked and refilled periodically.

I am not ready to move this to 'Abandoned', just yet. I will post some pics first, and provide a link to my follow up journal

If you have the ear of the Mods, ask them to put a My Journals tab immediately under the User CP tab. This would eliminate an extra step to accessing ones journal to make updates.

I hear you... no problem.

Yes, I used to be a Mod - too tough for me, but I know some good ones. It's just about the opposite of growing... people are not usually very happy when you have to send an advisory... I like the positive karma I get from sharing my growing much better. We need Mods though... just with thicker skin than me.

That's a good idea about the "my journal" tab... I wonder how they'd keep the link right though.

I wish more people would use their blogs as reference link holders... it's one of the more underutilized features here.
 
Photo Update

Six seedlings were started at the same time, and in the same environments, but only 3 survived.Why?

As can be seen by looking at the roots, the 2 plants on the left are seriously sick. These were started in full size Rock Wool starter cubes. Full size RW cubes hold too much moisture, creating a toxic environment that young roots cannot survive.
IMG_0738_500x333_.jpg


In the past, I cut RW in half vertically to keep volume to a minimum as they hold too much moisture. This time I did not, and paid a heavy price for it.

RW tip: Cutting in half vertically allows some roots to clear the RW fast (allowing for more nutrient uptake) while the tap root works its way out the bottom. This tip will maximize your success with RW

Note the roots on the far right are growing in a S2G starter cube. These are by far the most dense early root development I have ever had. The entire bottom of the S2G cube is loaded with roots. They are white, fluffy with tons of surface area to eat with. It does take time for all these roots to break through, during which, plant development is slow. Now that they can feast on the atomized nutes, the plant is really taking off.

IMG_0741_333x500_.jpg
IMG_0740_351x500_.jpg

After this photo I moved it to the center of my pod where it will have the most room to grow. I'll post above/below updates so all can see HPA in action.

As only one seedling has survived, I started 6 new seeds (all cracked) which I put into my DIY starter/cloner this morning.
My previous DIY starter/cloners were too big for my needs.

IMG_0739_500x333_.jpg

Bought this storage container at a Dollar store. It is long enough to fit a 10" bubble stone, but small enough to concentrate the O2 in a small area.

All germed seeds are in S2G starter cubes. I can't wait to see how this stage develops.
 
I have not found the short video I was looking for, but here are a few.

Here's a 13 second video showing what atomized nutes look like. Shortening the feed to <1-2 seconds fills the pod with enough nutes to coat the root hairs, feeding them in the most bioavailable manner


YouTube - Ultrasonic Air Atomiser Part 2

Here is a short video of a mist system that closely approximates what mine does
YouTube - Mist Technology : DigInfo
 
Quantum T 5 Bad Boy Question

I assembled my 8 bulb Bad Boy.

I was thinking to begin mixing bulbs IE

Early Veg 6 blue/2 red
Middle Veg 4 blue/ 4 Red
Late Veg 6 Red/2 blue

then reverse for flower.

Anybody tried this, or have a better blending suggestion?
 
Foliar Feeding

I just checked DMs website. They finally have the revised Nutrient Calculator up. An email would have been nice.

So I checked the LL/Saturator boxes and was directed to a page that gives the amounts, and there it was... a breakdown by week for how much Gold Grow/Flower A&B to mix: 2.6ml of each/liter, which seems reasonable, but then... it calls for 60mls (2 oz) of LL/Sat/liter.

I emailed DM and asked if this a misprint. Are we really supposed to use 26 times the amount of LL/S to nutrients? Saturator is reasonably priced but LL is $59/L ($40 from Cheaphydro, but still) that seems like a lot of product.

1000 ml= 1 liter, so 1000/60= 16.67 Foliar Feed (FF) liter bottles or 42 cents per liter. I'm guessing here, but one liter FF should last ~ 3 feedings of 4-6 plants. Well, that doesn't seem excessive.

Up until today, I was spraying every 3 days with LL/S (but no nutes), and growth has been very good; probably has more to do with being fed via HPA. :morenutes::adore::shhh:

I can't wait to see what happens now.

I just checked the LL/S page and it still says nothing about mixing them with diluted nutrients. WTF?
 
No pressure (no pun intended;-).

Reminding all This is only my 3rd HPA grow (the first starting with all the hardware and complete line of DM nutes), and I already blew it with only one plant surviving the bubbler, but look at those roots (4" tall plant). I haven't seen that kind of development in veg in any of my prior HPA grows. :cheer: HPA:cheer: HPA:cheer: HPA

I am so excited that I decided to set up a separate system to finish this one plant. I have a back up pump and all kinds of fittings on hand. And since it is an autoflower, I can finish it under my Bad Boy T5 while simultaneously growing the new plants. But then that would stop me from mixing the 6500/2900 bulbs, so I may just finish it with my UFO 90 with CFL supplement, or finish it some 2 weeks later under the BB. Sorry, I'm thinking out loud:reading420magazine:

What we will watch is: One LR X Bubble plant (said to become a 2 ft tall cola) placed in the center of one 10G tote, that is about 2 ft deep. If the roots get too close to the bottom I have an 18 G at the ready. Hmmmm. I might even use it once they start showing their pheno. During bloom is when a whole new set of roots develop from the bottom of the plant. They are called pompoms, because that's what they look like.:cheer: Their sole purpose is to feed the babies.

I posit that the more room I give the pom poms to develop in, the more surface area will be exposed to the atomized feedings. I expect BIG PHAT NUGGZ should follow.

One of the second set of 6 seedlings already has a 2" tap root, and 2 others have one protruding below their starter cube. Probably need to drop into HPA by Friday. I will start a second journal for these.
 
Finally getting back to the garden. Had a BAD flu, plus company for Thanksgiving. Lost a week.

I am hooking up the Quantum Bad Boy. WOW. Let there be light.

Now that I have the low down on autos I switched back to veg nutes for the 2 plants. They were getting flower nutes for 2 weeks and weren't growing very much.

The 6 seedlings are doing well, though one is having trouble rooting.

I will probably close this out and start a fresh journal.
 
TAKE 2: HPA + Quantum T 5 Bad Boy 8 Bulb

Strain: Low Ryder X Bubblicious.

Nutes: DM Grow/Flower A&B+ Add.27 and Silica
Foliar Feed with Liquid Light & Saturator

2 Plants from previous attempt were under UFO 90 LED. I'll keep you posted. The larger one 5" is in a pod all by itself, so we can monitor unrestricted root development. I 'may' move the smaller 4" in there later.

Nov 17th

6 seeds cracked and inserted into mini bubble-pod with 2 X 10" air stones.
Light: 2 x 150w CFL & one 26 watt LED spot

December 4

Transferred 6 seedlings (1"-3") from bubble-pod to HPA pod

Install Quantum BB T-5 (8 bulb). I will be mixing bulbs. Start with 6 @ 6500 & 2 @ 2900

I'm exhausted, so will post pics later.
 
Re: TAKE 2: HPA + Quantum T 5 Bad Boy 8 bulb

The HPA Rig Simplicity Itself. Aquatec 8800 pumps DM nutes from DIY rez with 2 @ 10" bubblestones. Filter not necessary with DM nutes (they are clear/clean)- no residue. 2 @ 10G pods each with a twin head misters from Reptile Basics
IMG_07463.JPG

6 Lowryder X Bubble seedlings. Note one without puck has yet to establish a strong root system.
IMG_07455.JPG


DIY dome/bubblepod with 2 @ 10" bubblestones
IMG_0739_500x333_.jpg


Roots are from older plants (from previous journal). Plant on left was started in the correct size PVC coupler. The plant from left is currently in its' own pod, so we can monitor root requirements when not competeling with other plants.
IMG_07428.JPG
 
Back
Top Bottom