

Or Rolling along the path of least wood pulp.
First some disclaimers and some info I forgot to add in the picture tutorial. Feel free to skip. It's a bit ranty.
I apologize if this is cheeky or just downright rude, but I am honestly just trying to be helpful. What I'm talking about are the terrible, TERRIBLE joints being smoked around here. The average joint I've seen in photos around here are probably more harmful to the smoker because of the insane amounts of paper going up in smoke, than the tobacco rolled in it. Not just that, but the paper tastes awful. Truly, spine-shiveringly awful. One guy filming himself rolling as a tutorial had two king size papers glued together, side by side, ALL rolled into a joint as thick as the ones I roll with a single layer of paper. Considering that the paper weighs around 1 g/square inch, that's almost as much paper as there is contents. (I'm sorry if you roll like that, and it's because an illness prevents you from doing it any other way.) Personally, I like the taste of whats in the paper much more than the paper itself, so I like to roll with as little paper as physically possible.
So. I made a tutorial of how I do it.
Now, rolling like this makes the joint a bit less resilient to bastards hot-smoking the joint (I don't know what you'd call that in english. Means smoking it so fast/hard that you end up with a very long, very hot tip, making the whole joint very hot,) but I feel the better and smoother tasting smoke far outweighs the need to treat it a bit carefully.
It's also more time consuming to do the actual prep'n roll at first, but once you get the hang of it, it's only a bit slower than the "usual" way. I usually take around 6 minutes, start to finish. Also, rolling with pot is a bit trickier than with tobacco/hash mix, but just grind the bud well, and there will be no problems.
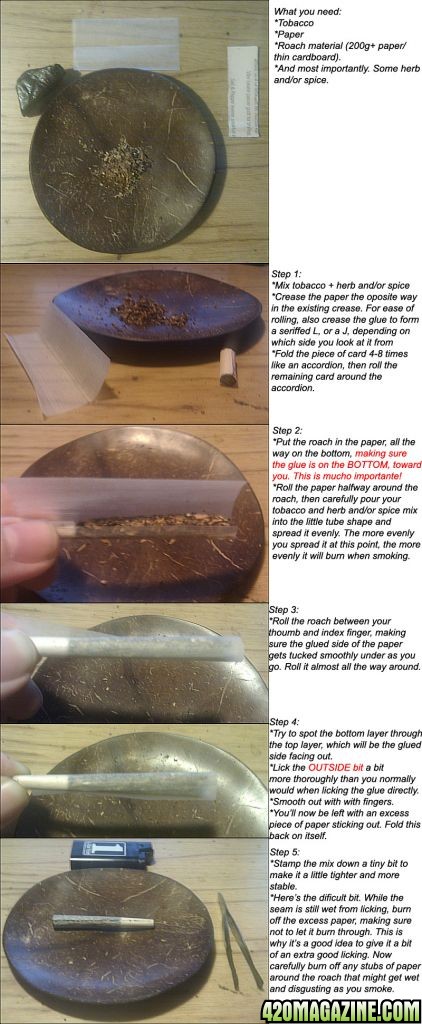
To get the seam straight (which I find important, for some reason) all you have to do is, in step 2, before step 3, align the glued edge slightly diagonally upward from your thumb toward the tip. This gives a slight cone shape, and a dead straight seam once you burn off the excess.
Anyway. Here's a tutorial.
First some disclaimers and some info I forgot to add in the picture tutorial. Feel free to skip. It's a bit ranty.
I apologize if this is cheeky or just downright rude, but I am honestly just trying to be helpful. What I'm talking about are the terrible, TERRIBLE joints being smoked around here. The average joint I've seen in photos around here are probably more harmful to the smoker because of the insane amounts of paper going up in smoke, than the tobacco rolled in it. Not just that, but the paper tastes awful. Truly, spine-shiveringly awful. One guy filming himself rolling as a tutorial had two king size papers glued together, side by side, ALL rolled into a joint as thick as the ones I roll with a single layer of paper. Considering that the paper weighs around 1 g/square inch, that's almost as much paper as there is contents. (I'm sorry if you roll like that, and it's because an illness prevents you from doing it any other way.) Personally, I like the taste of whats in the paper much more than the paper itself, so I like to roll with as little paper as physically possible.
So. I made a tutorial of how I do it.
Now, rolling like this makes the joint a bit less resilient to bastards hot-smoking the joint (I don't know what you'd call that in english. Means smoking it so fast/hard that you end up with a very long, very hot tip, making the whole joint very hot,) but I feel the better and smoother tasting smoke far outweighs the need to treat it a bit carefully.
It's also more time consuming to do the actual prep'n roll at first, but once you get the hang of it, it's only a bit slower than the "usual" way. I usually take around 6 minutes, start to finish. Also, rolling with pot is a bit trickier than with tobacco/hash mix, but just grind the bud well, and there will be no problems.
To get the seam straight (which I find important, for some reason) all you have to do is, in step 2, before step 3, align the glued edge slightly diagonally upward from your thumb toward the tip. This gives a slight cone shape, and a dead straight seam once you burn off the excess.
Anyway. Here's a tutorial.