This is my 2nd indoor bubble bucket/Deep Water Culture (DWC) hydroponic grow. My 1st grow was a G-13 Labs Thai Super Skunk. It showed signs of PRE-flowering at 7 weeks. It was a GREAT success cut short due to the fact that I am not into dudes and that lady had BALLS one week into the 12hr light/12hr dark schedule. I am now attempting another G-13 Labs Thai Super Skunk (TSS)(Indica/Sativa mostly Sativa F-1 Hybrid) and a U.F.O. #1 DNA Genetics L.A. Woman Feminized (LAW)(Mostly Indica mix of the Original L.A. and Martian Mean Green) strain in a hydroponic in-door DWC grow. Both with bubble buckets (DWC) and I figured I'd keep a journal to be able to look back on my successes and adaptations. I am SURE most of this stuff is going to be boring to you veterans but I notice a lot of little information for the new guy is unspoken rule to the vet and I want to fully describe those little things that made a BIG difference to me. I hope it helps the nubees become successful growers and truly brings them to love the hobby. So, here it goes.........
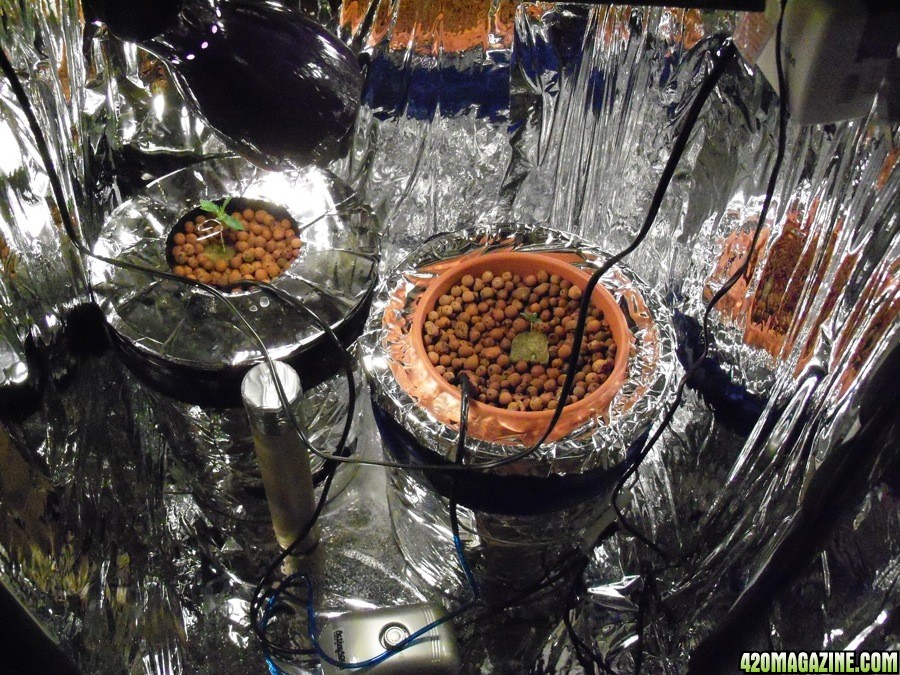
My Grow Cabinet Setup: My actual closet is 8 feet tall by 4 feet wide so I made a cabinet 7' by 2' by 2'. The internal grow cabinet floor is 6 in. from the closet floor for airflow (however little) around the entire cabinet. The interior is approx. 6'6" tall, 2' wide by 2' deep (that's 26 cubic feet right?). Mounted to the internal ceiling of the cabinet, I have a squirrel cage style exhaust fan that completely replaces all air in the cabinet 3 times per minute when turned on. I cut a hole 1' by 8" rectangle in the door for filtered air intake. This hole is externally covered by an everyday A/C filter (12x24x1) & is held on by supports that keep out light but not air. This hole is also shielded internally by a case of root beer box shaped appropriately to eliminate light & also CONTROL airflow direction to my desire. I covered the entire interior with Mylar (don't remember the thickness) including the walls, floor, and ceiling as well as the buckets (the black bucket lid actually increases cabinet temp. by a few degrees when the light bulb is close to it). I used a lot of double-sided carpet tape to keep the Mylar on the walls and aluminum tape to finish the corners. I also used the one-sided sticky foam strips for sealing the door. This cabinet is going to need to withstand some heat so the aluminum tape does better than duct tape and staples any day. The exhaust fan and ballast are installed on the ceiling giving me a total of approx. 6 feet of growing space. Now, I am using 5 gallon buckets so this really only gives me about 4½-5 feet of real plant space. This means I will have to TOP the plant as early as allowed if I want to avoid heat stress or light bulb burns towards harvest time. I've seen pictures of at least 9 plants in this size area so 2 plants should be noooooo worries. I've got the lumens, the space, the airflow, and the temperature (due to airflow) so I'm set. I plug all things into the power strip fastened to the interior so this means I will have to BLACK OUT THE LIGHTED POWER SWITCH on the power strip and "Timer On" indicator lights if I want 100% darkness during the 12hr light/ 12hr dark schedule. I also have an OZONE generator installed on the exterior of my cabinet for any odors & it also keeps the clothes in my closet smelling fresh. I had to make a hole in the drywall ceiling of my closet to accommodate the exhaust but it will be an easy fix if I ever move. I put a dryer exhaust vent up in the attic to keep the pests out when the fan is off.
My Light Setup: I have 250-watt ballast with a lumen booster switch (I thought that was pretty neat) and a 250-watt Metal Halide bulb for the Vegetation stage and a 250-watt High Pressure Sodium bulb for the flowering stage. I bought the light shield, the socket, and the ballast separately. The ballast was by far the most expensive but it sure is pretty & is mounted to the internal cabinet ceiling. I have two chains hooked into the light shield from hooks in the ceiling for double security and less movement during airflow, which means less fire hazards. Safety first!!! I suppose I could even set the light up to a full vertical position if I move the plants to one side just to get full coverage during heavy vegetation. Might be risky. I also have two timers. Both timers have the 15 minute increments so I can turn the fan on and off to allow some heat to build up and once I get the CO2 mix in the room, timers will give it a chance to sink in not to mention a plant can withstand higher temperatures when exposed to higher CO2 levels so I'm told. The other timer is for a strict 12hr on/ 12 hr off light schedule for when the flowers start to show their faces.
My Bucket Setup: I got two 5 gallon buckets, one from the local hydro shop & the other from the local hardware. It's cool 'cause the hydro bucket lid already has a sturdy net pot built in. For this black bucket I bought a small elbow pipe and threaded piece so I can fasten the two together on either side of the bucket wall through a hole near the bottom. I then clamped a tube onto the exterior elbow so I can check water level and even add more solution without disturbing the roots. This will only help until I have to completely change out the nutrient solution of course. I will buy additional buckets from the local hardware so I can make my plant a cocktail without it having to hang in the open air for too long (this may or may not have an effect). So, I will just make the nutrient mix and adjust the PH in the tub then just go straight to the cabinet and switch buckets. After the plant gets too tall, I will eventually have to do the switch outside of the cabinet to avoid lifting the plant into the light bulb — ouch (been there, the plant didn't like it). I got an air pump that can handle two pots and hooked up air stones to introduce the oxygen to the water/roots (They love that). I got the clay pebbles because they are PH neutral and once wet, can hold the plant, keep out light, and it works until the roots can do it on their own. I have to soak the pebbles to get them ready for the plant and so the water in the clay pebbles is the same in the Rockwool and in the bucket. This keeps shock chances down to a minimum I believe and gives me a chance to keep the clay dust from coating my air stone and bucket once installed. Just keeps it clean ya know...... Don't forget to keep the light out of the bucket with tape or whatever, otherwise green stuff will grow inside the bucket and kill your roots/plant.
THE PROCESS
Day 1 — April 14th
I have tried to germinate seeds in the warm Rockwool or spun stone cubes in different ways and it is more frustrating than helpful. I have had the most success with just taking 3 sheets of paper towel and folding them down to about an index card size, soaking it with boiled (not boiling) water, then squeezing it out real well, then putting the seeds in the middle fold and putting it in a Ziploc bag. I just put it on my T.V. and make sure I turn the T.V. on twice a day to keep it warm and just FORGET ABOUT IT FOR TWO DAYS. There is just something with that combination that never fails me. I have tried the distilled water and root growth hormone and all that junk and all I do is end up checking it every 6 hours to find myself frustrated and wasting seeds after a week or two. I get results this "paper towel" way in two days. At least something, not always ready for transplant but something.
Day 2 —
24 hours after the fact. Seeds have popped open but nothing growing outside the seed shell just yet.
Day 3 — 48 hours after the fact
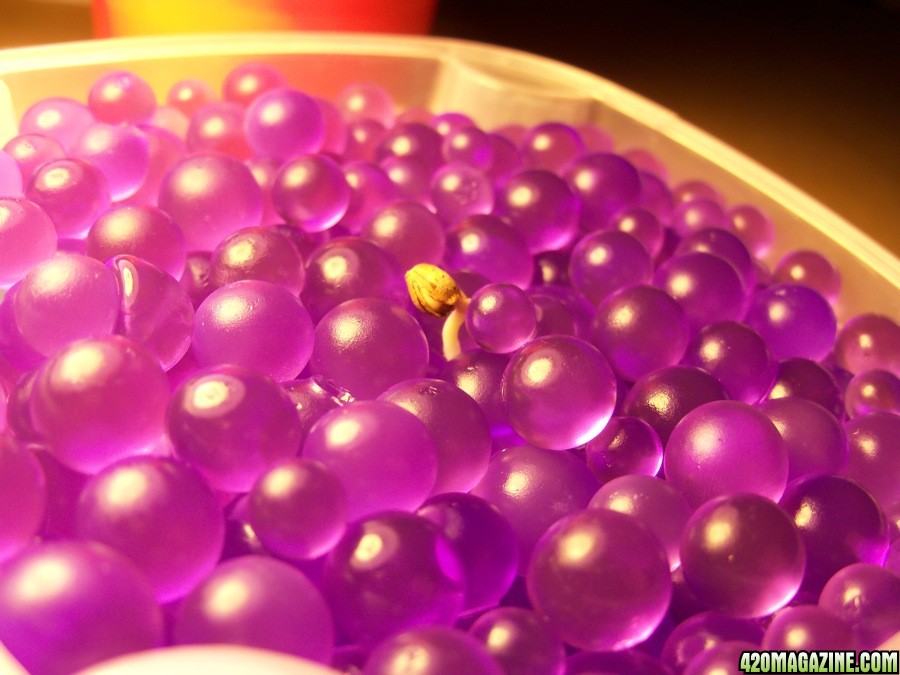
O.K good growth outside the shell for the TSS. About ¼ inch already but it is growing into the paper towel so I pulled the towel up gently. I DID NOT pull the seed out from the towel. I placed the seedling into a small Tupperware type container with some of those gel beads that absorb water. Pretty cool actually. The seedling root can absorb water just being next to the beads and they are kind of slimy offering zero resistance to root growth. My last TSS grow rooted into a few beads and I stripped the beads off then stuffed the roots into the Rockwool cube quite aggressively. I even broke the root. I am not sure if this may have been the cause of it being male but it survived quite well.
O.K. Good growth for the LAW. Only about 1/8 inch but the seed is popped anyway and there is enough root to put in another bead container. I boiled the water and sterilized the beads prior to putting the seedlings in them but made sure the beads got down to room temperature first. Now I will let the seedlings get settled in for a day before I introduce the CFL light. I am told the HID lights are too much for the seedlings at first so I will leave the CFL light to it until I can count 4 or even 6 leaves (including the first little rounded ones.) After those leaves show, I will transplant to the Rockwool cubes but this time I will cut the cube open on one side like a book so I don't have to STUFF the roots in. The Rockwool will be the final transplant and I will make sure everything is the same temperature.
My Grow Cabinet Setup: My actual closet is 8 feet tall by 4 feet wide so I made a cabinet 7' by 2' by 2'. The internal grow cabinet floor is 6 in. from the closet floor for airflow (however little) around the entire cabinet. The interior is approx. 6'6" tall, 2' wide by 2' deep (that's 26 cubic feet right?). Mounted to the internal ceiling of the cabinet, I have a squirrel cage style exhaust fan that completely replaces all air in the cabinet 3 times per minute when turned on. I cut a hole 1' by 8" rectangle in the door for filtered air intake. This hole is externally covered by an everyday A/C filter (12x24x1) & is held on by supports that keep out light but not air. This hole is also shielded internally by a case of root beer box shaped appropriately to eliminate light & also CONTROL airflow direction to my desire. I covered the entire interior with Mylar (don't remember the thickness) including the walls, floor, and ceiling as well as the buckets (the black bucket lid actually increases cabinet temp. by a few degrees when the light bulb is close to it). I used a lot of double-sided carpet tape to keep the Mylar on the walls and aluminum tape to finish the corners. I also used the one-sided sticky foam strips for sealing the door. This cabinet is going to need to withstand some heat so the aluminum tape does better than duct tape and staples any day. The exhaust fan and ballast are installed on the ceiling giving me a total of approx. 6 feet of growing space. Now, I am using 5 gallon buckets so this really only gives me about 4½-5 feet of real plant space. This means I will have to TOP the plant as early as allowed if I want to avoid heat stress or light bulb burns towards harvest time. I've seen pictures of at least 9 plants in this size area so 2 plants should be noooooo worries. I've got the lumens, the space, the airflow, and the temperature (due to airflow) so I'm set. I plug all things into the power strip fastened to the interior so this means I will have to BLACK OUT THE LIGHTED POWER SWITCH on the power strip and "Timer On" indicator lights if I want 100% darkness during the 12hr light/ 12hr dark schedule. I also have an OZONE generator installed on the exterior of my cabinet for any odors & it also keeps the clothes in my closet smelling fresh. I had to make a hole in the drywall ceiling of my closet to accommodate the exhaust but it will be an easy fix if I ever move. I put a dryer exhaust vent up in the attic to keep the pests out when the fan is off.
My Light Setup: I have 250-watt ballast with a lumen booster switch (I thought that was pretty neat) and a 250-watt Metal Halide bulb for the Vegetation stage and a 250-watt High Pressure Sodium bulb for the flowering stage. I bought the light shield, the socket, and the ballast separately. The ballast was by far the most expensive but it sure is pretty & is mounted to the internal cabinet ceiling. I have two chains hooked into the light shield from hooks in the ceiling for double security and less movement during airflow, which means less fire hazards. Safety first!!! I suppose I could even set the light up to a full vertical position if I move the plants to one side just to get full coverage during heavy vegetation. Might be risky. I also have two timers. Both timers have the 15 minute increments so I can turn the fan on and off to allow some heat to build up and once I get the CO2 mix in the room, timers will give it a chance to sink in not to mention a plant can withstand higher temperatures when exposed to higher CO2 levels so I'm told. The other timer is for a strict 12hr on/ 12 hr off light schedule for when the flowers start to show their faces.
My Bucket Setup: I got two 5 gallon buckets, one from the local hydro shop & the other from the local hardware. It's cool 'cause the hydro bucket lid already has a sturdy net pot built in. For this black bucket I bought a small elbow pipe and threaded piece so I can fasten the two together on either side of the bucket wall through a hole near the bottom. I then clamped a tube onto the exterior elbow so I can check water level and even add more solution without disturbing the roots. This will only help until I have to completely change out the nutrient solution of course. I will buy additional buckets from the local hardware so I can make my plant a cocktail without it having to hang in the open air for too long (this may or may not have an effect). So, I will just make the nutrient mix and adjust the PH in the tub then just go straight to the cabinet and switch buckets. After the plant gets too tall, I will eventually have to do the switch outside of the cabinet to avoid lifting the plant into the light bulb — ouch (been there, the plant didn't like it). I got an air pump that can handle two pots and hooked up air stones to introduce the oxygen to the water/roots (They love that). I got the clay pebbles because they are PH neutral and once wet, can hold the plant, keep out light, and it works until the roots can do it on their own. I have to soak the pebbles to get them ready for the plant and so the water in the clay pebbles is the same in the Rockwool and in the bucket. This keeps shock chances down to a minimum I believe and gives me a chance to keep the clay dust from coating my air stone and bucket once installed. Just keeps it clean ya know...... Don't forget to keep the light out of the bucket with tape or whatever, otherwise green stuff will grow inside the bucket and kill your roots/plant.
THE PROCESS
Day 1 — April 14th
I have tried to germinate seeds in the warm Rockwool or spun stone cubes in different ways and it is more frustrating than helpful. I have had the most success with just taking 3 sheets of paper towel and folding them down to about an index card size, soaking it with boiled (not boiling) water, then squeezing it out real well, then putting the seeds in the middle fold and putting it in a Ziploc bag. I just put it on my T.V. and make sure I turn the T.V. on twice a day to keep it warm and just FORGET ABOUT IT FOR TWO DAYS. There is just something with that combination that never fails me. I have tried the distilled water and root growth hormone and all that junk and all I do is end up checking it every 6 hours to find myself frustrated and wasting seeds after a week or two. I get results this "paper towel" way in two days. At least something, not always ready for transplant but something.
Day 2 —
24 hours after the fact. Seeds have popped open but nothing growing outside the seed shell just yet.
Day 3 — 48 hours after the fact
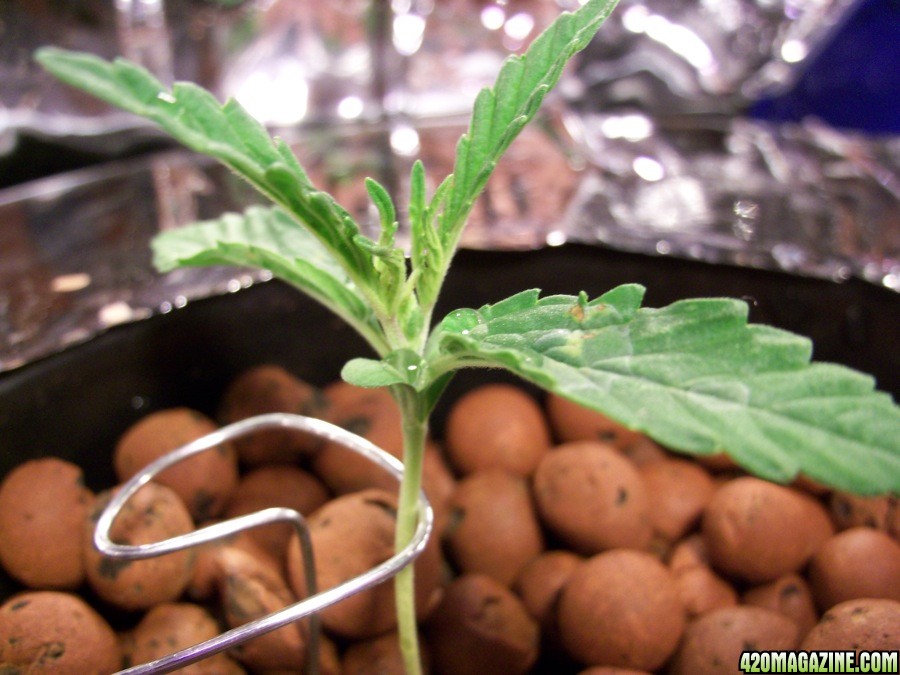
O.K good growth outside the shell for the TSS. About ¼ inch already but it is growing into the paper towel so I pulled the towel up gently. I DID NOT pull the seed out from the towel. I placed the seedling into a small Tupperware type container with some of those gel beads that absorb water. Pretty cool actually. The seedling root can absorb water just being next to the beads and they are kind of slimy offering zero resistance to root growth. My last TSS grow rooted into a few beads and I stripped the beads off then stuffed the roots into the Rockwool cube quite aggressively. I even broke the root. I am not sure if this may have been the cause of it being male but it survived quite well.
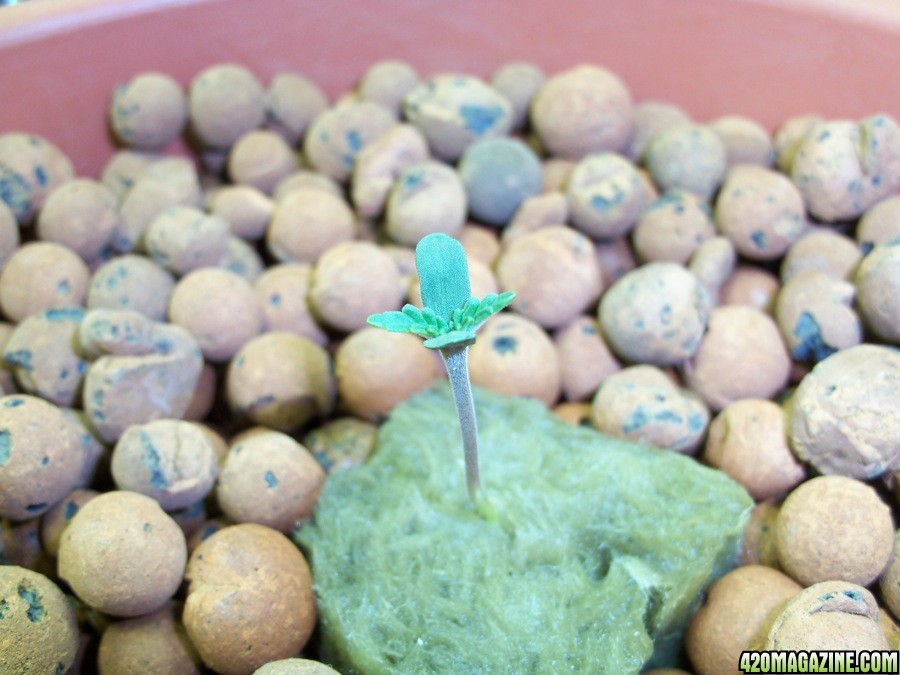
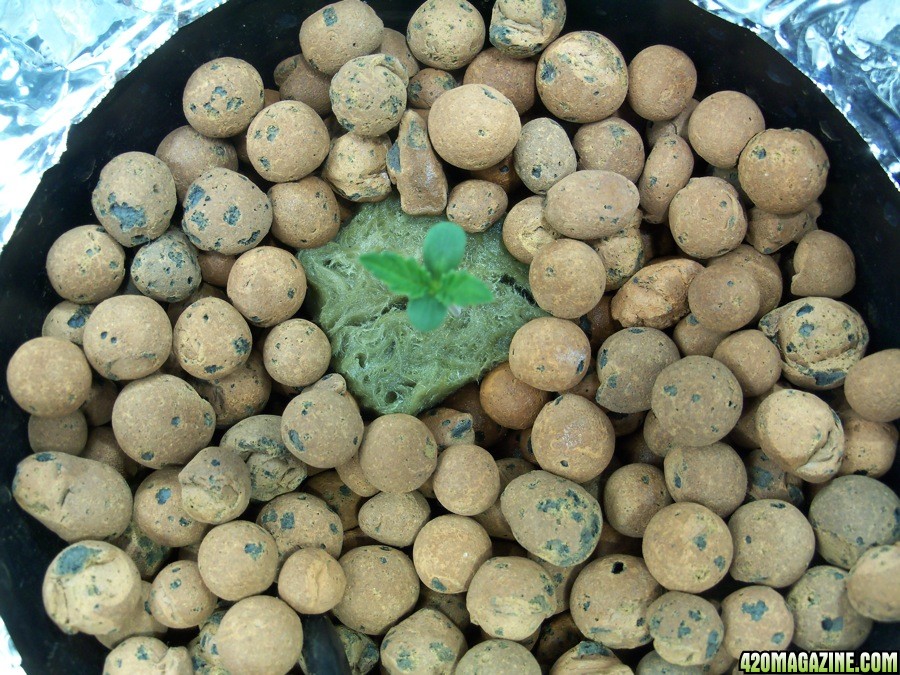
O.K. Good growth for the LAW. Only about 1/8 inch but the seed is popped anyway and there is enough root to put in another bead container. I boiled the water and sterilized the beads prior to putting the seedlings in them but made sure the beads got down to room temperature first. Now I will let the seedlings get settled in for a day before I introduce the CFL light. I am told the HID lights are too much for the seedlings at first so I will leave the CFL light to it until I can count 4 or even 6 leaves (including the first little rounded ones.) After those leaves show, I will transplant to the Rockwool cubes but this time I will cut the cube open on one side like a book so I don't have to STUFF the roots in. The Rockwool will be the final transplant and I will make sure everything is the same temperature.