

Gazoo;3611792 said:HOW TO Build the “7 Gal Rim Mount SCROG Pots” for a 2 X 4 Tent [8.25 Sq Ft]
With the following 5 Main Areas of interest
• TOTAL COST
• COST BREAKDOWN
• TOOLS NEEDED
• PARTS LIST
• BUILD INSTUCTIONS with
Cut List (sizes)
Hole Drill Location, with Layout & helpful hints
Assembly, Position Layout Help
BTW This is My official number 420 post, decided I needed to give something back
to this great community in honor of this special milestone.
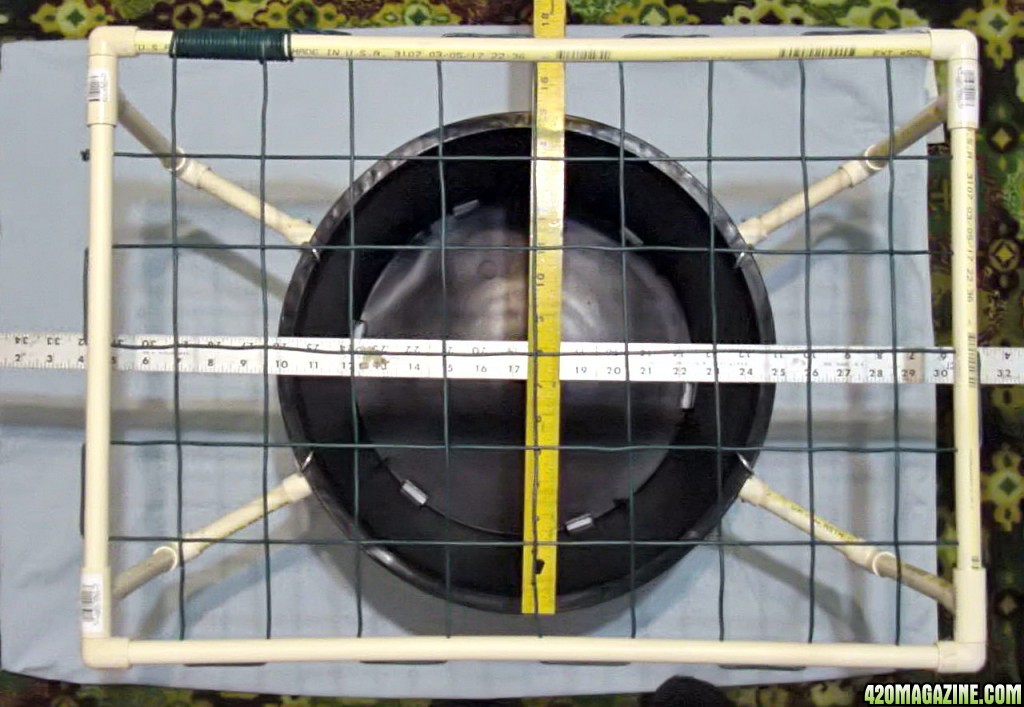
A little Preview
Please see continued post after this
commercial Break:
So here is my Home Made 7 Gal (10 gal also) Dunk able SCROG Pots
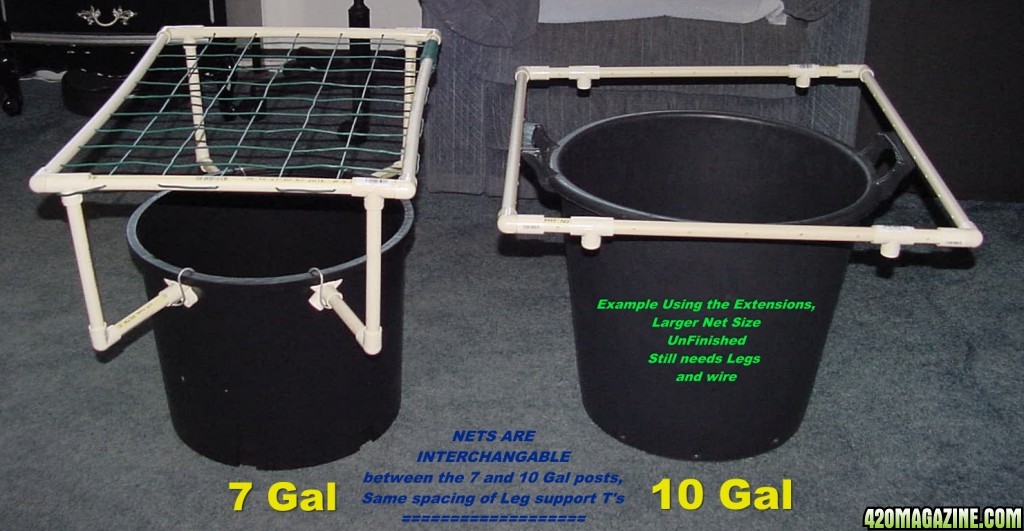
I calculated these to fit my 2 x 4 tent, So the size of the Net is
set to allow for 3 Individual SCROG pots, Total Sq Feet of the 3 SCROG Nets
is 8.25 Sq Feet (see note below about homemade tent Extender/Spreader)
2 x 4 tent = 8 Sq Ft.
BTW All 3 are self-contained and can be moved Individually, Which
means I can adjust for different Plant Stretch by either raising or
lowering each pot by them self’s. I also have the option to pull out any
plant I want for maintenance of the Tent or Plant.
The 2 X 4 Tent can accommodate either Three 7 Gal SCROGs or Two 10 Gal SCROGs.
7 Gal SCROG Nets measure 23 ½ inches front to back (2 foot dimension)
and 16 7/8 wide Each, this calculates out to 2.75 sq feet each.
NOTE: 2.75 X 3 equals 8 ¼ sq feet.
A little bigger than my 2 x 4 (8 sq feet) Tent but since I have
some home built side extensions (opens up approx. 3 extra inches per side)
It works out very well
The 3 Nets in the Tent Measure 50.625” left to right, so about 2.625 larger than
the 4 foot length, But again please NOTE most tents have some extra room if you
use something to push the sides out a little, The Nets will do this for you.
-----------------------
The 10 Gal set-up has a LARGER NET at 3 ½ Sq Feet each or 7 sq ft total,
and allows for 2 inches between Nets and Walls so if you allow the plants
to grow up around the outside of the Net CPVC Tubbing you will have the 8 sq ft.
PLEASE See the included pictures at END for a better Idea of what I am trying
to paint a picture of
TOTAL COSTTOTAL COST 26.63 + Tax Each (7 Gal Dunkable SCROG)
TOTAL COST 27.79 + Tax (Short about 5 inches of ½ CPVC Tubbing).
COST BREAKDOWN1 Each 10’ Length of ½ CPVC Tubing = 3.99 + Tax @ Dales Hardware
4 Each ½ CPVC Press fit Feet = 7.16 + Tax (1.79 Ea.) @ Dales Hardware
4 Each ½ CPVC 90 Deg Elbow = 1.16 + Tax (.29 Ea.) @ Orchard Supply
4 Each ½ CPVC 90 Deg Elbow, 1 Small end = 1.56 + Tax (.39 Ea.) @ Orchard Supply
4 Each ½ CPVC T Fitting = 1.56 + Tax (.39 Ea.) @ Dales Hardware
1 Each 7 Gal NC7 Pro Gro, Rigid Rim Plastic Pot = 4.50 + Tax @ Garden Supply
1 Pack of S hooks = 1.00 + Tax @ Dollar store
30’ Ft of 18 Gauge Plastic coated Wire. = 5.70 + Tax (.19 Foot) @ Orchard Supply
Additional Partsfor 10 Gal Dunkable
4 Each ½ Extension = 1.16 + Tax (.29 Ea.) @ Dales Hardware
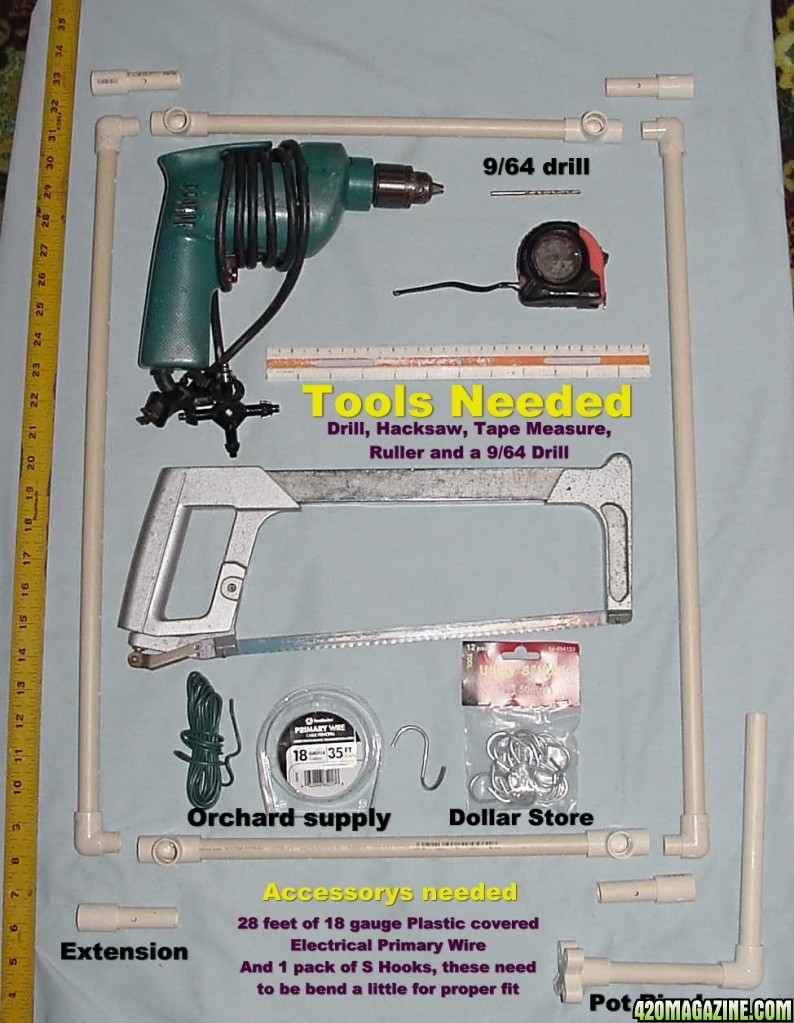
TOOLS NEEDEDHacksaw
Electric Drill
9/64 Drill Bit (big enough for wire pass through)
Tape Measure
Ruler
Pencil or Felt Pin (for marking hole location)
Pliers (to bend S hooks) 2 pairs work best
PARTS LIST
FOR 7 Gal Dunkable Pot Set-up
Ten Foot Length of ½ CPVC Tubing
4 Each ½ CPVC Press fit Feet
4 Each ½ CPVC 90 Deg Elbow
4 Each ½ CPVC 90 Deg Elbow w/Small end
4 Each ½ T Fitting
1 Each 7 Gal NC7 Pro Gro , Rigid Rim Plastic Pot
30 Feet Of 18 Gauge Plastic Wrapped Wire
4 Each S Hooks
Additional Parts4 Each ½ CPVC Extensions
for 10 Gal Dunkable
BUILD INSTRUCTIONS
The 10’ foot CPVC Tube length is just long enough for THE 7 Gal “Full Build”
With Net and Leg Supports.
The 10 Gal Pot Build is short some 4 or 5 inches for the larger 10 gal net (3.5 Sq Feet).
7 Gal Build Instructions
From the 10' Foot CPVC Tubing, Cut the longest Lengths first, You DO NOT CUT the extension Lengths (4 @ 2 1/8”) unless you have a little extra tubing laying around (The Extensions are only for the 10 Gal Pot).
By Cutting all the lengths starting with the longest lengths first and working your way down,
you can't run-out of material for the 7 Gal Set-Up
------------------------------------------
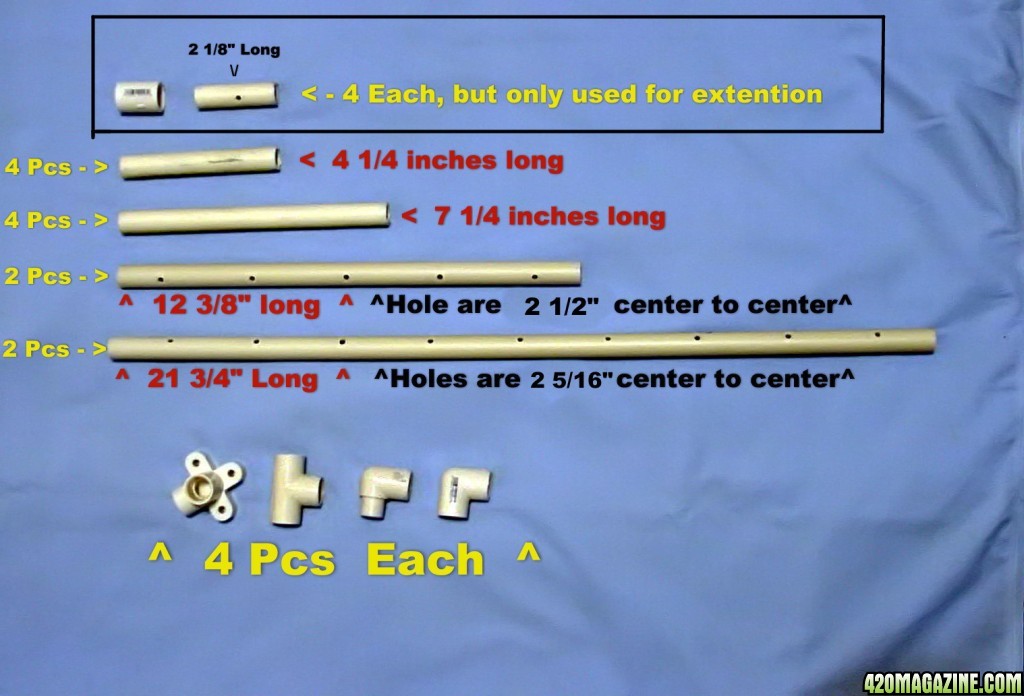
CUT LIST2 Lengths @ 21 ¾ Inches long
2 Lengths @ 12 3/8 Inches Long
4 Lengths @ 7 ¼ Inches Long
4 Lengths @ 4 ¼ Inches Long
Following NOT NEEDED FOR THE 7 Gal Pot4 Lengths @ 2 1/8 Inches Long
EXTENSION PARTS
(If you cut the longest sizes first you can’t run out of material for the 7 Gal)
DRILL----------------
HOLE LAYOUT
Drill holes
Helpful hint
----------------
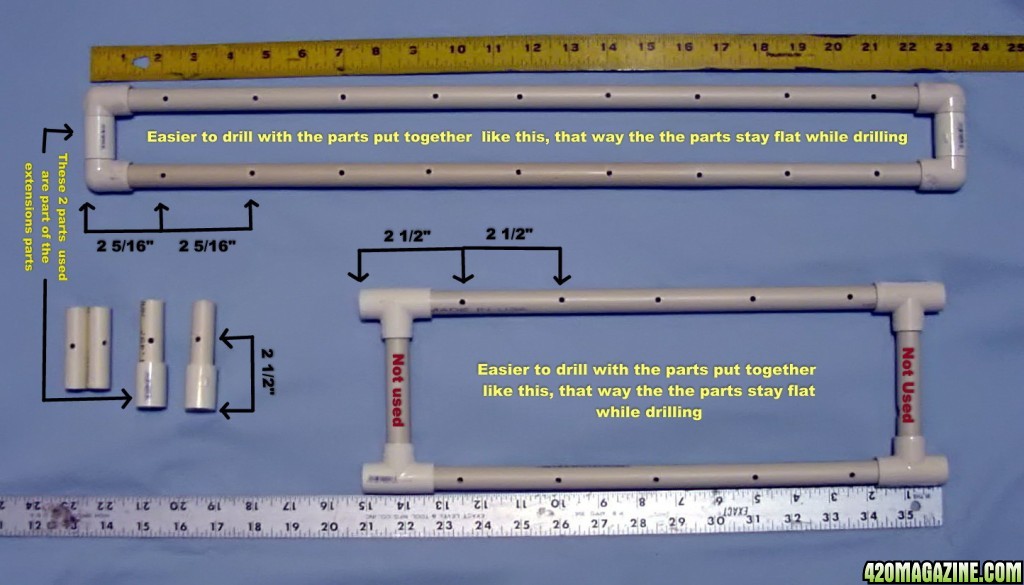
Its easier to put the Net arms together as shown in my pictures, That way when
you drill the holes it will be easier to keep them in line, no rolling around.
PLEASE NOTE
I used the Extension parts to put the Net Frame sides together in the Rectangle
shown But you can use the Leg support lengths to put them together in the same type of square/rectangles as shown, again this will help keep things straight
and flat while you drill.
STEP 1
Set up your Drill using a 9/64 Drill bit.
Configured The Net Frame Sides in two separate rectangles (see photo’s),
This will keep them from rolling around.
Starting with the longest Rectangle, the one that measure approximately
23 ½ inches long when Measured from the outside of the 90 Deg Ends.
Now Starting at the far Left end of the 90 Deg Elbow (see photo) Measure out
to the right 2 5/16” of an inch and continue to the far right side, Depending on
how accurate you cut the lengths you should end up very close to evenly spaced
measurements
Next Layout the Smaller Rectangle, the one using the T fittings ( 16 7/8 length)
Start on the Left side and at the outside Left end of the T Fitting, measure to
the right 2 ½ Inches, Mark and continue to the far right end. Again Depending on
how accurate you cut the lengths you should end up very close to evenly spaced
measurements
You should now have all 4 Net sides marked for the hole spacing, Now run a
straight line using either a string or a Yard stick down the center of each Tube,
This will give you a center line for drilling down the line.
If Building a 10 gal
Press one 2 1/8 small length into 1 end of one of the ½ CPVC Extensions,
Do this for all four Extensions. Now Measure again from the left edge
of the ½ CPVC Extensions to the Right 2 ½ inches this is the hole location.
ASSEMBLYNo need to use any glue or screws, all fits very tight.
For assembly, assemble the Net outer frame first and place on floor
upside down so you can fit the Legs on in the upside down position,
once you do this place the pot again upside down on the legs so you can
see were the feet need to be positioned around the Pot Rim, you will need
to force fit the feet nubs under the rim and once the S hooks are bent a
little it will not go anyware.
Hope I explained in a way that is understandable but if you have any questions
just ask.
I have included the Layout and Cut Size pictures at end of post to help out.
COLLECT MATERIALS NEEDED1) COLLECT Materials
MATERIALS
10 Foot Tube ½ CPVC , 30 Ft. 18 gauge Plastic Coated Wire (or similar),
4 Ea. Feet (Press Fit ½ end) (½ CPVC)
4 Ea. 90 Deg Elbows (½ CPVC)
4 Ea. 90 Deg Elbows W/ Ends that fits ID & OD (1 big end, 1 small) (½ CPVC)
4 Ea. T Fittings (½ CPVC)
1 Ea. 7 Gal Rigid Plastic Pot WITH MOLDED RIM( I used the 7 Gal GRO PRO )
Pack of S Hooks
ONLY NEEDED - If making the larger Net for the 10 Gal Pot
4 Ea. Extensions (small short pieces, Both fit onto OD of tubing (½ CPVC)
2) TOOLS
Drill , 9/64 Drill Bit , Tape Measure , Ruler , Hacksaw ,
=======================================================
=======================================================
=======================================================
=======================================================
=======================================================
=======================================================
How To - 7 Gal Rim Mount SCROG Pots In 2 X 4 Tent - 8.25 Sq Ft
- Author SweetSue
- Create date
Blog entry information
More entries in Member Blogs
-
 From Dab to Vape: The Evolution of Rosin Consumption HabitsIn recent years, Live Rosin, as a typical product type of solventless cannabis concentrate, has...
 -
Micro Bar: Box-Shaped Cannabis Vape and Their Market AppealMicro Bar, a brand that has quickly risen to the top of the disposable cannabis vape market...
-
How Box-Shaped Disposable Vape Empower Cannabis Vape Brand?The emergence of box-shaped disposable cannabis vape hardware as a preferred choice marks a...
-
 HashGirl's Completed Grow Journals - 2017 to 2024HashGirl's Completed Grow Journals My and Felonious Punk's (my husband) Completed Grow...
 -
DEMO: The Petite Powerhouse in Cannabis VapingIn the ever-evolving world of cannabis consumption, variety and personalization are key, and...
More entries from SweetSue
-
 AKgramma's Old School Tincture RecipeThe original post: SweetSue's Cannabis Oil Study Hall