

TheCapn;1748783 said:If you're on a budget and you don't have $250 bucks for a new aeroponic cloner, you might want to try cloning in rock wool. There are several tutorials on this site about cloning in rockwool, and my method isn't much different than most of them, but I'll show you DETAILED step by step how I do it (and why I do this or that), from start to finish. This method works for me, 100% of the time, and it can work for you too if you follow this recipe.
First, I'll tell you why I like cloning in rock wool, better than an aeroponic cloner:
1. RW is "set it and forget it". If done properly, you won't have to touch your clones for TWO weeks.
2. No wires, no electricity, nothing to go wrong.
3. Whether you are planting in dirt, hydroton, or more rockwool, after your clone roots, you can go to any growing medium with no transplanting shock.
4. It's CHEAP! No pump or sprayers or plumbing, etc, to buy.
Here we go:
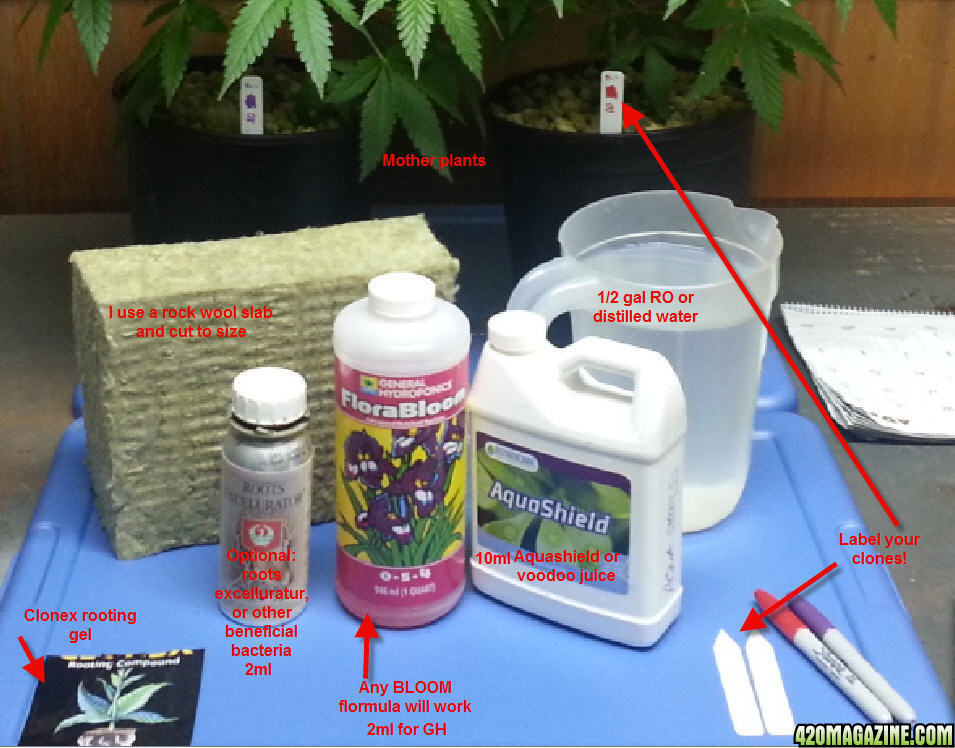
1. Prepare your work area and gather the necessary items:
a. 1/2 gallon of Reverse Osmosis or Distilled water. It is better to use distilled water for clones. The reason is because most tap water contains chloramines and chlorine, which may kill the beneficial bacteria (that accelerate root growth). If you're using tap water, aerate* the water for a few hours first.
b. Bloom formula nutrients (general hydroponics, fox farm, any will do)
c. Aquashield or voodoo juice (same thing)
d. optional: any kind of beneficial bacteria (great white, roots excelurator, soluble mycos, etc)
e. Razor blade or scissors
f. Labels to label your clones so you know what is what
g. Rock wool. I use the slabs and cut to size. You can use 2 or 3 inch blocks instead.
h. Clonex rooting gel (other gels will work too)
i. Mother plants, of course!
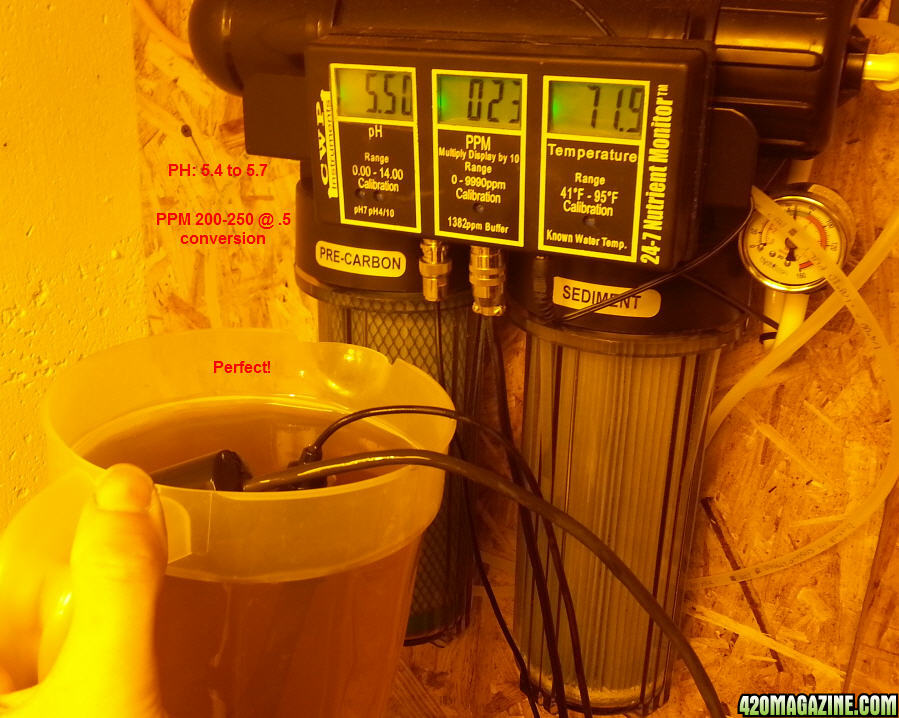
2. Mix up your water:
a. To the 1/2 gallon of water, add about 5ml of bloom formula (general hydroponics bloom or foxfarm big bloom) to the water, and mix to 250ppm @ .5 conversion. If you don't have a PPM meter, 2ml of Bloom in 1/2 gal of water should be close.
b. 10ml of aquashield or voodoo juice (same thing)
c. optional: add any kind of beneficial bacteria (mycos, etc) If you're not sure what this is, just skip this step!
d. The ph should be between 5.5 - 5.8, adjust if necessary* . If you OVER adjust, start over with a fresh 1/2 gallon, we don't want too many PH up/down chemicals in our mix.
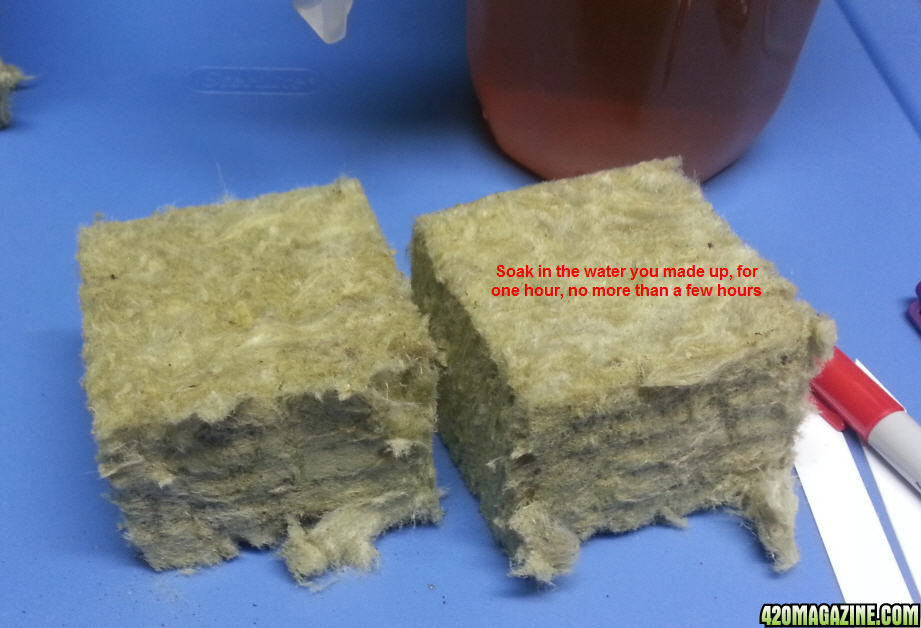
3. Soak your rockwool
Put your rockwool cubes in the water for an hour with an airstone in the container, so the beneficial bacteria can get air and survive, otherwise, it may die with lack of oxygen. It is not necessary to soak these small rock wool cubes for 24 hours.
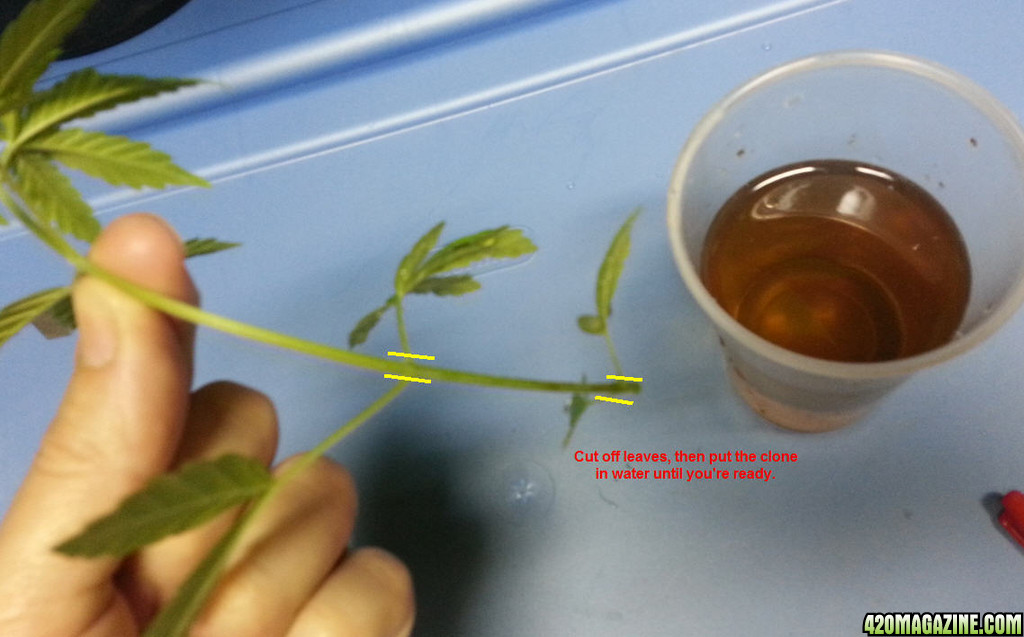
4. Take your cuttings
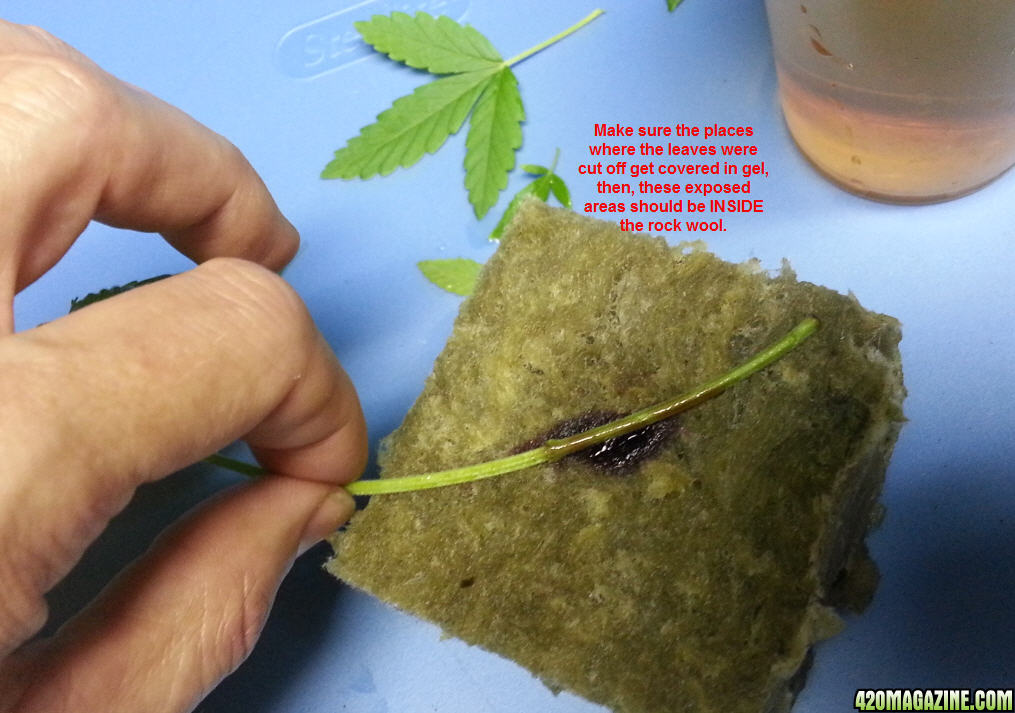
Clean your razor blade or scissors with rubbing alcohol, then be sure to rinse and wipe them off well (so you don't get alcohol on your clone). Find a branch near the bottom* of the mother plant (these root best), like the one in the picture below. Cut the branch off at the stem, and immediately put the cutting in a glass of water that you just mixed up. Cut the fan leaves off (as shown below). Where you cut, these nodes will go inside the rockwool. Roots tend to sprout first where fan leaves were.

5. Put cutting into rock wool
a. Clean a toothpic or similar with alcohol, and use it to make a new hole in the rockwool for the stem. I use my plant markers. The stem of the clone should fit snug into the hole. You don't want any air between the stem and the rock wool.

b. Dip the stem of the cutting into the clonex gel. Put the stem in the rockwool. Try to get the part where you cut off leaves, inside the rockwool. Push the stem down into it until it is about 3/4th the way to the bottom of the cube. Don't Squeeze the rockwool cube.
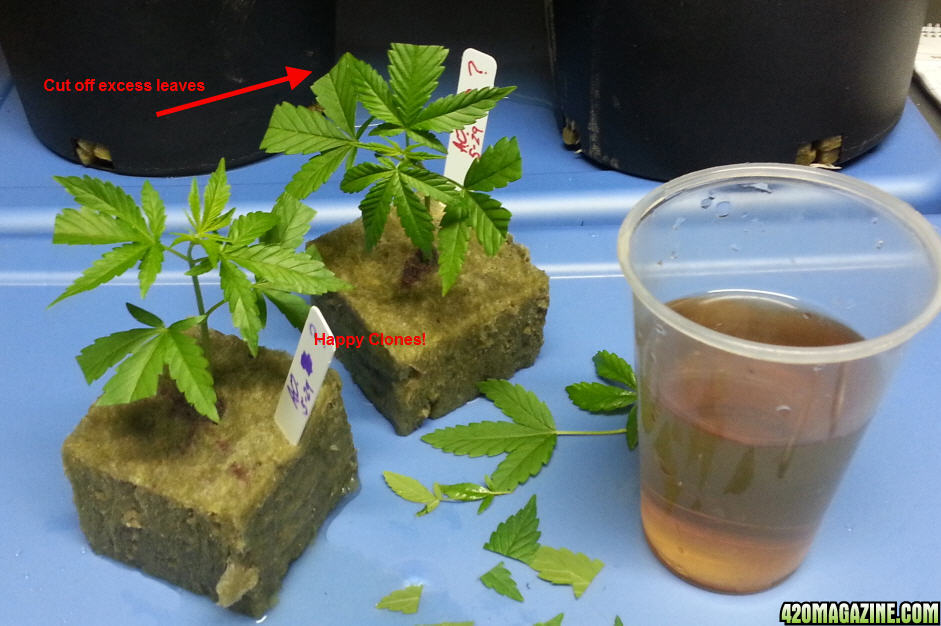
6. Trim off any excess leaves
The plant has no roots to feed the leaves, so if you have too many leaves, the clone may suffer.
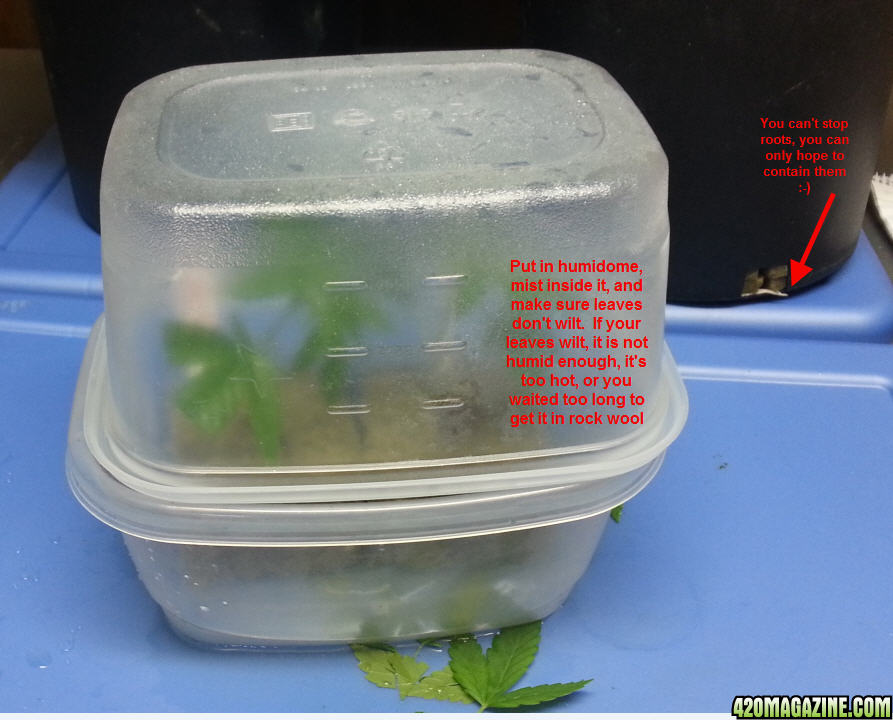
7. Put the clone inside a humidome
You don't need an expensive humidome. You can use a regular seed germination tray or two plastic containers as you can see in my picture. You can mist the inside of the dome with pure water if you want. If your clones are wilting now, you took too long to get them set in rockwool and put in the dome. Don't worry, they should perk up after they get in the humid dome.
8. Wait two weeks for roots to pop out the bottoms of the work wool cubes. When you see lots of roots, you can take then out of the humidome and transplant.
More information:
* If the branch you take has a "woody" stem, meaning the stem is hard, and more brownish color than green, these take much longer to root. Also, cuttings taken from higher "hollow" branches
* I crack up every time I hear people on youtube say, "Air-eee-ate your water." As if this was a 3 syllable word.
* If you don't have a PH meter, using this recipe with distilled or RO water should land your PH close enough and there is no need to adjust it. Also, it is not possible to "PH" water. "PH" is not a verb.
Subscribe, and in two weeks, I'll post root pictures!
How to clone in rock wool
- Author Greenthumb J
- Create date
Blog entry information
More entries in Member Blogs
-
 From Dab to Vape: The Evolution of Rosin Consumption HabitsIn recent years, Live Rosin, as a typical product type of solventless cannabis concentrate, has...
 -
Micro Bar: Box-Shaped Cannabis Vape and Their Market AppealMicro Bar, a brand that has quickly risen to the top of the disposable cannabis vape market...
-
How Box-Shaped Disposable Vape Empower Cannabis Vape Brand?The emergence of box-shaped disposable cannabis vape hardware as a preferred choice marks a...
-
 HashGirl's Completed Grow Journals - 2017 to 2024HashGirl's Completed Grow Journals My and Felonious Punk's (my husband) Completed Grow...
 -
DEMO: The Petite Powerhouse in Cannabis VapingIn the ever-evolving world of cannabis consumption, variety and personalization are key, and...
More entries from Greenthumb J
-
 GreenThumb J's Modified Heisenberg TeaHey everyone, GreenThumb is back with another tutorial here. Today i will explain my method to...
 -
How to Set up a Capn-Style Flowering machineHey Guys, GreenThumb J is back with yet another Video blog tutorial! Today, i'm paying homage...
-
How to Prepare Rockwool Grow Cubes for use.Welcome back guys! This is another addition to my tutorial blog. This video i am doing is a...
-
How to trim your harvested buds.Hey guys, GreenThumb is back with another blog post! This one is actually going to be a video...
-
The REAL Truth behind DefoliationI've been having lots of Discussions here on 420 and privately with TheCapn who has helped many...