- Thread starter
- #121
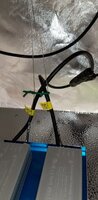
About 6" (15cm) below the canopy the temperature is the same as the incoming air. The drivers are still on the light. I'm making an extension cable to move the drivers out of the tent for ease of adjustment.
How To Use Progressive Web App aka PWA On 420 Magazine Forum
Note: This feature may not be available in some browsers.
About 6" (15cm) below the canopy the temperature is the same as the incoming air. The drivers are still on the light. I'm making an extension cable to move the drivers out of the tent for ease of adjustment.
I'm working on it, and should have the instructions ready to post tomorrow.How do you make the extension cable?
I would like to run the drivers outside of the tent if possible because any extra heat has always been an issue with where I am.
Are they extensions, or just extra long leads from the drivers?My tsw2000 came with 2 meter long extension cords but ive decided to leave the driver above the light rather than out tent to provide a tad more heat, in the summer i will most likely mount it outside of the tent. The light and driver runs a little warm and as a precaution i tied the wires so they dont touch the top side of the light or the driver, even if they were touching i think the cords are thick enough to withstand the heat but i just did it out of my own comfort. Plants are really liking the light too!
I think so....how long were the cords that came with your light?
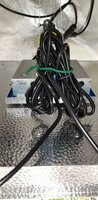
There are 1.5m (59") DC5525 extension cables available through e-Bay for about $2.00 each. There are two reasons I didn't buy them. They don't specify the wire type (size, stranded or solid core), and the wire used is copper coated aluminum. Aluminum wire was used in North American homes during the '60s and '70s. It caused a lot of house fires and has since been banned.Ya okay so the cords must be longer on the newer orders. I like your diy extension, glad i didnt have to jig up something like that!
1. Cables and Connectors 3. Wires at 'Y' Soldered 5. Cord Covered With Heat Shrink 7. Male Connector Ready to Solder 9. Completed Extension Cable _______________________________________________________________ | 2. Wires at 'Y' Ready to Solder 4. Splice Covered With Cord 6. 'Y' Covered With Heat Shrink 8. Male Connector Soldered 10. Cable Installed on the Light _______________________________________________________________ |
| Four Core | Two Core | Usage |
|---|---|---|
| Blue | Blue | Driver/LED panel 1 |
| Brown | Brown | Driver/LED panel 1 |
| Black | Blue | Driver/LED panel 2 |
| Yellow/Green | Brown | Driver/LED panel 2 |
 very detailed explanation,
  if anyone wants to extend the power cord, be sure to check out old salt's share
Are you guys planning on selling the extended wires that you now sell with the newer version light?Thank you very much for sharing,


We have been selling extended wires, but we can only ship from China to other countries. International shipping is not cheap. And customers still need to solder the extension wires by themselves. Therefore, we recommend that customers buy from local hardware stores or eBay, which can save your costs.Are you guys planning on selling the extended wires that you now sell with the newer version light?
Would be very helpful for people with the lights with the short ones and have no idea on how to solder.
Cheers