okay okay okay i know, we are all excited to have someone share this info with us.
what I am about to tell you will blow your mind, quite possibly
anywho, this tech. can be used with wood or metal or other material if wished, here though I will show you all a nice idea for plastic
For this you will need:
a plastic lid, better if off an old plastic bin or tote with a rectangular shape (somewhat thick plastic is advised for this project)
a few surge protectors/powerstrips (grounded please)
plastic zip ties (lots)
possibly an extension cord
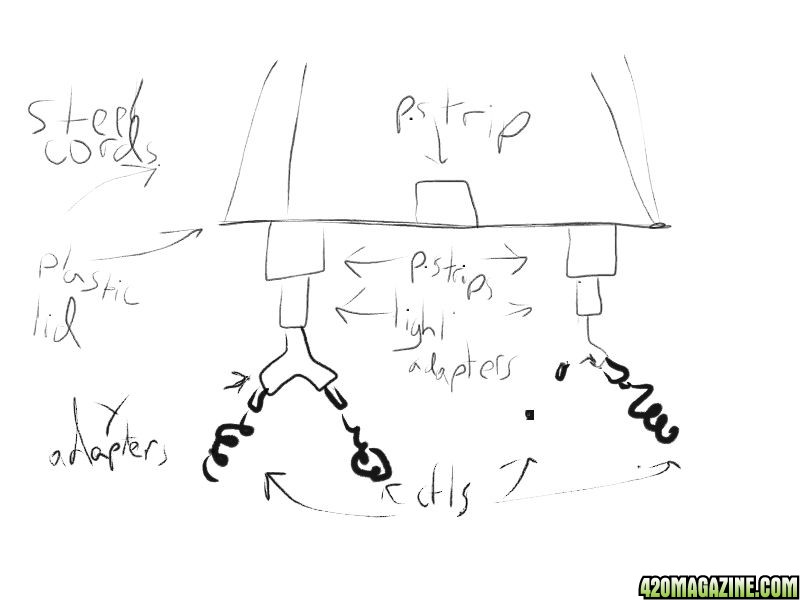
plug to light fixture adapters used for cfls or incandesants, we use cfls though because it will grow with cfls and cfls kick ass (y adapters and single adapters)
a lightpiece/lighter (ya I know real stoners say lightpiece)
screwdriver ( no heavy lifting or labor peeps i swear)
okay so i KNow i havent said much but wait there's more
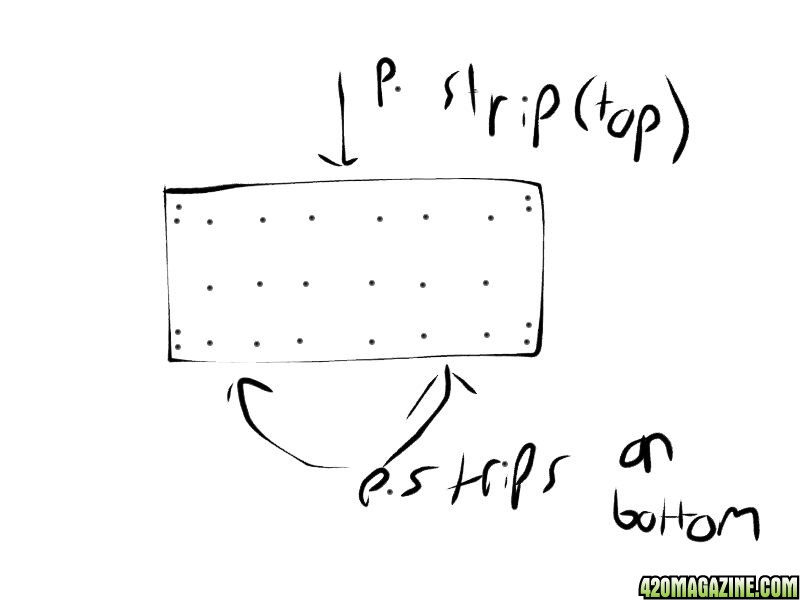
Take the lid. Now make holes in it. the holes will be as follows. you can make them with using a lighter and a screwdriver. Heat the tip of the screwdriver for a few seconds until it can go through plastic like butter. ya we know what's up, ooooo to the motherfucking yeah we do
(BE OUTSIDE OR IN A WELL VENTILATED AREA FOR SAFETY)
k so the holes with a perimeter of the lid:
-------------------------------------------------
l 0 0 l
l 0 0 0 0 0 0 0 0 l
l l
l l
l 0 0 0 0 0 0 l l l
l 0 0 l
l 0 0 0 0 0 0 0 0 l
------------------------------------------------
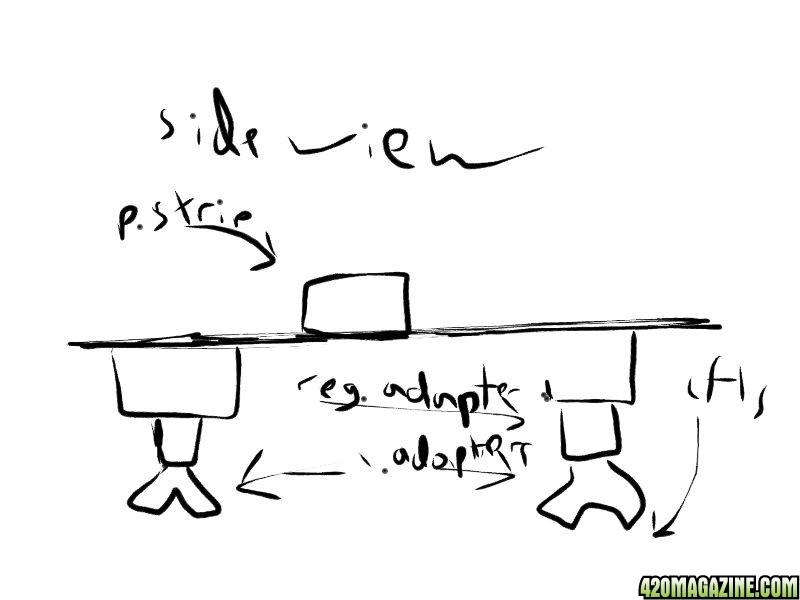
Please don't be confuzzled. the three innermost sets of 2 2 n 2 holes are for the powerstrips. Let me finish before I say any alterations. In this model we have three powerstrips k? We use one on the top and zip tie that bad boy to it. You cdan use multiple zip ties on a set of two holes. The end tails that might look ugly or get in the way can be cut off once the rest is secured and taut/tight. Now the other two power strips go on the opposite side facing the same way so their cords are close and don't get in the way of other stuff. These other two powerstrips also get secured. Now you're probalby like "but what are these other eight holes in the corners for?" These are so you can hang this bitch. You do wanna hang it right??????? jk I'm only joshing
You can get some steel cord for cheap at a hardware store. like 50 or 60 cents a foot. for your setup it might be more expensive but all you really need are 4 cords with 4 or 5 feet on each of them (pending your steup and spacial issues. make sure to get some 60 or 70 lbs test cord so you are safe and don't lean or put any more weight on this bitch ever than just lights cuz this b isn't no bench
connect the two lower strips cords to the one sitting on top and then put cfls in the adapters and put the adapters in the two lower powerstrips
what you can do to with any extra zip ties is make a connection that will hold in the four corners of your new ballast becuz you wanna hang this bitch because remember as I will someday say to my son "the only bitch you ever need to hang in life is your ballast"
so slide the cord through the two holes (one cord per set of holes/corner)
wrap it around and around itself after you have slid it through and then use at least 5 to 8 zip ties to really make it taut and secure (more if necessary) (other methods can be used to secure this with caulk or other
have an extension cord that is connected to your top powerstrip be connected to a grounded timer so you just need to either put the timer on or reset the timer to start 12/12 when the time is right.
on a final note you can make these ballasts out of wood if you want to but making holes isn't really a biggiein plastic
2. you can add more patterns of lower powerstrips if you have a big enough lid( i thought about making a gigantic one with a lid off a bigass tote and have like 4 or 5 power strips on one.)
3. if you don't want to make number two then you can make another one and have the top powerstip be connected to the top powerstrip on the other one since it will be hanging right next to it.
well that's all folks I hope this helps the world and everything said and done this doesn't cost too much or take a ton of time
costs:
4 y adapters and 4 reg. adapters (both for cfl connection) 15 or 20 bucks
3 powerstrips 10 or 12 bucks I'm guessing
lid (find it at home save moola) couple bucks at walmart or big shit chain take you pick
cfls usually pretty cheap try to use at least the 23 or 27 watt ones that are equivalent to 100 watts incandesant.
zip ties not expensive
steel cord,braided, 10 or 12 bucks
Building your own ballast and thinking that you're some kind of electrical engineer/genius ........PRICELESS
what I am about to tell you will blow your mind, quite possibly
anywho, this tech. can be used with wood or metal or other material if wished, here though I will show you all a nice idea for plastic
For this you will need:
a plastic lid, better if off an old plastic bin or tote with a rectangular shape (somewhat thick plastic is advised for this project)
a few surge protectors/powerstrips (grounded please)
plastic zip ties (lots)
possibly an extension cord
plug to light fixture adapters used for cfls or incandesants, we use cfls though because it will grow with cfls and cfls kick ass (y adapters and single adapters)
a lightpiece/lighter (ya I know real stoners say lightpiece)
screwdriver ( no heavy lifting or labor peeps i swear)
okay so i KNow i havent said much but wait there's more
Take the lid. Now make holes in it. the holes will be as follows. you can make them with using a lighter and a screwdriver. Heat the tip of the screwdriver for a few seconds until it can go through plastic like butter. ya we know what's up, ooooo to the motherfucking yeah we do
(BE OUTSIDE OR IN A WELL VENTILATED AREA FOR SAFETY)
k so the holes with a perimeter of the lid:
-------------------------------------------------
l 0 0 l
l 0 0 0 0 0 0 0 0 l
l l
l l
l 0 0 0 0 0 0 l l l
l 0 0 l
l 0 0 0 0 0 0 0 0 l
------------------------------------------------
Please don't be confuzzled. the three innermost sets of 2 2 n 2 holes are for the powerstrips. Let me finish before I say any alterations. In this model we have three powerstrips k? We use one on the top and zip tie that bad boy to it. You cdan use multiple zip ties on a set of two holes. The end tails that might look ugly or get in the way can be cut off once the rest is secured and taut/tight. Now the other two power strips go on the opposite side facing the same way so their cords are close and don't get in the way of other stuff. These other two powerstrips also get secured. Now you're probalby like "but what are these other eight holes in the corners for?" These are so you can hang this bitch. You do wanna hang it right??????? jk I'm only joshing
You can get some steel cord for cheap at a hardware store. like 50 or 60 cents a foot. for your setup it might be more expensive but all you really need are 4 cords with 4 or 5 feet on each of them (pending your steup and spacial issues. make sure to get some 60 or 70 lbs test cord so you are safe and don't lean or put any more weight on this bitch ever than just lights cuz this b isn't no bench
connect the two lower strips cords to the one sitting on top and then put cfls in the adapters and put the adapters in the two lower powerstrips
what you can do to with any extra zip ties is make a connection that will hold in the four corners of your new ballast becuz you wanna hang this bitch because remember as I will someday say to my son "the only bitch you ever need to hang in life is your ballast"
so slide the cord through the two holes (one cord per set of holes/corner)
wrap it around and around itself after you have slid it through and then use at least 5 to 8 zip ties to really make it taut and secure (more if necessary) (other methods can be used to secure this with caulk or other
have an extension cord that is connected to your top powerstrip be connected to a grounded timer so you just need to either put the timer on or reset the timer to start 12/12 when the time is right.
on a final note you can make these ballasts out of wood if you want to but making holes isn't really a biggiein plastic
2. you can add more patterns of lower powerstrips if you have a big enough lid( i thought about making a gigantic one with a lid off a bigass tote and have like 4 or 5 power strips on one.)
3. if you don't want to make number two then you can make another one and have the top powerstip be connected to the top powerstrip on the other one since it will be hanging right next to it.
well that's all folks I hope this helps the world and everything said and done this doesn't cost too much or take a ton of time
costs:
4 y adapters and 4 reg. adapters (both for cfl connection) 15 or 20 bucks
3 powerstrips 10 or 12 bucks I'm guessing
lid (find it at home save moola) couple bucks at walmart or big shit chain take you pick
cfls usually pretty cheap try to use at least the 23 or 27 watt ones that are equivalent to 100 watts incandesant.
zip ties not expensive
steel cord,braided, 10 or 12 bucks
Building your own ballast and thinking that you're some kind of electrical engineer/genius ........PRICELESS