

Navigation
Install the app
How to install the app on iOS
How To Use Progressive Web App aka PWA On 420 Magazine Forum
Note: This feature may not be available in some browsers.
More options
You are using an out of date browser. It may not display this or other websites correctly.
You should upgrade or use an alternative browser.
You should upgrade or use an alternative browser.
DIY Water Cooled light Chiller/rez > $300.00
- Thread starter budlydoright
- Start date
OldMedUser
Formerly Known as LabRat
I just love a good DIY article and that was a GREAT one!
+rep and 5 stars for sure!

+rep and 5 stars for sure!
- Thread starter
- #23
budlydoright
Well-Known Member
does the room you are growing in have central heating and air conditioning?
Just airconditioning. I get heat from the lamp and dehumidifier. Will likely need heat when the new ones go in as the dehumidifier won't run enough to add the heat I need.
I just love a good DIY article and that was a GREAT one!
+rep and 5 stars for sure!
Thanks Labrat, check out the current grow. 2 weeks left.
- Thread starter
- #24
budlydoright
Well-Known Member
Ok folks, it's closing in on one year since this chiller has been in service. I originally planned on replacing it every year but I think that can be pushed to every 2 years.
I am currently running a 1k hps 600w hps W/C Co2 off of it. It has run without issue the whole time.
One warning on ALL water cooled setups: Make sure your pumps don't have any type of foam filter in them. They will dissolve over time and taint your rez water. Will likely swap out my rez for a 50 gallon one soon.
If you're considering a fresca sol or ice box or hydrogen then this is a great setup.
Happy to answer any questions.....
- Thread starter
- #25
budlydoright
Well-Known Member
Alright, it's offically been one year since I built and deployed this DIY chiller.
Been running without even the slightest hickup. I am currently running a 1k and 600 hps in Fresca Sol sleeves as well as a water cooled co2 unit. I'm going to bump it up to either 2000 or 2600 watts soon. 100 gallon rex, 1200 gph fountain pump with UV filter. No bleach. RO water.
Slight signs of corrosion, but again. I'm betting on 2-3 year life on this chiller.
MisterPeabody
New Member
Ingenuity is the mother of invention! That is really cool. The methods in which man can overcome problems never ceases to amaze me. My hat is off my friend!
Evolution Of A GrowCab-From The School of hard Knocks
Grow Cab Ventilation Redesign-All About Heat
Evolution Of A GrowCab-From The School of hard Knocks
Grow Cab Ventilation Redesign-All About Heat
Deep Water Culture with Fogponic Contruction
I started off with this design mainly due to it being low profile and small. Cheap Sterilite container I took some 2" site plugs and drilled a hole in them. EZ Cloner plugs fit into the 2"site plugs perfectly. Doing this eliminates leaks at the site plugs. Once the holes are cut in the...
www.420magazine.com
Hello all, I'm a closet grower from the early 80's Been a while since i had a growroom going but decided to give a go a few moths ago.
My space is a 4 x 8 space divided into 2 4 x 4 sections. The ceiling height is only 50".
Wanting to cram as much light in there as possible I grabbed a 1k hps and a cooltube along with a 6" vortex fan. system worked great but was noisey and ran a minimum 85 degrees. with the summer heat comming I knew this wouldn't work so I started looking into the new generation of water cooled reflectors.
After looking at the two offerings currently on the market, I purchased a Fresca Sol reflector. I went with the fresca because it seemed like a more elegant design, simpler. Of course once it was in, I ran out and purchased a 96 gallon Tote from Lowes. This is just like the trash cans on wheels that many cities use for automated trash removal. It cost me about 90.00. I also picked up a 500gph smartpond pump for 60.00.
Once everything was installed and running, my temps dropped to 70-75. My rez water was getting up to almost 100 though. Once again with the summer heat coming I knew this wouldn't work either. I needed a chiller and fast.
I looked into all of the minifridge and other budget DIY solutions but didn't think they had enough "heuvos" to pull down and keep down 100 gallons of 100 degree water. While looking at a surplus industrial chiller it dawned on me that the inside of an AC unit had all of the same components, just arranged differently. So off to Wamart for the cheapest portable window AC unit I could get.
I purchased the Haier 5200btu unit for 89.00.
Took off the cover and low and behold, my chiller was hidding in there. I completely removed all of the casing and front panel. I removed all of the styrofoam inserts inside that keep the heat exchanger and condensor seperate and removed the plastic blower fan. I then very carefully pulled the heat exchanger out gently bending the copper tubes that carry the refrigerant. Once the exchanger is pulled far enough out, you can bend the tubes and the exchanger down so it sits a little outside of the original tray and lower than the tray.
Now I was fortunate that a shelf right next my rez happened to be at the right height and I was able to set the chiller condensor and compressor next to my 100 gal rez while the heatexchanger slipped into the rez water. My water was down to 65 within a few hours.
Unfortunately, I wasn't thinking of creating a DIY guide so I didn't take pictures of the process. Here are pictures of the finished item.
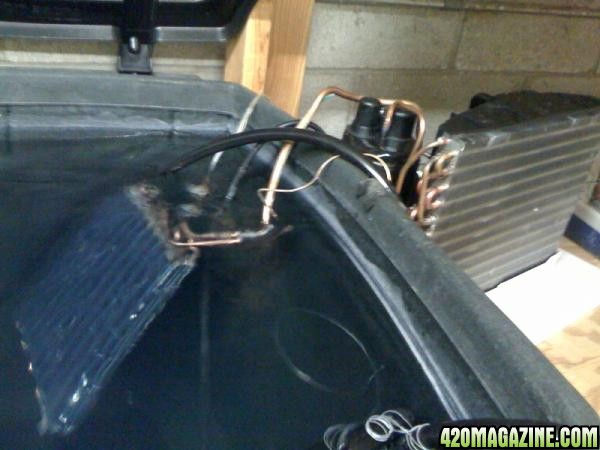
Here you see the condensor and compressor sitting in the original ac tray. we took all of the covers, styrofoam as well as the extra fan off. The switch and electronics are just sitting behind the compressor.
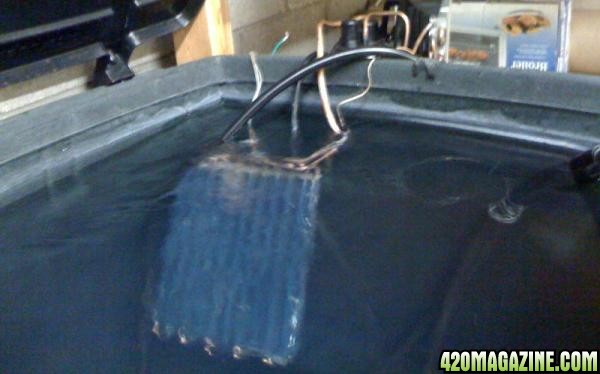
Here you can see the heat exchanger submerged in the 96 gallon tub. The temp probe is also in there and functions normally.
I have come to learn that I have about the capacity of a 1/3 hp chiller. I believe I can handle 3-4 lights with this setup. It has been running flawlessly for a couple of months now.
Stealthy1
New Member
Ever think about adding some antifreeze to the water it has corrosion inhibitors?
- Thread starter
- #28
budlydoright
Well-Known Member
Yes, I have thought about that. I am just going under the assumption that the purer or cleaner the water. the less lumen loss there would be.
honestly, I would be happy if I only got 1 year out of this thing. It's pretty continious duty, so I'll replace every X months. I'm just trying to determine X at this point. Looks like it could be as high as 24. I would treat a commercial 1/3hp chiller the same way. things going to wear out eventually.
honestly, I would be happy if I only got 1 year out of this thing. It's pretty continious duty, so I'll replace every X months. I'm just trying to determine X at this point. Looks like it could be as high as 24. I would treat a commercial 1/3hp chiller the same way. things going to wear out eventually.
Stealthy1
New Member
Thats true the light has to pass through it...
MisterPeabody
New Member
This type of setup could easily be placed in a doghouse outside, in a crawl space or basement and plumbed into the room.[/QUOTE]
I'm an HVAC Tech, and for what it's worth, it's really not that big of a deal to remote locate the evaporator in the reservoir and run soft copper from it to the main unit located outside of room. Yes, you have to break the system open and braze the line extension from the evaporator coil leading back to the main window air box, then recharge as required. Excellent idea. The only disadvantage I see is having the condenser in the same room as the evaporator. Ingenuity is indeed the mother of invention. I give 3 stars for thinking outside of the box.
I'm an HVAC Tech, and for what it's worth, it's really not that big of a deal to remote locate the evaporator in the reservoir and run soft copper from it to the main unit located outside of room. Yes, you have to break the system open and braze the line extension from the evaporator coil leading back to the main window air box, then recharge as required. Excellent idea. The only disadvantage I see is having the condenser in the same room as the evaporator. Ingenuity is indeed the mother of invention. I give 3 stars for thinking outside of the box.
- Thread starter
- #31
budlydoright
Well-Known Member
This type of setup could easily be placed in a doghouse outside, in a crawl space or basement and plumbed into the room.
I'm an HVAC Tech, and for what it's worth, it's really not that big of a deal to remote locate the evaporator in the reservoir and run soft copper from it to the main unit located outside of room. Yes, you have to break the system open and braze the line extension from the evaporator coil leading back to the main window air box, then recharge as required. Excellent idea. The only disadvantage I see is having the condenser in the same room as the evaporator. Ingenuity is indeed the mother of invention. I give 3 stars for thinking outside of the box.
[/QUOTE]thanks, I have wondered if extending those lines would be that simple. Been told that these closed systems can't handle any more volume of refridgerant therefore extending them wasn't advised. common sense teels me it would matter little.
MisterPeabody
New Member
[Q[/QUOTE]
thanks, I have wondered if extending those lines would be that simple. Been told that these closed systems can't handle any more volume of refridgerant therefore extending them wasn't advised. common sense teels me it would matter little.[/QUOTE]
Your central heat/air unit at your house is a sealed system. So is your neighbors. Your lineset might be 15 feet. Your neighbors might be 50 feet. His refrigerant charge will undoubtedly contain more (volume of refrigerant in lineset), and that is about the jest of it. Splitting your 5000 btu window unit is the same. Also, you will need a gauge set (borrow, beg, steal, (not the steal thing)). Also note that I'd bet a dollar there is no service ports of either high or low side on the window AC unit to even hook up the gauges. Once again, no big deal. You can do one of two things here. Get a saddle valve connection. It's cheap, but not as totally leak free as brazing one in. After all, you already have the line open, so now is the time. I'd braze one.
Be sure and perform a pump down (at least 28" mercury) after brazing in extension and service port. (BE SURE AND REMOVE THE VALVE SEAT BEFORE BRAZING SERVICE PORT. YOU CAN REMOVE IT WITH THE SAME TOOL YOU WOULD USE TO REMOVE YOUR VALVE STEM FROM YOUR CAR TIRE If you don't, it will leak and you'll then HAVE to steal one from your or your neighbors car and replace it). Anyway, the pumpdown will do two things, both necessary. The first will tell you if you have a leak (give it at least 5 minutes, 10 is better) if you don't have a leak, it will hold it's vacuum. Secondly, after opening the system, you can get moisture ridden air inside the lineset. This can and usually does end up forming an ice ball right at the evaporator metering device, creating a restriction, thus rendering your AC useless except it's still costing you to run it. By pumping down the system, you will "boil" any moisture in the entire system. (Water cant remain under a vaccum without boiling. A bug cant live under a vaccum either. Don't ask how I know that. This is VERY important, especially if adding any length of copper tubing. If you look at your AC nameplate, it will tell you type of freon used as well as quantity, usually given in lbs and/or ounces. I would however take armaflex (that black foam wrap you see on the lineset leading into your home) and wrap BOTH suction and discharge lines with the Armaflex. At the bare minimum you HAVE to insulate the suction (larger) lineset. It will condense bigtime if you don't. So once again, common sense prevailed. You already had the answer...you just needed confirmation.
PS I've been following your work, and am pleased your another asset to our community.
-Peabody
vspec
New Member
Unfortunately, I wasn't thinking of creating a DIY guide so I didn't take pictures of the process. Here are pictures of the finished item.
Great effort, kinda alittle over my head on the internals as ive had zero experience with tinkering in this area. However your efforts & the advise given seem well informed.
Oh, & 1st written warning by not being thoughtful enough to remember the extended DIY documentation
")
- Thread starter
- #34
budlydoright
Well-Known Member
. You already had the answer...you just needed confirmation.
PS I've been following your work, and am pleased your another asset to our community.
-Peabody[/QUOTE]
Yes, common sense goes along way, but when there's pressure involved I dig deeper.
Thanks.
Great effort, kinda alittle over my head on the internals as ive had zero experience with tinkering in this area. However your efforts & the advise given seem well informed.
The AC unit was 100 dollars. Once you remove a few screws it becomes very obvious how to arrange the componenets. I had no guide to follow and had a chiller from box to in the tank in 20 minutes. Really hard to screw this one up!
I'm attempting to do the same thing with a 5300 btu Daewoo A/C unit.
The question I have is how did you bend the pipe without kinking it? Did you use any kind of tool? Can you give me any advice on going about unbending the pipe?
Thanks
JG's Ghost
The question I have is how did you bend the pipe without kinking it? Did you use any kind of tool? Can you give me any advice on going about unbending the pipe?
Thanks
JG's Ghost
- Thread starter
- #36
budlydoright
Well-Known Member
I'm attempting to do the same thing with a 5300 btu Daewoo A/C unit.
The question I have is how did you bend the pipe without kinking it? Did you use any kind of tool? Can you give me any advice on going about unbending the pipe?
Thanks
JG's Ghost
No Tools. I use the existing bends and typically have to straighten a bend or two to get length.
Similar threads
- Replies
- 90
- Views
- 54K