1st Time Grow Organic - Bubblelicious

Fuzzy Duck

Well-Known Member
What strain is it? - Nirvana, Bubblelicious regular seeds.
Is it Indica, Sativa or Hybrid? What percentages? - Mainly Indica.
Is it in Veg or Flower stage? - Veg.
If in Veg... For how long? - 14 days from seed.
If in Flower stage... For how long? - N/A
Indoor or outdoor? - Indoor
Soil or Hydro? - Soil (organic mainly)
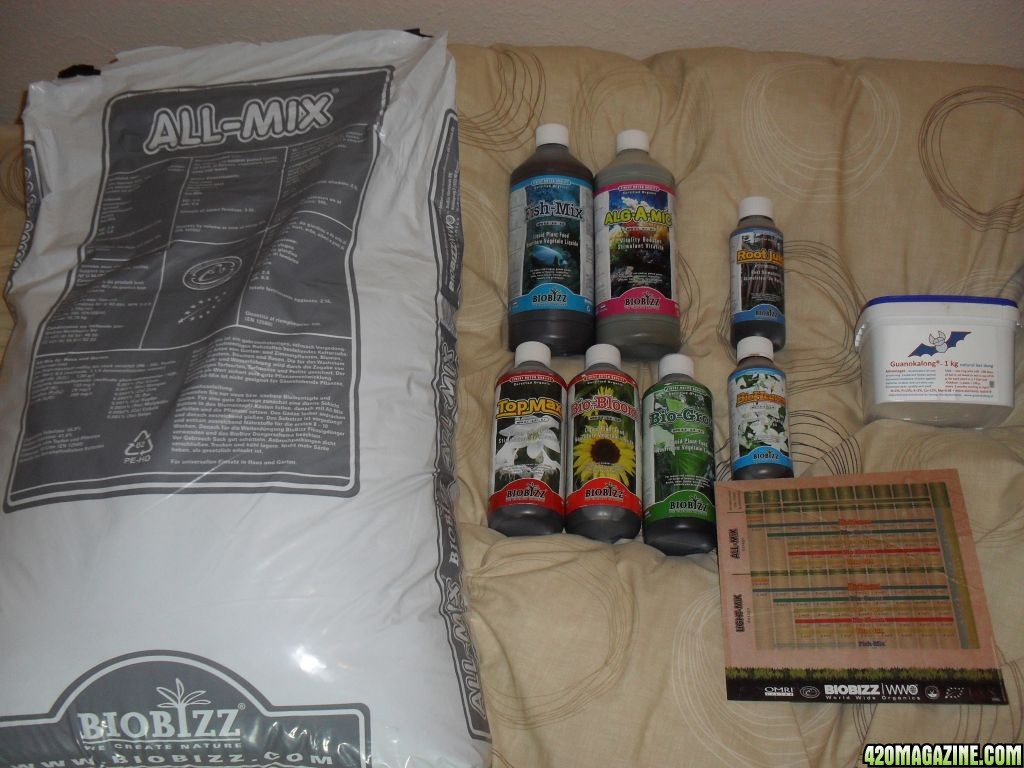
If soil... what is in your mix? - seedling/early veg john innes No 1 potting compost, will move into Bio Bizz All Mix at a later stage of veg for maturing into flowering.
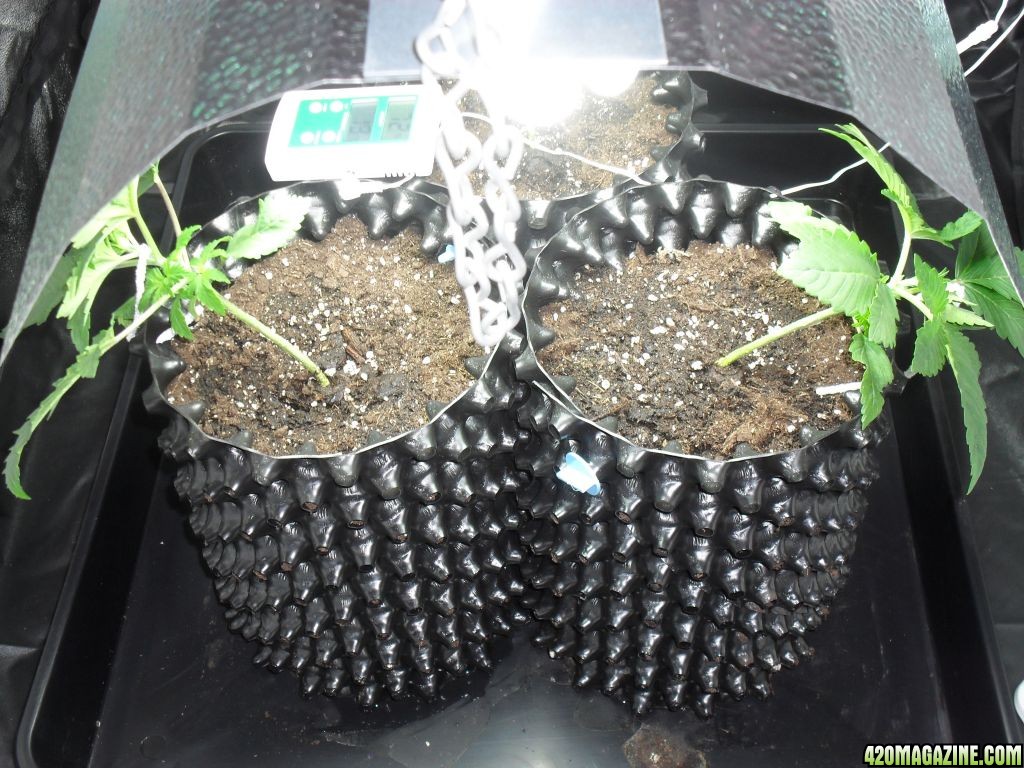
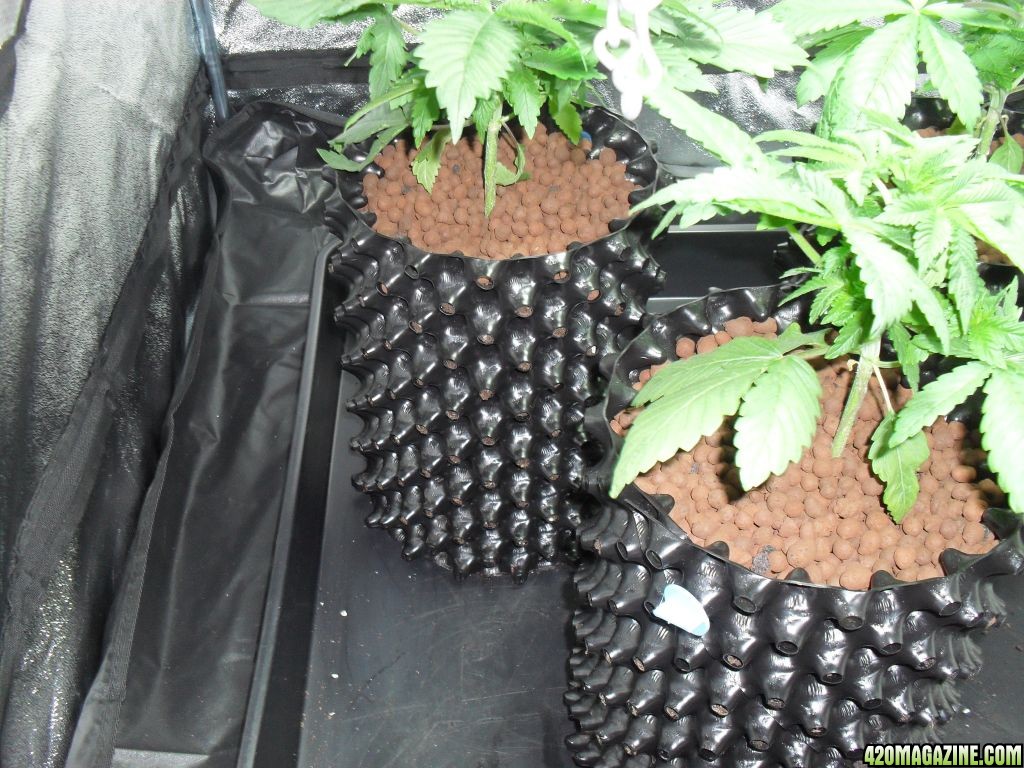
If soil... What size pot? 1 litre pot for early veg, moving to Air pot 6.5 litre at a later veg stage and maturing into flowering.
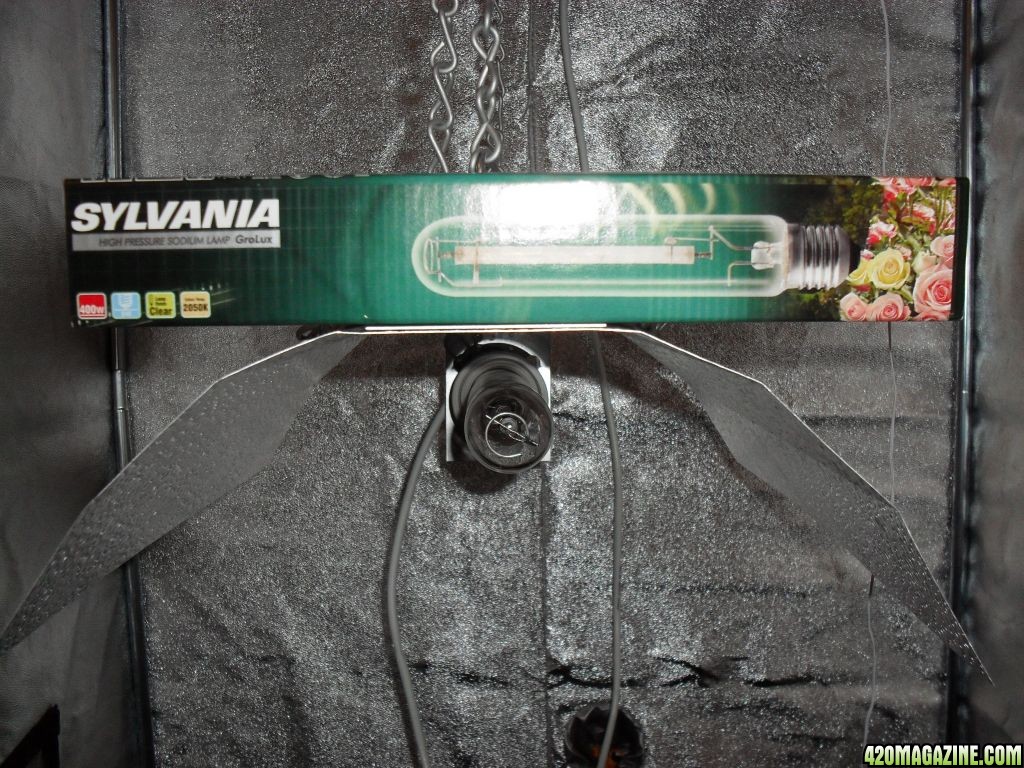
Size of light? Maxbright 125w cfl blue 6700k for vegging / Grolux 400w duel spectrum for flowering.
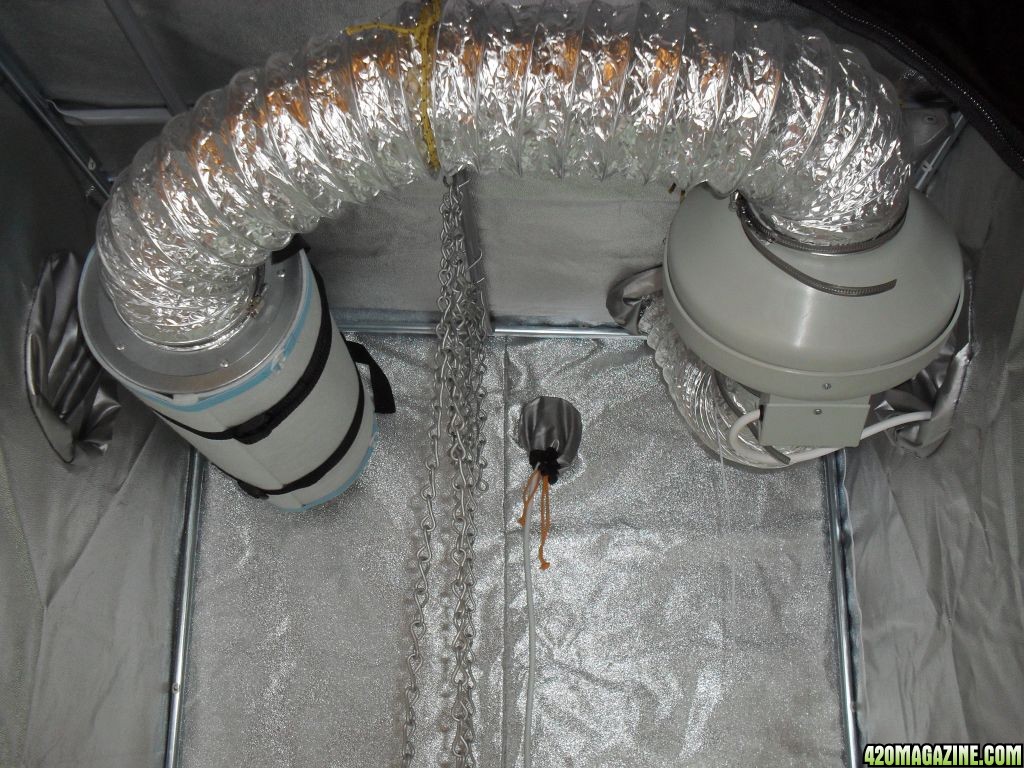
Is it aircooled? - Yes
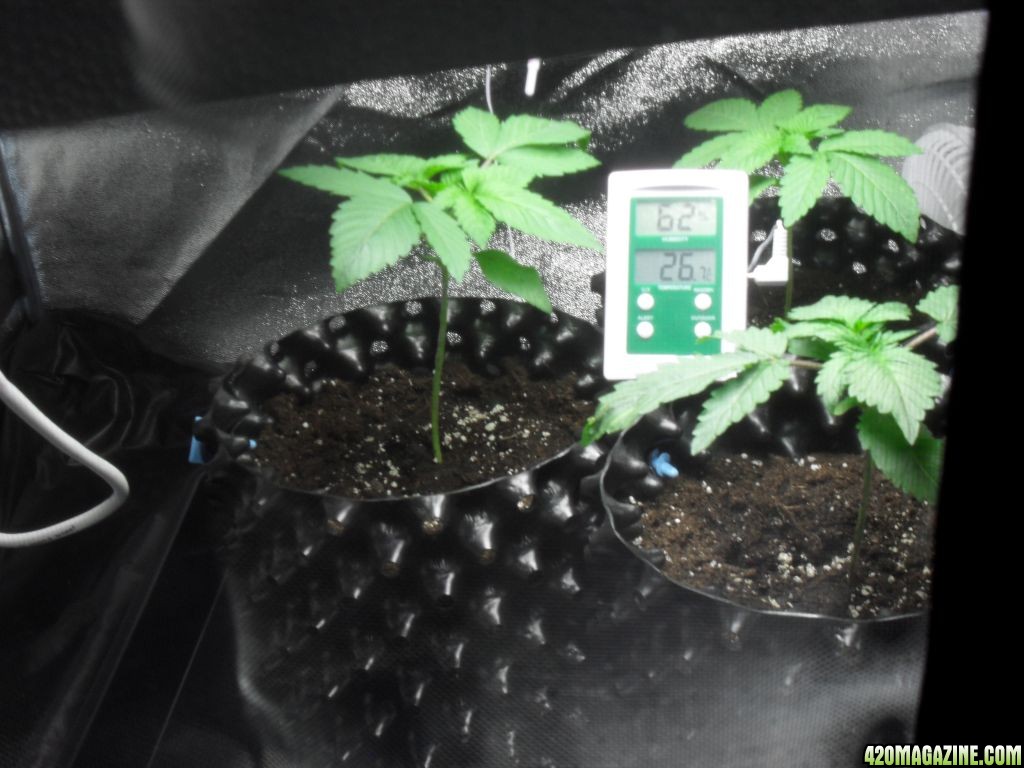
Temp of Room/cab? - 25/24 c normally.
RH of Room/cab? - Normally at 60% give or take a few %
PH of media or res? - 6.6ph.
Any Pests ? - No.
How often are you watering? - As & when required.
Type and strength of ferts used? - Complete range of Bio Bizz Nutrients.

Totally first grow, as i grow organic veg my choice was a natural progression for indoor cultivation of MMJ which i intend to self medicate for nerve pain/inflametry joint pain which to some point is related to long term of being diabetic.

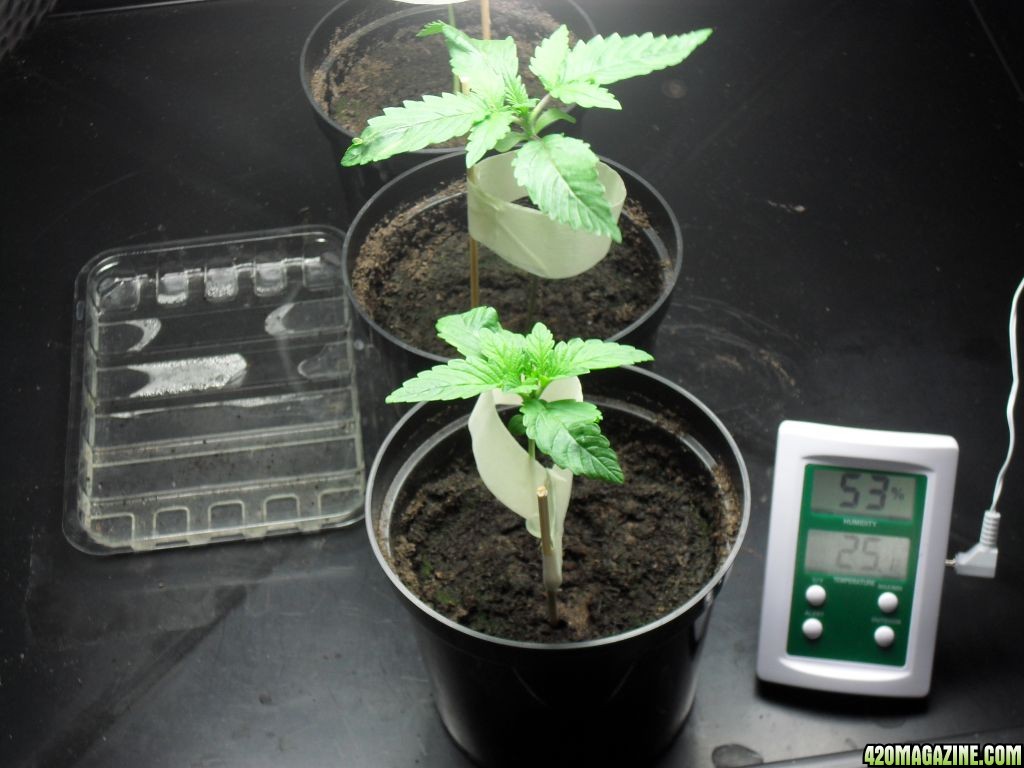
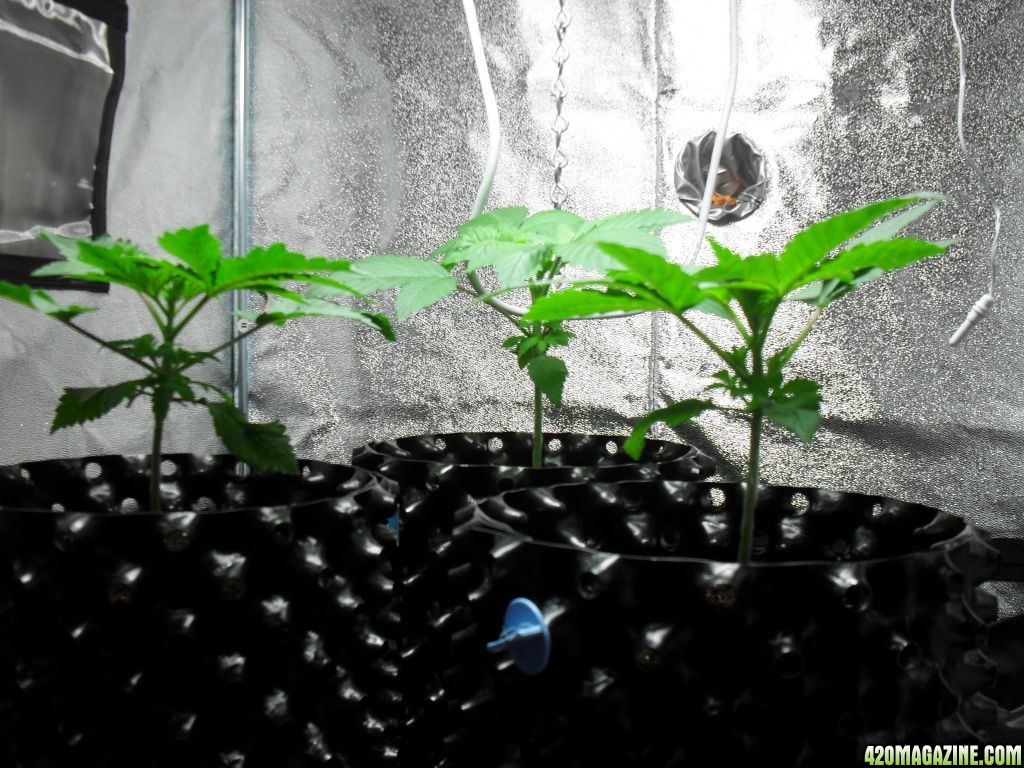
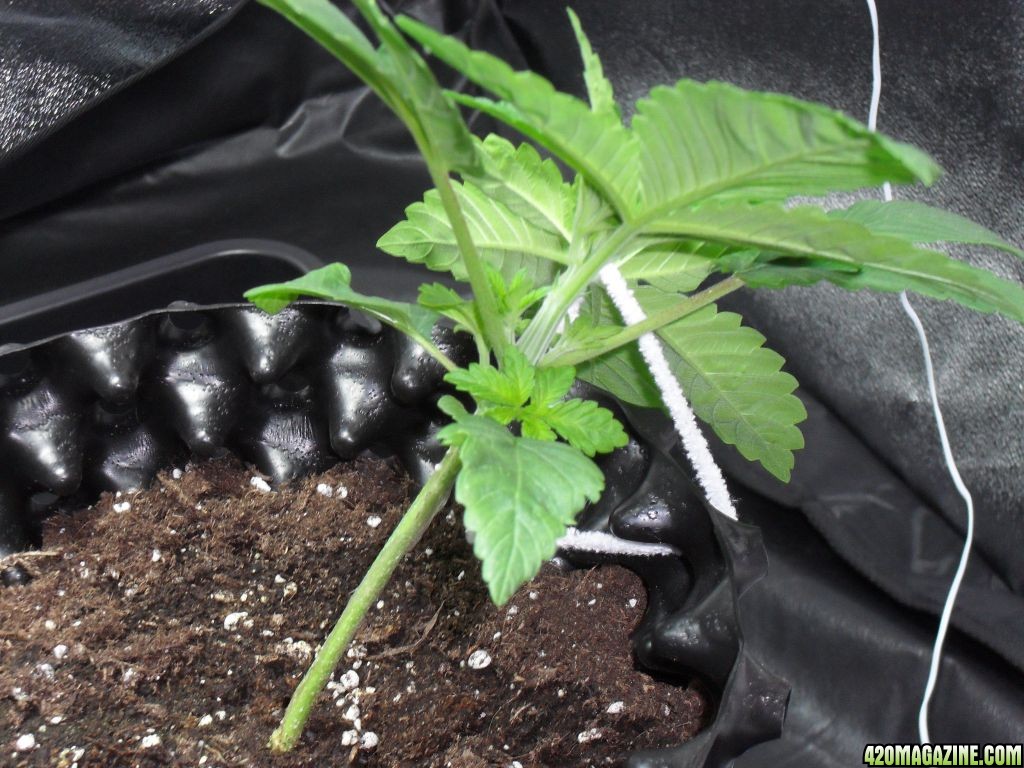
I suffered with a minor bit of stem stretch from early stage of growth from seed hence the improvised support, fan is on full blast to strengthen stem.

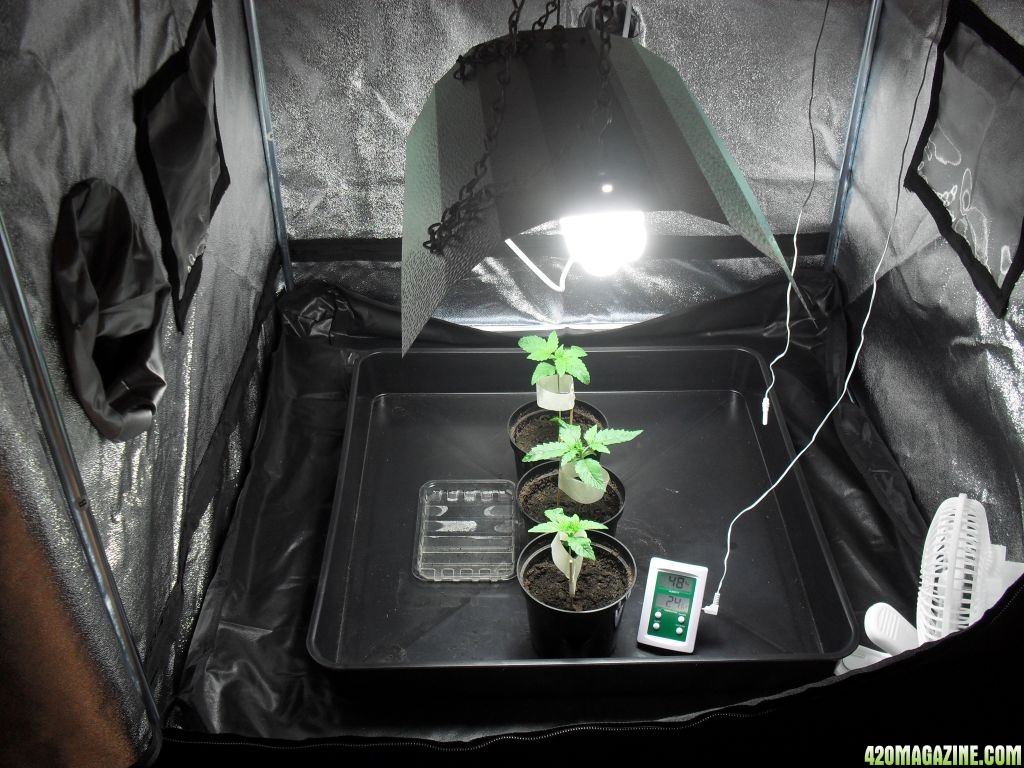
Currently using 125w blue cfl 6700k for vegging on a 24/7 cycle since seed/sprout which creates an average temperature of 24/25c in the tent a small tray of water also helps keep RH at an average of 60%.

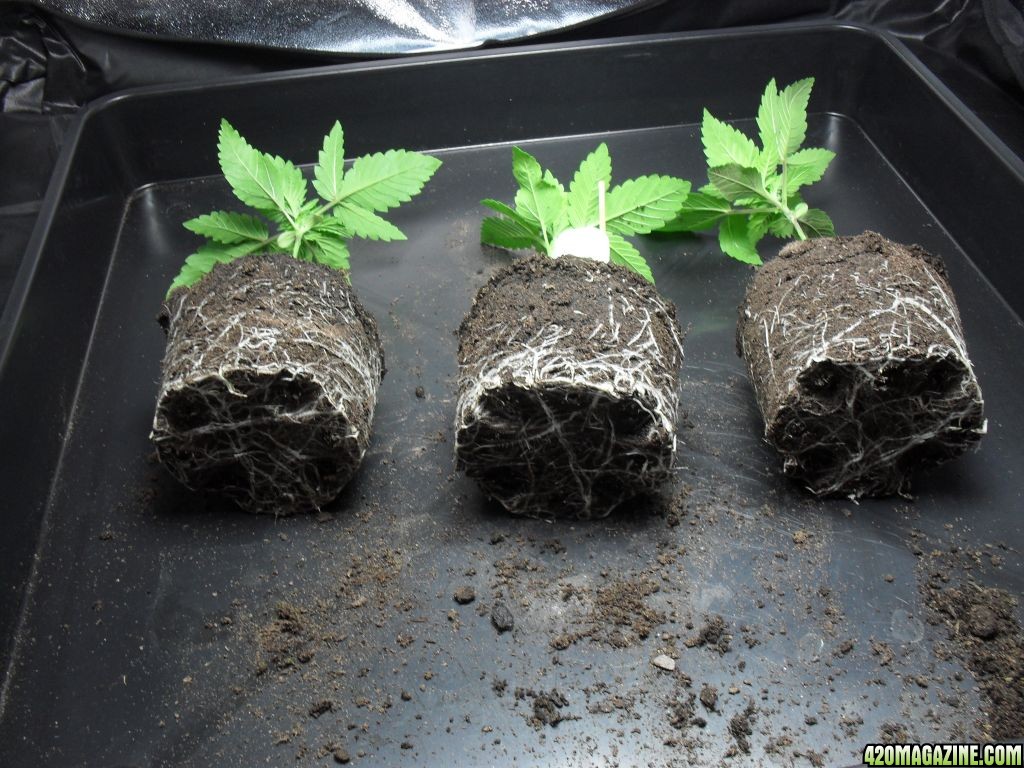
Plants are in 1 litre pot with john Innes No1 compost suitable for early veg stage/cutting etc watered once for first 7 days with a diluted solution of biobizz root juice/bio heaven and pot left dry natural over several days to help form good root growth in pot. 2nd watering was another diluted solution of biobizz root juice/bio heaven/alg-a-mic/bio grow.


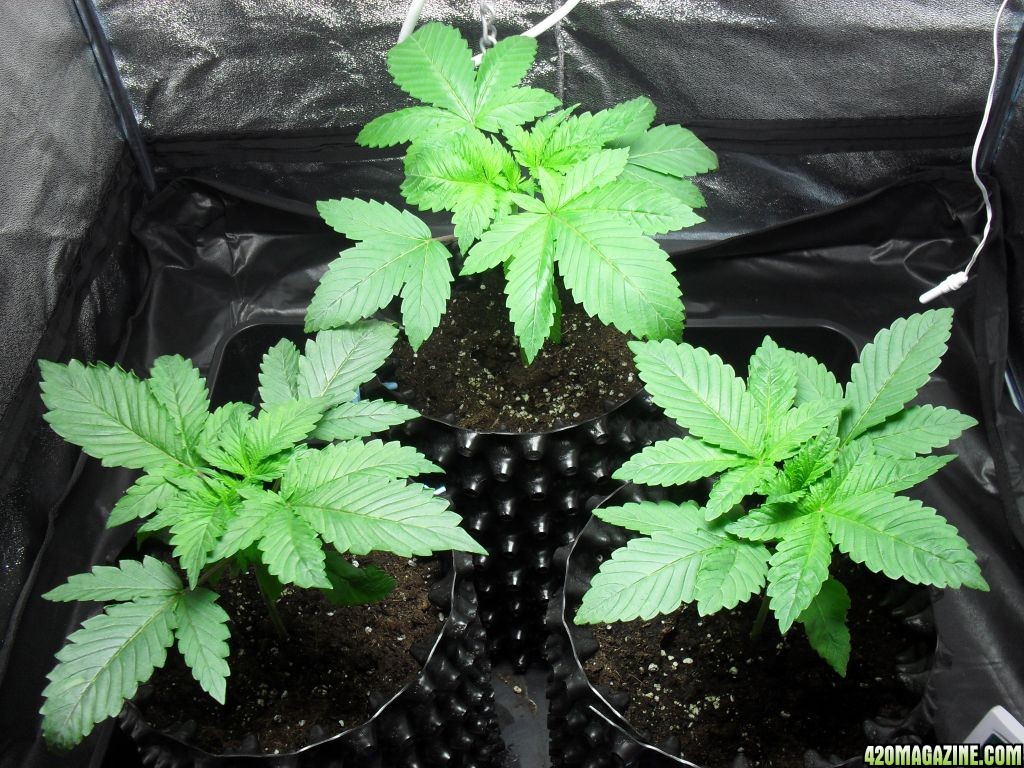
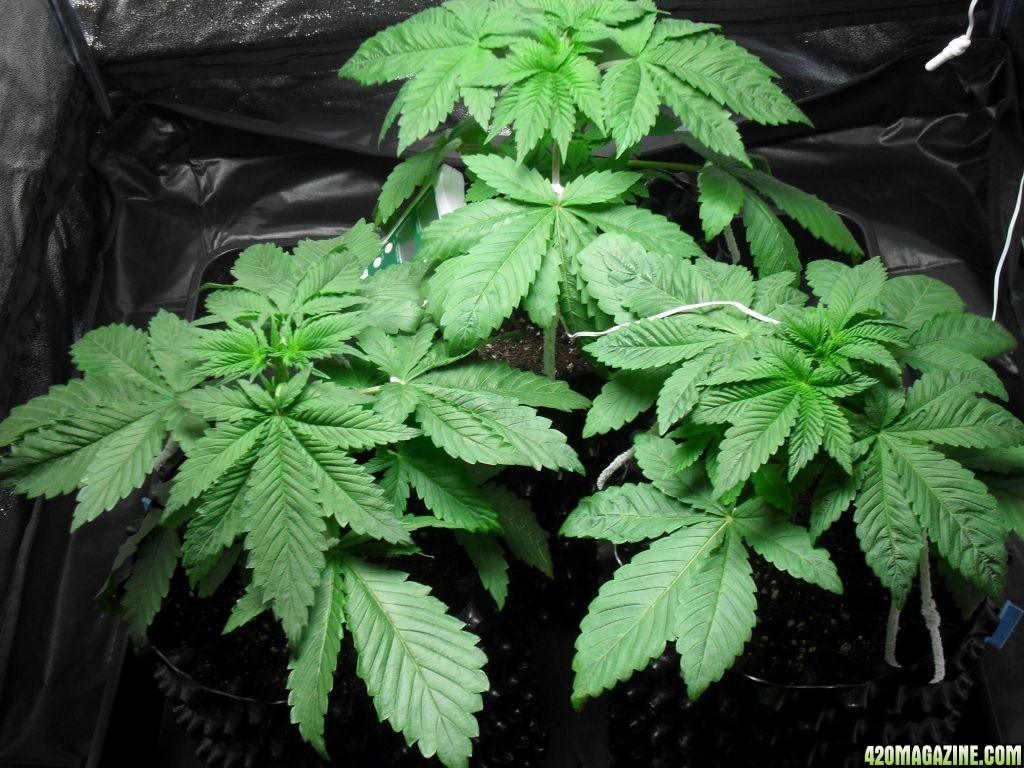
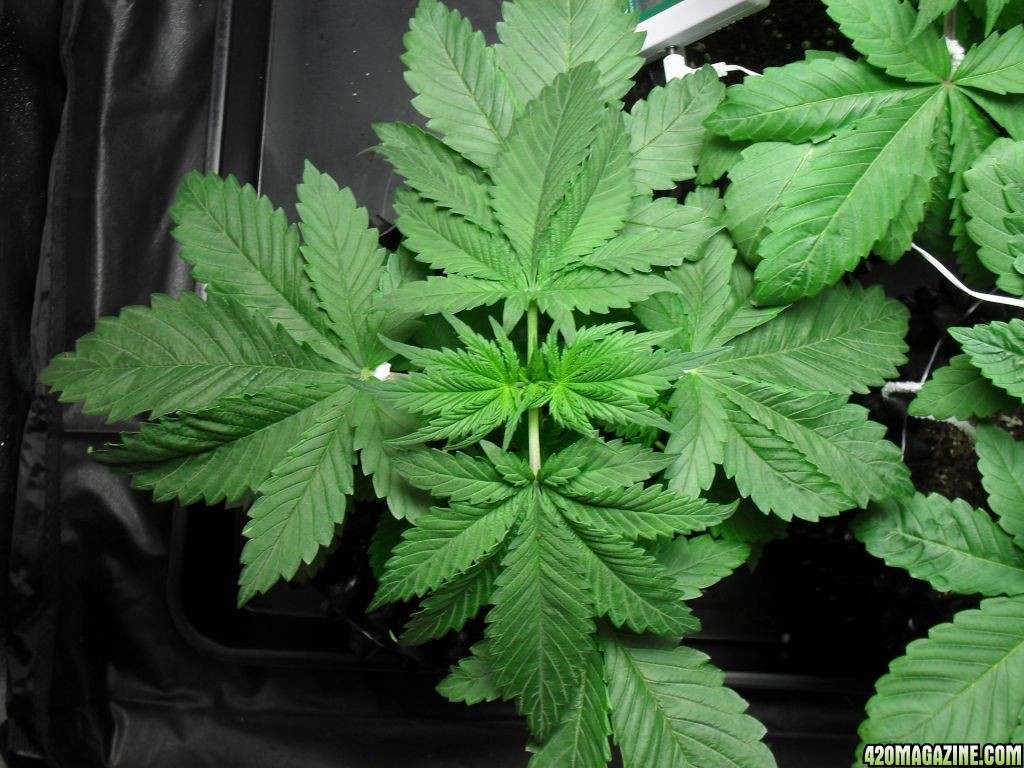
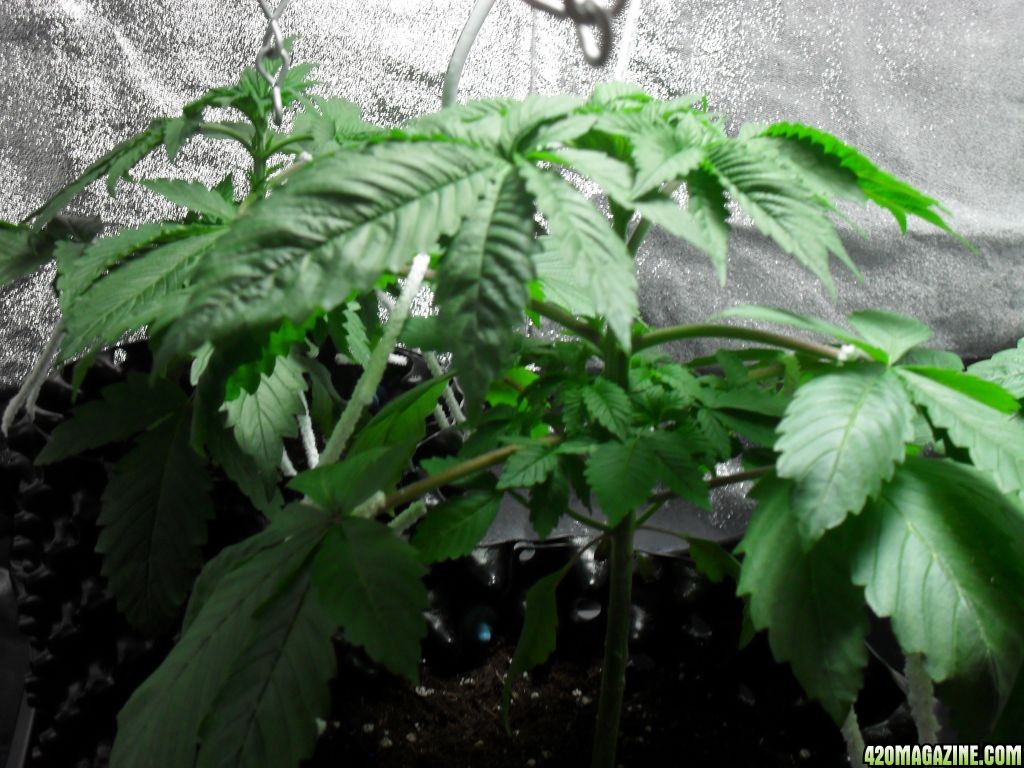
Average plant height is about 5 inch have been filling out nicely with plenty of new growth every day & show signs of roots at drainage holes of 1 litre pot at day 14.

Plants will be transplanted into larger 6.5 litre air pot at a slightly later stage of veg before being sexed.


I got some bat poop stuff for adding to soil mix for transplanting abit later may considor dolomite lime for ph buffer also.

Any tips or advice is always welcome at the house of the Fuzzy Duck :peace:


Photos coming soon once i work that stuff out :thumb:
 
001728.JPG


Humidity drops alot once tent door is open but ya get the idea tho... got some more photos i'll see what i can figue out with stuff lolz
002759.JPG


003722.JPG


Well that took a good 45 minutes to sort photos out & earnt myself a well deserved smoke break.
 
Oh man, another bubblicious grow to watch and compare, awesome!! I like your setup, they will really like the blue spectrum bulb. I kept mine under the 6500k CFL until about 1-1.5 weeks of actual vegetative growth, then i switched to my HPS. They seemed to like the HPS A LOT more because their growth exploded soon after switching. Is that fan pointed directly on those babies? If so you, might want to angle it just about the plants or bounce it off the tent wall or something. A fan set on high pointing directly on plants, especially that small might damage them. I bought a small oscillating clip on fan from HTG supply for like 8 bucks. I dont know if you plan on LSTing them but if you do, you might want to try that instead of using those supports because that will help thicken them babies up. Good luck and I will be subbed! :bravo:
 
Ye, the fan has been directly pointing at plants which may explain some pretty bent up stem... border line horizontal, i have alot of faith that the plants will be able to repair them selves :slide:

Supports are a tempory thing & I shall reconsidor the positioning of fan ASAP.

I've looked at both options for training LST & topping kinda undecided at the moment... i would like view the growth habit of plant before choosing which method is best, but i may expirement with both once i have identified a girlie which can provided enough cuttings for new grow including a mother plant for future generations.

I loved the idea of bubble in the nutrient mix 24 hours before watering, i've seen other stuff like that for explosive growth... Like autopots with bubble in bottom of a pot, bit like hempy bucket with bubble in the bottom of it :thumb:

This is why i choose air pots for greater airation to root zone, might do something funky with growing medium yet to improve air content even more...

Anyways cheers for bump wranglar :peace:
 
Very nice looking Setup Fuzzy Duck, and great that you are doing Organic's!!! I've never done topping (well purposefully...lol) but I have LST'd and it works wonders on producing tops...I invite you to check out my journal as well...doing organics and did lots of topping, and before flowering, each plant had a good 12-20 tops on it...not topping, just LST...

Great clean setup and very healthy looking babies!!! I'm excited to watch!
 
Cheers for the bump Icemud its always good to see others growing organically :thanks:

I've certianly taken the time to browse through 2nd journal & it took very little time to see the benifits of LST, my arm has been twisted in favour of this style of training now :thumb:
 
Changed Lighting time to 18/6.

Today was the first time my plants got any sleep.

They have been 24/0 for the last 2 weeks, from what i understood of 24 hour veg is that it can increase plant growth from 10% to 30%.
Prehaps the 125w blue cfl doesn't quite cut the ice in this department maybe a larger watt cfl would be more benifical or more than 1 should be used.

Part of the change was due to comparing others members grows & plant developement of aprox same age as mine, which lead to my conclusion of HPS ROCKS my plant growth 100% if used from the start almost doubling plant size in some case's.:cheer:
Bearing in mind different sized HPS bulbs of different wattage can lead to accelerated growth & maturation of plant quicker from observational notes of others grows and related length of time growing.

I'm still using my 125w CFL for veg as its cheaper on electricity, this may delay things a little abit whilst vegging when compared to HPS but i can live with that, as some of the better things in life can wait a lil longer :love:

Todays notes on plant growth - appears to be developing nodes & leaf sets, should be more noticable in a couple of days.
Considoring re-potting in later part of week to 6.5 litre air pot, may commence with LST training also pending on plant developement.

Shall add new photos for mid week :thumb:
 
looks good fuzzy, where did you get that CFL with the reflector? was it bought online?

Its just a cheap euro reflector & maxbright 125w 6700k CFL both where purchased from a hydroponic shop / ordered online.

I've sent you a PM on where i order em from.
 
Day 17... a lil bit sooner than expected.

Growth is slow but steady with the 125w blue CFL with leaf size now extending diameter of 1 litre pot & node developement, approx height is about 6 inch.

001730.JPG


Inspecting bottom of pot showed signs of additional root growth, this brought fowards repotting time by a few days rather than having root balling delay future progression.

003724.JPG


The undentified e.g sex of plants in their new home's Air Pot 6.5 litre i suspect the smaller plant out of 3 is female due to growth characteristics.

P.s Where watered with a diluted solution of root juice, bio heaven & alg-a-mic half strength to help settle em in, even tho not needed with 5% trace nutrients in All Mix compost.

005651.JPG


The nutrient collection, gone for the whole hog with Bio Bizz :thumb:

004679.JPG


In case ya get turned on by ventilation systems here's mine, slightly funky fitting to get it in the tent. :peace:

006559.JPG


LST training shall commence in a few days time.
 
those are some crazy looking pots, where did u get them so i can read some info. Looking good! :thumb:


‘WHAT EVER YOU ARE GROWING IT’S THE ROOTS THAT MATTER’

The Air-Pot ™ is a recyclable, reusable plastic container that actively enhances the root system of plants. The Air-Pot ™ is suitable for use with a wide range of growing media and is used in passive or hydroponics systems.

Whether you choose to grow in soil or hydro, Air-Pot’s ™ allow your plants to develop a remarkable radial root system that simply cannot be matched in any other growing container.

The Air-Pot ™ is delivered to you as flat packed kit that assembles in seconds. After harvest, the Air-Pot is quickly removed from the root complex and can be stored flat until the next time it is needed.

The Air-Pot ™ is made from extra tough 100% re-cycled HDPE plastic and can be used again and again and again...

* Prevent root circling
* Increase root mass
* Improve nutrient uptake
* Improve oxygenation
* Reduce crop times
* Reduce transplant shock
* Faster growth rates
* Higher yields

How the Air-Pot ™ works

The walls of the Air- Pot ™ are made up of inward pointing cones and open ended outward pointing cones. There are no flat surfaces on the inside of the container to deflect the roots and start the circling process.

The inward pointing cones direct the roots towards the open ended cones where, because the air density in the medium is too great, the root tips dehydrate and are “air-pruned”.

The plant responds to this "air-pruning" by sending out more roots to compensate for the loss. This very quickly leads to the entire volume of medium being filled with a vast number of highly active root tips and no unhealthy circling roots. The shear mass and efficiency of the root system increases the plants uptake by approximately 15% leading to accelerated growth and higher yields.

The porosity of the Air-Pot ™ also creates better conditions for bacterial activity which further increases the amount of nutrients available to the plant.

The raised base prevents plants from standing in water or on cold surfaces providing superior oxygenation and better conditions for growth.

Air-Pot™ freqently asked questions

Q: What is the best type of system to use with the Air-Pot™?
A: The most popular systems used with the Air-Pot™ are Top Fed Drip Irrigation systems, Flood & Drain and Passive Systems (hand watering).

Q: What types of growing medium can I use in the Air-Pot™?
A: The Air-Pot™ can be used with most types of growing media. Soil, Coco, Rockwool and Mapito are all good choices for Drip Irrigation or hand watering and Expanded Clay Pebbles are most commonly used in Flood & Drain systems.

Q: Will the growing medium fall through the bottom of the Air-Pot™?
A: The ‘Hydro Edition’ Air-Pot™ has a special Grid Base that is designed to prevent medium loss whilst still allowing maximum aeration around the base. Growing media such as soil will form a ‘bridge’ over this base and not fall through. If you are using an extra fine growing medium you can add a layer of spreader matt, or Grow Cubes in the base if necessary.

Q: Should the Air-Pot™ be used inside a normal container?
A: No. The Air-Pot™ is a free standing unit that is used instead of a normal container.

Q: Will the light damage the plants roots?
A: No. The roots are air pruned before they emerge from the Air-Pot™.

Q: Is the Air-Pot™ reusable?
A: Yes. The Air-Pot™ is made from an extremely tough, recycled plastic that can be used again and again. After you have finished growing, simply unscrew the fixing and unwrap the Air-Pot™ from around the medium. The Air-Pot™ will come away cleanly and easily. The Air-Pot™ can be stored flat until the next time it is needed.

Q: How frequently should I water my plants in Air-Pots™?
A: One of the major advantages of growing in Air-Pots™ is the increased root activity leads to a substantial increase in the plant’s demand for water and nutrient. This increased uptake allows plants to grow faster and more vigorously, reducing production time and increasing yields. Extensive field trials have shown an average increase in uptake of 15%. Hydroponics growers using Flood &Drain systems may need to add extra watering cycles per day to keep up with the plants increased demand. Growers using Drip Irrigation systems will benefit from using a ‘pulse irrigation’ technique rather than a single large watering per day. If you are hand watering, daily watering will be fine but we would recommend automatic feeding if you intend leaving your plants for extended periods.

Q: What size Air-Pot™ should I use?
A: Commercial growers using soil and coco fibre have found they are able to maintain the same level of productivity using an Air-Pot™ that is 30% lower in volume than their standard containers. This saves on medium and allows a higher number of plants to be grown, which further increase productivity, see our size guide for more info.

Here is a suggested guide to help you choose the right sized Air-Pot™...


1 litre
Used to grow rooted seedling or clones. It produces an extremely hardy young plant with a root structure that allows it to transplant much more effectively into larger pots
* Dimensions: Diameter = 100mm Height = 145mm Volume =1.02ltrs

3 litre
Mainly used in intensive hydroponic or coco systems. Plants can be grown up to 60cm tall
* Dimensions: Diameter = 150mm Height = 235mm Volume =3.01ltrs

6 litre
These can be used for full term growth and bloom where space is an issue. They can also be used to keep mother plants when space is limited. Plants can be grown up to 90cm tall
* Dimensions: Diameter = 195mm Height = 280mm Volume =6ltrs (Fits Wilma 4 & 8 Pot System)

10 litre
These are the most popular with soil growers. Plants can be grown up to 100cm. They are also used as long term containers for mother plants
* Dimensions: Diameter = 230mm Height = 320mm Volume =10ltrs

15 litre
These are popular with soil growers who prefer a larger plant. Plants can be grown up to 120cm. They are also used as long term containers for mother plants
* Dimensions: Diameter = 270mm Height = 330mm Volume =15ltrs

20 litre
These are used when the grower has plenty of space. Plants can be grown up to 200cm. They are also a popular choice for outdoor growing
* Dimensions: Diameter = 312mm Height = 315mm Volume =19.5ltrs


Due to my limited amount of posts i can not Pm you the link to where i got em from ! but i can suggest air pot - progrow as a search suggestion under google.
 
Day 21

Growth under the 125w blue cfl is steady & gains daily the plants now expand the width of the 6 litre air pots and a tad taller.

I've finally choosen to veg plants to sexually maturity which is around 5th node/branch set & wait for preflowers to sex the plants as after a little research appeared favourable for seed grown plants as it does not effect yield/quality.
001734.JPG


Lower nodes now producing healthly looking branchs, clearly 2 set visiable on all plants with 3rd & 4th sets developing.
003726.JPG


L.S.T is in order to help new branch growth, i may be a tad late as the main stem has chunked out a lot & developing a brown skin of a maturing plant, i'll see what happens.
004681.JPG

005654.JPG


Hopefully with in the next 2 to 3 weeks i shall get preflowers to sex these plants if a successful & healthy girlie is produced from one of these three plants, cuttings shall be taken for the next wave of bubblecious organic grow with the origanil plant going to mother hood.
 
Day 28 - From seed, 125w CFL blue 6400k.

Getting fatter every day packing on more leaf mass and branch nodes developing with 4th node sprouting, another node and the plants will be reaching sexual maturity & estimated guess would be another 2 weeks :cheer:
day_28_from_seed_001.JPG

day_28_from_seed_002.JPG


As for the LST stuff i was not that keen on bending stems about so i focused on bending the shade leaves out of way with the pipe cleaners to aid greater light penetration to the lower forming branchs at the nodes with some success.
day_28_from_seed_004.JPG


Clay pebbles/Hydroton was added to top of air pots as i've experienced a recent peak in humidity to about 80% in theory this should act as a mulch keeping the moisture in the pots longer and lowering surface evaporation keeping humidity lower.
day_28_from_seed_005.JPG


Now for the fun... :yummy:
Hello, 400w of growing power... lets get some explosive, turbo charged growth :thumb: :morenutes:
Sylvanna claim to be 15% blue 85% red 2050k lets see what this lil beastie gonna do...
The plan at the moment is another 2 weeks of veg on 18/6
day_28_from_seed_006.JPG
 
Subb'd

Nice operation you have going there bro everything looks clean and all aspects of the grow covered. Girls are looking mustard oviously loving the :love: you are giving them.

I am on the bio biz fish mix for vegging my bonsai mothers in all mix, just a heads up on bio bizz is not actualy organics, my first soil grow i was going to go the whole shabbam because my hydro guy said it was organics, little did i know...


They use their OMRI 'listing' as a pretense for being organic. OMRI can't certify a single thing.

As a matter of fact, Bio Bizz has a rather unique moniker - the only company to have their entire product line banned by the Oregon Department of Agriculture for mislabeling and their claim that their nutes is 'organic' based on the OMRI listing is the reason for the delisting.


This doesnt mean that they do not produce well .. oh believe they are good and you will yeild HIGH!

:peace:
 
Aye cheers for popping in & saying hello GodSpeed :thumb:

I think i'll call biobizz semi organic for the time being but the girlies :love: it & certainly healthly :thanks: i must admitt i will read into this OMRI stuff many thanks for the heads up on the subject :peace:


I do use Alg-a-Mic to help with any stress i may cause being a new grower plus its loaded with cal/mg which is a common deficencie with MJ & Bio Heaven which has all the micro nutrients in with every weekly watering so far.

I've used both Bio grow & Fish Mix but as 50% less ml per litre of water/half strength with recent waterings, i just like all the ingredients in it & believe fuzzys girls should have the best...

One day they will be Big Mommas :cheer:
 
Update - 2 days after 400w been plugged in...

Most mornings i wake up 'n' make a coffee & inspect the girlies for any problems part of my morning routine before commencing daily activities as we gotta get our priorities right :peace:

I've self diagnosed Heat Stress/Light Burn on one of girlies, only very minor but none the less a problem.

The light has been aprox 16 inch from top of plants with fan blowing/moving constant air through the canopy 24 hours every day, part of problem may result in reflector design as most types do have heat/hot spots with in their light foot print.
I can only take an educated guess that i have heat/hot spot build up at the rear of the reflector as the girlie at the back of tent is only effected so far.

I'll provide pic abit later as the girls are sleeping for a few hours at the moment.

Temporary measure will to be move plant/adjust reflector.

The counter measure is purchase a Heat Shield these are designed for open reflectors.

What does this product do?
This absorbs and reduces heat coming off from a HPS/MH lamp.

A Heat Shield is useful where there is limited headroom and your plants have grown so that they already touching the light. A Heat Shield deflects the light and heat from immediately underneath the light. This allows you to put the light closer to the plant increasing the yield.

- protect plants from burning
- Evens out plant growth
- Increases yield
- Easy to install
- Fits most horizontal reflectors
- Two sizes, small - up to 600watt, large - 1000watt
- Inhibits phototropism (stem elongation)
- Economical
 
Iv never used one of these but id be very intrested how you rate it and if it works properly.

This is what iv read on the subject.

The HeatShield cleverly redirects light and heat from the central hot spot created beneath all horizontally mounted lamps towards grow room extremities. This enables your horizontal reflector to be placed much closer to plants to increase light levels and penetration, whilst maintaining similar (often greater) areas of production under each lamp.
 
Back
Top Bottom