

Things you will need:
1 - Flood Tray
1 - Reservoir sized so that it will half fill your flood table +2 to 5 Gallons extra so as not to burn out your pump (OPAQUE or LIGHT PROOF PREFERRED)
1 - Pond pump GPH sized to pump to a height 2' over the height of your flood table over the reservoir
1 - 1/2" ID* tube 3' long
1 - 3/4" ID* tube 3' long
1 - 1/2" barbed drain fitting with rubber washer
1 - 3/4" barbed drain fitting with rubber washer
1 - Spillover riser 1/2 the height of your flood tray
2 - Screen covers or inserts to fit drain fittings
1 - 24 hour or 7 day timer
Drill
3/4" Speed bit
1" Speed bit
1-1/2" Keyhole bit
Zip ties
Caulk
Flat Black Spray Paint (Optional)
(*ID: Inner Diameter)
NOTE: If you will not be keeping your reservoir in a dark place, It will need to be lightproof to keep light from degrading your nutrients. The the container for my reservoir, while not opaque is kept inside a closed cabinet that I designed as part of the flower box this system is in. As such the reservoir does not need to be lightproof.
My system will be a small 5 Gal Ebb and Flow with siphoning drain. I chose these particular parts simply because they were fairly inexpensive, and because they fit the growspace. Pictorial step by step process follows.
The basic principle behind this system is that it will fill half full with nutrients three times a day stay flooded for 15min, and then slowly drain so that nothing is left but a bit of moisture for most (23 hours and 15 min) of a 24 hour cycle. Simply put, it will fill when the lights go on, for 15min, and drain after the pump goes off.
This is achieved by the use of a riser, or stand pipe measured to half the height of the given tray placed in the drain. When the lights come on for the day, the pump also goes on, it will fill no further than the top of your stand pipe and the rest will drain though it. When the pump goes off however, the water backflows down the supply line, through the pump, back into the reservoir to entirely drain the whole flood tray, but leaves a TINY bit of water/nutrients in the bottom of the tray, to be taken up throughout the next 7 hours, forty-five minutes.
So, three 15 minute fills per 24 hour cycle.
THE FLOOD TRAY:
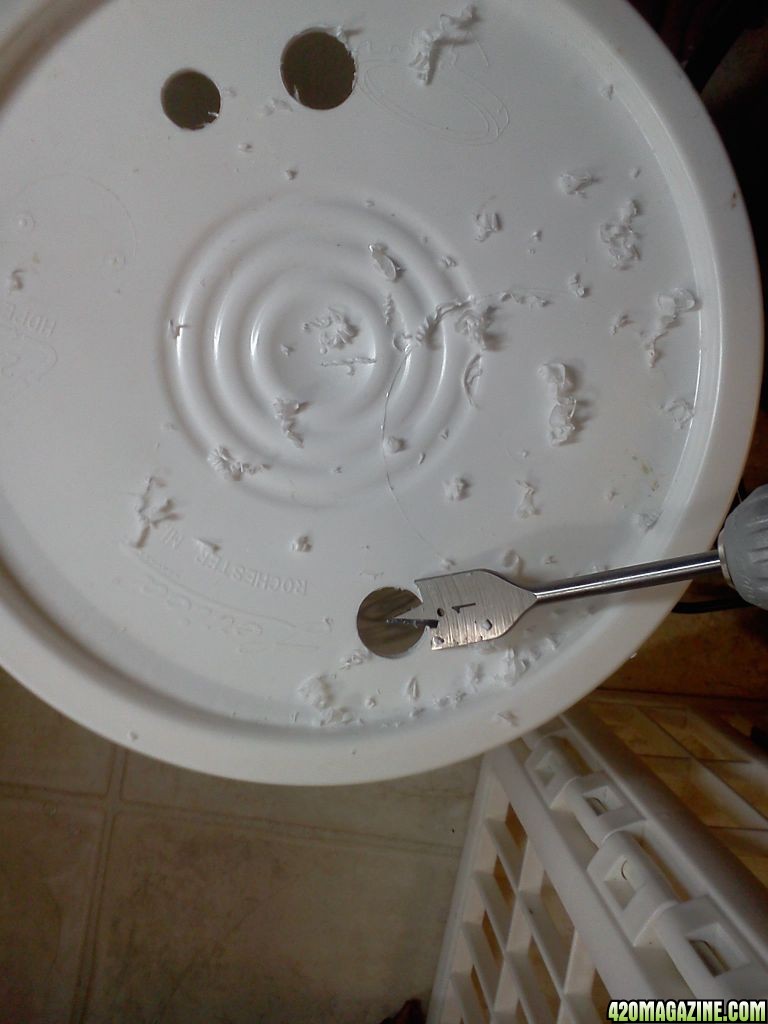
For the flood tray, use the 1-1/2" Keyhole bit in the drill to cut out 2 holes on opposing ends of the tray. Attach the fittings to these holes and make as HAND TIGHT as you can- no need for a wrench here. If you would feel safer, apply a small amount of caulk to the underside of the washer inside the bin before tightening down. Attach the tubes as shown using zip ties or hose clamps to secure.
1/2" ID fitting
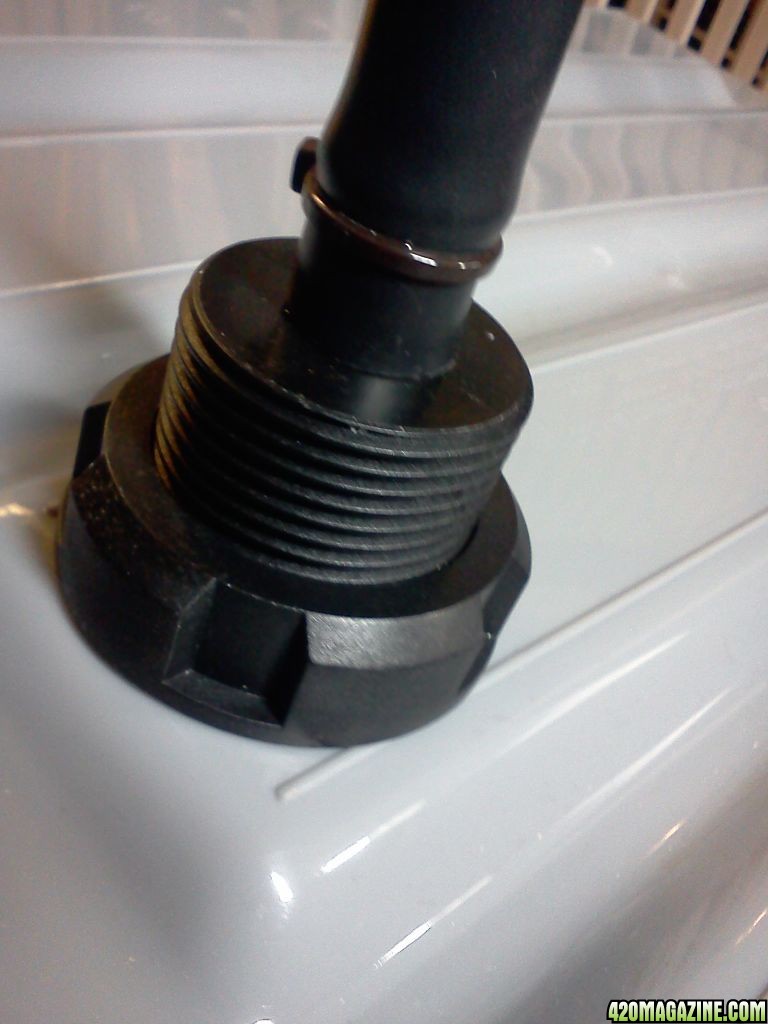
3/4" ID fitting
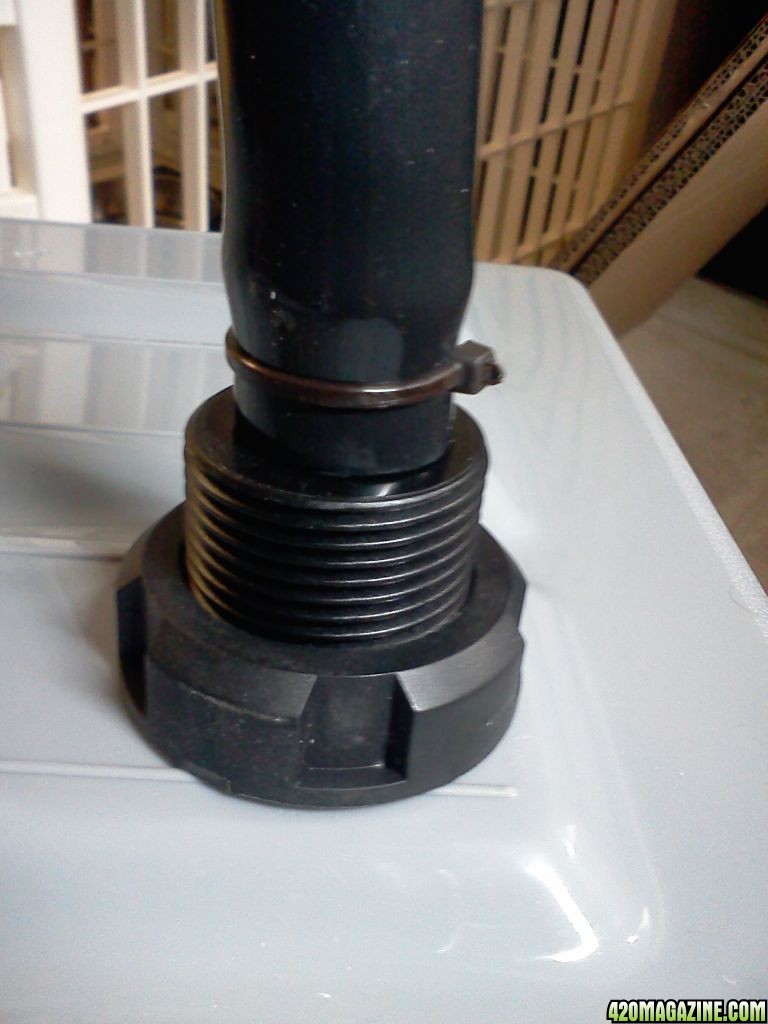
These are my fittings and attachments for the stand pipe:

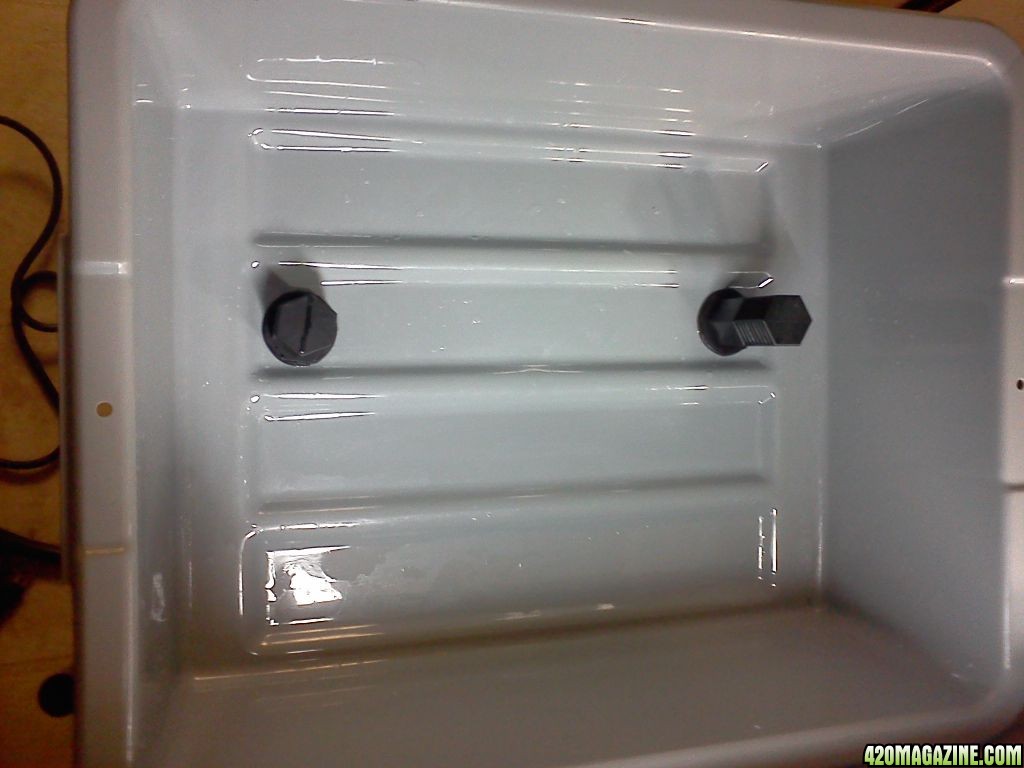
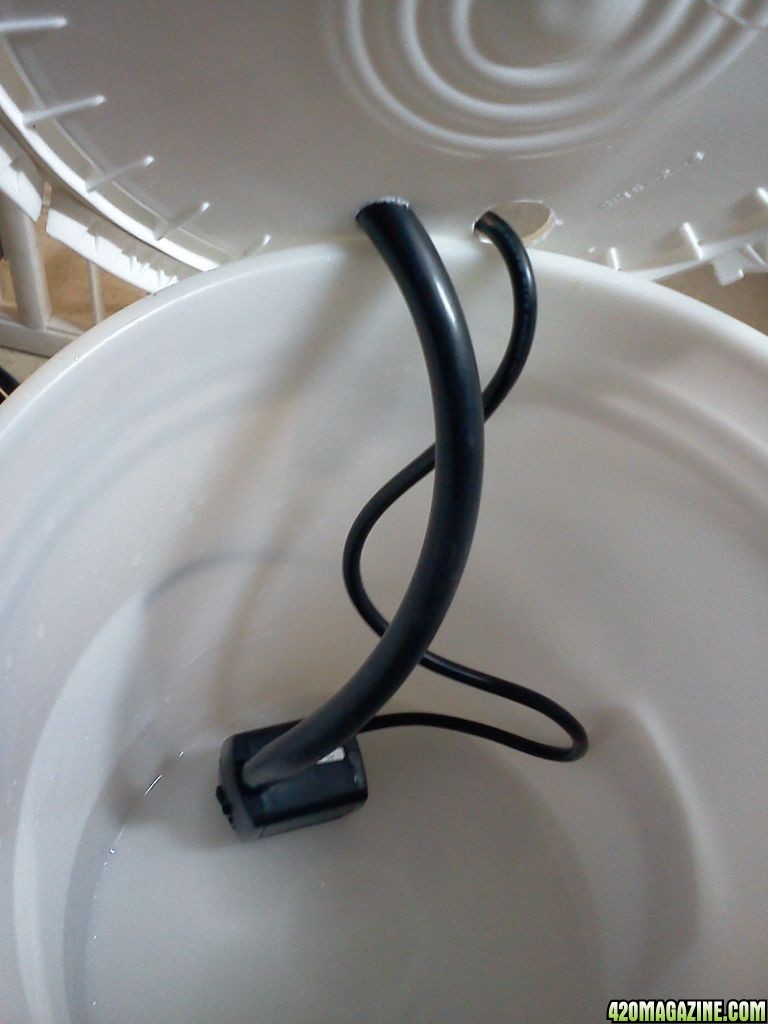
Now, turn over, taking note of the 3/4" ID position and place your stand pipe in the upper side of that fitting and the single screen insert into the fill or pump supplied fitting. These pictures were taken after a leak test with NO HYDROTON so I could empty quickly in case of leak.
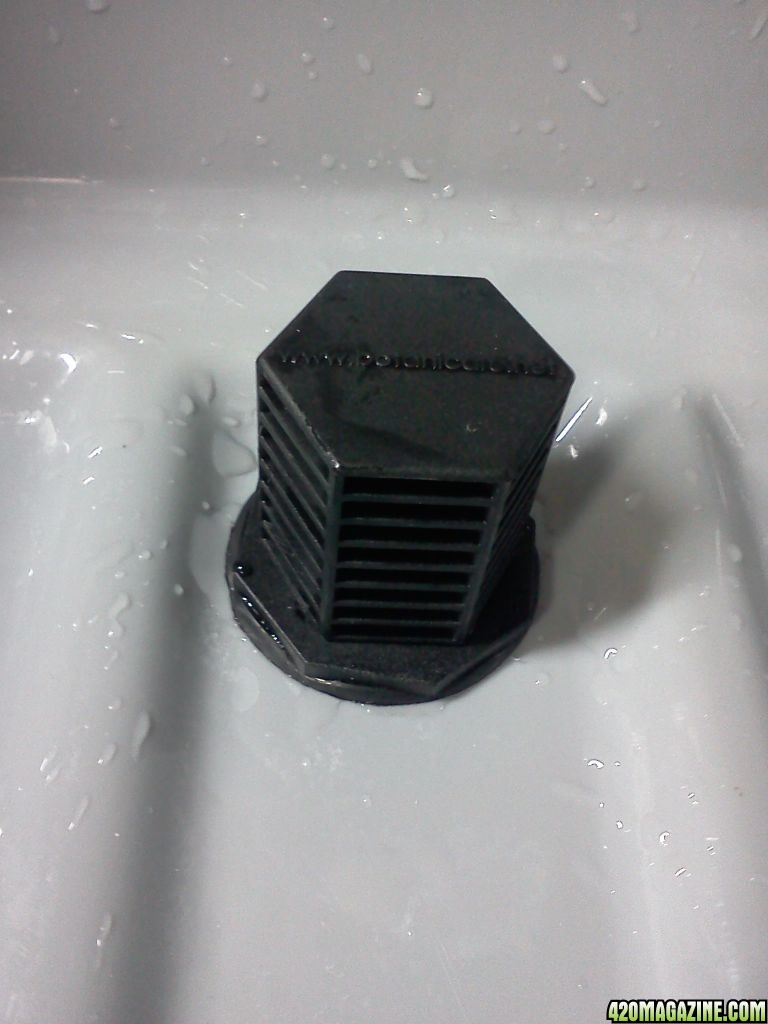
Left: Fill/Drain Screen. Right: water level stand tube. I have an extra just in case I want more height, but I got them in two pieces because hydroton floats in water, and I might not be able to fill 4" of a 7" tray. Also, and EMPTY leak test uses three to four times more water than if hydroton was in place, and took the whole 5 gallons to fill with both pieces in place so I removed one, and let it the pump run and drain through while I inspected for any wet or damp spots underneath.
After all fittings are secure, place on a corner of a table or on a bench, making sure not to bend or crimp the tubing, attach the pump, place it in your reservoir, place the drain tubing in the reservoir and plug in the pump. If you like, you can place something solid, large, and waterproof inside as a displacement, so it doesn't drain your res during this phase. Let the tray fill all the way up and spill over the drain tube. Inspect the underside, the fittings, the tubes, and all for any leaks. If you used caulk as a sealer, you'll need to wait for that to dry before testing. I personally have never used caulk for any of my delivery systems and have rarely had a fitting fail. If there was a leak, it was usually my fault for not tightening it down, or missing a hose clamp.
NOTE: In order to keep from burning out your pump, it should be said that if you used something to displace the water, and your reservoir still ran dry, Your pump suddenly got louder than it was in the first of the fill, or you noticed bubbles rising from the fill tube at the end of the fill, you will need a larger reservoir than you have selected. Alternatively, you could look into doing a Drip system if this is the largest res you can come up with.
THE RESERVOIR
As I stated earlier, if you will not be keeping your reservoir in a dark place, It will need to be lightproof to keep light from degrading your nutrients. The the container for my reservoir, while not opaque is kept inside a closed cabinet that I designed as part of the flower box this system is in. As such the reservoir does not need to be lightproof.
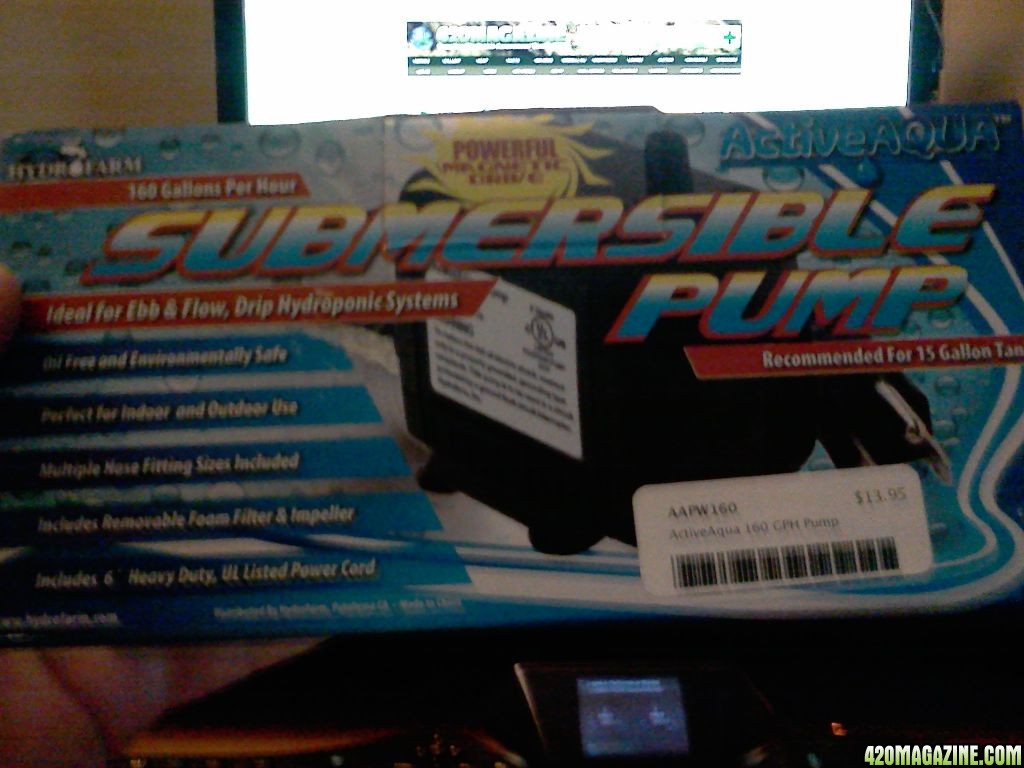
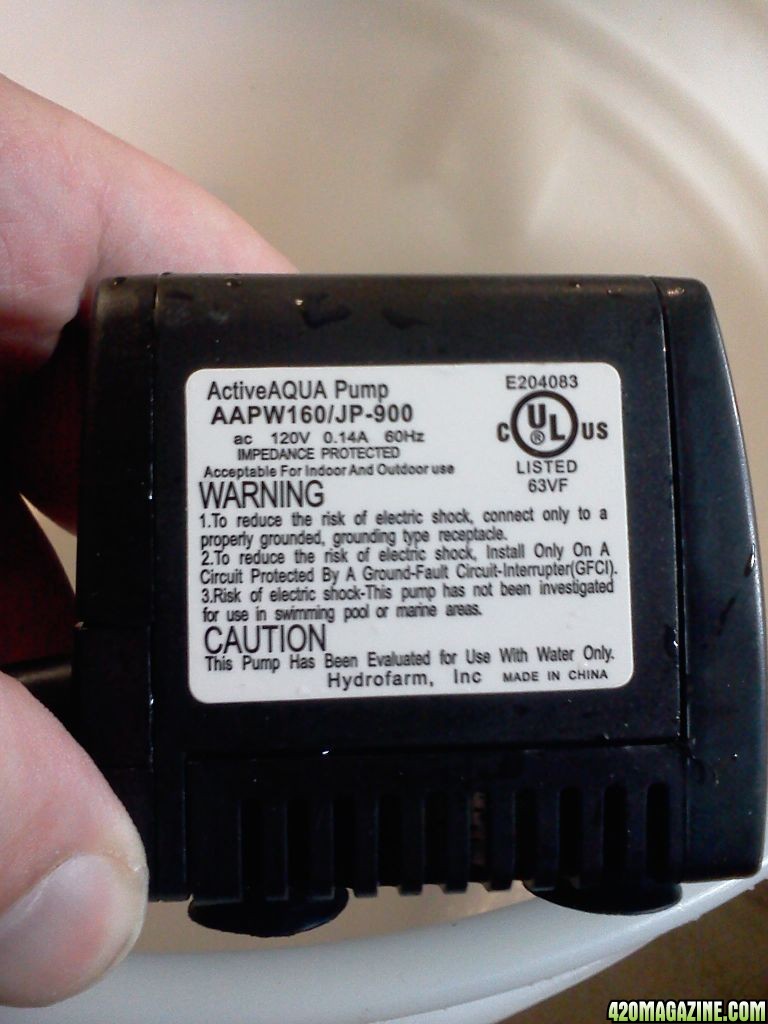
I chose a 160 GPH pump (box pictured below). This pump is strong enough for my needs and inexpensive. $14 at my local supplier.
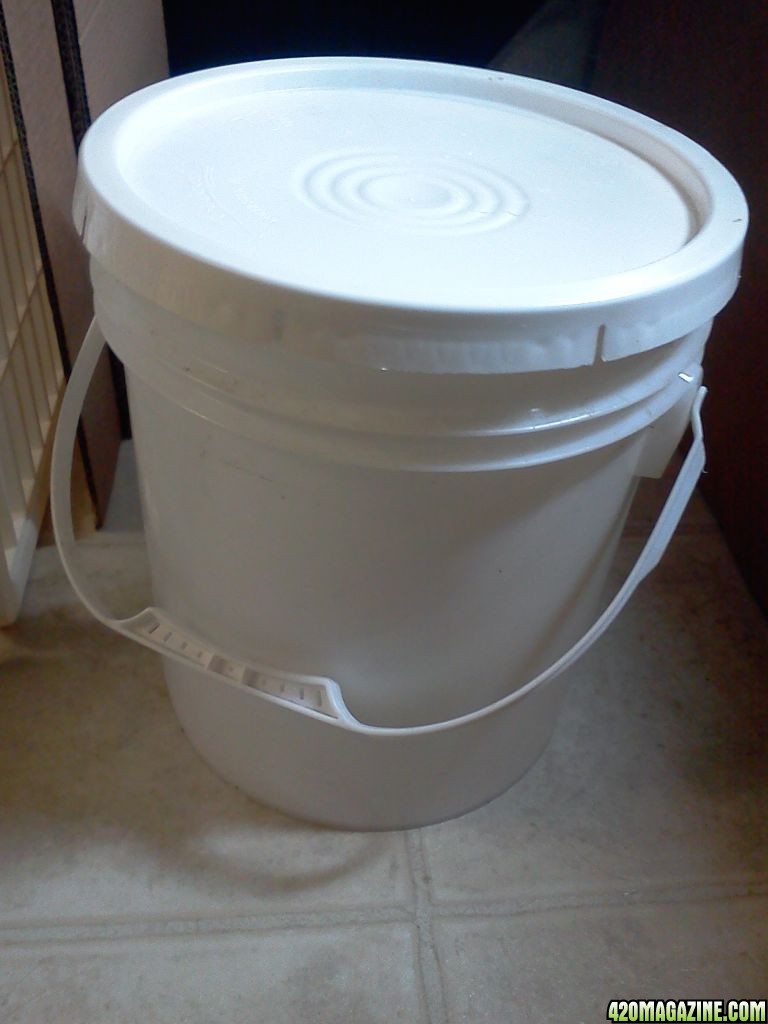
The reservoir is a simple 5Gal bucket, cleaned, sanitized, and dried before working. As this bucket is white, it has already been accounted for with light penetration, and will be placed inside the lower portion of the grow box and out of light. Cool and dark is your nutrient solution's best friend.
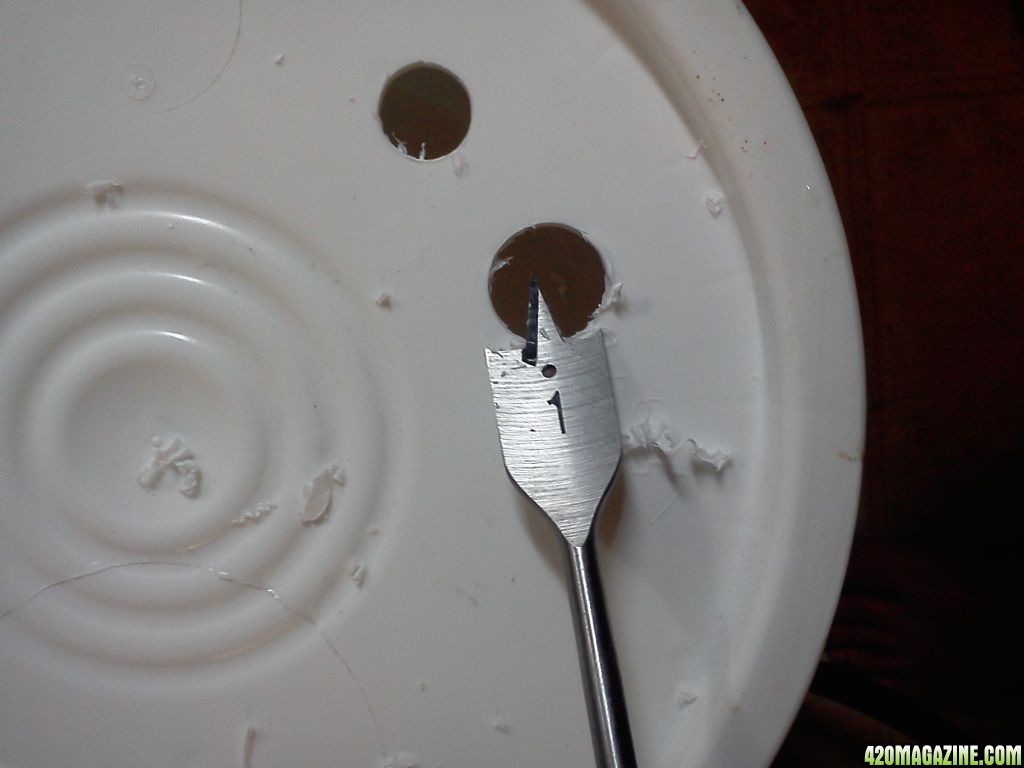
Into the lid I drilled three holes, until I get the air pump, tubing, and airstone. This was simply for fitting, filling, and testing for leaks. One 3/4" hole for the 1/2" ID supply line to pass through; although the ID is 1/2", the OD is slightly smaller than 3/4". Two 1" holes for the 3/4" ID drain tubing and for the pump's electrical plug.
Place pump inside the bucket, and pass the plug **up** through one of the 1" holes in the lid of the bucket (I used the hole right beside the 1/2" ID supply line for simplicity). Pass the 1/2" ID tubing through the 3/4" hole.
Pass the 3/4" ID drain tubing through the other 1" hole. The finished product should look something like this:


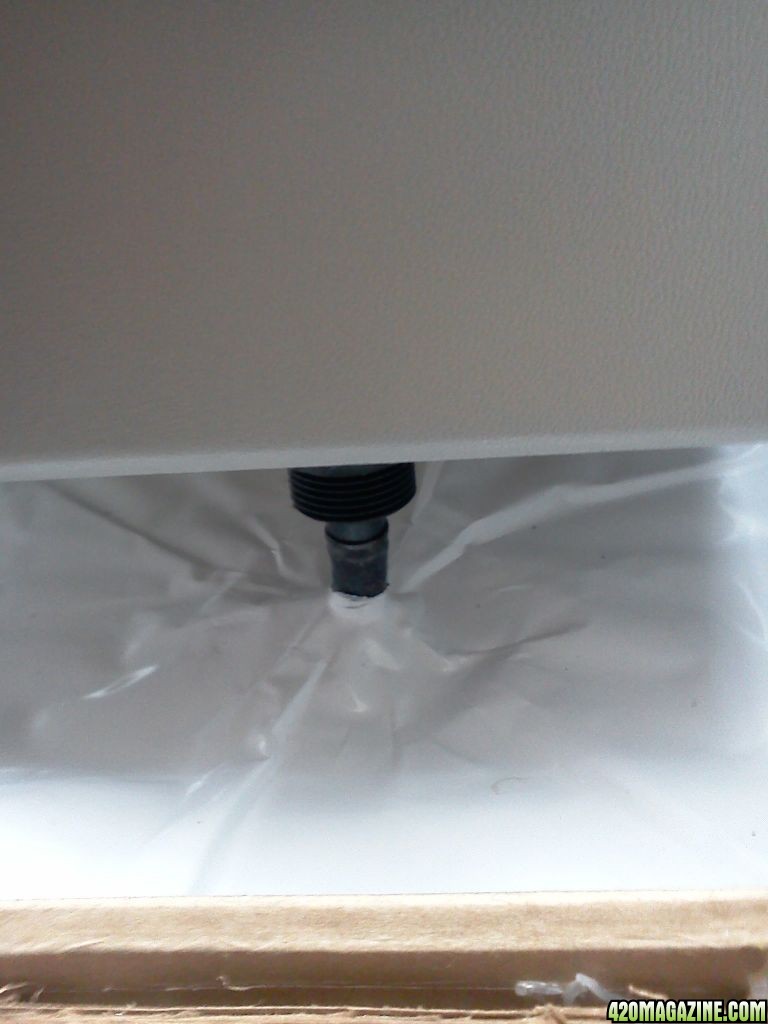
I Installed the tray directly into the box itself and through the floor, drilled a hole for the supply and the return hoses. Through the panda film, I cut a small hole and pushed the hoses into the bottom compartment.
I then filled the bin with Hydrotone.
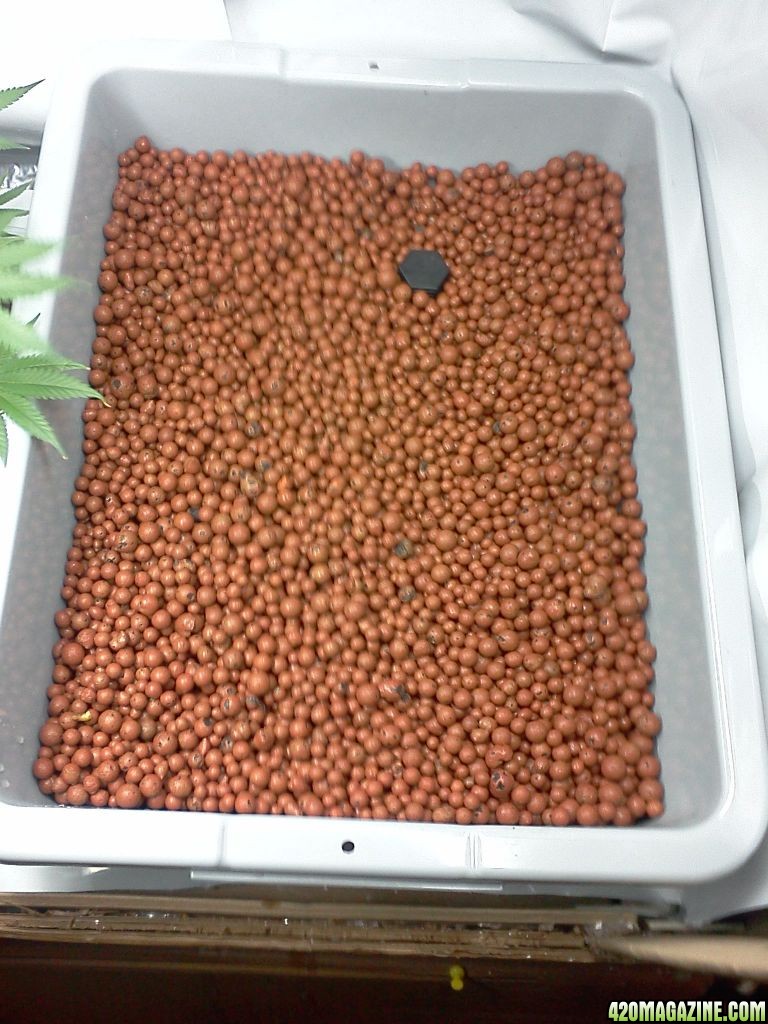
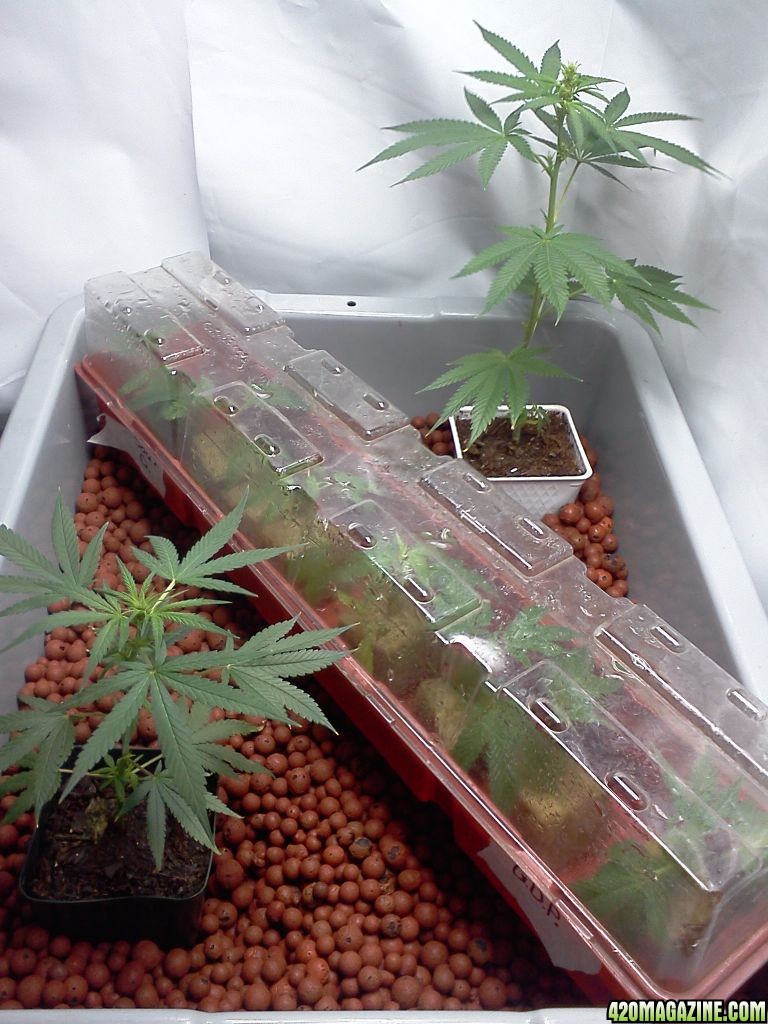
This is a representation of what your bin could look like. Yes, I know those two are in soil. They don't stay there, this is just a representation. And I need to add more hydrotone anyway, I just didn't, for some reason, get my math right on the volume needed.
I cannot stress it enough: If you will not be keeping your reservoir in a dark place, It will need to be lightproof to keep light from degrading your nutrients. Here is when you will use the spray paint if your reservoir is not opaque. Remove everything from the inside, and all hoses, and set aside for now. Close up your res, and start painting the outside. Make sure you cover EVERY outside surface, allow to dry and apply a second coat and allow that to dry as well.
Once you have allowed the time indicated on the label for your paint to dry, open up your res and continue.
Push everything back through the lid and into the res. Supply line, water pump (from the underside the lid, not the top), and drain line.
Now all that's left to do is fill the res, attach the hoses for supply and return, and plug it all in.[/URL]
1 - Flood Tray
1 - Reservoir sized so that it will half fill your flood table +2 to 5 Gallons extra so as not to burn out your pump (OPAQUE or LIGHT PROOF PREFERRED)
1 - Pond pump GPH sized to pump to a height 2' over the height of your flood table over the reservoir
1 - 1/2" ID* tube 3' long
1 - 3/4" ID* tube 3' long
1 - 1/2" barbed drain fitting with rubber washer
1 - 3/4" barbed drain fitting with rubber washer
1 - Spillover riser 1/2 the height of your flood tray
2 - Screen covers or inserts to fit drain fittings
1 - 24 hour or 7 day timer
Drill
3/4" Speed bit
1" Speed bit
1-1/2" Keyhole bit
Zip ties
Caulk
Flat Black Spray Paint (Optional)
(*ID: Inner Diameter)
NOTE: If you will not be keeping your reservoir in a dark place, It will need to be lightproof to keep light from degrading your nutrients. The the container for my reservoir, while not opaque is kept inside a closed cabinet that I designed as part of the flower box this system is in. As such the reservoir does not need to be lightproof.
My system will be a small 5 Gal Ebb and Flow with siphoning drain. I chose these particular parts simply because they were fairly inexpensive, and because they fit the growspace. Pictorial step by step process follows.
The basic principle behind this system is that it will fill half full with nutrients three times a day stay flooded for 15min, and then slowly drain so that nothing is left but a bit of moisture for most (23 hours and 15 min) of a 24 hour cycle. Simply put, it will fill when the lights go on, for 15min, and drain after the pump goes off.
This is achieved by the use of a riser, or stand pipe measured to half the height of the given tray placed in the drain. When the lights come on for the day, the pump also goes on, it will fill no further than the top of your stand pipe and the rest will drain though it. When the pump goes off however, the water backflows down the supply line, through the pump, back into the reservoir to entirely drain the whole flood tray, but leaves a TINY bit of water/nutrients in the bottom of the tray, to be taken up throughout the next 7 hours, forty-five minutes.
So, three 15 minute fills per 24 hour cycle.
THE FLOOD TRAY:
For the flood tray, use the 1-1/2" Keyhole bit in the drill to cut out 2 holes on opposing ends of the tray. Attach the fittings to these holes and make as HAND TIGHT as you can- no need for a wrench here. If you would feel safer, apply a small amount of caulk to the underside of the washer inside the bin before tightening down. Attach the tubes as shown using zip ties or hose clamps to secure.
1/2" ID fitting
3/4" ID fitting
These are my fittings and attachments for the stand pipe:
Now, turn over, taking note of the 3/4" ID position and place your stand pipe in the upper side of that fitting and the single screen insert into the fill or pump supplied fitting. These pictures were taken after a leak test with NO HYDROTON so I could empty quickly in case of leak.
Left: Fill/Drain Screen. Right: water level stand tube. I have an extra just in case I want more height, but I got them in two pieces because hydroton floats in water, and I might not be able to fill 4" of a 7" tray. Also, and EMPTY leak test uses three to four times more water than if hydroton was in place, and took the whole 5 gallons to fill with both pieces in place so I removed one, and let it the pump run and drain through while I inspected for any wet or damp spots underneath.
After all fittings are secure, place on a corner of a table or on a bench, making sure not to bend or crimp the tubing, attach the pump, place it in your reservoir, place the drain tubing in the reservoir and plug in the pump. If you like, you can place something solid, large, and waterproof inside as a displacement, so it doesn't drain your res during this phase. Let the tray fill all the way up and spill over the drain tube. Inspect the underside, the fittings, the tubes, and all for any leaks. If you used caulk as a sealer, you'll need to wait for that to dry before testing. I personally have never used caulk for any of my delivery systems and have rarely had a fitting fail. If there was a leak, it was usually my fault for not tightening it down, or missing a hose clamp.
NOTE: In order to keep from burning out your pump, it should be said that if you used something to displace the water, and your reservoir still ran dry, Your pump suddenly got louder than it was in the first of the fill, or you noticed bubbles rising from the fill tube at the end of the fill, you will need a larger reservoir than you have selected. Alternatively, you could look into doing a Drip system if this is the largest res you can come up with.
THE RESERVOIR
As I stated earlier, if you will not be keeping your reservoir in a dark place, It will need to be lightproof to keep light from degrading your nutrients. The the container for my reservoir, while not opaque is kept inside a closed cabinet that I designed as part of the flower box this system is in. As such the reservoir does not need to be lightproof.
I chose a 160 GPH pump (box pictured below). This pump is strong enough for my needs and inexpensive. $14 at my local supplier.
The reservoir is a simple 5Gal bucket, cleaned, sanitized, and dried before working. As this bucket is white, it has already been accounted for with light penetration, and will be placed inside the lower portion of the grow box and out of light. Cool and dark is your nutrient solution's best friend.
Into the lid I drilled three holes, until I get the air pump, tubing, and airstone. This was simply for fitting, filling, and testing for leaks. One 3/4" hole for the 1/2" ID supply line to pass through; although the ID is 1/2", the OD is slightly smaller than 3/4". Two 1" holes for the 3/4" ID drain tubing and for the pump's electrical plug.
Place pump inside the bucket, and pass the plug **up** through one of the 1" holes in the lid of the bucket (I used the hole right beside the 1/2" ID supply line for simplicity). Pass the 1/2" ID tubing through the 3/4" hole.
Pass the 3/4" ID drain tubing through the other 1" hole. The finished product should look something like this:
I Installed the tray directly into the box itself and through the floor, drilled a hole for the supply and the return hoses. Through the panda film, I cut a small hole and pushed the hoses into the bottom compartment.
I then filled the bin with Hydrotone.
This is a representation of what your bin could look like. Yes, I know those two are in soil. They don't stay there, this is just a representation. And I need to add more hydrotone anyway, I just didn't, for some reason, get my math right on the volume needed.
I cannot stress it enough: If you will not be keeping your reservoir in a dark place, It will need to be lightproof to keep light from degrading your nutrients. Here is when you will use the spray paint if your reservoir is not opaque. Remove everything from the inside, and all hoses, and set aside for now. Close up your res, and start painting the outside. Make sure you cover EVERY outside surface, allow to dry and apply a second coat and allow that to dry as well.
Once you have allowed the time indicated on the label for your paint to dry, open up your res and continue.
Push everything back through the lid and into the res. Supply line, water pump (from the underside the lid, not the top), and drain line.
Now all that's left to do is fill the res, attach the hoses for supply and return, and plug it all in.[/URL]