

Heya everybody,
I've been looking at PC Micro grows for a while, and was always interested in starting one. I live in a state that would probably send me to the electric chair if I was ever caught growing Marijuana, so I'll end up growing cherry tomatoes with it anyway. But I figure the audience here would appreciate the build effort as opposed to other gardening forums.
The first thing I wanted to build was a lighting system, I've played with fluorescents before and found them to be too hot. Incandescents were completely out of the question. I practically live in the subtropics, the house usually hovers around 80 deg F most of the day. So lighting needed to be kinda cool.
The past few years I've started to see LED technology get brighter and brighter, and also cheaper. Particularly the Chinese seem to be dumping scads of LEDs onto the market with almost no where for them to go.
Of course I realize now I've went a little overboard. I figured that I wanted the lumen output of at least two CFL bulbs. Somehow that went completely awry when I started ordering the LEDs! The "More is Better" syndrome got the best of me and I ended up buying 20 10 Watt LEDs!
I decided on the 10 watt LEDs because they were large enough to handle, and they offered colors other than white. The last thing I wanted to do was to solder hundreds of tiny LEDs together, that's kinda boring. Only problem was that the 10 watt LEDs I found were about 25 bucks a piece! Until I found E-Bay I managed to get them for 5 bucks or so direct from China. (Gotta love eBay)
And I went a little crazy with the light color selection too. It seems that most LED grow lights are only in the blue and red spectrum. I selected blue, red, warm white, and cool white. So this won't be your typical LED grow light.
It's a little hard getting data on these LEDs too, the data sheets are kind of terse and the supplier may or may not have data on these at all, so what I had to do was find as many data sheets on these 10 watt LEDs as possible and kind of conglomerate the information, to get a better picture of what their needs are.
The REDs are definitely not 10 watts, they're more like 7 watt LEDs. The blues and whites indeed dissipate 10 watts.
They each output about 500 lumens, the cool whites a little more about 800 lumens each, they're very bright, you can't hardly look at them without wanting to turn away. They also get hot too, and need to be heat sinked. Hopefully it will still be cooler than a large 200 watt CFL bulb!
OK enough blabbing, sorry I like to babble on sometimes.
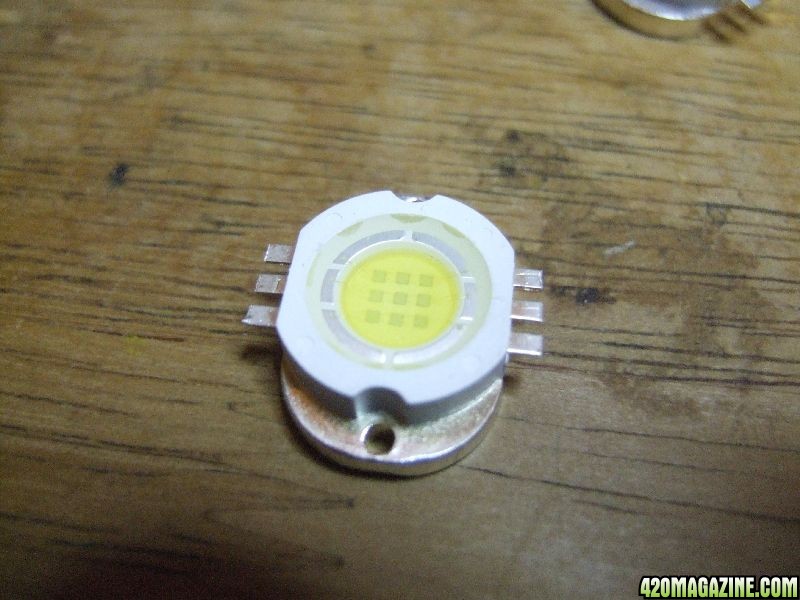
Here is a 10 watt LED:
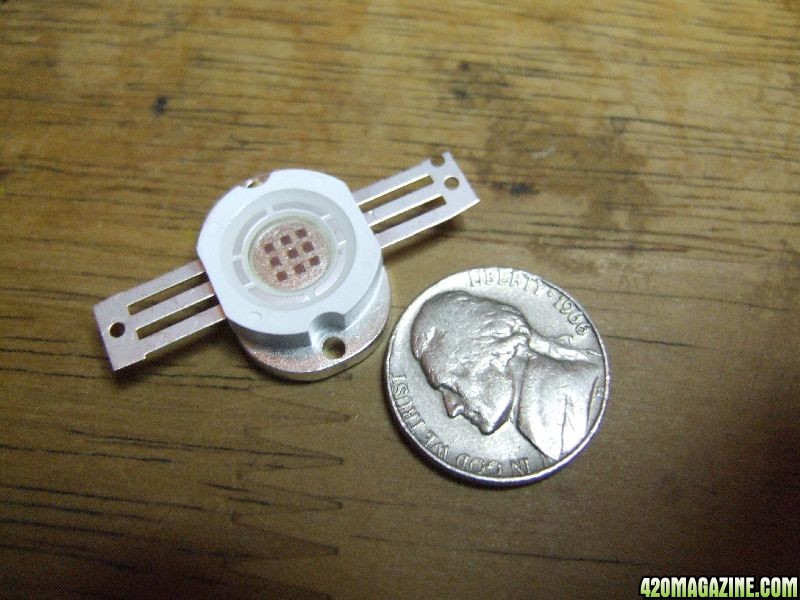
You can see they're not really big. And when you get really close you realize that three parallel strings of three LEDs in series.
So for the red LED, it makes sense that the forward voltage of the unit is 6~8 volts, since individual red LED's want to see a voltage of
anywhere from 1.8 2.5 volts. I'm going to drive the red LED's at 7.5 volts. They claim blues and whites have a forward voltage of 10 ~ 12 volts. They toss about 12 volts all the time with these LEDs and I think at that voltage you'll fry them pretty quick. When you think of the forward voltage for a white or blue LED it's about 3 ~ 3.5 so I'll drive the blue and whites at 10.5 volts.
The datasheet also claims that at the typical forward voltage, the current will be 1000mA or 1 amp! WOW! I'm going to need 20+ amps at twelvish volts to drive this thing. In retrospect it might have better to go with a higher voltage and wire these LEDs in series, but I happen to have a hugeish 12 volt power supply laying around waiting to drive this project.
First step was lopping their ears off, those large solder terminals wouldn't allow me to pack them together into a nice compact array, so I got some tin snips and cut them off. (They were too tough for regular old electronic snips)
The LEDs will be attached to a large chunk of copper which will act as a heat spreader, at first I thought of drilling holes and screwing them
to the heat spreader but drilling and tapping 40 holes then finding 2 mm screws seemed more trouble than it was worth.
I decided to epoxy the LEDs to the heat spreader. What I did was mix in some lithium/ceramic heat sink grease with my 5 minute epoxy.
At first I used JB Weld, but it seemed more viscous, after LED no 2 got glued in I switched to a much thinner 5 minute epoxy.
I used a 33% mix of heat sink compound to hardener and resin. I figured this would allow for enough heat transfer, and weaken the epoxy if I ever wanted to remove the LEDs if I wanted to repurpose them.
Here they are waiting to be glued in:
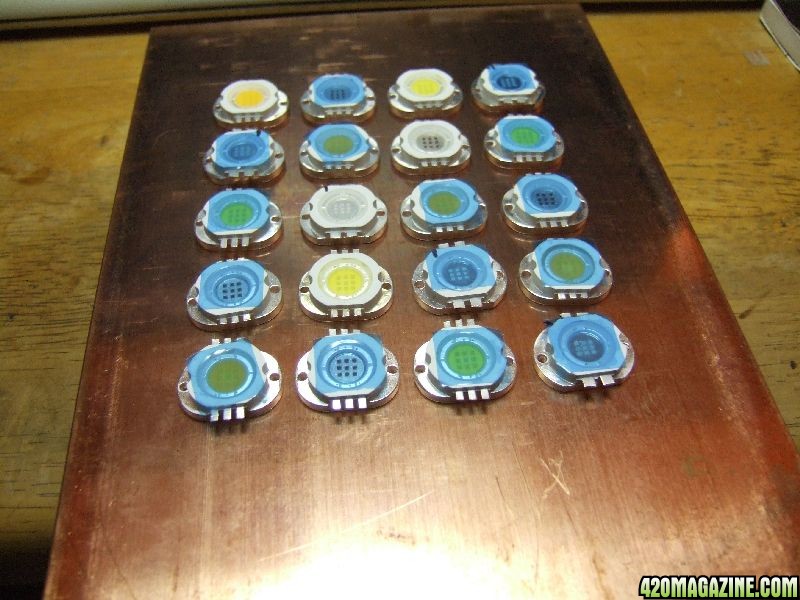
I arranged the LEDs in a barber pole fashion in terms of which colors where. I wanted to diffuse the color as much as possible. I also shouldn't have removed the little blue stickers that protect the lens of the LED, the lens is like a clear soft epoxy that's easy to get fingerprints
and gunk on. But of course when I received them I had to crack a few out and light them up and whatnot. So I almost ended up getting
this opaque epoxy gunk over the lenses! What I did was tape them up with some scotch tape before gluing them on.
I'm at the stage now where I need to solder up the wire, and attach the resistors. I'm running these all in parallel, so there are going to be some zany high watt ballast resistors in series with each LED. I know this is not the most efficient way of ballasting, but in terms of simplicity you can't beat it. The budget would have gone through the roof had I used solid state ballasts for each LED. In the future I might look at something like that, but this project is kind of a "proof of concept" run.
Expect another post this week as I get them soldered up and the ballast resistors wired in.
Sorry if this is kind of long winded and disjointed, I have so many ideas and thoughts about this I'm kind of spilling it all out without any outline!
I've been looking at PC Micro grows for a while, and was always interested in starting one. I live in a state that would probably send me to the electric chair if I was ever caught growing Marijuana, so I'll end up growing cherry tomatoes with it anyway. But I figure the audience here would appreciate the build effort as opposed to other gardening forums.
The first thing I wanted to build was a lighting system, I've played with fluorescents before and found them to be too hot. Incandescents were completely out of the question. I practically live in the subtropics, the house usually hovers around 80 deg F most of the day. So lighting needed to be kinda cool.
The past few years I've started to see LED technology get brighter and brighter, and also cheaper. Particularly the Chinese seem to be dumping scads of LEDs onto the market with almost no where for them to go.
Of course I realize now I've went a little overboard.
I figured that I wanted the lumen output of at least two CFL bulbs. Somehow that went completely awry when I started ordering the LEDs! The "More is Better" syndrome got the best of me and I ended up buying 20 10 Watt LEDs!I decided on the 10 watt LEDs because they were large enough to handle, and they offered colors other than white. The last thing I wanted to do was to solder hundreds of tiny LEDs together, that's kinda boring. Only problem was that the 10 watt LEDs I found were about 25 bucks a piece! Until I found E-Bay I managed to get them for 5 bucks or so direct from China. (Gotta love eBay)
And I went a little crazy with the light color selection too. It seems that most LED grow lights are only in the blue and red spectrum. I selected blue, red, warm white, and cool white. So this won't be your typical LED grow light.
It's a little hard getting data on these LEDs too, the data sheets are kind of terse and the supplier may or may not have data on these at all, so what I had to do was find as many data sheets on these 10 watt LEDs as possible and kind of conglomerate the information, to get a better picture of what their needs are.
The REDs are definitely not 10 watts, they're more like 7 watt LEDs. The blues and whites indeed dissipate 10 watts.
They each output about 500 lumens, the cool whites a little more about 800 lumens each, they're very bright, you can't hardly look at them without wanting to turn away. They also get hot too, and need to be heat sinked. Hopefully it will still be cooler than a large 200 watt CFL bulb!
OK enough blabbing, sorry I like to babble on sometimes.
Here is a 10 watt LED:
You can see they're not really big. And when you get really close you realize that three parallel strings of three LEDs in series.
So for the red LED, it makes sense that the forward voltage of the unit is 6~8 volts, since individual red LED's want to see a voltage of
anywhere from 1.8 2.5 volts. I'm going to drive the red LED's at 7.5 volts. They claim blues and whites have a forward voltage of 10 ~ 12 volts. They toss about 12 volts all the time with these LEDs and I think at that voltage you'll fry them pretty quick. When you think of the forward voltage for a white or blue LED it's about 3 ~ 3.5 so I'll drive the blue and whites at 10.5 volts.
The datasheet also claims that at the typical forward voltage, the current will be 1000mA or 1 amp! WOW! I'm going to need 20+ amps at twelvish volts to drive this thing. In retrospect it might have better to go with a higher voltage and wire these LEDs in series, but I happen to have a hugeish 12 volt power supply laying around waiting to drive this project.
First step was lopping their ears off, those large solder terminals wouldn't allow me to pack them together into a nice compact array, so I got some tin snips and cut them off. (They were too tough for regular old electronic snips)
The LEDs will be attached to a large chunk of copper which will act as a heat spreader, at first I thought of drilling holes and screwing them
to the heat spreader but drilling and tapping 40 holes then finding 2 mm screws seemed more trouble than it was worth.
I decided to epoxy the LEDs to the heat spreader. What I did was mix in some lithium/ceramic heat sink grease with my 5 minute epoxy.
At first I used JB Weld, but it seemed more viscous, after LED no 2 got glued in I switched to a much thinner 5 minute epoxy.
I used a 33% mix of heat sink compound to hardener and resin. I figured this would allow for enough heat transfer, and weaken the epoxy if I ever wanted to remove the LEDs if I wanted to repurpose them.
Here they are waiting to be glued in:
I arranged the LEDs in a barber pole fashion in terms of which colors where. I wanted to diffuse the color as much as possible. I also shouldn't have removed the little blue stickers that protect the lens of the LED, the lens is like a clear soft epoxy that's easy to get fingerprints
and gunk on. But of course when I received them I had to crack a few out and light them up and whatnot. So I almost ended up getting
this opaque epoxy gunk over the lenses! What I did was tape them up with some scotch tape before gluing them on.
I'm at the stage now where I need to solder up the wire, and attach the resistors. I'm running these all in parallel, so there are going to be some zany high watt ballast resistors in series with each LED. I know this is not the most efficient way of ballasting, but in terms of simplicity you can't beat it. The budget would have gone through the roof had I used solid state ballasts for each LED. In the future I might look at something like that, but this project is kind of a "proof of concept" run.
Expect another post this week as I get them soldered up and the ballast resistors wired in.
Sorry if this is kind of long winded and disjointed, I have so many ideas and thoughts about this I'm kind of spilling it all out without any outline!
