

quemedica
New Member
A friend up north fell seriously ill and asked for help setting up a 'medicinal' closet grow. He's on a tight budget, which will only get tighter as he’ll need to travel for medical treatment. Traveling also means he won't be able to tend his grow for extended periods of up to a week. Keeping all of this in mind, here's what I came with. He affectionately named it his "Sea of Light Closet Grow".
Hopefully this information will be of some use to other people and is written with the layman in mind. Not all of these ideas are original, so thanks and praise go out to other contributors who’ve seeded them over the years…
FLOOR PLAN
His closet is 3 feet wide with its doorway at an angle, one wall is 5 feet long and the other 4 feet. He had two small shelves at top corners of the 5 foot wall, which I put to good use. Here is a plan I prepared before we started:
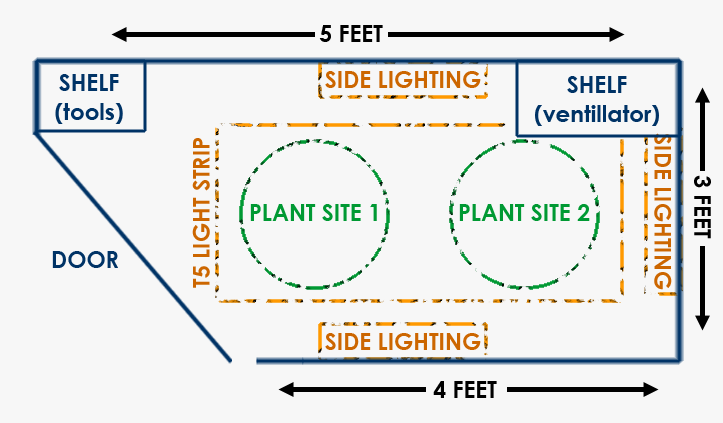
We began by covering the entire floor and walls (¾ of the way up) with emergency thermal blankets. These have a slightly diffused reflective property, they provide splash proofing and best of all can be purchased cheaply at discount dollar stores. Depending on choice of lighting, anyone considering using these might want to read about hot spots and alternatives to mitigate them such as more expensive Mylar.
OVERHEAD LIGHTING
Unfortunately for my buddy, he had already purchased his canopy light before contacting me. During a recent trip south, a hydroponics store seduced him into buying flimsy, over hyped and expensive gear ---> Sunblaster T5 fixtures, lamps and reflectors. I’m sour grapes about it because he’s a severely ill, life long friend who’s one step away from hitting food banks and these pressure cooker salesmen fill his trunk with $300 worth of cheaply built lights, arghhhh.
For a company professing to serve the "horticulture industry", Sunblaster falls way off my scepticism scale. While setting up these cabinet-style fixtures into a light strip, the lamp end-cap connectors would fall off their aluminum channels. Sunblaster claims their products are rated IP65 (dust and water resistant), but a lot of good that will do if one of those connectors is offset while foliating plants. Furthermore, should someone bump into the light strip and a cap flies off like they so easily did in my hands, so will the lamp it’s meant to hold! I emailed the company and have yet to get a reply, I guess product quality is not the only shortcoming at Sunblaster. In all fairness though, their website looks nice. Anyways, moving on…
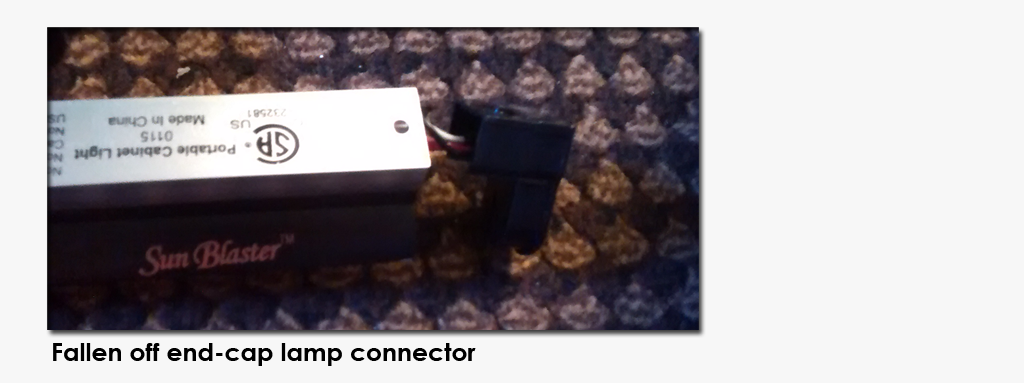
The 7 fixtures he bought are the 3' models. The fist thing I did was to secure the end-caps using 14 self-tapping metal screws driven through the aluminum channels and slightly into the underlying plastic connectors.
Next, I fabricated light strip hanger bars using two pieces of 14½" aluminum channels (half inch size) sourced at the local hardware store. Sunblaster supplies snap-on mounting clips with centered holes in them. Using an 11/64 bit, I drilled 7 holes evenly spaced 2¼ inches apart along the length of both aluminum channels. The 14 mounting clips were fastened on using #10 flat head machine screws and nuts. With the lamp reflectors installed, this configuration spaces the fixtures half an inch apart for a total width of 16½ inches:
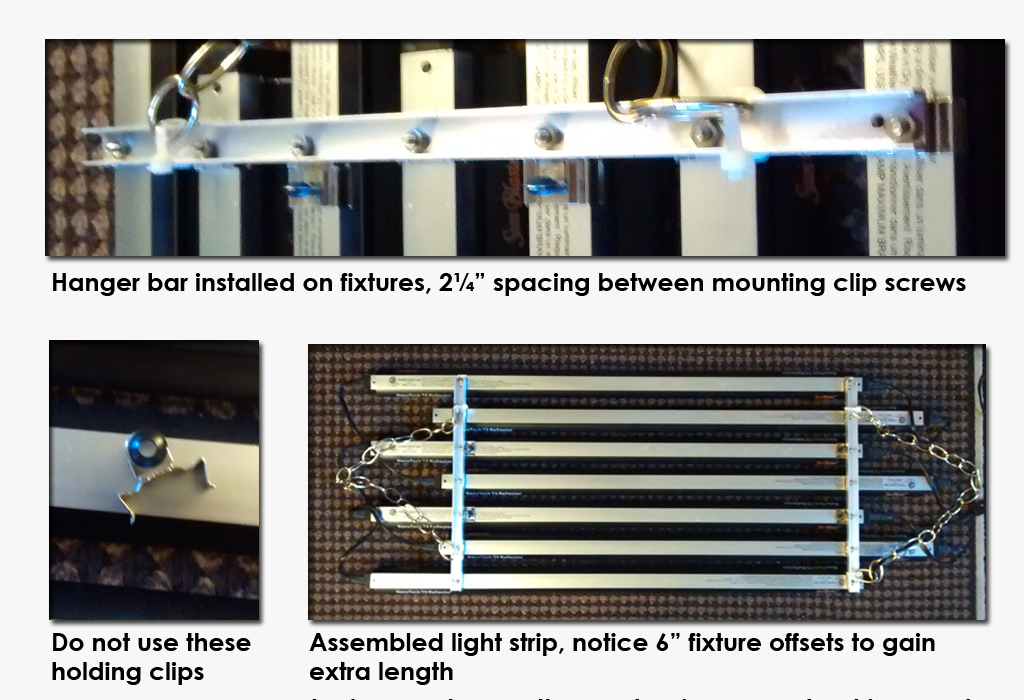
I later discovered Sunblaster sells plastic hanger bars, but if they’re as useless as the holding clips they provide, your light strip will come crashing down on a whim. I’m glad the hydroponics store messed that one up, my pal surely would have bought them.
I wanted to gain extra length to cover his shortest (4' wall) run. This was solved by offsetting each fixture by 6 inches. Ornamental chains were installed using 4 tie wraps at each corner. Finally, the light strip was hung from the ceiling using 2 screw-in hooks and cheap ($5 each) plant basket ratchet pulleys.
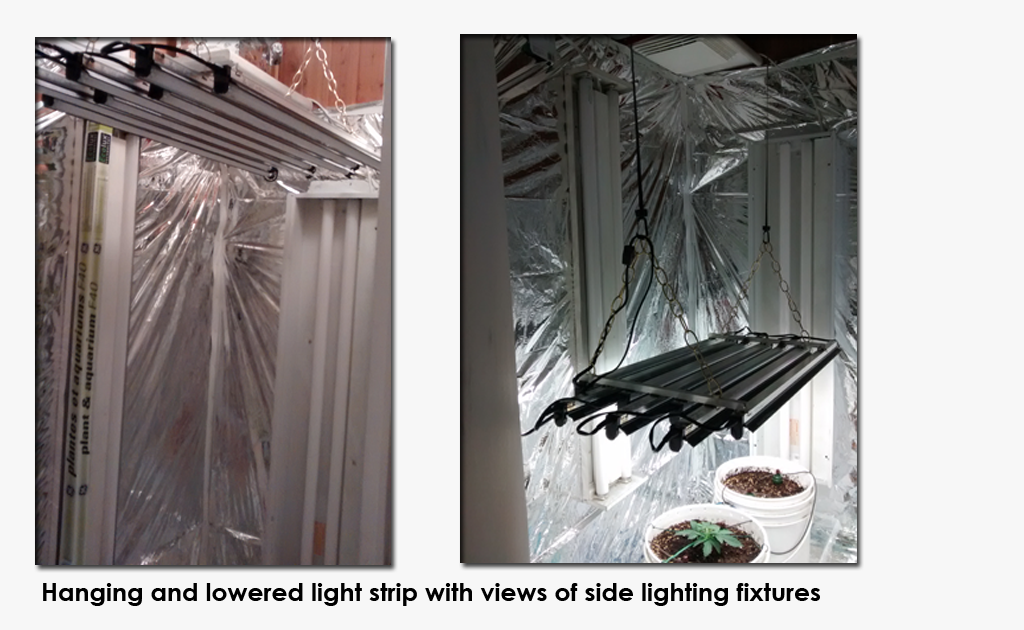
SIDE LIGHTING
For side lighting purposes, I visited his local electrician and asked if he had any used 48" T12 double lamp fixtures. Sure enough, he had plenty and was glad to offload 3 at $5 each. Electrical shops are dismantling these from commercial buildings by the thousands as they swap them out for LED lights. This is how I could of spared my buddy from that disappointing $300 Sunblaster purchase. By buying an extra 3 fixtures and disassembling them, I could of built a sturdy, 6 lamp overhead light strip for under $40,00!
If you go hunting for T12 fixtures, be sure to remove their covers checking that they contain ballasts (black rectangular box), but don't be too distraught if some of them don't work. Try choosing the newest looking fixtures and buy more than needed for the job at hand. If you're lucky and happen to drop by on a day they have a truckload, you'll get them for free. You can also easily convert your fixtures to use more efficient T8 lamps, they have the same pin size as T12 lamps.
Back at my friend's place, I tested the fixtures one by one and they worked perfectly. We mounted a box on each wall, wired them in series (one electrical cord to plug in) and headed back to the hardware store to buy 6 lamps. I had him purchase GE's Wide Spectrum tubes at $6,95 each, which is a fair price for a 3 year (20h cycle) lamp. We use these at our commercial (food) grow so I’m familiar with their efficiency, but don't just take my word for it and google “Fluorescent Plant Lighting – Wayne”. Reference data is also available on GE's website.
VENTILLATION
CFM (cubic feet per minute) ratings are not the be-all, end-all of air movement. A desktop fan can displace 200 CFM, but hook it up to a duct with a carbon scrubber located downstream and you're SOL. What is also needed is power, as in horse power.
In such a confined space, lighting will generate and trap lots of heat, which is no friend of electrical components or smelly plants for that matter. In trying to come up with an efficient, inexpensive, quiet and reliable ventilation solution for my friend's dream closet, I thought; what industry needs to achieve all this on a tight budget? After more than a few therapeutic vapes, it finally hit me, the home appliance business!
A clothes dryer needs to be quiet, reliable and powerful as its motor not only drives the blower, but also the drum that tumbles damp, heavy wash loads. Dryer blowers displace anywhere from 160 to 300 CFM and are equipped with ¼ HP to 1HP electric motors. As an added bonus, these blower housings come ready to plug onto 4” ducts without the slightest modification:
Used dryers can be found all over the place from free to under $60. I found a second hand dryer at the town’s recycling facility for $20, easily removed its blower and installed it on one of the closet’s top shelves.
If a clothes dryer is out of reach, another cheap, plug and play alternative is a used bouncy house inflator. These high static (as in static pressure) blowers are reliable and have power to spare, especially models in the 2HP, 1500 CFM range. Here’s an image I found on Ebay, the person was unloading several models:
CARBON SCRUBBER
While moving lots of hot air, we might as well clean the unavoidable odours that will occur once the plants are in bloom. An on-the-cheap scrubber was fabricated using a Ractive high performance automotive air filter ($19,99) filled with 2 lbs of Fluval activated carbon ($14,95). Fluval supplies a convenient holding bag which we cut into a disk overlapping the filter’s collar. This served as a retainer preventing back drafts from sending carbon into the duct and blower.
The other side of the closet’s back wall lands in the bathroom, it’s the bathtub and showerhead wall. We cut a hole directly above the showerhead and plugged the filter onto the duct leading from the closet blower:
If you intend to use activated carbon in an application similar to this one, be sure to choose low-ash media. This will minimize the risk of carbon micro particles making their way through your filter.
WATER SUPPLY
In an organic setting with tightly controlled irrigation, full grown canna plants still make for thirsty guests that will guzzle down water at a rate of 3-4 gallons per day. As mentioned earlier, my friend will need to travel once or twice a month and be away 2-5 days at a time. An automatic irrigation solution with a backup water supply of at least 30 gallons had to be devised.
One option might of been a 30 gallon ‘wheeled water tank’ (goggle it) available in the RV industry, which could be carted away to fill from rain water barrels. But how do you fit such a whopping container in what will become a leaf filled, cramped area the size of a closet? Speaking of whopping, even if it were second hand, how much would a tank that size cost? So much for that idea…
The only viable solution was to plug a high pressure hose onto the nearest cold water pipe and string it into the closet. But first, I’d have to run down to city hall and find out what kind of chemical soup they feed their citizens. Chlorine can be easily dissipated with aeration, but chloramines, fluoride and other plant hating chemicals and constituents are a whole other expensive ball game to get rid of.
Lady luck was on a roll. No sooner had I mentioned going to city hall, my friend stopped me straight in my tracks. It so happens his city’s water source is the same one used to fill one of the World’s finest bottled H2O (google “Eska Water”). People in that town wash their cars and water their lawns with Mother Nature’s unadulterated, esker-filtered spring water! Problem solved and man, did I ever drink lots of that wonderful water!
IRRIGATION
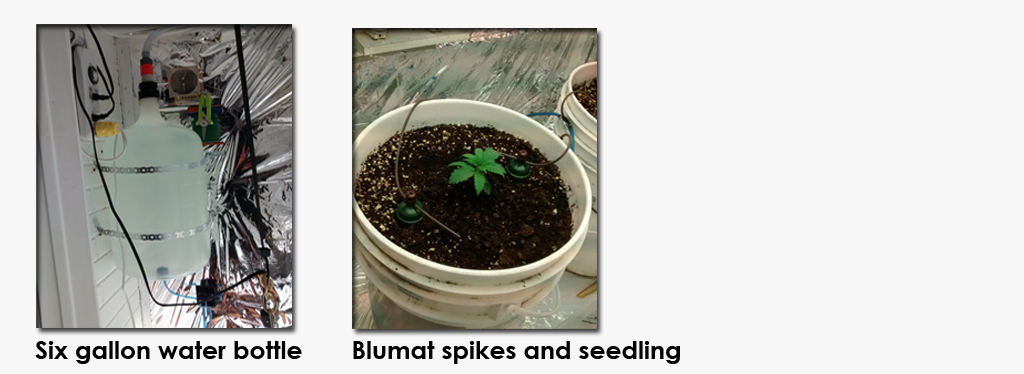
Irrigation was a no-brainer, we use controlled in-soil watering at our commercial operation. Tropf Blumat (ggogle it) spikes allow us to irrigate systematically and still have the ability to control individual plant sites. Driven by capillary action (no batteries or power source needed), each ceramic spike has its own valve, which automatically opens and shuts according to soil moisture. Blumat’s highest virtues include perfectly irrigated soil with virtually no runoff.
I installed 2 Blumats per 5 gallon bucket, one nine inch mid-soil spike and a five inch top-level model. Finally, I plugged their feed lines onto a 6 gallon polymer bottle using a Blumat pressure reducer. The bottle is plugged onto the high pressure water hose and also serves as a backup should city water briefly go down.
POWER
Everything was plugged into a Woods power bar with integrated (mechanical) timer. This cheap ($11,99) and convenient device has 4 timed plugs and 4 regular ones. Total power usage is 892 Watts, but I suggested he start using the side lighting at mid veg only. The blower won’t be needed until bloom. which cuts power usage considerably.
CONCLUSION
This auto-irrigated, carbon scrubbed closet grow cost under $250 and made for a fun filled project we finished in 3 days. Considering this is the price he’d pay for a few ounces of chemical-laden, cartel grown street shrub or even worse, having to support the Stock Exchange weed growers, I think it was well worth the effort.
I started my friend off with medicinal seedlings; Medicann’s Blue Blood and Sensi Seeds’ Hash Plant. His closet has room for two full grown plants, but I gave him a third, sacrificial seedling in case something goes wrong in the early stages of his grow.
Smaller expenses not mentioned above are included in the detailed list below.
HARDWARE
$2,00 Two emergency thermal blankets
$15,00 Three used T12 double lamp fixtures
$41,70 Six GE Plant & Aquarium 48” T12 lamps
$7,95 Aluminum channel 3’
$3,98 #10 flat head machine screws and nuts
$10,00 Pair of plant basket ratchet pulleys
$4.99 Pair of screw-in hooks
$1.99 Ornamental chain
$20,00 Used clothes dryer
$4,99 Semi rigid 4” aluminum duct
$19,99 Ractive automotive air filter
$14,95 Fluval Activated Carbon 2lbs
$10,00 High pressure hose
$18,00 Tropf Blumat Maxi (9”) Set of 2
$14,00 Tropf Blumat Garden (5”) Set of 2
$26,00 Tropf Blumat Pressure Reducer
$2,98 Marina triple valve
$5,99 Marina Tubing
$12,95 Clamp-on fan
$11,99 Woods power bar with integrated timer
===========================================
TOTAL $249,45
Hopefully this information will be of some use to other people and is written with the layman in mind. Not all of these ideas are original, so thanks and praise go out to other contributors who’ve seeded them over the years…
FLOOR PLAN
His closet is 3 feet wide with its doorway at an angle, one wall is 5 feet long and the other 4 feet. He had two small shelves at top corners of the 5 foot wall, which I put to good use. Here is a plan I prepared before we started:
We began by covering the entire floor and walls (¾ of the way up) with emergency thermal blankets. These have a slightly diffused reflective property, they provide splash proofing and best of all can be purchased cheaply at discount dollar stores. Depending on choice of lighting, anyone considering using these might want to read about hot spots and alternatives to mitigate them such as more expensive Mylar.
OVERHEAD LIGHTING
Unfortunately for my buddy, he had already purchased his canopy light before contacting me. During a recent trip south, a hydroponics store seduced him into buying flimsy, over hyped and expensive gear ---> Sunblaster T5 fixtures, lamps and reflectors. I’m sour grapes about it because he’s a severely ill, life long friend who’s one step away from hitting food banks and these pressure cooker salesmen fill his trunk with $300 worth of cheaply built lights, arghhhh.
For a company professing to serve the "horticulture industry", Sunblaster falls way off my scepticism scale. While setting up these cabinet-style fixtures into a light strip, the lamp end-cap connectors would fall off their aluminum channels. Sunblaster claims their products are rated IP65 (dust and water resistant), but a lot of good that will do if one of those connectors is offset while foliating plants. Furthermore, should someone bump into the light strip and a cap flies off like they so easily did in my hands, so will the lamp it’s meant to hold! I emailed the company and have yet to get a reply, I guess product quality is not the only shortcoming at Sunblaster. In all fairness though, their website looks nice. Anyways, moving on…
The 7 fixtures he bought are the 3' models. The fist thing I did was to secure the end-caps using 14 self-tapping metal screws driven through the aluminum channels and slightly into the underlying plastic connectors.
Next, I fabricated light strip hanger bars using two pieces of 14½" aluminum channels (half inch size) sourced at the local hardware store. Sunblaster supplies snap-on mounting clips with centered holes in them. Using an 11/64 bit, I drilled 7 holes evenly spaced 2¼ inches apart along the length of both aluminum channels. The 14 mounting clips were fastened on using #10 flat head machine screws and nuts. With the lamp reflectors installed, this configuration spaces the fixtures half an inch apart for a total width of 16½ inches:
I later discovered Sunblaster sells plastic hanger bars, but if they’re as useless as the holding clips they provide, your light strip will come crashing down on a whim. I’m glad the hydroponics store messed that one up, my pal surely would have bought them.
I wanted to gain extra length to cover his shortest (4' wall) run. This was solved by offsetting each fixture by 6 inches. Ornamental chains were installed using 4 tie wraps at each corner. Finally, the light strip was hung from the ceiling using 2 screw-in hooks and cheap ($5 each) plant basket ratchet pulleys.
SIDE LIGHTING
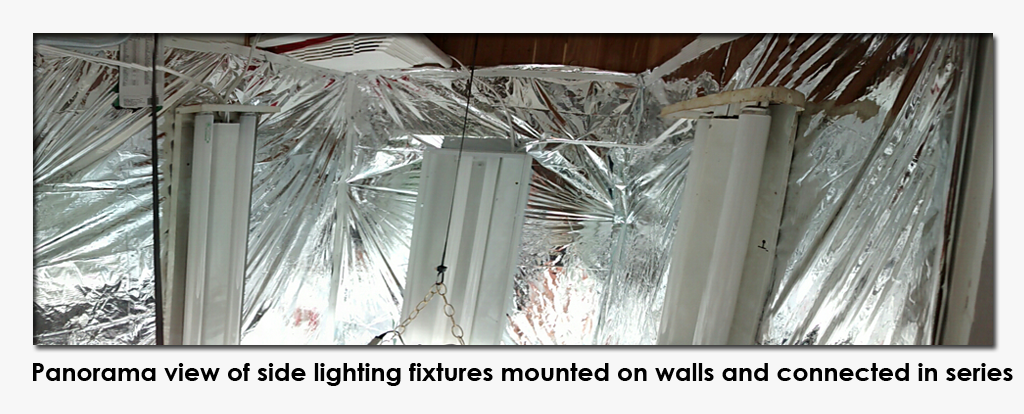
For side lighting purposes, I visited his local electrician and asked if he had any used 48" T12 double lamp fixtures. Sure enough, he had plenty and was glad to offload 3 at $5 each. Electrical shops are dismantling these from commercial buildings by the thousands as they swap them out for LED lights. This is how I could of spared my buddy from that disappointing $300 Sunblaster purchase. By buying an extra 3 fixtures and disassembling them, I could of built a sturdy, 6 lamp overhead light strip for under $40,00!
If you go hunting for T12 fixtures, be sure to remove their covers checking that they contain ballasts (black rectangular box), but don't be too distraught if some of them don't work. Try choosing the newest looking fixtures and buy more than needed for the job at hand. If you're lucky and happen to drop by on a day they have a truckload, you'll get them for free. You can also easily convert your fixtures to use more efficient T8 lamps, they have the same pin size as T12 lamps.
Back at my friend's place, I tested the fixtures one by one and they worked perfectly. We mounted a box on each wall, wired them in series (one electrical cord to plug in) and headed back to the hardware store to buy 6 lamps. I had him purchase GE's Wide Spectrum tubes at $6,95 each, which is a fair price for a 3 year (20h cycle) lamp. We use these at our commercial (food) grow so I’m familiar with their efficiency, but don't just take my word for it and google “Fluorescent Plant Lighting – Wayne”. Reference data is also available on GE's website.
VENTILLATION
CFM (cubic feet per minute) ratings are not the be-all, end-all of air movement. A desktop fan can displace 200 CFM, but hook it up to a duct with a carbon scrubber located downstream and you're SOL. What is also needed is power, as in horse power.
In such a confined space, lighting will generate and trap lots of heat, which is no friend of electrical components or smelly plants for that matter. In trying to come up with an efficient, inexpensive, quiet and reliable ventilation solution for my friend's dream closet, I thought; what industry needs to achieve all this on a tight budget? After more than a few therapeutic vapes, it finally hit me, the home appliance business!
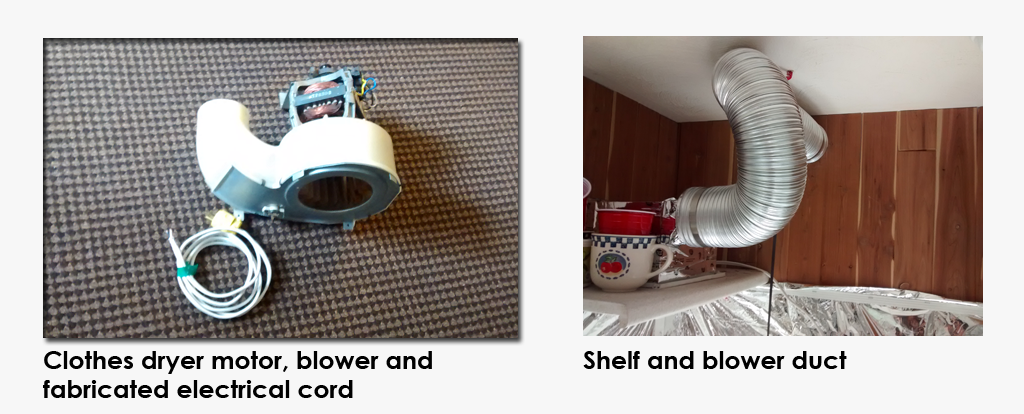
A clothes dryer needs to be quiet, reliable and powerful as its motor not only drives the blower, but also the drum that tumbles damp, heavy wash loads. Dryer blowers displace anywhere from 160 to 300 CFM and are equipped with ¼ HP to 1HP electric motors. As an added bonus, these blower housings come ready to plug onto 4” ducts without the slightest modification:
Used dryers can be found all over the place from free to under $60. I found a second hand dryer at the town’s recycling facility for $20, easily removed its blower and installed it on one of the closet’s top shelves.
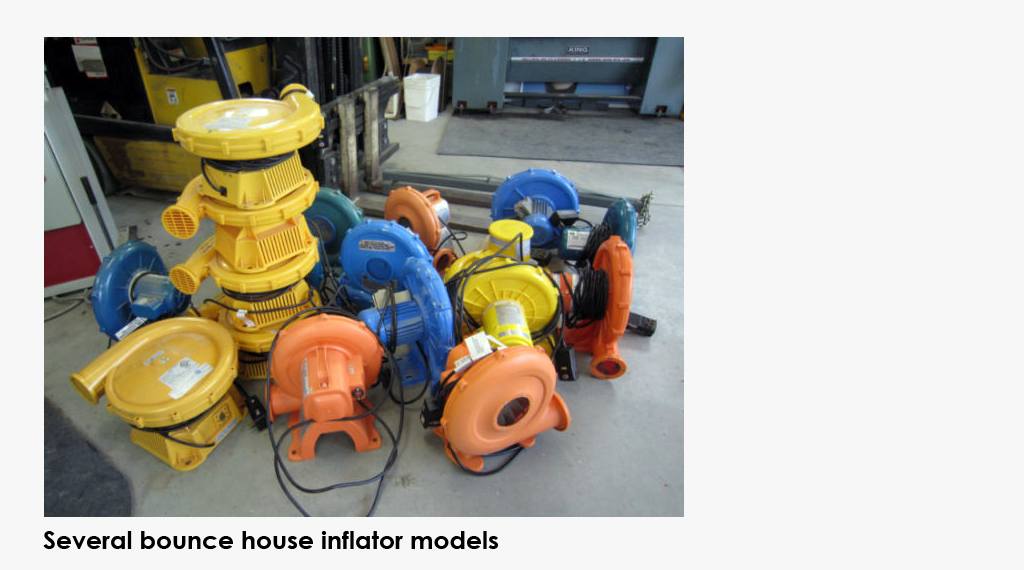
If a clothes dryer is out of reach, another cheap, plug and play alternative is a used bouncy house inflator. These high static (as in static pressure) blowers are reliable and have power to spare, especially models in the 2HP, 1500 CFM range. Here’s an image I found on Ebay, the person was unloading several models:
CARBON SCRUBBER
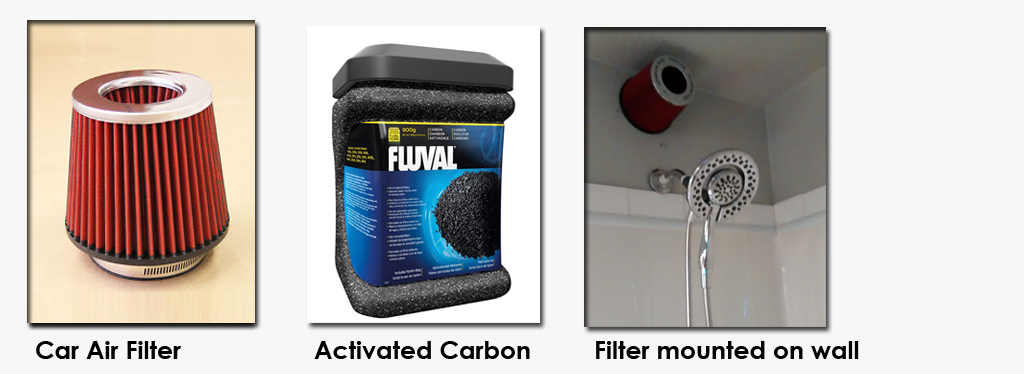
While moving lots of hot air, we might as well clean the unavoidable odours that will occur once the plants are in bloom. An on-the-cheap scrubber was fabricated using a Ractive high performance automotive air filter ($19,99) filled with 2 lbs of Fluval activated carbon ($14,95). Fluval supplies a convenient holding bag which we cut into a disk overlapping the filter’s collar. This served as a retainer preventing back drafts from sending carbon into the duct and blower.
The other side of the closet’s back wall lands in the bathroom, it’s the bathtub and showerhead wall. We cut a hole directly above the showerhead and plugged the filter onto the duct leading from the closet blower:
If you intend to use activated carbon in an application similar to this one, be sure to choose low-ash media. This will minimize the risk of carbon micro particles making their way through your filter.
WATER SUPPLY
In an organic setting with tightly controlled irrigation, full grown canna plants still make for thirsty guests that will guzzle down water at a rate of 3-4 gallons per day. As mentioned earlier, my friend will need to travel once or twice a month and be away 2-5 days at a time. An automatic irrigation solution with a backup water supply of at least 30 gallons had to be devised.
One option might of been a 30 gallon ‘wheeled water tank’ (goggle it) available in the RV industry, which could be carted away to fill from rain water barrels. But how do you fit such a whopping container in what will become a leaf filled, cramped area the size of a closet? Speaking of whopping, even if it were second hand, how much would a tank that size cost? So much for that idea…
The only viable solution was to plug a high pressure hose onto the nearest cold water pipe and string it into the closet. But first, I’d have to run down to city hall and find out what kind of chemical soup they feed their citizens. Chlorine can be easily dissipated with aeration, but chloramines, fluoride and other plant hating chemicals and constituents are a whole other expensive ball game to get rid of.
Lady luck was on a roll. No sooner had I mentioned going to city hall, my friend stopped me straight in my tracks. It so happens his city’s water source is the same one used to fill one of the World’s finest bottled H2O (google “Eska Water”). People in that town wash their cars and water their lawns with Mother Nature’s unadulterated, esker-filtered spring water! Problem solved and man, did I ever drink lots of that wonderful water!
IRRIGATION
Irrigation was a no-brainer, we use controlled in-soil watering at our commercial operation. Tropf Blumat (ggogle it) spikes allow us to irrigate systematically and still have the ability to control individual plant sites. Driven by capillary action (no batteries or power source needed), each ceramic spike has its own valve, which automatically opens and shuts according to soil moisture. Blumat’s highest virtues include perfectly irrigated soil with virtually no runoff.
I installed 2 Blumats per 5 gallon bucket, one nine inch mid-soil spike and a five inch top-level model. Finally, I plugged their feed lines onto a 6 gallon polymer bottle using a Blumat pressure reducer. The bottle is plugged onto the high pressure water hose and also serves as a backup should city water briefly go down.
POWER
Everything was plugged into a Woods power bar with integrated (mechanical) timer. This cheap ($11,99) and convenient device has 4 timed plugs and 4 regular ones. Total power usage is 892 Watts, but I suggested he start using the side lighting at mid veg only. The blower won’t be needed until bloom. which cuts power usage considerably.
CONCLUSION
This auto-irrigated, carbon scrubbed closet grow cost under $250 and made for a fun filled project we finished in 3 days. Considering this is the price he’d pay for a few ounces of chemical-laden, cartel grown street shrub or even worse, having to support the Stock Exchange weed growers, I think it was well worth the effort.
I started my friend off with medicinal seedlings; Medicann’s Blue Blood and Sensi Seeds’ Hash Plant. His closet has room for two full grown plants, but I gave him a third, sacrificial seedling in case something goes wrong in the early stages of his grow.
Smaller expenses not mentioned above are included in the detailed list below.
HARDWARE
$2,00 Two emergency thermal blankets
$15,00 Three used T12 double lamp fixtures
$41,70 Six GE Plant & Aquarium 48” T12 lamps
$7,95 Aluminum channel 3’
$3,98 #10 flat head machine screws and nuts
$10,00 Pair of plant basket ratchet pulleys
$4.99 Pair of screw-in hooks
$1.99 Ornamental chain
$20,00 Used clothes dryer
$4,99 Semi rigid 4” aluminum duct
$19,99 Ractive automotive air filter
$14,95 Fluval Activated Carbon 2lbs
$10,00 High pressure hose
$18,00 Tropf Blumat Maxi (9”) Set of 2
$14,00 Tropf Blumat Garden (5”) Set of 2
$26,00 Tropf Blumat Pressure Reducer
$2,98 Marina triple valve
$5,99 Marina Tubing
$12,95 Clamp-on fan
$11,99 Woods power bar with integrated timer
===========================================
TOTAL $249,45
