

Muttt
New Member
A friend of mine liked the box I built to grow in. He asked me to help him build one. We'll be doing that here. There'll be alot of back and forth and questions by everyone is welcome. Bear with me/us, this will be a ongoing thing. So, you'll have to wait for updates.
The first thing that needs to be built is the base of the box. The base will be made from 2 x 4's and the sides, floor and roof of the box will all be made from 1/2 inch plywood. I prefer plywood over particle board because it is stronger. But, it also costs more.
The ventilation for this box will come up through the floor. So, you'll need to drill 3/4 or 1 inch holes in the 2x4's and the bottom of the floor. This will allow air to come in through the floor and be drawn up through the box and then vented out through the top of the box (by the carbon filter). This ensures that heat, humidity and stale air will all be sucked out through the filter. The fresh air will come from the floor and since cool air drops and so does CO2, the fresh air should be cooler and have more CO2 then you would get from an intake at the top of the box. Here's what the bottom frame should look like ....
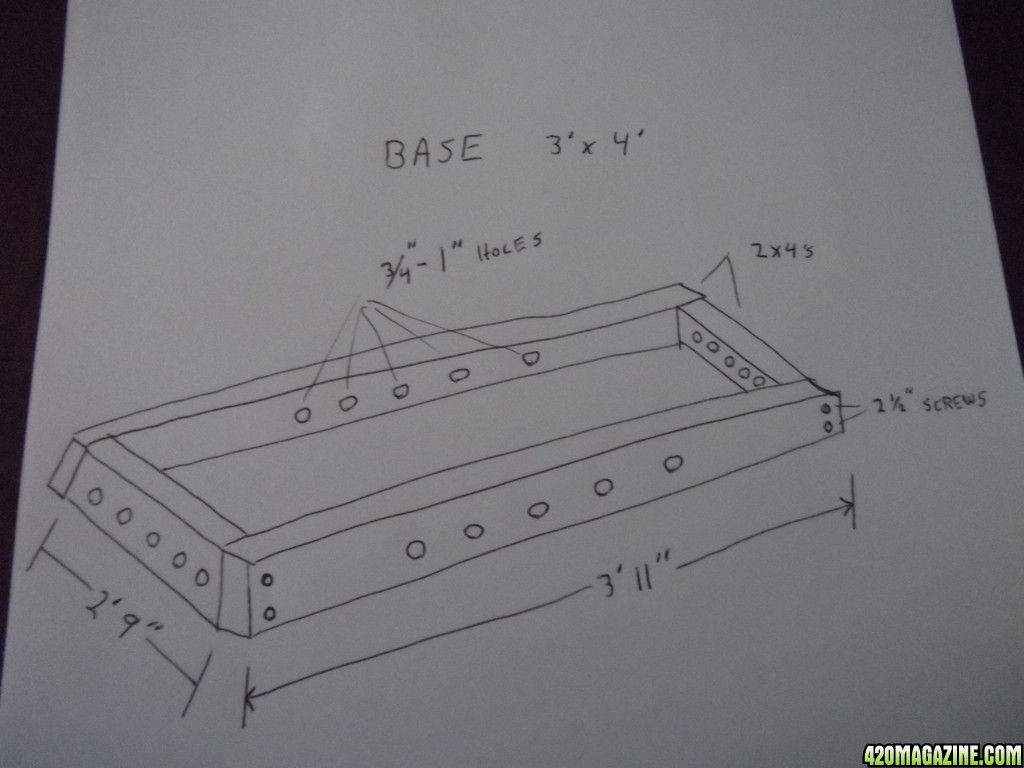
I used 2 1/2 inch dry wall screws to screw together the 2 x 4's . You don't need to drill a hole first. But it cant hurt. I use a drill with a screw driver bit to screw everything together. As you can see, you need to drill holes in the 2x4's to let air through.
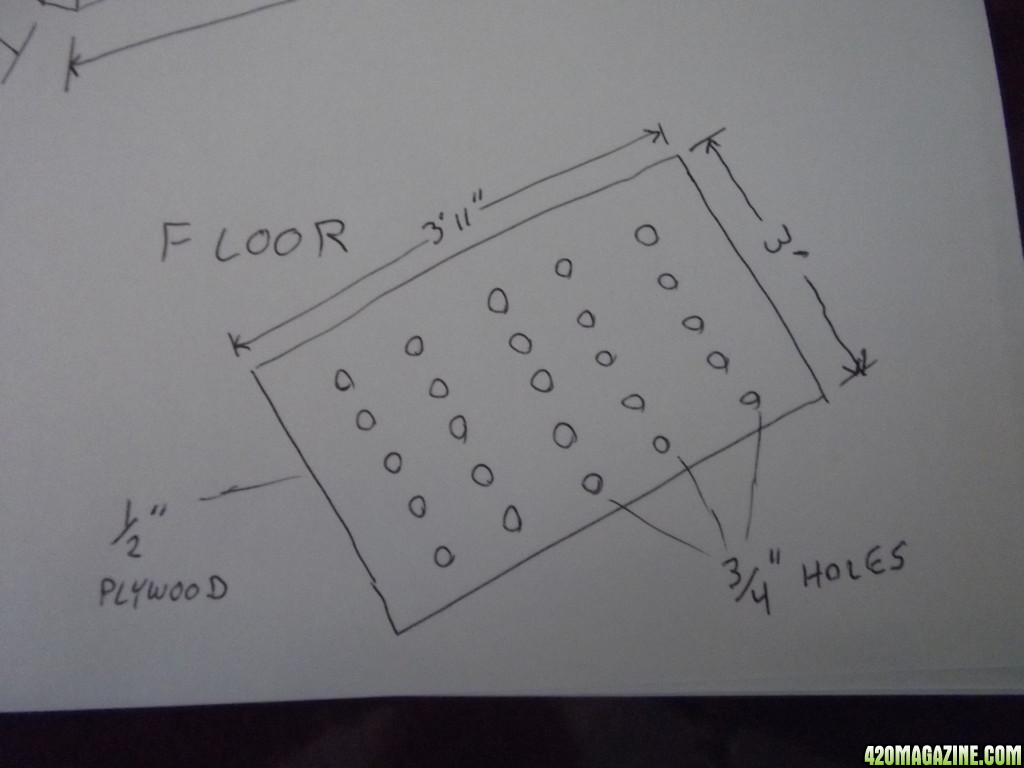
Then you need to make a floor. You need to cut a piece of 1/2 inch plywood that is the same size as the platform you just made. You also need to drill holes in the 1/2 plywood floor (to let air through). I just use a cheap spade bit to make the holes. YOu can attach foam or screen over the holes (under the bottom) to keep bugs and stuff out. The floor should look like this ................
Then, you simply take the floor panel and lay it on top of the 2x4 frame. Take 1 1/2 inch drywall screws and use them to screw the floor to the frame. I put at least three screws on each side. Now you should have the base of your box finished. The next thing you'll need to do is attach the sides. You will need to sides. They need to be 3 feet wide and 6 feet tall (or as tall as you can use it ... up to 8 feet), so you'll have to cut a 1 ft strip off of a sheet of 1/2 inch plywood. Cut both sheets of plywood at the same time. That way, both sides of your box will be exactly the same size (3 ft x 6 ft ..... or 3 ft by 8 ft if your room is tall enough for an 8 ft box) (for the rest of this build, we will assume that we are a building a 6 ft box.
Any questions so far?????
The first thing that needs to be built is the base of the box. The base will be made from 2 x 4's and the sides, floor and roof of the box will all be made from 1/2 inch plywood. I prefer plywood over particle board because it is stronger. But, it also costs more.
The ventilation for this box will come up through the floor. So, you'll need to drill 3/4 or 1 inch holes in the 2x4's and the bottom of the floor. This will allow air to come in through the floor and be drawn up through the box and then vented out through the top of the box (by the carbon filter). This ensures that heat, humidity and stale air will all be sucked out through the filter. The fresh air will come from the floor and since cool air drops and so does CO2, the fresh air should be cooler and have more CO2 then you would get from an intake at the top of the box. Here's what the bottom frame should look like ....
I used 2 1/2 inch dry wall screws to screw together the 2 x 4's . You don't need to drill a hole first. But it cant hurt. I use a drill with a screw driver bit to screw everything together. As you can see, you need to drill holes in the 2x4's to let air through.
Then you need to make a floor. You need to cut a piece of 1/2 inch plywood that is the same size as the platform you just made. You also need to drill holes in the 1/2 plywood floor (to let air through). I just use a cheap spade bit to make the holes. YOu can attach foam or screen over the holes (under the bottom) to keep bugs and stuff out. The floor should look like this ................
Then, you simply take the floor panel and lay it on top of the 2x4 frame. Take 1 1/2 inch drywall screws and use them to screw the floor to the frame. I put at least three screws on each side. Now you should have the base of your box finished. The next thing you'll need to do is attach the sides. You will need to sides. They need to be 3 feet wide and 6 feet tall (or as tall as you can use it ... up to 8 feet), so you'll have to cut a 1 ft strip off of a sheet of 1/2 inch plywood. Cut both sheets of plywood at the same time. That way, both sides of your box will be exactly the same size (3 ft x 6 ft ..... or 3 ft by 8 ft if your room is tall enough for an 8 ft box) (for the rest of this build, we will assume that we are a building a 6 ft box.
Any questions so far?????