Perfect Sun LED
Well-Known Member
After seeing the prices of intake fans, venting fans, I decided to build my own. I strolled around Walmart for a while before I found cheap parts, and homedepo.
Parts.
1. Plastic Pitcher, about 8inches diameter. You could also use a 7 or 8 inch PVC pipe, but it will be much heavier. Not sure you want that if you are using a tent.
2. Metal Ruler. Or a piece of metal that is bendable and about as thick as a ruler. Sheet metal cut to size from Homedepot would work. It was closed, so I found the ruler at Walmart, open 24-7. I didn't feel like waiting until the next day.
3. A stove fan, the kind that go above the stove, I think called a stove range fan or something. I found one at Home Depot for $14.
Total cost per fan with parts $19. These babies pull and push a lot of air.
First I sawed the handles off the pictures with a hacksaw. Then I sawed the closed end off, so that it was a tube.
I cute the ruler into two pices 10 inches long, this way I could bend the ends 1 inch, so that the length is 8 inches and will fit inside the tube. Next, I drilled small holes in the bent sides and in the tube so I could screw it in. Then I drilled holes in the long part so the fan would fit.
Okay, so when you open the fan, it will be attached to a metal piece, usually square. The fan will pop off. Just slowly pull until it comes off. It takes some force. Then unscrew two screws so you can remove the fan motor from the metal it is attached to. Measure the distance of the three holes in that bracket and duplicate them in the center of the ruler. Now your fan will slide into the ruler. Put the fan back on. Walla.
Place the fan with new bracket inside the tube you built. Screw screws in the holes to hold it in place. To be most secure, you should drill two holes in the side parts, so you can put two screws on each side.
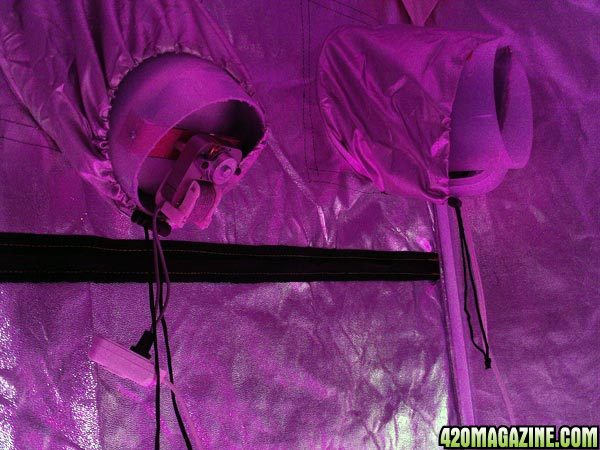
You can put these babies in the holes, or fit them to each side of venting tubes. I places them at the top of my tent, one blowing in and one out. I just used the tents tie tubes to secure it.
I don't need to vent any lights because I use CFL and LED
If you would like to see a video process of making these, I might make one more and maybe sell it ob ebay or something.
They move about 70cfm. Keep in mind, the higher the cfm the more costy. However, if you leave them on all the time, they will complete replace the room's air in 30 minutes I am sure. They seem to be more than enough to keep fresh air in the 4x4x8 tent.
Parts.
1. Plastic Pitcher, about 8inches diameter. You could also use a 7 or 8 inch PVC pipe, but it will be much heavier. Not sure you want that if you are using a tent.
2. Metal Ruler. Or a piece of metal that is bendable and about as thick as a ruler. Sheet metal cut to size from Homedepot would work. It was closed, so I found the ruler at Walmart, open 24-7. I didn't feel like waiting until the next day.
3. A stove fan, the kind that go above the stove, I think called a stove range fan or something. I found one at Home Depot for $14.
Total cost per fan with parts $19. These babies pull and push a lot of air.
First I sawed the handles off the pictures with a hacksaw. Then I sawed the closed end off, so that it was a tube.
I cute the ruler into two pices 10 inches long, this way I could bend the ends 1 inch, so that the length is 8 inches and will fit inside the tube. Next, I drilled small holes in the bent sides and in the tube so I could screw it in. Then I drilled holes in the long part so the fan would fit.
Okay, so when you open the fan, it will be attached to a metal piece, usually square. The fan will pop off. Just slowly pull until it comes off. It takes some force. Then unscrew two screws so you can remove the fan motor from the metal it is attached to. Measure the distance of the three holes in that bracket and duplicate them in the center of the ruler. Now your fan will slide into the ruler. Put the fan back on. Walla.
Place the fan with new bracket inside the tube you built. Screw screws in the holes to hold it in place. To be most secure, you should drill two holes in the side parts, so you can put two screws on each side.
You can put these babies in the holes, or fit them to each side of venting tubes. I places them at the top of my tent, one blowing in and one out. I just used the tents tie tubes to secure it.
I don't need to vent any lights because I use CFL and LED
If you would like to see a video process of making these, I might make one more and maybe sell it ob ebay or something.
They move about 70cfm. Keep in mind, the higher the cfm the more costy. However, if you leave them on all the time, they will complete replace the room's air in 30 minutes I am sure. They seem to be more than enough to keep fresh air in the 4x4x8 tent.
")