Germination Setup Question

Dean Moriarty

New Member
Are there any foreseeable problems with this?

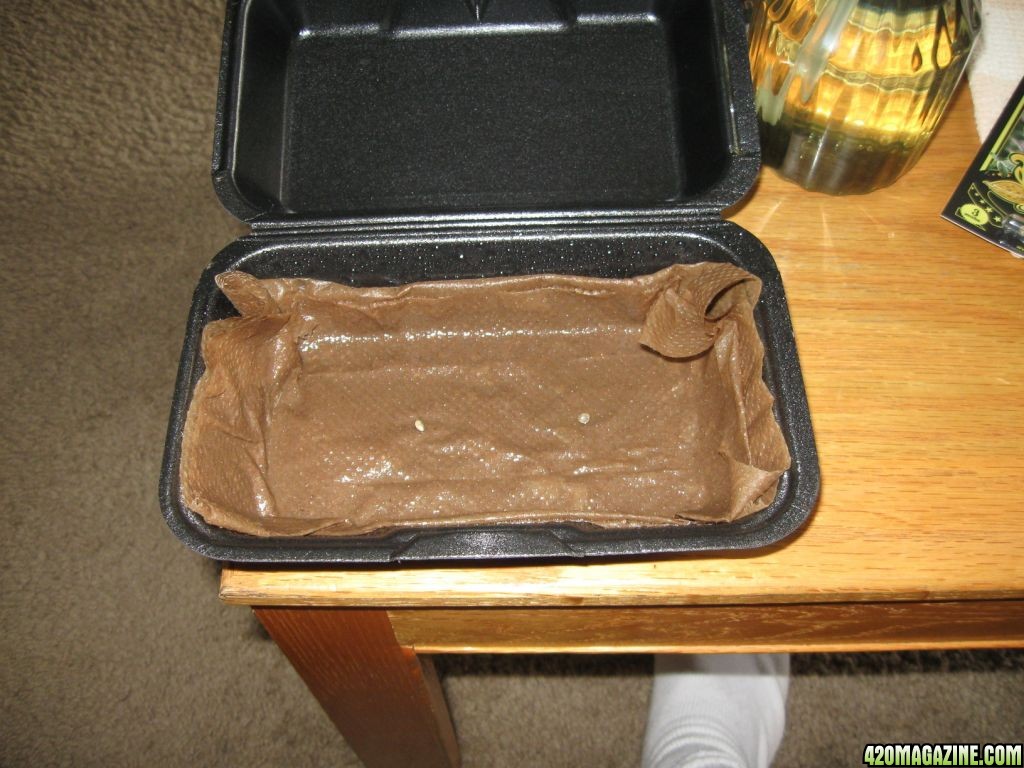
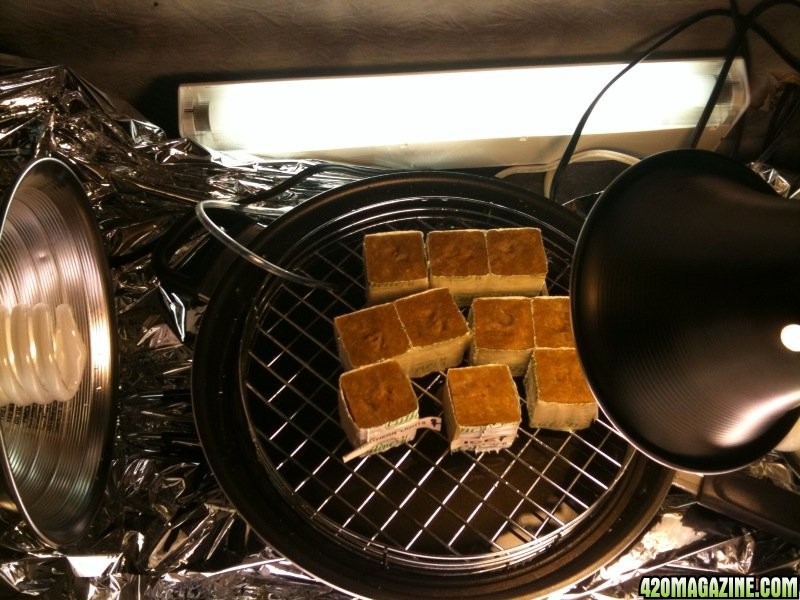
Rockwool cubes were soaked for 24 hours in distilled water adjusted to the pH 5-6 range. Cubes were then shaken out and placed on the rack to drain (I had a pan about two inches deep that includes a grate and lid, which seemed like an ideal place to germinate as the excess water could run off and there would also be room for root growth should the cubes get dry). Seeds were placed in the rockwool about a day and a half ago and the holes were pinched closed.

In order to maintain a warm, humid climate while simultaneously giving the sprouts exposure to light immediately after germination and roots room to develop, the pan was placed in the grow cabinet (not currently ventilated but this will be fixed before vegetation) with some fluorescents on). An airstone attached to a pump was placed in the water-filled pan. After 24 hours, I noticed the water level in the pan was at about the half-way mark so I topped it off with a pH-adjusted "seedling mix" of 2.5 mL each of Grow, Bloom, and Vigor nutrients dissolved in a gallon of distilled water.

It has now been just shy of two days and I have not yet noticed any growth. There are three Master Kush, two feminized AK-48, one each of feminized Ice and Northern Lights, and three beefsteak tomato seeds.

germination3.jpg
 
Dean,

I'm a newbie to growing, but one thing I've found out is that Roseman is giving you excellent advice. Pre-soak the seeds first, before doing anything else.

I pre-soak my seeds for about 14-16 hours, before putting them in a paper towel. My germination rates, for high quality seeds, is 100% (about 30 out of 30 seeds). Often, I get 1/2 inch roots, ready out of a pre-soaked seed, 6-8 hours after transferring to a wet paper towel.

Hope this helps.

Searcher
 
So soak seeds 8-24 hrs in PH'd water of 5-6 without any nutes. Also soak cubes in the same type PH water for 24 Hr's. Once seed root tap comes out place in cube about the seeds depth close the hole and place under how much lighting would you say? I have read many germ techniques but dunno the BEST germination method. Plan on ordering my seeds in about a week or so
 
Myzz,

After you soak the seed and the rockwool, put the seed inside the rockwool. No need to wait for the taproot to come out of the seed. When you soak your seeds for ~ 8-16 hours, the seed will fill up with water and ignite the germination process. Tap root will probably start to develop within 24 hours while it is inside the rockwool. If it has not already started while pre-soaking. I use a perlite/vermicilite mix myself, but from what I've read it is the same principle as rockwool. Getting my first rockwool cubes this weekend. I think those will be easier to deal with than perlite mix for seed germination and early seedling development.

My germination rack is 3, 18 inch slots that easily holds about 18, 2 inch grow cups. For lighting, I use 4 each, 18 inch florescents. Cheapest ones I could find. I first place the lights about 4-5 inches above the top of the seed cups.
Once the seedlings have sprouted and extended the cotyledons (SP?), I lower the 18 in. florescents to about 2 inches above the seedlings. So far this method has worked extremely well for me.

Once myseedling have 3 sets of true leaves and I can see number 4 peeking out the top, I start feeding them 25% and transfer them to vegging and gradually up nutes to normal levels. If my leaves start turning yellow due to nitrogen deficiency, I will start with the 25% solution before the 4th set of leaves starts growing. I've only had that happen a couple times when 3 sets of leaves were already fully developed and the 4th set seemed to be taking its time on popping out.

Sorry the post is so long. Hope it helps.

:goodluck:
Searcher
 
Thank you searcher. It is not long at all believe me. All i do is read on this site and some posts I have to print out and read on the train. This is not one of them and seems pretty basic. I'll prob use bag seeds to test out my germ tech before using the seeds I purchase. Let me know how things go once you get your rockwool and germ with that :)
 
Thanks for the advice! The 16th passed so I am now worrying ;)
I pulled them off of the rack and shook out excess water and put them into my trunk for warmth.

Another batch just soaked overnight till a small taproot appeared and were planted in rockwool.

A third group was germed on paper towels and transplanted.

A forth and fifth are currently on towels and a jar respectively.

The germed and planted seeds are all in rockwool in a Tupperware in the trunk until the cotyledon breaks through :)
 
Dean,

Are you using any lighting at all before the cots pop out? I may of misread your post, but it seemed that you are starting your seedlings, after germination, in the dark. Has this worked well for you?

I know I've got a lot to learn, but I thought that if young seedlings are not provided some mild light - not enough to burn them e.g. 18w flouros - they may not pop out as fast? But then again, I've never tried nurturing a young seedling without light.

:peacetwo:
Searcher
 
Myzz,

I like your idea about experimenting with bag seed. Then buying quality. That's the route I took, and it saved me lots of money.:thumb:

:goodluck:
Searcher
 
there are so many germination techniques, some of which are far more complicated than they need to be.. I just pop my seeds in wet paper towels between paper plates, keep moist for 48 hours and i usually have half inch roots by then. Pop them in some dirt, wait another day and they're generally above ground and opening.
 
this is how i germ, ill see inch long tap roots in 24 -72 hrs. lay down a thin layer of paper towel spray it wet drop the seeds down then another layer on top spray that and close the lid. i prefer the brown paper towels over white because there are no bleaching agents..

rsz_img_0967.jpg
 
Dean,

Are you using any lighting at all before the cots pop out? I may of misread your post, but it seemed that you are starting your seedlings, after germination, in the dark. Has this worked well for you?

I know I've got a lot to learn, but I thought that if young seedlings are not provided some mild light - not enough to burn them e.g. 18w flouros - they may not pop out as fast? But then again, I've never tried nurturing a young seedling without light.

:peacetwo:
Searcher

Yes, the original setup was in that picture under some mild fluoros.

So far, having tried directly planting in rockwool, soaking seeds, and paper towels, paper towels have had the highest success rate for me.
 
Shoot. The sprouts I have are beginning to wilt. One directly under the 26W CFL looks lightly toasted. I came home to find the resevoir 3/4 depleted (it only holds
about half a gallon) and most of the seedlings laying on their sides. I topped it off with 1/4 gallon of distiller water, a splash of already half strength nutes, and a drop of superthrive.

Any suggestions? They're only a few days old and in rockwool.

Yeah, I've got a few suggestions:

I assume you're going hydro?

If that's the case, germinate like this:

1.)Soak seeds for 20 minutes in a mild bleach solution (1 tsp per gallon of water)
2.)Soak the same seeds as above for 12 hours in water
3.)plant the seeds in rapid rooter, root riot.....or, if you must, rockwool.

Keep the T5's or other light source an inch or two above the plugs.....the first few hours of a seedlings life determines sex and the overall health of the plant.

If you're growing in soil, do the above but put the seedling in a small pot for germination on step 3....a solo cup with drain holes works great.

Here are the facts....not the Pot forum facts, or the opinions, or the traditions, but the facts based on botany and horticultural practice.

Roots should never see the light, neither should they be handled! The paper towell method is a testament to the hardiness of our plants.....it is NOT a great way to germinate seeds!

Here's what a living legend of MJ growing has to say about germing seeds:

Please note the dose of P right after transplant. Phosphorus is for roots.....NOT bloom.

Also, if you're going into a hydro medium you don't need to worry about sterilizing soil, etc. Just germ in the rapid rooter plugs, etc.

Rockwool is tricky, I'm told. None of the pro-growers I know use it, and the guys in the horticultural department at the university don't use it either.....at least not for 20 years.

Germinating Cannabis Seeds (for Bio Growers)


This is my foolproof method for Cannabis Seed Germination in soil, by Uncle Ben:

First, if harvesting seeds from my own crosses, I air-dry newly harvested seeds for a couple of weeks, and then store them in the refrigerator with a little rice. Cold-treatment seems to increase viability and germination rates, especially with indica-dom strains. I almost always get a 100% germination rate with quality seedstock.

Soak the seeds in plain water for 12 hours prior to planting to hydrate them, which will speed up germination. In general, good seeds will sink, bad seeds will remain floating (they contain air, not an embryo). I first sterilize seeds in a bleach solution (1 Tbsp. bleach/1 gallon of water) for 1/2 hour to kill any fungus residing on the seedcoat.

Sterilize enough *damp* fine soil with heat to germinate all of your seeds. You can do this by treating the damp soil to temps of (no more than) 200F for 20 mins in a conventional oven, or in a microwave oven on high for 2 minutes, while stirring a couple of times. Let the mix cool thoroughly. This will insure that damp-off fungus spores have been killed in the soil mix. Make sure the soil mix is light and humusy (not real coarse). You can add a little sand or vermiculite to aid in drainage and weight. Stay away from perlite, it has a nasty habit of floating out of the mix (if you do indeed need to water later).

Buy some white 20oz styrofoam "drinking glasses", commonly called "Styro-Cups", and punch holes in the bottom (and side bottom) for drainage. I use a red-hot ice pick for this. These containers are 6 1/2" tall and will allow ample room for the taproot to grow before cotyledon emergence which will increase your seedling's vigor. The taproot (radicle) is already at least 4" long at the point of emergence - don't restrict it (in order to maximize seedling growth rate). Styro-Cups can be found on the shelf displaying picnic items at your local grocery store.

Fill the pots almost to the top with your soil mix, water well to settle the mix, take a pencil and make a small hole about 1/4" to 1/2" deep, NO deeper, and drop *one* seed in. Cover the seed with *fine* soil, only enough to top up the hole, firm lightly with your finger, and lightly water until water runs freely thru the drain holes. Place in a warm spot around 80F/26C. Do NOT cover the cup with saran wrap or anything else. The seed has been hydrated from the soaking and will germinate soon. This container should not require further watering until the seedling is up and running.

Your seedlings will be alot better off if you germinate directly in soil - less handling and mechanical disturbance means less chance of physical damage to the plant's taproot and less food reserves used to position itself due to the natural hormonal influence called Gravitropism.

During the first couple of days, mist the top soil surface lightly (if need be), never allowing the top 1/2" to dry out, but not to the point that the medium stays waterlogged which will invite rot. "Less is more" at this point. Do NOT water this pot any more until the seedling is up, and only if it needs it at the point of emergence. Again, no need to cover with plastic wrap as the radicle will grow at least 4" before the cotyledons emerge from the soil. IOW, even though you can't see it, the plant's root is seeking and finding moisture at the container's lower soil levels. I cannot emphasize this enough.

That's all to it! With good care, your faves will be ready to transplant within 1 to 2 weeks, and will easily slip out of the "cup" with a solid rootball that will never know it's been disturbed if potted up gently and quickly. Move up to a final pot of 3 to 5 gallons to sex and finish.

An effective transplant solution can be made using (no more than) 1 teaspoon of a 15-30-15 fert and 10 drops of Superthrive per gallon of water. Take note regarding the immediate growth spurt after this!
 
Thank you! I was just soaking a new batch of seeds as a backup. I am almost out of rockwool; instead of picking up more, I'll check for rapid rooters at the hydro shop.

Any ideas about the sprouts in rockwool that are suddenly wilting? They are under two 26W cfls with side lighting provided by two 14" fluoro tubes.
 
Back
Top Bottom