SommerVirelli
Well-Known Member
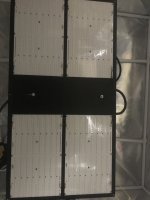
This thread will be dedicated to my HLG-550 R-spec build. I couldn’t afford straight out buying a kit, so I’m buying it in separate pieces. It will be a month before I have everything assembled, but I had finally decided on how I wanted to do the build. Many thanks to those who’ve helped me this far!
I’ve learned many things about the HLG builds. Not just the kit, but all their quantum board builds. I knew I wanted one of the quad board units, but wasn’t sure which one would suit me best or even what the differences were. Turns out the only real difference between the 550 and 600 kit is the driver. That’s it. Well, that and what spectrum of board you want to run.
There are a few drivers HLG has actually used for these kits and builds and even more options that would make a nice fit for a build, depending on wether you were to run series or parallel, and how hard you wanted to run them:
Meanwell HLG-480-54A (or B)
Meanwell HLG-480-2100A (or B)
Meanwell HLG-480-2800A (or B)
Meanwell HLG-600-54A (or B)
Inventronics EUD-600S280DT
Inventronics EUD-480S280DT
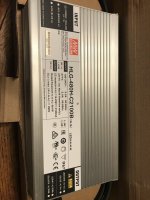
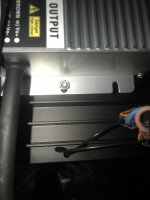
I almost went mad in the beginning trying to understand what driver I needed. I’ve learned a lot about driver and now all the numbers aren’t scary. After much thinking on what would meet my needs, I decided to go on the HLG-480-2100B. With this model I can still hit over 1000 PPFD while consuming much less power. I could go with a 600w model that could hit numbers over 1500 if I was pumping my room with co2, but right now, it’s not needed. Right now less is more. And at 2100mA I’m not pushing the boards as hard.
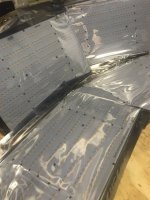
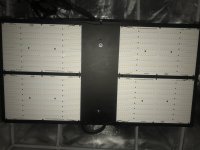
Yesterday I got my 4 HLG 288 v2 r-spec boards. Next payday is the driver, then the Slate 5 Heatsink.
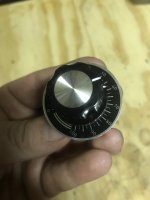
I’ll also get things like wire and connectors along the way as well as a potentiometer. I’ll be updating as I go!
I’ve learned many things about the HLG builds. Not just the kit, but all their quantum board builds. I knew I wanted one of the quad board units, but wasn’t sure which one would suit me best or even what the differences were. Turns out the only real difference between the 550 and 600 kit is the driver. That’s it. Well, that and what spectrum of board you want to run.
There are a few drivers HLG has actually used for these kits and builds and even more options that would make a nice fit for a build, depending on wether you were to run series or parallel, and how hard you wanted to run them:
Meanwell HLG-480-54A (or B)
Meanwell HLG-480-2100A (or B)
Meanwell HLG-480-2800A (or B)
Meanwell HLG-600-54A (or B)
Inventronics EUD-600S280DT
Inventronics EUD-480S280DT
I almost went mad in the beginning trying to understand what driver I needed. I’ve learned a lot about driver and now all the numbers aren’t scary. After much thinking on what would meet my needs, I decided to go on the HLG-480-2100B. With this model I can still hit over 1000 PPFD while consuming much less power. I could go with a 600w model that could hit numbers over 1500 if I was pumping my room with co2, but right now, it’s not needed. Right now less is more. And at 2100mA I’m not pushing the boards as hard.
Yesterday I got my 4 HLG 288 v2 r-spec boards. Next payday is the driver, then the Slate 5 Heatsink.
I’ll also get things like wire and connectors along the way as well as a potentiometer. I’ll be updating as I go!