

George Parker
New Member
Hello, This is my first post so I thought I might as well try and contribute to this awesome forum the best I could.
After researching many designs for my CFL light fixture and seeing all the great work contributed by you the members, this is what I came up with using SketchUp:


The final product was a little different but the overall design remained pretty much the same. With the 23W 1600 lum CFLs I'm using, this will put out 19,200 lumens and 276 watts. All with very little heat. I wanted each bulb to have a reflector to force the light down, since these bulbs shoot so much light from their sides and not their bottoms. I chose to use white vinyl for the reflectors because of the low thermal conductivity.
**Please note, you will be working with power tools and electricity. Be safe and have fun with it!**
Tools Used:
Cordless Drill
Chop/Miter Saw
Wire Strippers
Wire Crimpers
Hammer
Materials Used/Needed:
1 PC. 2x4, cut to 24 5/8"
1 PC. 1/4" - 1/2" Plywood cut to 23"x15 3/4" (I used a piece of scrap 1/4" particle board I had that was shorter than the full width, the demensions given are for a true fit)
1 10' White vinyl rain gutter cut into 12, 7" PCS.
12 light socket cleats
12, 1/2" wood screws
28 Drywall screws
24 Blue ring terminals (16-14 GA.)
8' extension cord (14/2)
2 Screw Eyes
~10' of 14 GA wire cut to the following:
12 PCS cut to ~4"
12 PCS cut to ~6"
2 wire nuts (I love the beige ones, good for 18-8 AWG)
1, 1/2" staple
12, 23W CFL's (I am going to run 8 6500K /4 2700K for Veg, and reverse for Flower)
NOTE: Look for the Edison "Discount" CFL Packs. I found mine at a local Goodwill Store and picked up 48 23W 2700K Bulbs for $23.99 OUT THE DOOR!:

Now on to the build!
After cutting the 2x4 and the top pc, screw the top piece to the 2x4 using 4 of the drywall screws. (The 2x4 is longer for a reason, just center the top section)

Cut the rain gutter into 12, 7" pieces:

Don't eat the man-made snow! :") :
:

Lay the wood top down and evenly place the 7" sections along the 2x4 and fasten to the top sheet with one 1/2" screw per piece (12 total):

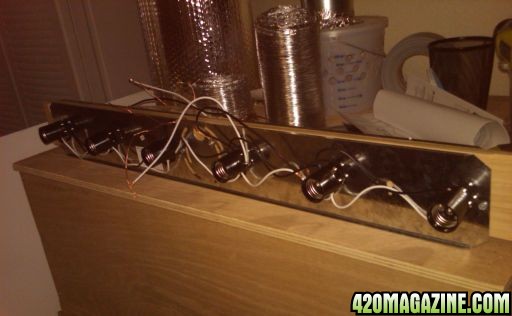
Install the light socket cleats with the remaining screws. I drew the center line along the length of the 2x4 then centered each socket in the gutters as so:

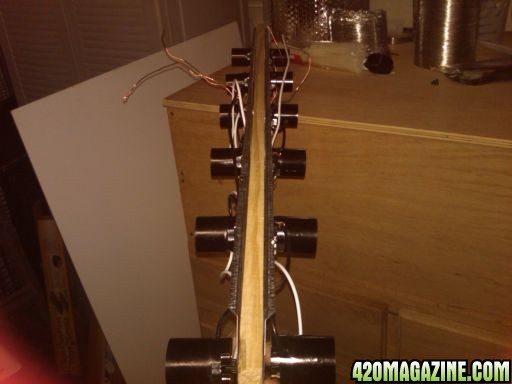
Now pull up a chair, sit down and start cutting and splicing the wires:

Install the wires:

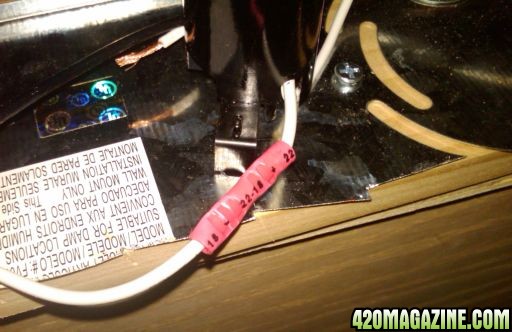
Cut the female end off of the extension cord and pull the two wires ~3" apart, then strip the ends and connect them. NOTE: the skinny prong on a two-prong plug is the "HOT" and the fatter one is the NEUTRAL. The "HOT" side of the light socket is usually indicated by a darker color metal, in my case the hot side was "Gold" and the neutral is "Silver". Make sure you connect the right wires to each other. You should end up with 2 groups of 3 wires each.

Then get out that heavy duty staple and hammer it to the 2x4 making sure to only SNUG it up to the wood! Don't beat the heck out of it or you can damage/cut the wire.

Now flip the fixture over and install the screw eyes in that little spot we left on top of the 2x4:

Install your bulbs, plug that girl in and enjoy!


The light is plugged into a surge protector that is plugged into a GFI outlet.
My trusty cell phone took all of these pics. I'll post up some pictures of how much light this thing kicks out when my camera is done charging.
Thanks for stopping by, if you have any questions/suggestions , ask/tell away, and thank you for posting your ideas and engineering, it was what inspired this build.
After researching many designs for my CFL light fixture and seeing all the great work contributed by you the members, this is what I came up with using SketchUp:
The final product was a little different but the overall design remained pretty much the same. With the 23W 1600 lum CFLs I'm using, this will put out 19,200 lumens and 276 watts. All with very little heat. I wanted each bulb to have a reflector to force the light down, since these bulbs shoot so much light from their sides and not their bottoms. I chose to use white vinyl for the reflectors because of the low thermal conductivity.
**Please note, you will be working with power tools and electricity. Be safe and have fun with it!**
Tools Used:
Cordless Drill
Chop/Miter Saw
Wire Strippers
Wire Crimpers
Hammer
Materials Used/Needed:
1 PC. 2x4, cut to 24 5/8"
1 PC. 1/4" - 1/2" Plywood cut to 23"x15 3/4" (I used a piece of scrap 1/4" particle board I had that was shorter than the full width, the demensions given are for a true fit)
1 10' White vinyl rain gutter cut into 12, 7" PCS.
12 light socket cleats
12, 1/2" wood screws
28 Drywall screws
24 Blue ring terminals (16-14 GA.)
8' extension cord (14/2)
2 Screw Eyes
~10' of 14 GA wire cut to the following:
12 PCS cut to ~4"
12 PCS cut to ~6"
2 wire nuts (I love the beige ones, good for 18-8 AWG)
1, 1/2" staple
12, 23W CFL's (I am going to run 8 6500K /4 2700K for Veg, and reverse for Flower)
NOTE: Look for the Edison "Discount" CFL Packs. I found mine at a local Goodwill Store and picked up 48 23W 2700K Bulbs for $23.99 OUT THE DOOR!:
Now on to the build!
After cutting the 2x4 and the top pc, screw the top piece to the 2x4 using 4 of the drywall screws. (The 2x4 is longer for a reason, just center the top section)
Cut the rain gutter into 12, 7" pieces:
Don't eat the man-made snow! :
:Lay the wood top down and evenly place the 7" sections along the 2x4 and fasten to the top sheet with one 1/2" screw per piece (12 total):
Install the light socket cleats with the remaining screws. I drew the center line along the length of the 2x4 then centered each socket in the gutters as so:
Now pull up a chair, sit down and start cutting and splicing the wires:
Install the wires:
Cut the female end off of the extension cord and pull the two wires ~3" apart, then strip the ends and connect them. NOTE: the skinny prong on a two-prong plug is the "HOT" and the fatter one is the NEUTRAL. The "HOT" side of the light socket is usually indicated by a darker color metal, in my case the hot side was "Gold" and the neutral is "Silver". Make sure you connect the right wires to each other. You should end up with 2 groups of 3 wires each.
Then get out that heavy duty staple and hammer it to the 2x4 making sure to only SNUG it up to the wood! Don't beat the heck out of it or you can damage/cut the wire.
Now flip the fixture over and install the screw eyes in that little spot we left on top of the 2x4:
Install your bulbs, plug that girl in and enjoy!
The light is plugged into a surge protector that is plugged into a GFI outlet.
My trusty cell phone took all of these pics. I'll post up some pictures of how much light this thing kicks out when my camera is done charging.
Thanks for stopping by, if you have any questions/suggestions , ask/tell away, and thank you for posting your ideas and engineering, it was what inspired this build.

") , but am capable.
, but am capable.


