The Happy Cola Company's Official Ground Up Medical Cannabis Grow Op

We set our hydroponics for top feed, but wanted to use something that wouldn't clog up so easily, so we went with 1/2" and put ball valves on each feed to regulate water flow.
The only issue now is getting the Hydroton in the net basket evenly wet. The 1/2" feed won't ever plug, however it doesn't offer even watering around the circumference of the plant.
I know they make drip rings, but they aren't cheap, and I need 128 of them.

So... it was time to come up with a cost effective, viable solution.
Here's what I came up with
20191220_124145.jpg


Yes. That's 1/2" Pex, a 300 foot roll. It's gonna take pretty close to 275 feet to make 128 drip rings.
20191220_124156.jpg

What I found was if your using 10 inch net baskets designed for a 5 gallon bucket a 26.5" piece connected into a plastic 1/2" Pex T will create a perfect fitting drip ring.
20191220_170942.jpg


No clamps required for the T's, and I drilled 8 tiny drip holes evenly spaced around the drip rings.
20191220_180901.jpg


This gives a full 360 degrees for the roots to reach at, instead of from one side.

Time to put this issue to bed!
 
Haven't had a chance for much of an update, but the wheels do keep turning, slow as it seems. We did manage to get the room filled with ladies, but this first go round, we have gals from a few weeks to a few months, and are now training them for an even canopy. The next go round, the ladies will all be the same age.
20200103_173857.jpg


Now I can look away for long enough to get started in the clone/mother room. The plan in the mother room is two 4x8 flood tables for the youngsters and a flood and drain involving a controller and 5 gallon buckets for the pre-flower ladies. This design should allow for easy transfer from veg to flower with little to no shock to the plants. Least that's the goal.
I decided some time ago to make the tables involving transferring into flowering rooms on rollers. With two large veg rooms and four flower rooms we felt we needed to be able to freely move things around. Also makes clean up a LOT easier!
Anyway, I'd been eyeballing our 100 site cloner. It's big. It's heavy when loaded, and there simply isn't any moving it around without draining it. I don't like that, because stuff happens,and since we still have a few hundred feet of 1x2 steel tubing just surface rusting away I went to work. Here's what I came up with.
20191230_194720.jpg


I built a square frame around the cloner where it could be dropped into place. Unfortunately, I found out because of the pump cord exit locations on the tank. it wouldn't sit flat on the frame I built around it.

So... I welded a handful of 1/2" pieces of angle to provide a standoff and still offer the required support.

20191231_173100.jpg


Also, since this was to be "mobile", the last thing I wanted was a 4 foot, 8 bulb T-5 light dangling around on the included cable, so I decided to make the light stationary....sort of.

20200101_172740.jpg


In my workshop, I'd never paint a creation white, but here, white just seems right. Note the standoffs to allow the tank to sit solid and level now. I also welded a crossmember to support the center of the tank. I'm betting without it, disaster. To achieve the required 4 foot of space for the T5 light, I had to add 4 inches on both ends.

20200103_173010.jpg


I added wheels and a 4 way power block, then hammered a few plastic end caps for the open ended tubing.

20200103_172912.jpg


Done. This allows easy movement of the cloner, the light won't swing around when moving. I welded a few 5/16' nuts at the top of the light support brace and put a 5/16' bolt to lock it down. Now the I can raise and lower the light and move the equipment around if need be without having to drain the cloner.

Next up: Rolling veg tables!

In closing, I feel I need to clarify something as a member here made a comment what warrants a clarification, so here it is.

1. First and foremost, I am not a "pro" in this arena by any stretch of the imagination, and I'm not afraid to ask for help. I am simply here to share and learn with all forum members. I'm a simple country boy who's not afraid to research, ask questions or get his hands dirty while wearing however many hats required to achieve this bucket list dream. There is NO way I could hire all the hats required to have got this venture off the ground. It would have been a pipe dream.

2. I have spent countless hours researching forums, from DIY to reading from others who chose to share their mistakes in effort to prevent someone like me from going through the same issue they did. Knowledge IS power, no doubt, however without those who not only paved the way before me, chose to share their knowledge with others, this venture would never have made it off the ground.

3. I am not wealthy, and neither is my partner, therefore yea, you get to see a LOT of homemade things going on throughout this build. I coulda bought a few 32 light controllers or bought a bunch of rolling tables and purchased ready made lighting and a plethora of other goodies, but Ed McMahon never showed up at my house with an 8 foot check for a bazillion dollars either. So I researched and I built. It ain't perfect and I'm sure there will be hiccups and upgrades along the way, but one day at a time. I am however proud of our achievements in getting this far.

4. Though I have grown medicine "under the radar" since the late 70's, early on digging holes outside in the north 40 and tossing a few fish in the holes for the next year's crops to firing up the Ford 5000 and connecting a plow and working some of the lower land while my folks were at work to going indoors with PVC toilet pipe arranged on a slight slope in now what's called a NFT system, I've tried many methods, had many scares, and now our day has came.

5. Neither of us has ever taken on a grow of this size. 10,000 square feet might be pretty small for a grow from what I gather from others, but to us, it's a huge undertaking and I am simply here to share the experience with ALL my brothers and sisters, not to step on toes or be a punching bag for folks suffering from things I cant help them with. Period.

I truly hope you've enjoyed the ride along so far, as it's been a real challenge, and a lot of sleepless nights for us just to get where we now are. The sacrifices our wives and children and friends have made in supporting this venture is uncanny. More like destiny.
The support and education I have received from others who learned their lessons from the School of Hard Knocks and chose to share their knowledge with us has been absolutely priceless in this venture. I thank you all!

-The Happy One
 
Been a spell since I put out an update, and it's about time. We have somewhere around 2 more weeks to flipping the lights, and have already began training the plants

20200111_124718.jpg


In the flower room (GR-1) everything is whirring like a fine oiled machine, leaving a handful of hours to get stuff done.

Focus now has been on our mother/veg room. We never really had a firm plan on layout, so the same rules we applied to the flower room get applied in here.
Rule #1. No wasted space, and it doesn't look like we're gonna have a lot of that in here either after mapping out a game plan.
For now, we are using a few 4x4 flood tables built from 2x4's and added wheels for easy movement. This will work until we can get the two 4x8 flood tables laid out, and the 14 roll-around tables I've began constructing for final vegging.

20200114_174249.jpg


I've also built another light controller in this room, however, it isn't a flip-box like the flower room due to the light regimen for vegging. It's located in the panel right of the main breaker box. Those two 115 volt outlets below the box are for light controlling duties. This allows a simple 115 volt light controller to control the entire 220 volts overhead outlets. One is an outlet...one is an inlet.

20191026_144317.jpg


The room behind this one is another 22x40 that will the 3rd flower room downstairs.

20200105_191057.jpg


We have 5000 sq ft upstairs, still untouched. As time and money allow, we'll finish it off.
For now, I have plenty to keep me going downstairs for a while.

Anyway, the goal in the mother room is to be able to veg out specifically 168 plants in 5 gallon buckets to around 2 to 2.5' tall, and in the same hydro setup as our flower rooms. This way there is very little, if any shock taking the ladies from veg into flower. Once again, back to the 1x2 metal pile, make a prototype table, then start cutting pieces to build 14 of them.

20200105_191047.jpg

20200109_171918.jpg


After a good gander, I thought I should build a shelf for the 17 gallon reservoir on each table. (They look connected, but they aren't. Just rolled next to each other)

20200114_174249.jpg


The "tables" in this room each hold 12 plants in 5 gallon buckets. I'm designing them to be top feed, constant recirc as well, and each table will have their own 17 gallon reservoir, sitting on a welded tray to allow the entire table, reservoir, and 12 plants and all to be easily wheeled in and out of rooms. I'll add a power block to each table for the pumps. I might drop down power from the ceilings like I did in the flower room. Haven't decided yet.
If anyone is curious, a 6'3" long table 28" wide can wheel in and out of rooms with ease, (as long as your hallway is 6 foot wide). This is about as big as I could make them while still allowing for two rows of plants
This room needs 14 of these tables, and I only have 3 left to go!

Yes. I had to add security. Each room has a security monitor so we can see what's going on around us at any given time. Even set up for smart phones, so I can see what's taking place even when I'm not around. Talk about piece of mind! I even had to go out of the way to pull anything located in the office security wise and house it in a secured location that would take a blow torch to enter. If we ever get broken into, you won't get to any security or recording devices, so I'll have some nice high def 5k video available to identify and hunt the perps down and give them a ride in the trunk of a 1973 Olds 98.... Did I just say that?:rip:

20200114_174239.jpg


This area will house 8 of the 14 tables. The other side of the room will have 6 more of these plus two 4x8 flood tables
 
This morning Inpicked up ten 4x8 sheets of expanded metal #13. After playing around with how to cut it up and make it go the furthest we determined the little bit left over could be used on shelves like we did the chiller and dehumidifier. I hate waste.

20200115_172019.jpg


We decided to mock one up after figuring out the cut pattern. Time for some tack welding.

20200115_182019.jpg


Since there is only 12 feeds per table, one feed and one drain should do. Done like this, changeouts and cleanup will be pretty easy. I like easy.

20200115_182045.jpg


I haven't mounted it yet, but each table has it's own dual plug power outlet and have specifically 10 feet of cord. Haven't decided if I want to run I overhead, but for now, plug into a wall outlet and go for it
My parner spent some time with a tape measure and mapped out the mother/veg room, taking into account no wasted space and came up with a gameplan. As we figured, no wasted space, and even with 14 tables and 168 plants in veg, we still have room for not two 4x8 flood tables, but three, plus we still have a nice nesting place for the cloner!
 
Today was spent mocking up the first stage 2 veg table. It's top feed and the distribution feed was done in 3/4" PVC, then reduced at the T's to 1/2". This manifold will feed 12 plants in final veg

20200116_170842.jpg


I love Lowes. A person can build a fine hydroponics setup with over-the-counter items. I've used 100's of these

20200116_142327.jpg


I also picked up one of these. Something cheap to keep cords off the ground. If it all passes the smell test, I need to build out 13 more tables. Yay.

20200116_170918.jpg


You get the idea Also note the plastic cap. It serves two purposes. First and most importantly, the open-ended square tubing in a grow room leaves a crazy cool hiding place for critters, dust, ect. Second, they just complete a project with a finished look, and they are cheap!

20200116_180218.jpg


Yup. That's PVC glue all over my fingers

20200116_180302.jpg


This should keep wiring neat and tidy

20200116_181929.jpg


Here's a view from above. Each "side" has it's own drain, with the feed supply manifold ran down the middle for all buckets. We don't have the feed lines installed yet, and the buckets still need rubber grommets and 1/2" 90's, and the return lines haven't been drilled out yet.

20200116_182011.jpg


With the drain exits placed high enough, and being a constant feed, the waterfall effect from the return lines dumping into the reservoir provide a constant supply of oxygen to the reservoir. So much so, there is no need for an external air pump to dump warm air into the reservoir. Yea. We're cheap like that.
Here's a shot showing the 1 1/2" dumps. Neither are glued in, allowing easy removal of reservoir for cleaning

20200116_182042.jpg


Being in the veg room with a lot less intense heat, we don't need to chill these reservoirs, however, the room temps in the mother/veg room is kept much cooler than the flower room.

20200116_181913.jpg

20200116_181833.jpg


Next up: Pump selection, final plumbing and a test run!
 
Still working on the veg/mother room. I need to build a frame for theee 4x8 flood tables. These will house plants coming out of cloning and veg on these tables until they are around a foot tall. From there they gonna in not stage 2 veg and into the 5 gallon buckets.
Once again, I'm using 1x2 mild steel tubing, except on these, I need to make the legs removable.
20200118_191558.jpg

20200118_162937.jpg

20200120_152901.jpg


I'll build a tote shelf for the 27 gallon reservoir and equip the legs with 3" wheels
20200120_152920.jpg

20200120_175949.jpg

20200120_175941.jpg


This will hold over 200 plants out of the cloner, enough for an entire room and then some. I feel this is important, as it allows you to choose the healthiest and most robust plants to go into the 168 five gallon buckets in stage ll veg
 
I really enjoy how you fabricate your own equipment :thumb:

Thanks for the kind words! Building stuff to me is 90 % of the fun. The other 10% is useful, required tasks, most of which thankfully are a one time affair....sort of. We have two more 22x40 flower rooms to go. Once that is done, it will account for 5000 sq ft.
Then...after making a few dollars we need to begin on the untouched upstairs....yet another 5000 sq ft.
 
20191017_175503.jpg


Here's a view of how it will be set up. This offers us adjustments in the form of 1/4" increments, and does so with one handed ease!

20191023_191102.jpg


Here's a birds-eye view from above

20191102_174119.jpg


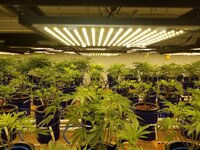
Here's a shot with all the lights in place. This will make light adjustments so much easier.

20191102_174157.jpg


Getting close, but we still have Co2, carbon scrubber and dehumidifier to contend with.
More to come!
Loving this greenfield story I stumbled upon...gonna watch this journey...thanks for sharing and best wishes.
 
Quick update. We ran into a problem. Not so much this minute, but it's going to have to be addressed before we crank the lights up and flip to flower.
Problem: With our lights cranked down to 200 watts per light at the plug, our four reservoirs in the flower room are hanging around precariously borderline temps banging on 69 to 70 degrees.
Case in point: The 1 hp (12,000 btu) chiller is barely able to maintain, and it runs 24/7.
Keep in mind, we still have two flower rooms to go, then maybe a 4th.
Bottom line, we need a bigger chiller.
So.....
Being the 'po boy I am, it's time to improvise. I'll build one. I'll take one of our 4 ton R-410a condensers we got on a Colorado grow we bought out and make one.
One thing I figured out though. I can't build anywhere near as efficient of a chiller evaporator as I can buy, and even at my contractor hvac pricing, they aren't cheap, close to 1000 bucks shipped, and that's just a coil.
I'll have to put the components together and make a chiller capable of maintaining a 65 to 68 deg reservoir without breaking a sweat.
I'll highlight the build. This is gonna have to happen pretty quick now.
 
This has been the greatest build up i have ever seen step by step! You sure put your heart and soul into it! Thank you for sharing this ride with us. Thats my dream too. Maybe one day itll be legal here also. Its ridiculous that i cant help people in pain/stress/opioid withdrawl/ms patient,cancer patients etc.legally! Thank u for the inspirational work!
 
This has been the greatest build up i have ever seen step by step! You sure put your heart and soul into it! Thank you for sharing this ride with us. Thats my dream too. Maybe one day itll be legal here also. Its ridiculous that i cant help people in pain/stress/opioid withdrawl/ms patient,cancer patients etc.legally! Thank u for the inspirational work!

Thanks for those inspirational words! I really need them!
 
I am smiling like a Happy One!
After overcoming a potential hurdle that could have put us out of business, I can smile like The Happy One I'm supposed to be!
New laws now requiring interaction with Fire Marshal which would have involved a lot of blueprint inspections and various approvals to obtain a sign off from the State Fire Marshall, over 9k in drafting, filing, and a plethora of other "administrative fees".
Great news for us and a LOT of legal Oklahoma Medical Cannabis grows who operate in very rural areas, as the Fire Marshall doesn't want involved and the local city municipalities are behaving like a deer in the headlight.....so....all we need to do now is get the local officials to sign off, which is news worthy of partying like it's 1999....
Yippy!!!!!
 
Guess it's time for a grow room update. The girls are still in veg, and due to the different strains as well as various ages of the girls, we are still trying to even out the canopy before flipping into flower. Not only that, but I have to implement an improved reservoir chiller before nearly tripling the light output.
20200130_190645.jpg


It's getting about time to implement a trellis into the equation. Some of our "Fast Jack" or "Happy Jack" as it's so dubiously been named is getting out of hand compared to some different and younger strains we have

20200130_190807.jpg


My partner came up with some Columbian Gold seeds, so we had to see what these girls will do, and hopefully bring back some of those memories from days gone by

20200130_190532.jpg


I've been working on the veg/mother room and nearly have all the required tables built to carry the next grow into a more coordinated transfer with all the girls being the same age, height, ect. That way, we can flip the lights as soon as the transfer from veg takes place. Streamlining is the name of the game!

20200129_201920.jpg


Yes, that's a cement mixer alright, however it will never see cement.
This clever idea came from my partner, and we use it for cleaning Hydroton (expanded clay). This takes a real tedious task and turns it into a much shorter dreaded event....

20200130_190322.jpg


To me, this is the cat's meow in cloning. One of the far largest issues in getting fast AND happy roots is reservoir temps. A small 1/10th hp chiller prevents runaway reservoir temps.

:420:
20200129_202034.jpg


In the end the goal is everyone being Happy. This is what Happy Girls look like....
 

Attachments

  • 20200130_190645.jpg
    20200130_190645.jpg
    1.1 MB · Views: 107
Im going to keep following, great update. Im really anxious to see the Columbian Gold grow...brings back memories of the late 70’s when red and gold Lumbo was the best you could get...before it totally dried up in the early 80’s...replaced by Skunk.

I have to agree. I cant wait to see if it brings back some old memories. Remember though, I'm betting the original was sun dried, giving it that gold color. Also, I'm thinking is was field grown with very little effort in hulling out the males and probably cured in a 105 deg barn...... I STILL remember getting a good buzz though...:ganjamon:
 
Back
Top Bottom