Jandre2k3's Intelligent-Gro Testing: Phase 1

Big news guys... LED is completely done- All harvested... Complete. Guess what though- HPS still has a week before first harvest. Surprised?

Well you know "blister" always shows up when the work is done :cheesygrinsmiley: Well Done! This is an important fact about growing LED an "extra" harvest over time in a perpetual grow has to be factored in to the value. Thanks Jandre
 
Well you know "blister" always shows up when the work is done :cheesygrinsmiley: Well Done! This is an important fact about growing LED an "extra" harvest over time in a perpetual grow has to be factored in to the value. Thanks Jandre

"Blister" always pokes his head up before trimming is all done, making the end of it a sore task. :rofl: You're still invited to that party, just bring your Fiskars. :cheesygrinsmiley: Gotsa Lotsa that still to do.
 
Hi,
Your close up photos look great what are you using? By the way how many plants were you growing? It looks like quite a few but I'm not sure.

Everything looks good though, too bad the HPS didn't make it for a final comparison of weight and lab testing, I was really looking forward to seeing the information.

Have a great day and enjoy your efforts!

Oh the testing will be done, and the final weights will be shown. ALL HPS numbers will be shown vs. LED. that's what this whole thread was about in the first place.

As far as the close-ups- I have a Celestron 10x to 150x digital USB microscope.
 
Sweet. I can see you lean high cbd end. Hope you found one that works' for ya. I know it's been along time since I cruised thru, but seems it's working out for ya. Never know one day I might throw a supplement of led's in my room. I know afew people here that work second harvest on outdoor plants. But that looks like tasty buddage my friend. Keepem Green
 
Sweet. I can see you lean high cbd end. Hope you found one that works' for ya. I know it's been along time since I cruised thru, but seems it's working out for ya. Never know one day I might throw a supplement of led's in my room. I know afew people here that work second harvest on outdoor plants. But that looks like tasty buddage my friend. Keepem Green

WOOD! Glad you stopped by! Yeah, I have a really close friend that actually feels as though his shadow stops following him smoking it, metaphorically speaking, of course. So yeah, gonna keep this one on the menu for a good while.

About the LED's I really think you should. Just from the reduction in heat alone, the buds seem to taste so much better.
 
Jandre2k3's Intelligent-Gro Testing: Phase 1

Concluding:

09/01/2014

Still trimming, and drying, and getting ready for final results. Because of the condition of my hands, this much trimming must be done in stages, with rest in between. I'm sorry that it is taking so long, but this is how it must be done. Thank you for your patience.
 
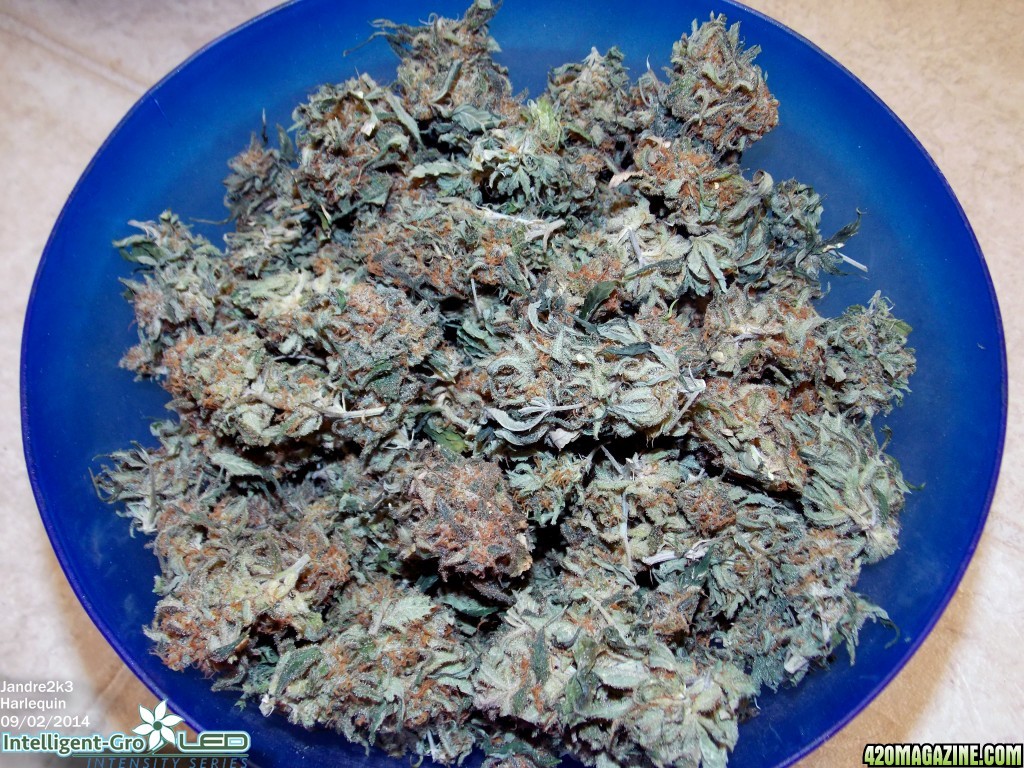
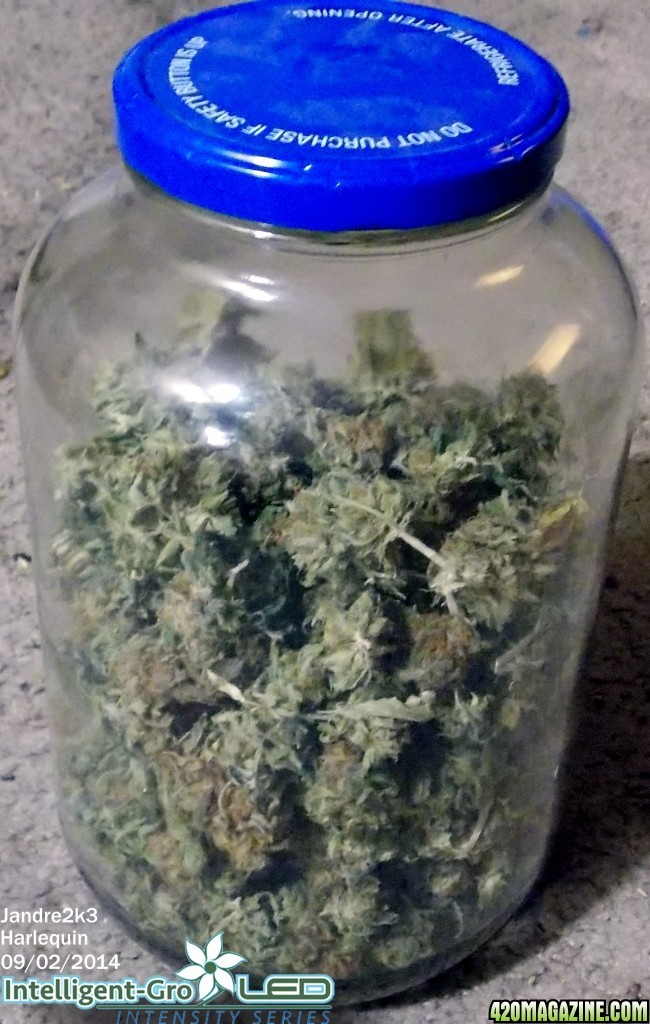
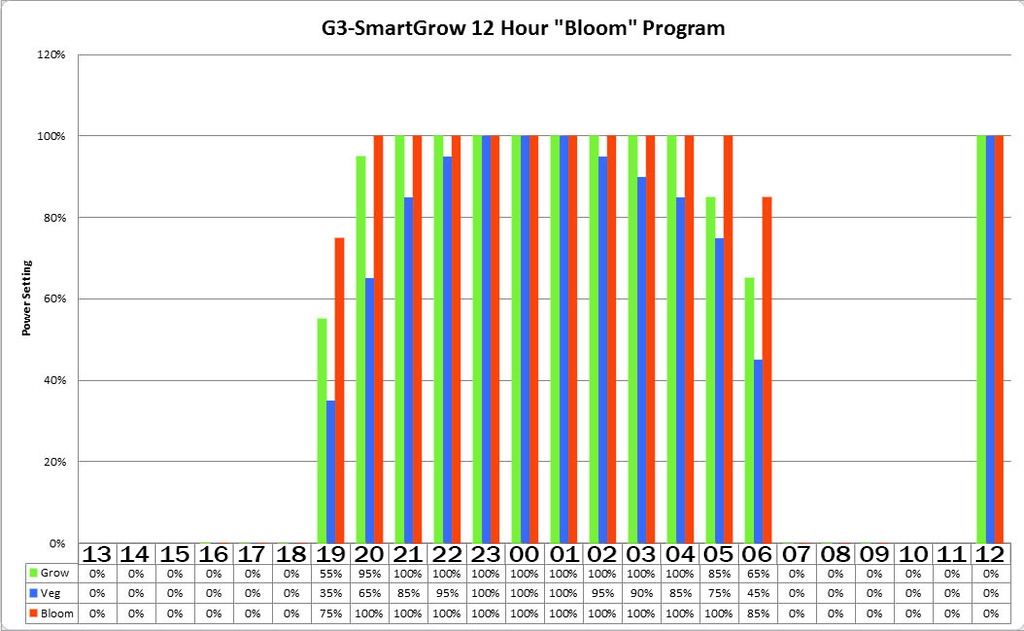
Jandre2k3’s Intelligent-Gro Testing: Phase 1

Concluding:

09/02/2014

Wattage input = 270w
Total yield = 257g
Yield per watt = 0.951g/w
Dangit, not quite a gram per watt.


When compared to actual wattage putput:
Wattage output = 342w
Total yield = 257g
Yield per watt = 0.751g/w


Now... here's something I found very interesting.

From the Sponsor:
"You ran and the 3 Module panel which has a average draw between 260-270 when run at 100% ALL intensity on during all three growth stages. However because you used the controller during the three growth stages, you reduced the power draw significantly down to 25%(+/-) less energy. Which takes the 260-270 max draw down to 196-202 Watts average used during the entire grow cycle using the Gen I Igro-342w Model."


So lets do the math at the Average Wattage used. We'll take the max of 202w for this.

Wattage input = 202w
Total yield = 257g
Yield per watt = 1.272g/w

YES!! SUCCESS!!
 
Hey guys, having problems with the hands again. I'm working on the final review right now, got four pages so far. I'll post it when I'm done. Sorry for the delay. Post any other questions you may have about the lights, or the grow, and I'll answer them here.

The new (Phase 2) grow is underway at Jandre2k3’s Intelligent-Gro Testing: Phase 2


Product: Intelligent-Gro 270w(input) LED grow lamp
Manufacturer: CTlite


First impressions:[FONT=&amp]

[/FONT][FONT=&amp]Thought one: When picking up the box. "This box is bigger than I thought it would be"
Thought two: "It's heavier, too"

When unpacking the box from its nondescript shipping, I notice how NOTHING is rattling around inside. Well packed, and tightly bound, the product stayed safe and undamaged in near perfect condition. I say "near perfect" because while the fixture itself is perfectly unmarred, the touch-pad on my control unit's face is cracked. No consequence, though, because the touch-pad still works, and all controls are fully functional. This is okay for me because the remote still works perfectly and it will not affect the testing of the light in the least, and this test is all about performance, anyway, so no big whoop there. I also notice right off that LED POWER OUTPUT and POWER CONSUMPTION that are printed on the fixture, are reverse in the booklet... on the fixture it says Power Consumption is 342w and the Power Output is 270w. OOPS! I’m sure that will be corrected on future models.

So the labeling flaws, and the minor crack in the controller aside, I decided to turn on the light FULL POWER and check things out a bit. All the LEDS work and actually caused me to be blinded for a while when looking at it on full power for all three channels. Then I noticed something, when my eyes adjusted of course, there are a few lights that appear much dimmer than all the others. A few "red" and a few "blue" LEDs really looked a lot dimmer, and that concerned me. Keeping in mind the crack in the controller pad I initially assumed that the light had taken damage during shipment, somehow... Then my brain kicked in... INFRARED AND ULTRAVIOLET is nearly IMPOSSIBLE to see with the human eye. So knowing that infrared equals heat, I held a finger over a "dim" red one, then a bright red one. I noticed a definite heat difference between them and got excited. I went tearing through my things until I found my UV reactive bouncy ball! Holding it over the "dim" blue LED, it lit up like a Christmas tree. Proof of my hypothesis achieved, I decided to play around with the settings...

This proved to be confusing at first, and took about a minute to realize how the charts on the website are programmed. At first I thought the labeled settings on the remote were 1, 2, 3, and 4 from the charts on the website. I soon found that they really are as follows:[/FONT]


[FONT=&amp]SETTING[/FONT] [FONT=&amp]GROW (White/Red)[/FONT] [FONT=&amp]VEG (Blue/UV)[/FONT] [FONT=&amp]BLOOM (Fuchsia)[/FONT]
[FONT=&amp]Sunny[/FONT] [FONT=&amp]100%[/FONT] [FONT=&amp]100%[/FONT] [FONT=&amp]100%[/FONT]
[FONT=&amp]Cloudy[/FONT] [FONT=&amp]65%[/FONT] [FONT=&amp]40%[/FONT] [FONT=&amp]40%[/FONT]
[FONT=&amp]Moon[/FONT] [FONT=&amp]5%[/FONT] [FONT=&amp]0%[/FONT] [FONT=&amp]0%[/FONT]
[FONT=&amp]Custom[/FONT] [FONT=&amp]Will Explain[/FONT] [FONT=&amp]Will Explain[/FONT] [FONT=&amp]Will Explain[/FONT]
[FONT=&amp]Manual[/FONT] [FONT=&amp]Cloudy?[/FONT] [FONT=&amp]Cloudy?[/FONT] [FONT=&amp]Cloudy?[/FONT]
[FONT=&amp]* (Sunrise/set)[/FONT] [FONT=&amp]40%[/FONT] [FONT=&amp]80%[/FONT] [FONT=&amp]80%[/FONT]
[FONT=&amp]
Then I when I was playing with the "Custom" setting, I realized that I could scroll through the different hours... and the three settings could be changed according to the hour. That's when I realized "Here's where I set the charted values!" I hurriedly mapped out a new chart for my "Nighttime Sun" hours. [/FONT]

[FONT=&amp]Okay, because the electrical prices in my area are higher during the day then at night. This means that my Lights On period is at night for cost reasons.[/FONT]

[FONT=&amp]Moving on-
[/FONT][FONT=&amp]

[/FONT]
[FONT=&amp]
[/FONT]
[FONT=&amp]Here's the chart, shifted for my nighttime hours... Midnight is "00"

[/FONT]
[FONT=&amp]So, yeah, there's a small learning curve and no documentation on how to do this, but it's pretty easy to figure it out.


That done, you only have to go to "Settings" and set the time for YOUR time zone, and it will automatically cycle through each hour as set in the chart. For those of you who like the "Full ON/OFF" you can set it to do that in two ways: Set it for "Sunny" and place it on a timer -OR- considering this thing comes equipped with its own timer, you can set it on the same 100% on all three channels for 18 hours, and 0% on all three channels for the other 6. Easy as pie, no reason to involve any other hardware. It will gradually “dawn”, and “dusk” for the beginning and end of the 18-hour cycle, going from 0% to 100% the hour before your scheduled ON time, and will dim from 100% to 0% for your last hour. This is very beneficial to those that live in the damper, more humid climes, as the “dusk” hour will allow the plant to shut down for the day and stop transpiring, before the light goes completely off. This helps to eliminate that Relative Humidity (RH %) spike experienced with other light types when the lights abruptly go off and the plants are still in full production mode. That alone can cause a significant drop in the occurrence of Powder Mold, and Powdery Mildew, which could ruin the final harvest.[/FONT]

[FONT=&amp]


[/FONT]
Further Examination:


[FONT=&amp]When hanging the fixture in the newly built box, I noticed that (for me at least) the hanging cables seemed a bit too long. To fix this I ran one cable through two posts and then back up to make the two ends of the cable meet over the light. That worked really well, and shortened the hanging length below the hanger by 75% to about 3-4 inches. This allowed me to get the light about 9 inches higher in the box, and ultimately allowed for about 6 more cubic feet of grow space. [/FONT]

[FONT=&amp]Once programmed for the veg cycle, the light performed flawlessly. About one hour before the ON cycle was supposed to start; the timer would start slowly bringing up the lights to their programmed levels, and would work smoothly through the programmed hours until finally dimming back to full-dark by the last hour. As I had hoped, I never had to change the programming to better suit the grow until I was about ready to transition into flower. [/FONT]

[FONT=&amp]During the Vegetative stage, the plants grew at a normal pace, and looked very healthy. As compared to the T5 and CFL grown plants, they both grew at the same pace, but it seemed that the LED plants needed a tiny bit stronger nutrient solution, and a bit lower pH than the others. That could be the reason they were a few shades darker green than those growing under T5’s and CFL’s. [/FONT]

[FONT=&amp]Speaking of transition, I use a lighting schedule called Gas Lantern Routine to continue growth, but start building up the flowering hormone in the plants. This causes a much shorter transition, thus reducing the stretch and time taken for them to fully go into flower stage. It only took 10 days to transition and for “The Stretch” to stop. I used the regular G3-SmartGrow 12 Hour “Bloom” Program, but added a setting at 100% for all three channels at the 12 hour.[/FONT]
4-My-GLR.jpg


[FONT=&amp]This wasn’t the best solution for that schedule, as it was only 100% for about 12 minutes. Easy fix, though, I took out the hour, set it on the “Sunny” setting, and plopped it into a timer set for the GLR Schedule:[/FONT]
[FONT=&amp]ON: 17:00[/FONT]
[FONT=&amp]OFF: 06:00[/FONT]
[FONT=&amp]ON: 12:30[/FONT]
[FONT=&amp]OFF: 13:30[/FONT]
[FONT=&amp]That ensured that I had an even 5.5 hours to either side of the half-way mark in the dark.[/FONT]
[FONT=&amp]
[/FONT]


Even Further Examination: Flowering

[FONT=&amp]After the given time of the Gas Lantern Routine, it was a VERY simple switch to flower. We’ve already seen that graphic above with the extra hour, so just imagine it without the noontime hour on. I had already set it for the “Bloom” setting several weeks before, so I just set it back it “Custom” and took the timer out of the circuit. *POP* done. [/FONT]

[FONT=&amp]Now comes the part you’ve all been waiting for! Performance in flower was, for lack of a better word, astonishing. I had never before seen temperatures so steady in an indoor grow. Nor had I ever seen light so bright, with temperatures so low! Most times the temps were Transition took a mere 10 days, but that’s probably due to the GLR more than the LED, but during transition, the aromas that wafted out of the box began to make me smile every time I’d peek in to check on things.[/FONT]

[FONT=&amp]Now, something that I didn’t expect was the sheer speed at which the flowers bean to grow, multiply, swell, and finish. I was pulling the first harvest in this box at 50 days, for a 60 day plant. Second harvest was at 55 days, and most people stop there. All that was left were the inner popcorn buds, and loose flowers but I gave them an extra two weeks to try to plump them up before I pulled the plants. I finally did that at 68 days. And most of that went to the “TRIM/HASH” pile for later processing.[/FONT]

[FONT=&amp]Now, for the weirdest part; The HPS switched GLR and then to flower on the same days as the LED. However the Main Harvest was finally ready to come down at 68 days- A full 13 days after the first harvest, and 7 days after final. Not sure what exactly caused it to ripen faster, but that was definitely unexpected.[/FONT]

[FONT=&amp]As I expected from the lower temperatures taste and smell were greatly improved over HPS. However, upon drying and testing, the flowers were, a tiny bit more airy than I like. Now, just like you, dear reader, I had a healthy skepticism going into this whole LED adventure. Like you, I have read many reviews in the past with mixed reactions to LED, and huge debates ay how well they actually work. I was actually a little partial to my beloved HPS, and was actually rooting for the HID’s to come out on top. Here’s where I stand, in my little box, firmly corrected on the validity, feasibility, fiscal viability, and quality of product that can be had from a GOOD LED product. Overall the product grown, surprisingly, was better than what I had expected coming into this test. Airy though it was, taking my medicine is an enjoyable experience, and one I look forward to every time, now when pain and nausea strikes.[/FONT]


Overall Impression:


[FONT=&amp]You’ll pry my Intelligent-Gro Intensity series light from my cold, dead, resin encrusted hands. That’s right, I’m convinced; And no one could have convinced me of it with all the charts, and graphs, and reviews, and everything. I had to try it for myself, and “Take one for the team”, so-to-speak. All you out there in 420Magazine that are on the fence thinking, “Should I?” Let me answer that for you in the simplest way I know how... [/FONT]

[FONT=&amp]YES![/FONT]

[FONT=&amp]I have seen many people out there, myself included, trying to break the gram-per-watt barrier. If it’s efficiency, reliability, ease of use, low heat, space saving, and an overall solid product, you’re looking for. Look no further. You have found the light for you. Pay the price, take the hit. You’ll reap the rewards soon; that I promise.[/FONT]
[FONT=&amp]
[/FONT]


And now for all you numbers people, and results people, just like me: Here’s the skinny.


Results[FONT=&amp]:[/FONT]


[FONT=&amp]Test parameters[/FONT][FONT=&amp]: Use in competition with T5/CFL/HPS 400w for a full grow (Clone/Veg/Bloom).[/FONT]

[FONT=&amp]Test restrictions[/FONT][FONT=&amp]: Must be exclusively LED, no auxiliary or supplemental light.[/FONT]

[FONT=&amp]Test environment[/FONT][FONT=&amp]: 2’d x 4’w x 6’h custom built cannabis grow cabinets.[/FONT]

[FONT=&amp]Nutrient/Substrate[/FONT][FONT=&amp]: Hydroponic Ebb & Flow with only base nutrients, no boosters or other additives.[/FONT]

[FONT=&amp]Strain Grown[/FONT][FONT=&amp]: Harlequin[/FONT]

[FONT=&amp]Anomalies[/FONT][FONT=&amp]:[/FONT]
[FONT=&amp]a) [/FONT][FONT=&amp]One pump failure, causing the necrosis of a single plant of 8 starts.[/FONT]
[FONT=&amp]b) [/FONT][FONT=&amp]“Sunburn” in center of canopy periodically under 16” from light fixture.[/FONT]
[FONT=&amp]c) [/FONT][FONT=&amp]No infestations, infections, or other diseases.[/FONT]


[FONT=&amp]Variables[/FONT][FONT=&amp]:[/FONT]
[FONT=&amp]a) [/FONT][FONT=&amp]Temp: 72 – 84[/FONT]
[FONT=&amp]b) [/FONT][FONT=&amp]pH: 5.1~ – 6.3~[/FONT]
[FONT=&amp]c) [/FONT][FONT=&amp]Relative Humidity: 40 – 30 [/FONT]
[FONT=&amp]d) [/FONT][FONT=&amp]Light distance to canopy 12” – 18” (17” Optimal)[/FONT]


[FONT=&amp]Time Taken[/FONT][FONT=&amp]:[/FONT]
· [FONT=&amp]Date Cloned: 02/01/2014[/FONT]
· [FONT=&amp]Veg Start: 02/26/2014 [/FONT]
· [FONT=&amp]Flower Start: 06/15/2014 120 days in Veg[/FONT]
· [FONT=&amp]Harvest[/FONT]
[FONT=&amp]o [/FONT][FONT=&amp]1st Staggered: 08/04/2014 50 days in Flower[/FONT]
[FONT=&amp]o [/FONT][FONT=&amp]2nd Staggered: 08/09/2014 55 days in Flower[/FONT]
[FONT=&amp]o [/FONT][FONT=&amp]Final Harvest: 08/22/2014 68 days in Flower[/FONT]
· [FONT=&amp]
TOTAL TIME: Start-to-Finish: 177 Days[/FONT]

[FONT=&amp]Final Weight[/FONT][FONT=&amp]: 257g = 9.0654oz = 0.5665875lbs Dried Flowers[/FONT]
[FONT=&amp]Trim Weight[/FONT][FONT=&amp]: 160g will yield about 10g hash.[/FONT]
[FONT=&amp]Yield Ratio[/FONT][FONT=&amp]/Efficiency: [/FONT]
· [FONT=&amp]Wattage input: 202w (Average)[/FONT]
· [FONT=&amp]Total yield: 257g[/FONT]
· [FONT=&amp]Yield per watt: 1.272 g/w[/FONT]


Hey Jandre,

Excellent review!


It will gradually "dawn", and "dusk" for the beginning and end of the 18-hour cycle, going from 0% to 100% the hour before your scheduled ON time, and will dim from 100% to 0% for your last hour. This is very beneficial to those that live in the damper, more humid climes, as the "dusk" hour will allow the plant to shut down for the day and stop transpiring, before the light goes completely off. This helps to eliminate that Relative Humidity (RH %) spike experienced with other light types when the lights abruptly go off and the plants are still in full production mode. That alone can cause a significant drop in the occurrence of Powder Mold, and Powdery Mildew, which could ruin the final harvest.


This is a great feature!! I think having meters may have merits :cheesygrinsmiley: to reduce mold conditions is a big thing.


During the Vegetative stage, the plants grew at a normal pace, and looked very healthy. As compared to the T5 and CFL grown plants, they both grew at the same pace, but it seemed that the LED plants needed a tiny bit stronger nutrient solution, and a bit lower pH than the others. That could be the reason they were a few shades darker green than those growing under T5's and CFL's.

I said in my reps I was gonna argue... not really, just share that my results in veg were different. Maybe I should ask why you felt you needed to give more nutrients... because over the years I have used less and less. The shades greener from the excess nitrogen? Also I have had very different leaf structure with varying types of light and LED grown seedlings were way further along than any other type of light (full power flower lights were used at one point and veg only spectrum was used too)


Now, something that I didn't expect was the sheer speed at which the flowers bean to grow, multiply, swell, and finish. I was pulling the first harvest in this box at 50 days, for a 60 day plant.

This is something I knew but never documented... this is huge!!! it increases yield over time by giving an "extra" harvest. Cool!!!

As I expected from the lower temperatures taste and smell were greatly improved over HPS. However, upon drying and testing, the flowers were, a tiny bit more airy than I like.

This is not the case with some of my panels... for some yes, but others make hard dense nuggets that impress folks that know HPS nuggets


I have seen many people out there, myself included, trying to break the gram-per-watt barrier.

Congratulations... :cheesygrinsmiley: LED is awesome and I am glad you are ... lit up :cheesygrinsmiley:


Really nice review
 
Beautiful job you did on this grow and what a conclusion write up!!! That is probably the best format of test grow conclusion I have seen!!! definitely very detailed, unbiased, informational and detailed!!! ( I may have to borrow your format in the future, ;) )

Can't wait to see the new grow with the I-gro lights! My Gen 2's are really putting on a show so far :)

Hey, was curious, what was the weight you pulled from HPS in comparison to the LED?
 
Back
Top Bottom