Mao tries to build a stealth DWC. WIP

MaoZebong

New Member
Hello 420!

So, I used to hang out here a year or so ago, when I built my first stealth grow. I only got one plant harvested before I was thrown out from where I lived. (Not because of the grow. Ninja-grow. ;) )

Anyway, I've finally sort of got back to my feet, and I'm starting a new grow. Have to build the system again, though, as the previous box was thrown out... I managed to salvage lights and ventilation from the old one, so I'm not starting completely from scratch this time.

Last time I grew in soil, but that was so messy and unintuitive, I want to grow in DWC this time. To maximize yield, I'll also attempt to do a SCRoG, even though this sets harvest time back quite a bit.

Anyway, to what you probably clicked this thread for.

(Apologies for low quality photos. I'm using my phone for this...)

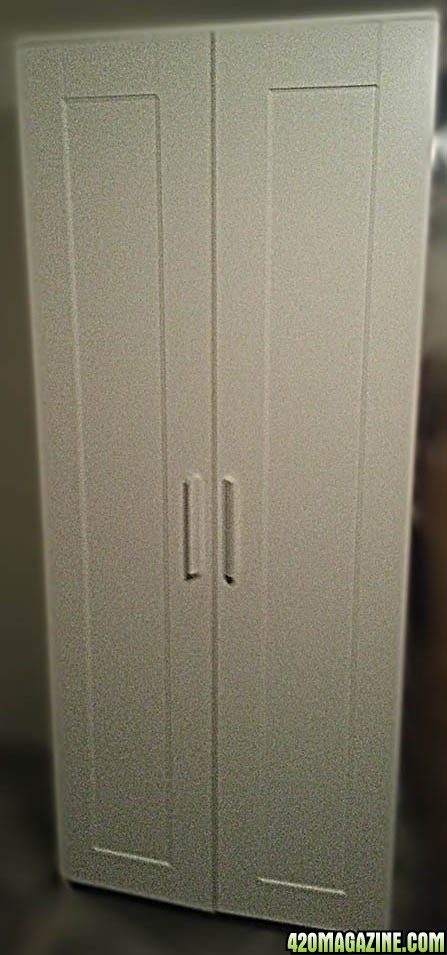
Here's what I'm starting out with. This closet is 75x50x190 cm (~30x20x75 in.), and is the Brimnes wardrobe at ikea at around $150.
20130406_153136.jpg


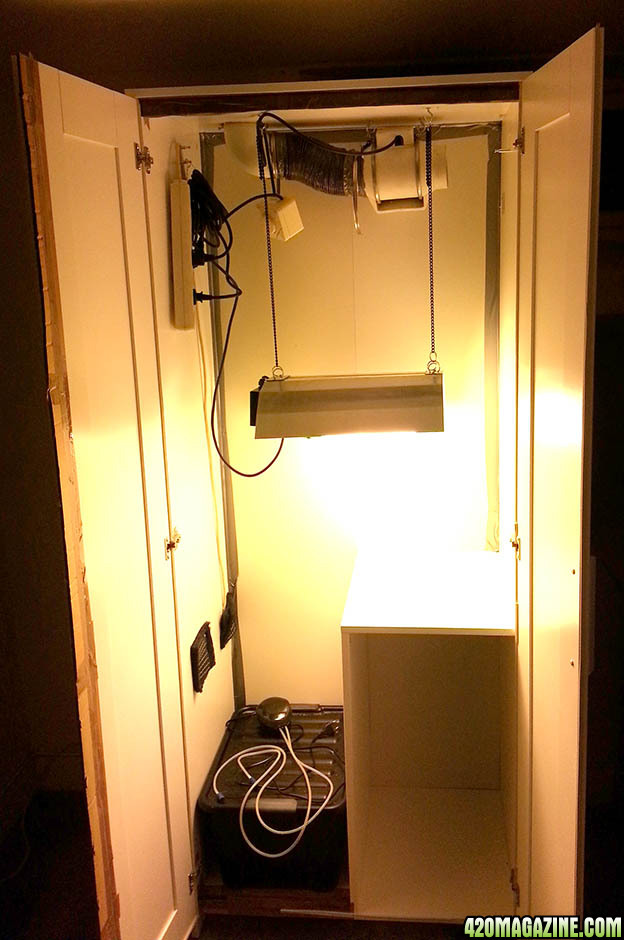
This is the open wardrobe, with ventilation holes cut. Two small passive intakes near the bottom and one large exhaust, where I'll put my inline-fan with a DIY carbon filter attached. I'll isolate the small compartment at the bottom, and use that for clones or something.
20130406_153155.jpg


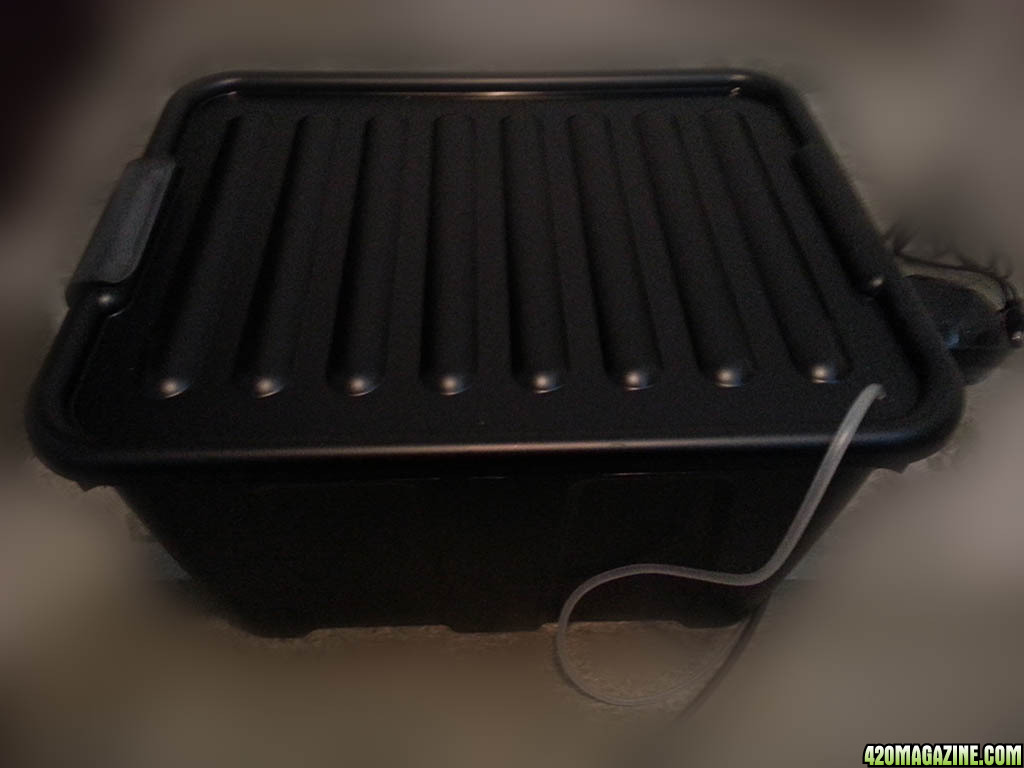
The DWC container. 31L (approx 8 gal.?), sprayed black to avoid light penetration. Then I realized it'll soak up a lot of heat from the lights, so once I've got my pots and I'm ready to cut holes for the lid, I'll re-spray the top white. Having the black base will just make it extra opaque, so that's good.
20130406_153214.jpg


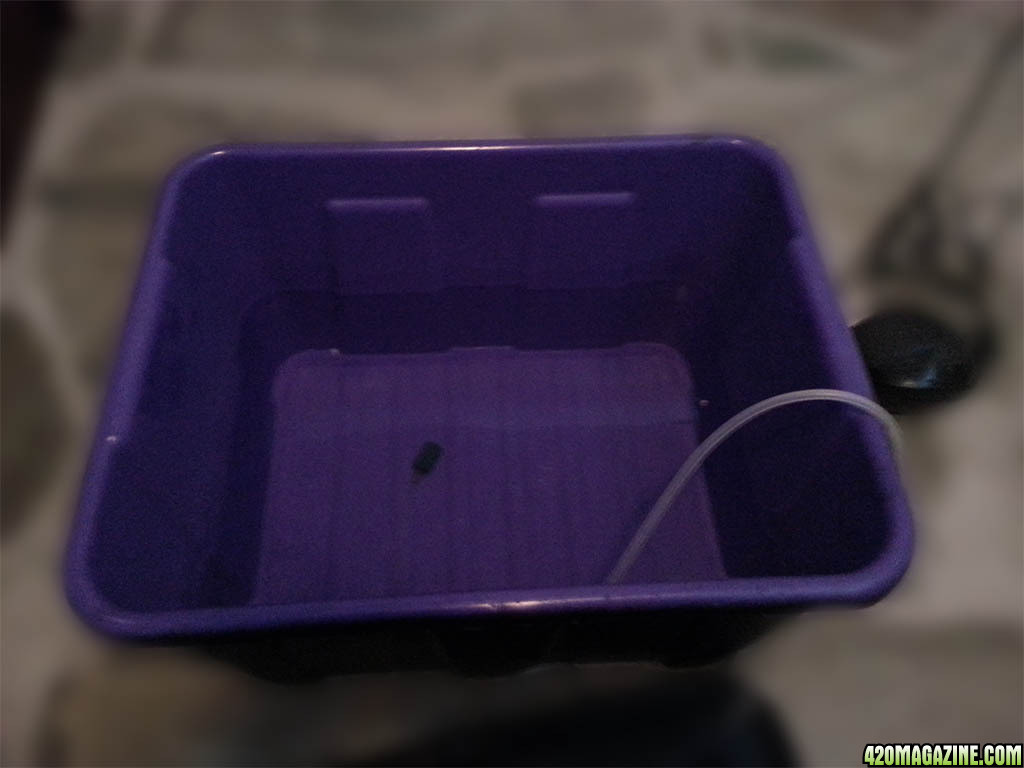
Inside. I've got air-hose #1 fitted, but since I thought that the pump came with one airstone, I didn't buy more than one extra, so I have to go back.
20130406_153228.jpg


What remains to be done:
  • Fit light blockers to the doors and ventilation holes
  • (Possibly) hang mylar on the walls
  • Fit plumbing to ventilation holes
  • fit in-line fan to ventilation system
  • Hang mounts for lights
  • hang lights
  • make carbon filter
  • Finish DWC system

So what do you guys think? Any suggestions, critique or advice will be very welcome, as I am a complete n00b. If you have questions, feel free to ask anything. I will have a bunch of them before this is over.
 
I wouldn't bother with the mylar. White paint works pretty good.

Where will that exhaust be going? If it's not going outside, it will just heat up the room the cabinet is in and your cooling ability will suffer.

I like the cabinet. You probably won't need that much vertical with the size light you're going to use in that small space (400W HPS?), so you could divide it up into separate flowering and veg areas. You talked about closing in that bottom right area, why not just put a board across the top of it and dedicate the entire bottom to some clones/mothers? I think you have plenty of vertical to carve out enough space to get a small scale perpetual going.

I want to see how you solve your light leak problems too. I'm always trying to come up with new methods, so I love seeing new ideas on this topic. :)
 
Ya might want to simply put a thin board on the back of one door, so that it covers the space between the doors when they're closed.
 
Hey asteidl and Hiker, thanks for visiting. Sorry I've been AWOL for a while, but I didn't expect anyone to reply this early, and there really haven't been any major differences until today.

Small update here, so I'll reply below.

So, on the outside it still looks like this:
20130421_011716.jpg


All outside modifications have been done (I hope), and the wardrobe is working.

However, with the wardrobe running, and lights out in the room, it looks like this:
20130421_020215.jpg


Not very impressive, I admit. And I'm not just talking about the photo quality. :D

But here's probably the interesting part:
20130421_020323.jpg


Hiker said:
I wouldn't bother with the mylar. White paint works pretty good.

That's what I figured as well, but I am going to have to go over a lot of the inside with white packing tape, or something, to cover all my ugly shortcuts...

Hiker said:
Where will that exhaust be going? If it's not going outside, it will just heat up the room the cabinet is in and your cooling ability will suffer.

I expect that I'll be fighting temperature constantly, since I live quite far north, and this wardrobe is in the basement. Not sure how I'll solve that, but I hope it'll stay pretty cool. It's all concrete and stone, and there is an air vent to the outside right next to the wardrobe.

Hiker said:
I like the cabinet. You probably won't need that much vertical with the size light you're going to use in that small space (400W HPS?), so you could divide it up into separate flowering and veg areas. You talked about closing in that bottom right area, why not just put a board across the top of it and dedicate the entire bottom to some clones/mothers? I think you have plenty of vertical to carve out enough space to get a small scale perpetual going.

Thanks, although I think you'll be disappointed. I'm only running a 250W CFL. There's room for two if I hang them sideways, but I'm worried the heat buildup by the power-thingie (technical term) resting against the back wall may be dangerous. I hope you understood what I meant.

I like the idea of one closet, one plant, so if I want to run a perpetual grow, I think I'll get another wardrobe. I know exactly which one, which would give me two additional rooms, including a much larger space for flowering, and a "utility room" for all the hardware. I thought about removing the little compartment altogether, but it gives the whole thing some much needed structural integrity. (I don't think IKEA meant for their wardrobes to be used for growing a weed. :D )

Hiker said:
I want to see how you solve your light leak problems too. I'm always trying to come up with new methods, so I love seeing new ideas on this topic.

Well, as you can see, I haven't solved it myself. Yet. In the dark picture you can see an atrocious amount of light leakage (at the bottom, I just haven't finished what I tried), but I believe I have the solution in mind. What I used to get to this stage was window sealer strips(???).

Now, I just used the ones I had around to try it, and it's approaching what I'd call acceptable. I think thicker strips, in a slightly different location is the key. For the center bit, I basically did a using-what-I-had-at-hand kind of job of what asteidl posted. I had some card board spacers from the packing that the wardrobe came in, they were the perfect width, though a bit thick, but it does the job perfectly. I just taped it to the inside of the left door, overlapping a bit with the right door. In the open picture, you can see what I did on the left hand door.

As for the ventilation, it's not done, but it works. I have a helluva lot more "pull" through this box than the last one I built.

Things left to do:
  • FINISH LIGHT PROOFING!!! (80%)
  • Finish the ventilation duct.(90%)
  • Find a permanent solution to all the electrics. (0%)
  • Finish the DWC bucket. (80%)
So, all in all, I'm making progress.

To finish up, I have some questions, again..

I don't have cheap and ready access to RO water, is tap water a serious no-no? The area I live in has pretty good tap water. How good, I won't know until I get my EC meter, I guess.

Also, what are the bare minimum I need of nutes to get by in a DWC bucket? I have access to most brands, I guess, except General Hydroponics, which I haven't seen anywhere. Don't want to order this stuff online, see. I hardly pay for this stuff with a credit card, even. Let's just say I don't live in a country with a medical MJ plan... Anyway, I'm quite low on funds, so I can't go overboard with the nutes.

Well, that's it for now. I'll try to peek in here a bit more often now that it's so close to start-up. (I'm hoping to start germinating monday or tuesday.)

See you guys later, and thanks for the feedback.
 
Nutes made for pot, BPN will probably be the least expensive. If you want really cheap, MG water soluble tomato food will work. 5 bucks at wally world.
 
Back
Top Bottom