Orangeblood's Area 420 Skunkworks Extravaganza

Status
Not open for further replies.
Hello fellow DIYers!

I'm starting this thread to showcase some of the contraptions I've built to help inspire and guide those amateur MacGyvers in all of us.
Alot of my inspriation comes from people like Rube Goldberg so you may see some strange and round about ways to accomplish a simple feat in my creations.
Patience, creativity, and common sense is used in everything I build. Basic knowledge of botany, science, and math is used for nearly everything.
Some things work and some dont. Some things dont work very well at first but by simply making adjustments and working thru the faults I can often get the thing to do what I want.
I do plan to show the failures I've had along the way. Learning from mistakes and failures is paramount when building your own gardening machines. Plus I'm sure many of you will be able to offer suggestions on how to get the failures working the way they should.

:yummy::yummy::yummy::yummy::yummy::yummy::yummy::yummy::yummy:
 
oh yeah!! I'M IN!!

we sound A LOT alike :passitleft:
 
The Water Cooled Grow Room/Tent Air Conditioner

After nearly a full year of tinkering and changing out parts I have finally come up with an air cooling system for growing in a tight confined area.

This thing has not come cheap. Many of the crucial parts are hi end items that are used for their perfomance qualities. I've made cheap homemade parts to use in this system and I plan to show them as well.

The size of machines in this system is for my grow room which is 10'x10' with a 4'x'4'x7' gro tent for flowering. The sizes for your particular situation will vary from mine but you will get the basic idea of what to build and how to build it.

Parts List:

Thermostat controller

465 cfm blower. Mine has a double barrel outlet to divide the air so I'm actually using 230 cfm of air power

Aquarium water chiller. Mine is a Hydrofarm 1/10hp chiller capable of chilling 13-130 gallons of water. If your needs are small enough you may be able to get by using a water cooler with ice bottles. If your needs are greater you will need a 1/4hp + chiller.

Hydro Innovations Ice Box. I've made a homemade version that works but not as good as HIs' that I'll show.

350 gph hi quality pump. Size of the pump will vary. I find it better to buy a larger pump and use a flow adjusting valve to slow it down if needed.

A reservoir. I'm using a 30 gallon trash barrel

Air King 12" wall mount fan

Duct work tubing and adapters if they're needed.

3/4" and 1/2" tubing, hose and duct clamps, duct tape

Installation:
The thermostat is mounted in my bloom hut because that is where the cool air is needed the most and where I want the temps to be measured and set.

100_09802.JPG


The thermostat is set at 80 degrees and the blower and fan are plugged in and controlled by it. This particular thermostat has a piggy back style plug where a power strip is plugged in and the blower & fan are plugged into the power strip.

The blower is put into position to pull fresh outside air. Duct work is ran from the blower to the Ice Box and then from the Ice Box into the flowering tent.

100_08971.JPG


The reservoir is filled with 18 gallons of water and wrapped with insulation. Holes are cut into the lid so that the feed and return lines are easily ran thru the holes along with the pumps power cord.

100_09773.JPG


The chiller is put in place and a stretch of 3/4 tubing is cut to go from the pump at the bottom of the reservoir to the inlet of the chiller. This line is also where the flow adjusting valve will be installed.

100_09464.JPG


Next a stretch of tubing is ran from the chiller's outlet to the inlet of the Ice Box. This line will require an adapter to go from 3/4" tubing to 1/2" tubing needed to enter the Ice Box. Then a stretch of tubing is ran from the Ice Box back to the reservoir.
Hose clamps or zip ties are used on all connections to prevent leaks.

Next the pump is plugged in to run 24/7 thru the chiller and Ice Box. The temp is set on the chiller to 50 degrees.

Check to make sure water is flowing and the chiller is chilling.

Adjustments in water temp, water flow, and air flow will be needed for your particular application.

The chiller will produce warm air and can either be placed outside of the grow room or you can build an exaust system for it like I did. I will post the ins and outs of that device in a future posting.

This system maintains my grow room with an abundance of fresh cooled air. Temps in my room never exceed 79.8 degrees regardless of the air temperature being injected into the room.

The system runs an average of 3 minutes on, 3 minutes off being controlled by the thermostat.
Total wattage used is only about 300 watts compared to a window unit ac which run at 700 watts+ for the smallest units.

Below are pics from earlier versions
100_08951.JPG


This version used a 5 gallon water cooler filled to capacity with 2-3 frozen 3 liter bottles of water. It worked but the ice bottles needed changing evry three hours. It was not efficient enough for me but this system would be great for a mini garden.

100_09785.JPG


Here is a home made version of an Ice Box. It's built from two hvac boxes with six inch outlets duct taped together with 20 feet of copper tubing coiled inside of the box. Water pumped thru the coil as air passed over the coil to cool the air. It worked but not as good as the one from Hydro Innovations
 
The Chiller/Dehumidifier/Air Conditioner Exaust System

If you are using a chiller, dehumidifier, or air conditioner you may be faced with issues because of the warm air created by these machines if they are operating inside of the grow room.

Because these machines create very warm air I have found it easier to deal with it by isolating it and evacuating it immediately rather than trying to round it up with the rooms general exaust system.

This exaust box is very inexpensive and easy to build


The Parts List:

A plastic bin large enough to slide over the machine to capture the warm air. It should probably have about an inch of play on all sides so it does not effect the function of the chiller. If you cannot find one the right size it just needs to be able to butt up against the chiller to catch the majority of the warm air.


A PC type fan that can fit in a piece of rigid 4"duct work. My fan is an 8 watt 20 cfm Dayton mini fan


At least a 12" section of rigid 4" exaust. The same stuff they use for an oven exaust.

Enough flexible 4" dryer duct to reach thru your ceiling


And of course, Duct Tape


Construction:

Prefit the plastic bin where it will be on the chiller and determine where the warm air is focused. That spot is where you will cut a 4" diameter hole to fit the piece of rigid exaust.


Cram the pc fan into the rigid exaust making sure it will blow away from the chiller and up the exaust.


Insert the rigid exaust into the bin and bend it into an L shape so the exaust will go straight up.Use the duct tape to seal it all up.

100_09337.JPG


Attach the contraption to the chiller


Attatch the dryer duct to the exaust and run it straight up thru the ceiling giving it a chimney style exaust. Plug it in and there you go! No more hot air!

100_09464.JPG
 
The Six Site Aeroponic Cloning Bucket built for less than $25 and has a 100% Success Rate in Ten Days


This bucket is the heart and soul of my R2D2 Cloning Droid. It will perform just as well sitting on a table under similar cfl lighting as R2 or you can place it in a veg box under a T5. The possibilites are only limited by your imagination.
This bucket can also be converted to a three site aeroponic bucket that can take 3 small plants all the way thru harvest.


Parts:
1 3 gallon black bucket w/lid

6 vertical slat style 2 inch net cups

1 185-250 gph Eco Plus pump

1 1/2" x 10" piece of black tubing

1 360 degree sprinkler sprayer with an adapter that will allow it to slide into the piece of tubing

1 piece of pvc pipe that can slide over the tubing to give it rigidity.

Two quality timers

1 cup of Hydroton

I purchased everything I used for this machine at my local hydroponic supply shop. If you choose to use parts from Home Depot, Lowes, etc. you will not have the highest quality parts and your results could vary from mine.

Tools:

Drill with a 2" hole saw. Make sure it will not cut a hole larger than the rim of the net cups.

Construction:

Cut six holes in the lid with the drill. You want to space them evenly apart.

Place the pump in the center of the bottom of the bucket.
Attach the sprinkler to the adapter and plug it into the tubing.
Slide the piece of pvc over the tubing to give it rigidity. This will prevent the sprinkler from flopping around when it sprays.
Cut the tubing to length so that the spinkler spray pattern is just below the rim of the bucket when it is fitted onto the pump. This may take some adjustments and several cuts before you get it at just the right height. I think mine is around three inches.
100_09442.JPG


100_09451.JPG


Cut some slats out of the net cups to widen the strike zone for the sprayer. I use rockwool as a medium but many mediums will work in this machine as long as they do not break apart causing particles to be picked up by the pump and clog the sprayer.

100_09543.JPG


I use clonex gel and solution with an additional dip in vita grow. I mix up 3 gallon of solution and pour it into the machine.

I then take my clones, put them in the rockwool and then into the net cup and then into the machine.

I also put some Hydroton around the base of the clone to fill up the cup. This will prevent algae and any spray coming out thru the top.

I run my light for 18 hours on and 6 off.

I set the 2nd timer to run the pump for 15 minutes every hour. Running eco plus pumps 24/7 could give you heat problems.

After 10 days in this machine I got these results

100_1022.JPG

100_1008.JPG
 
Hey Bandit, That ice box thing ain't nothing but a heater core out of a 76 or 77 Firebird. East bound and down, loaded up and trucking.
 
Cloner Update

I forgot to add that a notch must be cut into the rim of the bucket for the pump power cord to pass thru. You want to make this cut as small as possible so that the cord is nice and snug in the notch. This will prevent leakage thru the notch.

For the net cups it's possible to cut out all but three of the slats. The cup will still have enough strength to cradle the rockwool and eliminate the possibilities of causing damage to the roots when it comes time to remove the rooted clone from the net cup.
:Rasta::yummy:
 
Hey OB. How much was the pump man? Did you get it online or local?
thanx,
J

I picked it up locally and it was only $18 + a 10% discount. My hydro shop sells everything at msrp so if your shop has a tendecy to mark up their prices you'll probably find it for around $25-$30.
Eco Plus Pumps are very inexpensive and should be carried by any decent hydro shop that sells Hydrofarm or is a vendor for National Garden Wholesale Distribution. They're decent as far as quality. I've had some that crap out in a year and I have two pumps that are over five years old and are still running strong.
My pump brand quality list from best to worst goes...
1 Beckett
2 Little Giant
3 Eco Plus
4 Via Aqua (Every via aqua pump I've had was a piece of junk that crapped out within weeks or months. I avoid them now)
 
:nicethread:
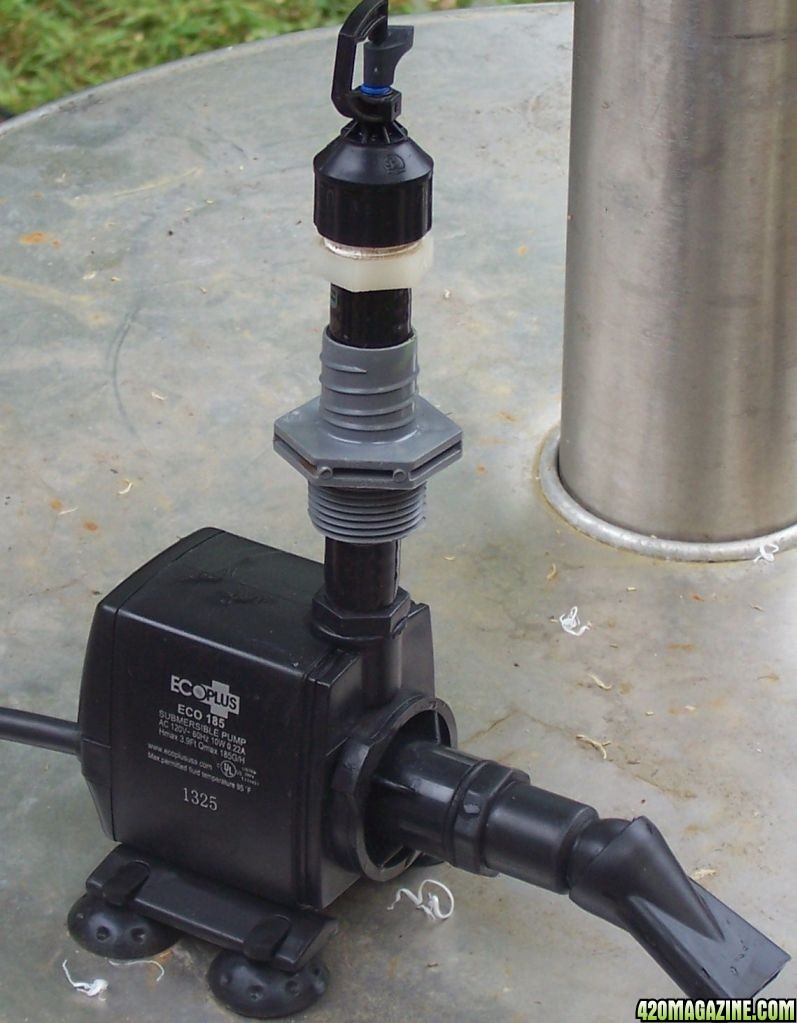
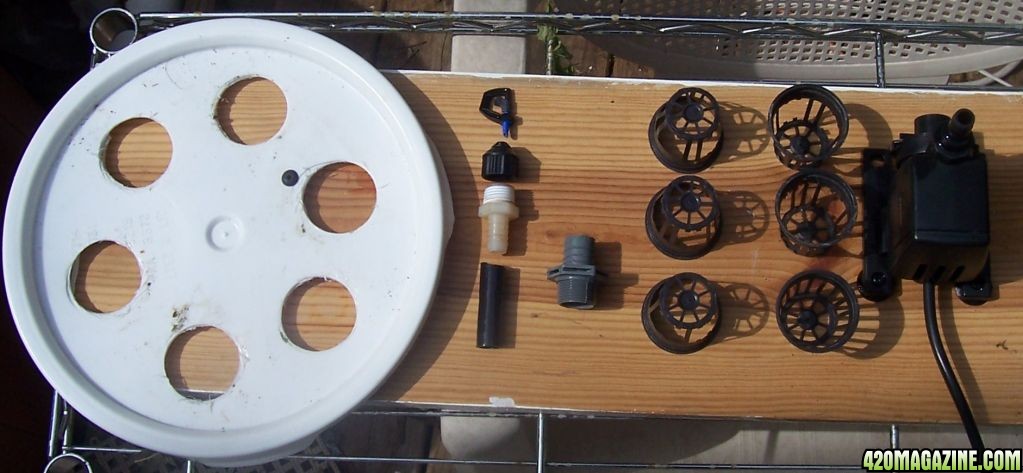
orangeblood, but why is the beckett pump better than the little Giant?
idk and have only used the little giant strongest model but am always looking for better anything.
+Rep on this thread my friend

High Wingman! :welcome:
It's just an opinion from my experience with the two brands. Both are high quality.
I've built several garden ponds that require pumps to run 24/7. So far 1 of three Becketts have been replaced and all three Little Giants have been replaced. One LG simply quit working while the other two would work but their seals failed and electrified the ponds. The LGs were between 3 and 5 years old. The failed Beckett was under a year old but the other two have been running for 12 years now.
 
How did I not see this sooner!?

Orange you got skillz! Not just growing, not just building, but the ability to think it and do it! I learned too many cool little tidbits in this thread already to list them.

Great stuff! Wish I could rep ya.

:bravo::bravo:
:thanks::thanks:
 
Status
Not open for further replies.
Back
Top Bottom