First Grow-Aero-Stealth Box

A guy I work with (2 hour drive) wants it, but I'd have to wait for him to come get it. Any thoughts how to transport something like that, that far? Another option is to put it out somewhere and see if nature can bring it to harvest. We'll see though. Now, to ease my troubled mind I will begin acquiring materials to build HygroHybrid's RDWC setup and begin aiming for the 2lb per plant grow he describes on his YouTube channel.
 
I'm sorry to hear about you having to shut down. That happened to me 3 times within 9 years before I finally got it to be stealth and totally hush. I was really hoping you would be able to showcase my secret method. Hey, lets not rule it out. You could always get yourself some new digs in the future to make that possible. I'm actually certain that you will. This is just a delay in your game.
You know what they say...when one door closes another one opens. Now you have the time to think up a new set-up (possibly at a new place if you want to do that in the future, this way you have less heads seeing what's cooking) and you will be all the more adept. Matter of fact, if you are able to go bigger than a closet next time around, I will see to it that you are a Supreme Lord Jedi Master of this craft. Here's what I could enable you to do:

1.)Multiple container DWC with no connected water circulation plumbing whatsoever yet a central multi-zone auto top off system that is made possible by a soon to be Patent Pending (yet not for sale anytime soon, I assure you, I will only give the fully hidden and encapsulated sensors and controllers to one person, you...at least for now) control module and auto top off level sensors. There is one sensor for each container and it is infinitely expandable with one additional interface module for each 36 containers and chaining additional 4-zone control modules. Imagine a multitude of containers without any connected circulation plumbing to get clogged with roots yet they are all topped off separately from one RO unit.

2.)No water pumps are ever used for circulation because they are not necessary.Only for filling during water change (even then it is not 100% necessary but thats another topic for another post) Water pumps heat the water much, much more watt-for-watt , for the same amount of oxygenation and surface agitation that an air pump would do just the same but with much less wattage.Using very large 8" diameter fish farm air stones will create vicious surface agitation (read:eek:
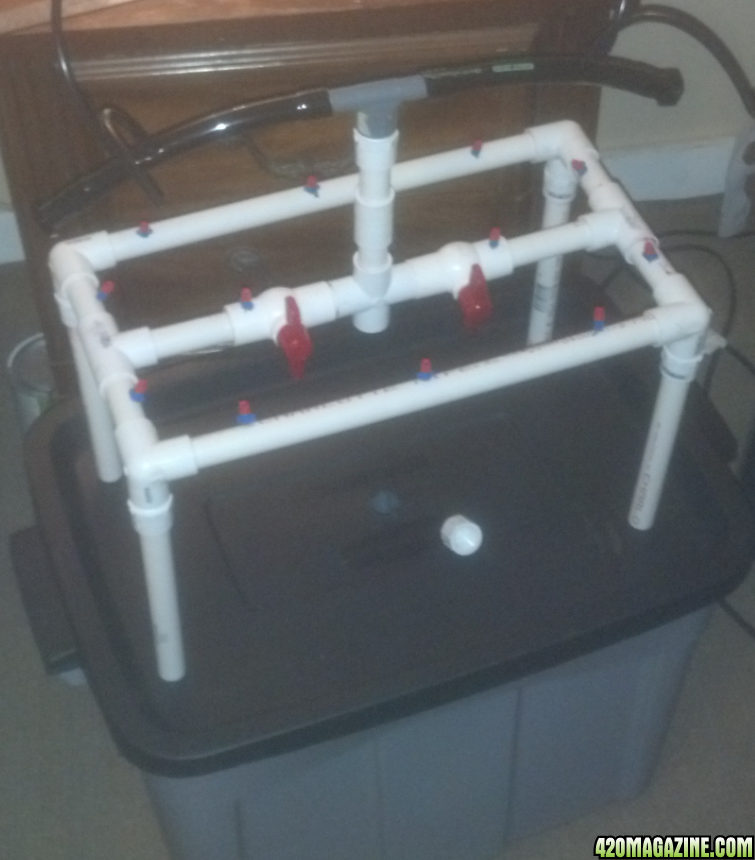
xygenation) with very little heat induction, and plenty of bubbling for the cloner/seedling stage. 100 watts of air pump can create enough oxygenation for 12-20 gallon containers. If you only use a 4 site system, you could probably get away with a 25 watt pump! Even better still, make a small intake air hose (through a small carbon filter forced through a low cfm fan, pulling air from outside) to bring in cooler clean lint free air for the air pump that would cool your water during cold months and even preclude the need for a chiller during warm months. Best thing about those 8" stones is that they last forever if you valve them up properly and give them a good cleaning after each cycle. That's one 8 inch stone per container, not just one in an auxiliary res.Heck, my system doesn't use an aux res anyway. Those were never necessary to begin with.

3.) No need to have walking space around the plants. Even though it is perceived by many that you need some space to walk around flowering plants, I assure you that having empty unused footprint under the lights is the wrong way to go. With my method (this bit of advice is not dependent on the controller, yet the way that you put them into flowering) you simply put clones (or a seedling in a small peat pellet) in a small hole in a foam disc that sits in your bubble cloner (or just use the same DWC flowering container as a bubble cloner because the 8" air stone creates perfectly popping bubbles above the water surface when you adjust the valve properly) and when the vegging plant gets so big that it tips over (it will do that because you don't use media for support except for a small peat pellet if its a seedling and that doesn't give support in late veg anyway) that is when it is time to put it into flowering and you tie it down at just a few points along the main stem so that it remains at a full 90 degree tilt when in the flowering room. This enables you to veg longer without having to worry about a 3x stretch , just a moderate stretch upward, and you get the same benefits of LST without having to go back in the flowering room after Day 1. You can use the entire footprint of the room. No need to go back in for water changes either.
4.) Water changes are very fast and can also be few and far between. Each container has a 1-1/2" vacuum manifold inlet that goes down right to the very bottom of the container. You cut the inlets to the exact length needed for your particular container (I'll explain how the containers are provided later). If you are doing DWC properly and have at least a 20 gallon Rubbermaid Brute Tote (tote is good for low height requirements) or 20 gallon Rubbermaid Brute round trash can, then you will have at least 13-15 gallons of useable water inside the container even when the root ball is at its biggest. For this reason there is no need to do too many water changes. I will explain why this enables you to do fast , right down to the very bottom water changes with a wet vac, without ever harming roots (this was my method for 5 years mind you). The vac is set-up on a table above the container level(outside the room) with a valve in the drain hole for easy emptying via connected hose to a toilet drain or by fixed in place means. Way faster and more reliable than a water pump. No chance of getting roots tangled in an impeller cavity or clogged basket screens.
When you first set up your clones or seedlings in the container, you will not need to change water for another 10 days or even up to 3 weeks if you have a slow rooting variety ( mine always rooted within 8-12 days). Even though you will have small roots by the time you need to add nutes and adjust pH, they wont be so long that they get sucked in by the vac. Remember the manifold inlet stays at the bottom of the container far away from new roots anyway. By the time you need to do the second water change ( which will be at least 3 weeks away because of the 13:1 gallon/plant count ratio, the roots may very well be at the bottom of the container, but the root ball is going to be so massive that it doesn't matter if it gets caught at the inlet of the wet vac manifold. It will not stop the wet vac from doing its job. It will not harm the roots either. No more clogged pumps, no more clogged pipes. Did I mention that the separate vacuum outlets for each container are outside of the room? Out of the way of the plants. Although, if for some reason you want the thing inside, you can do that to. Everything is very easily adjustable.
4.) You provide the containers yourself. Think about it, why would somebody want to get a container delivered that they could easily pick up at home depot, lowes or the local hardware store. Your containers don't have any plumbing holes. No bulkheads, no uniseals. You simply drill 4 holes in the lid yourself to accommodate the RO hose, the level sensor, 3/4" air stem and the vacuum manifold inlet. I'm sure everybody that does this hobby has a drill. That shouldn't be a problem. Only you know how much headroom you have below your lights. It is best to optimize the amount of usable gallons by providing the containers that best suit your needs yourself.

5.) This system comes with an auto top off controller that is un-defeatable. Can't malfunction because the device is not being used for anything even close to its cycling potential. Float switches are unreliable so they are not part of this system. Ball cocks are even worse. I use a switch that is immune to any of the conditions you could throw at it. You could turn the water surface into a hellish wave pool by putting the full force of your air pump through one air stone and simultaneously set the de-watering vac to blow through the water column (instead of sucking) and still the level sensor does not get faked out, harmed or even give a shit. It does not degrade over time either. You and the next generation born the very day you start using the system will be long gone and the controller will still work. Doesn't get mucked up over time, it's that simple. It is not a sensitive electronic printed circuit board device. It is part and parcel of a reliable electromechanical relay switchboard that is fully encapsulated to be preserved for your entire life.
6.) Because of my system, for the first time in history, it is possible to do a multiple container DWC tree grow ( a la vertical lighting) with a central auto top off with no connected plumbing and a lazy susan pail caddy under each tree. This eliminates the problem that is encountered when 4 trees are grown in a diamond configuration surrounded by 5 vertically hung lights. That problem being one side of the plant facing the wall and not getting as much light as the other three sides of the tree. You can spin the trees around periodically to avoid a dead leaf side without upsetting the crucial re-circulation plumbing of a connected dwc tree grow. Although, you cannot leave the horizontal portion of the vacuum manifold connected while spinning it around (or the air pipe but it is very easily removable and put back in with less than a minute of twisting a thread here and a union there, not a hindrance whatsoever) but it's not an issue at all.
7.) There is an optional water change module that aids in automatic or semi-automatic water changes if that's what your into. Think about it. Even if you like to do this step manually ( which I like personally) wouldn't it be nice to use a hand-off-auto switch to fill each container (after quickly emptying with the wet vac) and have the filling pump stop automatically when the exact desired level is achieved? The same level/auto top off switch that establishes the auto top off level also stops the filling pump so that the auto top off level and water change filling level are exactly the same and in tune. The timer relays associated with the water change module are known to work with 120 volt DC circuits (the harshest control voltage there is) for upwards of 25 years in the harshest industrial treatment facilities. Think about how long it will last when your just using it for 24 and/or 120 volts AC (AC is much less taxing on equipment than DC).
8.) I don't provide any parts that you could get at the Hardware store much cheaper than what it would cost for me to buy it myself and pay shipping. That wouldn't make sense and it would be an insult to the abilities of the operator who is going to use the system. I simply provide you my unique technology (that cannot be provided by someone else) and you go down the road to the hardware store to pick up the stuff that can be provided by so many others.What kind of inventor would I be if I was trying to give you some 13 gallon kitchen size wastebaskets connected with pvc?? I give instruction on how to layout and custom build for your particular room. This is the only way you will be able retrofit the system to the exact full footprint of your room. Your available grow space should always be the determining factor in how the containers are laid out. This is the only way to get the most GPW harvests possible for your space. That is an inconvenient truth for manufacturers who sell systems with connected plumbing. All too often a compromise has to be made because the room will sometimes need to be re-structured according to the available system configurations they offer. There is no set configuration with my system and no plumbing to cause the great flood of 20XX. FLOODPROOF as long as you do the little bit of RO connections properly and to be honest I can't see how you could mess that up. Roots cannot cause a flood the way they can with a pre-manufactured connected system.
9.) Did I mention that with each container ,being its own separate reservoir,you are able to run as many different strains as you have containers, the same way that you would in an individual soil container garden? 7 week, 8 week, 9 week , 10 week, 11 or 12 etc.. Doesn't matter because each plant is a separate entity. No other multiple zone system has ever been able to achieve that without poking a hole into the side of a container which could (and sometimes does) cause a flood. None of those systems offer an included foolproof auto top off either.
In short... In the past there were pros and cons with every growing method. No cons here. So, are you in?
P.S. I also have a clever way of not making the lighting above the containers heat up the water. That's for another post.
P.P.S. I don't mean to irritate anybody by saying this but it actually is the truth. My system makes RDWC pointless, inefficient and obsolete. Not to say that RDWC is not a great producer. It certainly is. But it is the predecessor to this system. I've since made leaps and bounds above that method. I'm probably just drawing the ire of so many members right now and doing the opposite of what I intend by saying that but it's simply the truth. I just need someone to show it in action to prove it. If I show it, everybody will think I am biased and lying to support my claims. That's why I need a total stranger (like you) to test it in the open forum.
 
>>> Any thoughts how to transport something like that, that far?

I usually set up a dark/light period with the dark being the majority of the day. In that case if I need to transport I could prepare a light proof transport box made from simple materials like cardboard aluminum tape. I would then put the plant in the box a few minutes before lights off the day before a move with just enough time to put it back under the lights and if not you will still have the ability to take it out of the light proof box! Obviously you have more daylight time when working with 12/12 ;)

Nice ideas there Liquid. My thoughts are still pending.
 
BAR.JPG
DSCF12205.JPG
DSCF12224.JPG
DSCF12233.JPG
DSCF12244.JPG
DSCF12253.JPG
DSCF12265.JPG
DSCF12274.JPG
DSCF12282.JPG
 
its such a shame that you cant see this grow through, but your mates have only got themselves to blame and if they smoke bud make sure you let them know that you would of shared it out between the people living in the room with the plants, that should piss them off enough to make them wish they never opened their mouths, even worse let them know someone else is growing it and your splitting the harvest with them, rub it in as much as you can just to teach them a lesson.

hopefully you can find a friend to grow it for you and give you some of the bud at harvest, at least it wont be a total loss and you get to sample the end results, it looks like a really nice strong plant as well and if it its female then its going to do well, ive i lived within a hundred miles of you id come and pick it up and grow it for you and give you all the bud it produced, but im not even on the same continent so thats just not possible,

hopefully you will find a way of keeping it going, if a friend can grow it then even better, at least you might get the chance to see it through the grow and get something back at harvest, or worse case as mantioned above go and find somewhere outdoors to plant it, out the way of the wind so the temps wont affect it to much and it should do fine and flower before it gets to cold, if the weather is good where you are then it will do much better outdoors then indoors and you will end up with more at harvest then you would if you kept it growing indoors, just plant it somewhere out the way where dog walkers dont go and you can check on it once a week or every 2 weeks up till harvest,
 
I am on the fence of continuing to take the chance as I really want to get it in really good shape in veg before sending it somewhere to flower. I am not too concerned about getting any buds as I smoke almost never, I am just emotionally committed at this point. A lot of equity went into this grow and that's what really hurts to lose.
 
its such a shame that you cant see this grow through, but your mates have only got themselves to blame and if they smoke bud make sure you let them know that you would of shared it out between the people living in the room with the plants, that should piss them off enough to make them wish they never opened their mouths, even worse let them know someone else is growing it and your splitting the harvest with them, rub it in as much as you can just to teach them a lesson.
you know they can't keep there mouth shut. The 1st person he tells is a cop. Go figure.
 
Brief update. I just got back from a very long, hot and extremely physical shift in the oil field, and unfortunately I have to back for another this evening sometime. With that said, I must wait till I have some time off again to catch up on everyone's journals which will likely be tomorrow night sometime. Also, when I was half way to work last night, I remembered that I had taken the T5 from my clone room and mounted it in the veg room and forgot to put it on a timer. I called a room mate to see if he could break in to shut it off, but he was unable. So last night at midnight the 6 CFLs went off for 6 hours, but the T5 remained on. the light cycle for that day ended up being 31.5 hours. Upon my return I opened the closet to find all 7 plants had put on a good amount of foliage and my cut tops are branching out nicely. after that brief perusal, I shut all the lights off in the middle of a normal day. I'm thinking off for 3 hours till 4:30 PM, then back on till 6PM, off till 9PM then on again till midnight when everything will be back on schedule. This is a last stitch effort to reclaim the dark period that was lost in the form of a variation of the Gas Lantern Routine (GLR) DonPaul has been sharing with us. If veteran growers suggest I just forget about the lost time, I will neglect the 2nd planned light off period of 6PM-9PM and just get the lights back on at 4:30. I can't see how at least giving the plants 3 hours of lost time could hurt anything, but if I am wrong about any part of my approach, please say so as I will check back after I get a few hours of shut eye to recharge my body. Thanks for understanding and I will get back to everyone's journals in due time.
 
Damn the one time you would want someone to break into your grow and they can not!:hmmmm:

Although I am a fan of gradual increments of everything to do with 'change' I would assume the 1and a 1/2 hour light period you will have between 4:30pm and 6pm is unnecessary when if your lady is already in a 12/12 flowering cycle. My first suggestion would be to forget readjusting the period in increments in this case but I am utterly confused on what your original time schedule was! May you please elaborate a bit for me ;)

We are still in veg from 6am to 12 midnight. however it went from 6am to 1:30 pm the next day. I want to give back some lost dark period before getting back to normal veg schedule. thanks AG
 
Nice work. Very well planned.


Box-1.PNG
Box-2.PNG
Box-3.PNG
Box-4.PNG
Res_Table.PNG
Aero-Top_Drip-DWC.PNG
Box-5.PNG
Remaining_Glass.PNG


Perhaps this should not yet be classified as a journal. If not, I apologize. This box is a plan that I've been meticulously designing for 3-4 weeks now. I am starting from complete scratch, shy of some bag seed and a few beans my room mate has and claims to originate from some nugz. As I am starting from scratch, I have a pretty extensive list of things to buy and with a 2 week window of no bills (this and next), I will be doing quite a bit of shopping in the days to come. Once everything is constructed, I will drop some beans and have at it.

From you awesome folks, I request criticism, as much as you feel might help. I pre-apologize for sounding obtuse. As this and other Journals are archived for future researchers, I do request keeping kudos (unless warranted) and subbed posts to a minimum to benefit the next man that is in search of info.

I am known in my circles as being one that over thinks everything, and I believe this may show in the pictures. But for my girls I will spare no expense (within reason). I live in a small city somewhere in the northeast US and necessity dictates that I keep this grow on the hush. i will address every measure of security I can think of, but I want to utilize the space I have to maximum efficiency to get the absolute best quantity and quality my unlearned hands can produce. I get that this will be a learning and growing experience for me, but I wish to provide myself with as many tools as possible to better increase my rate of success.

I will try to acquire most of the remaining materials on my list within the next 2 weeks, but I know I will have to leave a few things and just purchase them as I go from week to week. Below is a list of the things I have on that list. Somethings may be in the pictures and not on the list, or vice-a-versa. I apologize for that as it's a work in progress, plus I may have already bought it.

01 - 1/2" Barbed Tee......................................................................................$00.50 DH
01 - 10' Length 1/2" Poly Tubing......................................................................$03.00 DH
02 - 1/2" Poly End Plugs..................................................................................$03.90 DH
01 - 50' Roll 1/4" Vinyl Tubing..........................................................................$05.95 DH

01 – NDS 4 in. PVC 45-Degree Hub x Hub x Hub Wye………………………………………$05.12 HD
02 - NIBCO 4 in. PVC DWV 90-Degree Hub x Hub Elbow…………………………….…..$08.84 HD
01 - JM eagle 4 in. x 10 ft. PVC Sewer and Drain Pipe………………………………….….$07.35 HD
01 - Master Flow 6 in. Starting Collar Take Off - Snap Together……………………..$04.48 HD
02 – Speedi-Products 6 in. 30-Gauge 90 Degree Round Adjustable Elbow….….$05.36 HD
03 – Leviton 660-Watt Keyless Twin-Socket Lamp Holder Adapter………………….$07.44 HD
01 - Viagrow 20.5 in. x 8.5 in. Seed Propagating Seedling Heat Mat……………….$19.97 HD
01 – Defiant 15 Amp 7-Day 8-Outlet Digital Timer Power Strip……………………….$18.97 HD
01 - 72 in. x 36 in. x 5/32 in. Twinwall Plastic Sheet…………………………………$13.46 HD (cut to 30x48 for inner door)
01 - Rubbermaid 18 Gallon Roughneck Tote..............................................$08.47 HD (15.9D x 16.5H x 23.9W)
01 - Stalwart Ratcheting PVC Pipe Cutters…..……………………………………………………$11.99 HD
01 - PRO-SERIES 19-Piece Hole Saw Set with Case………………………………………….$12.97 HD (3/4”-5”)
01 – PVC Cement…………………………………………………………………………………………………$04.44 HD
01 - 1/2" x 10' PVC Pipe..........................................................................$01.81 HD
04 – ½” PVC Slip Caps…………………………………………………………………………………….….$01.44 HD
01 - 1/2" PVC Cross................................................................................$01.46 HD
04 – ½’ PVC FPT Male Cap…………………………………………………………………………………..$01.48 HD
02 - 1/2" PVC Tees..................................................................................$01.32 HD
01 - 1/2" PVC 90 Elbow............................................................................$00.31 HD
02 - ½” PVC Solvent Socket Ball Valve.......................................................$03.32 HD
07 - 1/4" Plywood 4'x8'............................................................................$97.65 HD
02 - Shepherd 2 in. Rubber Wheel Rigid Caster………………………………………………….$06.26 HD
02 - Shepherd 2 in. Swivel Plate Caster………………………………………………………………$07.30 HD
02 - 3pk Everbilt 3.5" 5/8r door hinge........................................................$15.96 HD
01 - Rheem 12 in. x 12 in. x 1 in. Basic Household Pleated Air Filter……………….$03.97 HD
03 - 4 in. Brown Louvered Plastic Vent…………………………………………………………......$06.78 HD
02 - Everbilt 3-1/2 in. Zinc Plated Adjustable Staple Safety Hasp……………........$07.94 HD
04 – Speedi-Products 4 in. White Round Soffit Vent…………………………………………..$08.28 HD
01 - Speedi-Products 6 in. White Round Soffit Vent……………………………………………$02.58 HD
02 - Master Flow 6 in. X 96 in. Aluminum Flex Duct……………………………………………$25.70 HD
01 - 2x4 Stud..........................................................................................$02.87 HD

04 - 1/2" Side Outlet SxSxFPT Elbows..................................…....................$06.40 LW
02 - AC Infinity HS1238A-X Fans............................$31.98 AZ (4.7x4.7x1.5) 110CFM @47DBa (20 watts/110V)
01 – 20 LBS bag of Active Carbon…………………………………………………………………………$45.90 EB (12x12x5=720)
01 - IMAGE® Aluminum Water Cooled Single-Row Heat Exchanger Radiator……$15.09 AZ (6.2” x 4.7” x 1.1”)

01 - iPower Grow Light 400W HPS/MH Dimmable Air Cool Hood Set…………….……$143.89 HG (23X17x9) Ballast – 120V/8.6A 240V/4.3A - 50/60Hz - PF>0.99

01 - iPower 4" Inline Duct Fan 175 CFM………………………………….$47.00 HG (8.5x12x11)
01 - ActiveAqua Pump 250 GPH……………………………………………….$13.10 HG (16 watts/120 VAC)- 384W per 24 hr day
01 - Clonex Rooting Gel, 100 mL……………………………………………..$17.88 HG
01 - Jungle Juice Grow 4L…………………………………………………………$18.18 HG
01 - Jungle Juice Bloom 4L……………………………………………………….$18.18 HG
01 - Full Circle Stream Micro Spray Jets, pack of 10………………$03.98 HG (11.9 GPH @ 25 PSI)
01 - Sunleaves Rocks 0.25"-0.5" 13lb/10L……………………………..$06.71 HG
01 - ActiveAir Indoor-Outdoor Thermometer w/Hygrometer…$14.96 HG
01 – pH Control Kit…………………………………………………………………..$12.90 HG
01 - TDS-3 Handheld TDS meter……………………………………………..$20.81 HG
 
DSCF12303.JPG
DSCF12325.JPG
DSCF12334.JPG
DSCF12342.JPG
 
I just shut them off for. Hours only to give back something. @ work now, can't wait to see what's what wheI get home later i
 
blogged your set-up diagram.
 
Thanks Reg! Finally got home from work and got some sleep. Just checked in the closet and I noticed that these plants are BOOMing with new growth. The mother is bushing out very nicely and about 6 of the tops have some white hairs developing. The seedlings are growing nicely, but the 2 clones I managed to salvage are nearly twice their height and beginning to fluff up as well. I'm glad to have gained some perspective as to why people clone rather than drop seeds. All 6 sites in the little aeroponic have rooted nicely and though all 6 are pretty light green (deficient or lockout), overall growth appears to have went along much faster than the mom did in the soil in her younger days. I am restraining myself from posting pics as I noticed I got a little carried away with that in the past. About my situation, I decided to bight the bullet for another week or 2 to finish out the veg cycle. I could likely flip into flower any time I want to now, but I want to wait just a little bit longer to get the branches more evened out in terms of length. The guy I work with is willing to take any/all plants I want to give him. He allotted some space in his shed for me out in the country so I can build a bigger ScrOG net and maybe get the 18gal 2 site running one of the clones and one of the seedlings. I told him we can split the harvest 50/50 and that I'd get him into the hobby of cannabotany. So assuming my door don't get kicked off the hinge in the next 2 weeks, I think everything will be good.

Now time to visit all of your journals and lust after your ladies!
 
I am restraining myself from posting pics as I noticed I got a little carried away with that in the past.
You could never post too many pics. We're still all kids inside; we like the pictures the best.
 
Back
Top Bottom