Bio char

I will haven't gotten to it yet. Wood chips
I don't do a cover crop they won't be in there long enough to do any good I usually go 1 week 18 hrs then straight to 12 I only use the bed for flowering I veg in containers in I like to pot up in suscession as they grow I veg under LED's
 
I usually let my soil sit and rejuvenate for a few weeks or more in between grows.
I'll top dress and add a layer of Bokashi then start a cover crop, by the time the cover crop gets several inches tall I'll chop most of it and put it under the mulch (I use barley straw).
The worms chomp it right down and put it into the soil.
The cover crop keeps roots in the soil for the mycorrhazae.
 
It been 3 months sitting I usually ALWAYS got something going in there I tried all what you do and just kinda got tired of finding worms on the floor and adding chips and replacing cover crops so now all's I do is reammend add a little mycorrhizae to the root ball some chips on the top if I feel like it and to be honest they usually outgrow the bed by time I get to flowering them because I grow them up in containers first when I was caregiving I needed a perpetual going but since recreational came in here in Michigan the dispensarys took care that for me I can't compete with all the different flavors they have. I've been growing since like the late 80's early 90's so I really have tried a few different growing methods and now I have all the time in the world semi retired and that I don't have any more patients, I do pretty good on yeild, flavor, and tricombs if I do any more than 4 plants in there I run outta room even with a net up
I keep things going inside in the winter get 1 or 2 harvests if I need it after the fall harvest then if I time it right the ones that are in there now will be done by spring just in time to reveg and stick them outside for summer. And I never know what I might do I'm always trying something new can't get better or learn anything if I don't try new techniques! Sometimes it turns out good sometimes not so good!!
 

How To Redirect Water Runoff To The Garden​

Learn here how to use rain water harvesting to water your garden. Think beyond the rain barrel and figure out how to redirect water runoff. Harvest more water for your garden!​


Learn here how to use rain water harvesting to water your garden. Think beyond the rain barrel and figure out how to redirect water runoff. Harvest more water for your garden!
Harvesting rainwater to use for growing vegetables makes a great deal of sense. Unfortunately, the most common method of rainwater harvesting isn’t the most effective. Typically, gardeners invest in a rain barrel — which holds only 50 or 60 gallons of water — and then dole out the captured water to plants as needed, hopefully emptying the barrel before the next storm.
But 50 gallons is only a small fraction of the water you could be harvesting each time it rains. During a 1-inch shower, more than 900 gallons of water flow off the roof of a 30-by-50-foot house or barn. Instead of catching just a little bit of it in a rain barrel, why not capture it all? You can do just that with a simple setup that diverts rain from your downspouts directly to your garden. We’ll tell you more about how to do this in a minute, but first, we’ll explain why we think it’s such a good idea.

How Soil Stores Water​

Even many experienced gardeners have trouble comprehending just how much water soil can hold. Except in areas with consistently high rainfall, your garden soil’s moisture level will seldom be at “field capacity.” That’s the term scientists use to describe the maximum amount of water a soil can hold. When it rains or when we irrigate, gravity pulls the water down into the soil. After a heavy rain, some of the water may move all the way down to the water table or the bedrock, but a large amount of it is held by capillary forces that cause water to coat each soil particle and partially fill the spaces between particles. (An example of capillary action is the way a paper towel absorbs liquid.) That capillary water is what your crops use as they grow.
Each soil’s field capacity varies depending on how much sand or clay is in it. One cubic inch of coarse sand may contain 125,000 particles, while the same amount of the finest silt could contain 15.6 trillion particles! Soil particles have an astonishing amount of surface area. One cubic inch of an ordinary soil (with a mix of sand, silt and clay particles) could have a surface area of 25 square feet.

Source: Mother Earth News
By Cheryl Long
 
Gravity-Fed Soaker Hose
Gravity-Fed Soaker HoseLearn how to create an inexpensive and more effective gravity-fed soaker hose to capture this great resource, free rain from the sky.
Designing Your Gravity Rain Barrel Pressure Pump
Designing Your Gravity Rain Barrel Pressure PumpLearn here about everything you need for a rain barrel water pressure calculation. Designing a gravity rain barrel pressure pump doesn't have to be difficult to be functional.
Ep. 176 Planning and Preparing a Garden for Spring
Ep. 176 Planning and Preparing a Garden for SpringInterview with Joe Lamp’l.
What those numbers mean is that many soils can hold 2 to 3 inches of water in each foot of soil depth, and garden soils that contain lots of organic matter can hold even more. Crop roots can reach down 4 feet — sometimes even 8 feet deep — to tap this capillary water. To be sure crops get the water they need, gardeners would ideally want to keep their soil moisture near field capacity to a depth of at least 4 feet. During peak growth, crop transpiration together with surface evaporation can draw as much as a half-inch of water per day. The more water you’ve stored in your soil, the less you will need to provide supplemental irrigation.
To understand how soil moisture levels vary in your area, check out the soil moisture maps from the National Weather Service. These maps will tell you whether soil moisture levels in your region are above or below normal at any particular time.
Rainwater-Harvesting-System-Illustration-431x300.jpg

Image Illustration by ELAYNE SEARS
This simple rainwater-harvesting system will put the water where your plants need it most.

Your Improved Rainwater-Harvesting System​

To store as much rainfall as possible in your garden soil, you can set up a rainwater irrigation system that diverts your roof runoff water directly onto your garden beds (or lawn, if you prefer).
This rainwater-harvesting system relies on gravity to carry rainwater from your downspouts out into your garden or lawn. For it to work, the area you choose to irrigate must be level with or below your downspout. If your garden is not near a downspout, you may need to modify your setup, perhaps attaching a larger pipe to the downspout to carry the water out to a manifold and a set of perforated hoses in the garden.
Step 1: Go Shopping. Study the illustrations then head to a hardware store and buy one or more standard plastic trash cans. Get rectangular ones if you can — they will fit up against the wall behind your downspout a little better than round ones. (If you already have a rain barrel, you can just use it.) In the lawn and garden department, look for a hose manifold that will let you attach several hoses to it. Next, you’ll need one manifold per trash can. Go to the plumbing department and find a clerk who can locate the bulkhead fitting you’ll need in order to attach the hose manifolds to your trash cans. Printing this article and taking it along to show the clerk what you’re planning to do may be helpful.
Rainwater-Distribution-System-Illustration-470x284.jpg

Image Illustration by ELAYNE SEARS

This distribution system will deliver rainwater to where it can be stored best — in your garden.

Step 2: Install the Bulkhead Fitting and Manifold. Cut a hole near the bottom of the trash can, attach the bulkhead fitting to the can, and then screw on the manifold.
Step 3: Cut a Hole in the Trash Can Lid; Install the Can Under a Downspout Near Your Garden. If there will be leaves in the water coming off the roof, you may want to cut the downspout off above the trash can and install a screen over the entrance hole into the trash can. The screen will allow water from the downspout to enter but will prevent leaves from being washed into the can and clogging the manifold.
A small screen secured over the bulkhead entrance in the bottom of the can is also a good idea to keep debris from clogging the hoses. To prevent mosquitoes from breeding between rainstorms, drill a few small holes in the bottom of the can so water can drain away completely after each storm.
Step 4: Install Perforated Hoses. Decide which areas you want to direct the rainwater to, then round up some old garden hoses. If you don’t have any, ask around — many of us can seldom bring ourselves to throw out hoses even after they’ve aged and begun to leak. Cut them to the lengths you need, and then cap the ends or fold the ends back and secure with wire. Drill holes in the hoses every foot or so, and then attach them to the manifold. You could also buy no-pressure soaker hoses designed to work with gravity flow. (Commercial low-pressure soaker hoses will not work well with this setup.) If you use irrigation ditches between your crop rows, you can skip drilling holes in the hoses and just lay the hose ends in the ditches.
Each time it rains, roof water will flow into the trash can and out through the manifold to wherever you’ve directed the hoses. Check the system during a heavy downpour to confirm that the hoses are distributing the water where you want it. You may need to add more holes or possibly tape some holes closed.
Rainfall patterns vary greatly from region to region, but even if most of your rain comes in fall or winter, this system will let you store it right in your garden beds. (Be sure the manifold is fully drained during cold weather to prevent damage from freezing.) If you have periods during which your garden gets too much rain and the soil reaches field capacity, you can simply redirect your hoses away from the garden for as long as you need to.
There’s a bonus to using this DIY rainwater-harvesting system: If the rain doesn’t come often enough and you need to irrigate using your household water supply, you can just aim your main hose into the trash can and turn on the water, and your network of hoses will distribute the water wherever you want it.

Source: Mother Earth News
 

Soil and Water​

Water provides more than just liquid to a plant; it’s also the medium that enables nutrients and minerals to enter the roots. (Roots don’t digest dirt — they’re not “woody earthworms” — but instead obtain their nutrients only in solution.) What’s more, through the process of photosynthesis, some of water’s hydrogen is split off to become a constituent of the carbohydrate compounds that make up most of the body tissue of growing plants.
Interestingly, water also enables plant roots to obtain nutrients that are beyond their physical reach. At varying depths below our feet lies the water table. Above that is soil containing minute, air-filled vestibules. When enough moisture surrounds each soil particle to create a continuous film from roots to water table, plants can, by capillary action, draw water and thus food from places far beneath their roots. (When this happens, the soil is said to have reached field capacity.)
If, on hot summer days, the crops use more water than is replaced, dry air spaces are created within the soil, and the bridge to the water table is broken. Conversely, if a real downpour hits and the air spaces become flooded to the point of excluding oxygen altogether, plants can literally drown — because roots must have air available, as well as water.
Whether or not your garden soil will retain water well without becoming over-saturated is determined, for the most part, by its structure. But don’t feel that you must live with the type of soil that’s currently in your plot. The great equalizer, compost, can help improve any ground that has trouble properly absorbing or retaining water.
Take sandy soils, for instance. They often have large spaces between their particles that allow for excellent drainage — if there is existing moisture in the soil. If, however, as might be the case in an extremely sandy soil, those spaces are completely filled with air, they can actually become a barrier to water penetration. Rain will be able to penetrate no deeper than the first few inches, so even though the garden has gotten a good soaking, deeper levels will remain bone-dry. When that happens, plant roots tend to seek out only the upper few inches of soil and will thus be quite susceptible to heat and moisture loss.
Compost added to such a sandy soil will act as a moisture-retaining wick. It should be incorporated deeply — say, six to eight inches — so it will also help attract roots downward.
Silty soil acts in much the same way. Its powdery, flour-like texture can let water slip right through . . . just as the soil itself would sift through your open fingers. In the process, that water will quickly leach nutrients from your plants. Here again, compost will give your plot a better water retaining capacity.
Clay soils have another problem: They have so few air spaces that they’re too easily flooded by water. A sticky, slimy, wet clay soil can easily drown roots. The addition of as much organic matter as possible is a definite must in order to lighten the soil to allow plant roots more room to breathe. At the Eco-Village, we turn in at least an inch of compost (and preferably more) before planting any crop in our clay-heavy beds.
Turning under green manure (or cover) crops is often another good way to add more humus to the soil. Our own clay plot, however, doesn’t have sufficient below ground air to stimulate the needed decomposition of turned-under crops, so we actually cut down most of the green matter and compost it before working it in.
On the other hand, adding sand to clayey soil is not supposed to help its texture — the clay allegedly “swallows” it up! As an old gardening maxim puts it: Put clay in sand, money in the hand; put sand in clay, throw money away. But when we finally tested this adage last summer by working about an inch of sharp creek sand into a few beds along with their compost allotment, the sand did make a noticeable improvement in both texture and drainage.
 
Everyone from small backyard gardeners to large commercial growers to nurseries face the challenge of caring for plants when they’re young, small, and vulnerable. Here are some of the best ideas and methods. The less soil in a pot, the more important keeping up with irrigation becomes. Plants in big pots can go long times without water, those in rockwool cubes or small containers can need water many times a day.

The Challenge​

  • How to give your small plants and seeds enough water when they don’t have much soil
  • How to take care of small plants when you don’t have much time
  • How to keep new plants watered before you have time to transplant
  • How to prevent over-watering
  • How to save labor, water, and plant-loss costs
  • How to assure the most healthy, strong-rooted, and prolific plants

Solutions​

capillary10-infographic.jpg

Evolve your strategy and irrigation system
We started designing and supplying irrigation systems in the mid-1970’s. Since then, we’ve continued a quest to experiment and evolve better ways to water. We learned and continue to learn from both our own and our customers' experiences and we’re happy to share these with you. We can help you design systems through the range from conservative/traditional/proven to innovative/cutting-edge/experimental.
propagation20-starts.jpg

Capillary Mat Systems​

The best way to start and nurture clones, starts, seeds and seedlings​

Made from a felt-like material, capillary mats supply water by wicking moisture up from the bottom - when the planting mix and roots dry, they automatically pull moisture up. In university studies, this normally saves 70% of the water use and 92% of the labor costs while making plant growth faster with bigger yields.
 
Long Definition: Composting is the biological decomposition and stabilization of organic substrates, under conditions that allow for the development of thermophilic temperatures as a result of biologically produced heat, to produce a final product that is stable, free of pathogens and plant seeds, and can be beneficially applied to land. Thus, composting is a form of waste stabilization, but one that requires special conditions of moisture and aeration to produce thermophilic temperatures. The latter are generally considered to be above 45oC (113oF). Maintenance of thermophilic temperatures is the primary mechanism for pathogen inactivation and seed destruction.

Compost is an organic soil conditioner that has been stabilized to a humus-like product that is free of viable human and plant pathogens and plant seeds, which do not attract insects or vectors, that can be handled and stored without nuisance, and that is beneficial to the growth of plants.

Reference: The Practical Handbook of Compost Engineering, Robert T. Haug, 1993


AERATED STATIC PILE COMPOSTING​

The method of composting that we use with is referred to as Aerated Static Pile (ASP) Composting. This simply means that we induce airflow through the mix of materials using an electric blower - we do not turn the pile during the active phase (first 30 days) of composting.

ASP composting was originally developed by the U.S. Department of Agriculture in the mid-1970’s and is used throughout the country to process a wide variety of municipal organic waste materials. We have simply taken this technology and adapted it to work with smaller volumes of organic waste materials in various on-site settings, including agricultural, industrial, municipal and institutional (e.g., universities, military bases, prisons, etc.).


OBJECTIVES OF ASP COMPOSTING​

In designing our compost systems, our primary objectives are to: 1) protect surface and ground water resources; 2) reduce the time and expense now committed to manure management; and 3) produce a high-quality finished product for use around your farm, local community gardens, or to sell to gardeners in the area. Our goal is to provide a compost system that becomes fully integrated into your daily activities.

With aerated composting we maintain aerobic conditions throughout the compost pile and are able to control pile temperatures. This, in turn, expedites the composting process and yields a high-quality compost product that is effectively free of pathogens, parasites, and weed seeds. By composting in this manner, we are able to control offensive odors and flies, improve the aesthetics of the waste handling area, quickly produce a superior product and reduce the cost of labor and equipment (i.e., fuel, maintenance, etc.).
 
I just watched a Matt Power's video What is EM on YouTube I recommend watching that he talks about the Amazon and the human waste pits and Bio char and aerobic vs anaerobic conditions and some other things it made sense seemed to be good information if anyone else has checked that out let me know what you thought 🤔
 

Soil and Water​

Water provides more than just liquid to a plant; it’s also the medium that enables nutrients and minerals to enter the roots. (Roots don’t digest dirt — they’re not “woody earthworms” — but instead obtain their nutrients only in solution.) What’s more, through the process of photosynthesis, some of water’s hydrogen is split off to become a constituent of the carbohydrate compounds that make up most of the body tissue of growing plants.
Interestingly, water also enables plant roots to obtain nutrients that are beyond their physical reach. At varying depths below our feet lies the water table. Above that is soil containing minute, air-filled vestibules. When enough moisture surrounds each soil particle to create a continuous film from roots to water table, plants can, by capillary action, draw water and thus food from places far beneath their roots. (When this happens, the soil is said to have reached field capacity.)
If, on hot summer days, the crops use more water than is replaced, dry air spaces are created within the soil, and the bridge to the water table is broken. Conversely, if a real downpour hits and the air spaces become flooded to the point of excluding oxygen altogether, plants can literally drown — because roots must have air available, as well as water.
Whether or not your garden soil will retain water well without becoming over-saturated is determined, for the most part, by its structure. But don’t feel that you must live with the type of soil that’s currently in your plot. The great equalizer, compost, can help improve any ground that has trouble properly absorbing or retaining water.
Take sandy soils, for instance. They often have large spaces between their particles that allow for excellent drainage — if there is existing moisture in the soil. If, however, as might be the case in an extremely sandy soil, those spaces are completely filled with air, they can actually become a barrier to water penetration. Rain will be able to penetrate no deeper than the first few inches, so even though the garden has gotten a good soaking, deeper levels will remain bone-dry. When that happens, plant roots tend to seek out only the upper few inches of soil and will thus be quite susceptible to heat and moisture loss.
Compost added to such a sandy soil will act as a moisture-retaining wick. It should be incorporated deeply — say, six to eight inches — so it will also help attract roots downward.
Silty soil acts in much the same way. Its powdery, flour-like texture can let water slip right through . . . just as the soil itself would sift through your open fingers. In the process, that water will quickly leach nutrients from your plants. Here again, compost will give your plot a better water retaining capacity.
Clay soils have another problem: They have so few air spaces that they’re too easily flooded by water. A sticky, slimy, wet clay soil can easily drown roots. The addition of as much organic matter as possible is a definite must in order to lighten the soil to allow plant roots more room to breathe. At the Eco-Village, we turn in at least an inch of compost (and preferably more) before planting any crop in our clay-heavy beds.
Turning under green manure (or cover) crops is often another good way to add more humus to the soil. Our own clay plot, however, doesn’t have sufficient below ground air to stimulate the needed decomposition of turned-under crops, so we actually cut down most of the green matter and compost it before working it in.
On the other hand, adding sand to clayey soil is not supposed to help its texture — the clay allegedly “swallows” it up! As an old gardening maxim puts it: Put clay in sand, money in the hand; put sand in clay, throw money away. But when we finally tested this adage last summer by working about an inch of sharp creek sand into a few beds along with their compost allotment, the sand did make a noticeable improvement in both texture and drainage.
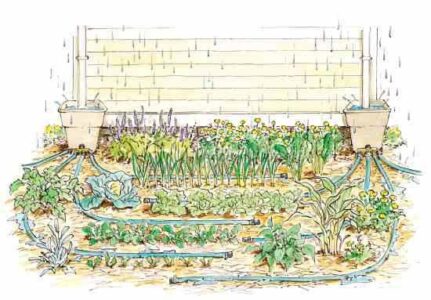
I use a Clackamas Coots soil recipe which is 35% aeration in the form of Pumice, Rice Hulls and Pre-charged Biochar.
Then water most everyday with super oxygenated water to deliver as much dissolved oxygen into the soil as possible, that plus the worms and roots from cover crop in large fabric pot my soil needs a constant supply of water to keep it at 30-35% moisture level.
 
Why Wollastonite?!
Why use wollastonite? You can use wollastonite to maintain your soil pH instead of agricultural lime. Although it is more expensive than ag lime, wollastonite has some advantages you should be aware of. Wollastonite brings in both calcium and silicon. All growers are aware of the importance of calcium in their soil but many growers are just learning some of the important advantages of silicon. Si can partition toxicities and it adds significant strength to plant cells and therefore is very helpful in battling fungal pathogens. A recent study demonstrated an 88% reduction in powdery mildew at a facility just by adding wollastonite. Si may also outcompete heavy metals for uptake. There is lots of research that still needs to be done but I am definitely Going to start using it​
 
I use Volcanic tuff, like Montana Grow.

 
Agsil 16 H is a soluble form of Potassium Silicate that will provide your plants with a 100% available source of silicon and potassium essential for optimum plant growth and health. Potassium Silicate will strengthen your plants internal processes during periods of excessive stress and external defenses against foliar and soil diseases. Benefits include stronger cell walls, increased stem strength, increased heat, drought and cold tolerances and longer lasting leaves and blooms!

Agsil 16H is a simple and inexpensive alternative to water-based Silica products – now you can make your own for pennies on the gallon. 560 grams of Agsil in 1 gallon will give you 7.6% silicon (SiO2).

Derived from: Potassium Silicate

Guaranteed Analysis
Soluble Potash (K20): 32%
Silicon Dioxide (SiO2): 52%

SUGGESTED APPLICATIONS

Use ½ teaspoon per gallon of water as foliar spray, soil drench or emulsifier

Recipe for 7.8% Solution:

780: 1
148g : 1 L
560g : 1 gal

Mix 148 grams AgSil 16H into 1 liter water or 560 grams per gallon. Store in bottle or jar and shake well before use. (1 lb = 454 g). Use this 7.8% solution at 1/4 - 1/2 teaspoon per gallon water.

WARNING: Causes eye and skin irritation. Avoid contact with eyes, skin and clothing. Wash thoroughly after handling.

Never mix concentrated silica solutions with other concentrated fertilizers. It is best practice to make up the liquid solution first or add water prior to mixing the powder with other ingredients or nutrients.

When mixing, be sure to add water to the container first. Fill the container halfway with water and then add the Agsil before filling the rest of the way and then mixing thoroughly.

STORAGE

The silica needs to be stored in a cool dry location. There is no real shelf life to speak of if kept dry or in liquid concentrate form. We suggest you make the liquid concentrate for storage because if the powder gets any moisture it can turn into a rock. Shake vigorously before using.
 
Good info in this thread but straying a bit far afield from the thread title. You can always ask a mode to change the title if you want something more descriptive.
This Thread Just kinda morphed into the different topics I myself aren't to worried about the thread title I like to hear myself talk 😂 but I do have a regular organic thread among the other 10,000 on there so I'm good with the small group attending this thread I've already learned a few different things from you do folks 👍 GOOD STUFF!
 
Back
Top Bottom