Building an aeroponic cloner bucket, aka The Cloninator!

After 24 days the second clone showed nubs making this run 2 for 2! 100% success rate! Cloning so easy even I can do it, thank you Cloninator 2000!​
:yahoo:
I recently ran a batch of clones through my little bucket and discovered a little too late that I didn’t have the lid on tight enough so it leaked water from the lid and ran dry. Two of them recovered so not a total loss. I don’t know how long the pump was running dry, but it’s awfully loud now and I think will be replaced before another run. The two survivors rooted in 13 and 15 days respectively, and are nice and healthy looking now after transplant.
Oof! Betcha don't do that again. I'm glad you still got a couple of cuts to root though!
 
Oof! Betcha don't do that again. I'm glad you still got a couple of cuts to root though!
Well I was hesitant to take you up on that bet because I’m dumb and figured I would do it again. But I didn’t, these cuttings rooted in 13 days. I had the pump and light on 24/7, with the light partially shaded by a plastic tray (which I think made a big difference).
0D896A17-3AB6-4116-84BC-1A6C09513D6C.jpeg
A278D732-0C4A-461F-8848-8EDED2F11C0D.jpeg


:passitleft:
 
Sorry I meant for cloning just in general good way to learn how it all works
Oh true! So many ways to clone and sometimes it takes a while to find a way that works for you. There are lots of ways simpler than aeroponic/hydroponic though. Stems in water works for a lot of varieties as does stems in a cup of perlite with water at the bottom. It's not quick but it's cheap and pretty effective.
 
How to build my cloninator aeroponic cloning bucket! This is the original but I've made a few modifications since then. I'll put those at the end in case you'd like to try them.

I started with a 2 gallon bucket and lid from Home Depot. I got this pump from Amazon:
full

Which came with these adapters:
full


None of which will connect to the sprinkler head, so I had to buy these in brass at Home Depot because they don't carry PVC smaller than ½:
full

So when it was connected it looked like this:
full

Next I centered the pump in the bucket:
full

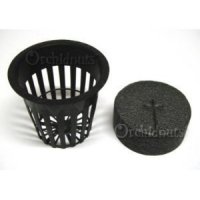
And laid out the 2" baskets from Amazon (they came with the inserts):

full

Hole drilling was next. Here is a tip I got from youtube...after you drill the center pilot hole, run the hole saw backward and it makes a much cleaner cut. Here are the cuts and a notch for the wire:
full


Baskets inserted with the bottoms cut off. It should keep the roots from getting tangled:
full


Finished bucket with the neoprene inserts:
full


I used barbecue skewers to test the spray:
full


Maximum wetness! I filled the bucket about ¼ full (so around 64 ounces) and added 4 ounce H2O2 since I don't want to buy any z7 etc:
full


I needed a timer that would do short intervals, so I got this one and set it for 1 minute on / 15 minutes off. I may make that interval longer after a couple of days. Setting the timer was a lot easier than some of the reviews mentioned on Amazon:
full


I hung a single 23w 6500K CFL over the bucket:
full


And that's the original! Since I built it I changed the sprinkler system twice, and now I'm using micro-sprayers in PVC:
full


I also wrapped the bucket in duct tape and spray painted it (red was all I had) to make it more light proof. Did the lid as well.


And now that the weather is cooler I'm having pretty good success. Certainly better than my previous attempts :).

:Namaste:
Any chance you remember what that sprinkler head is called? Might be making one of these sick ass clones soon 😁
 
Back
Top Bottom