1st Indoor Grow - 9 Strains - Eek!

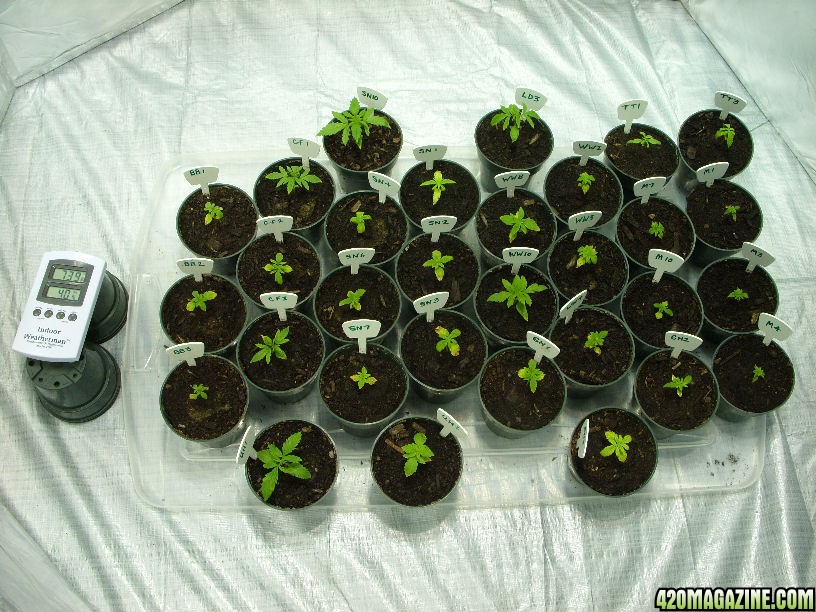
2) Humidity has often been 30s% to 40s%, but has dipped down to 26% and been as high as 77% (short lived). I put a humidifier in the room last night and will see if it brings it up at all - would like it at least above 40%.

Seedlings and Vegatative plants grow best when the RH is 60 to 70% Flowering plants grow best in 40 to 60%

Lower humidty discourages disease and pests. As with tempature, consistent humidity promotes healthy and even growth. RH affects the transpiration rate of the stomata. WHenhumidty is high water evaporates slowly. The stomata close, transpiration slows... plant growth slows.

Transpiration in dryier conditions will be rapid ONLY if there is enough water for the plants roots to draw in. If the water supply is insuffienct - the stomata will close to protect the plant from dehydration... and again growth will slow.

When the RH is above 70% the pressure is toomuch outside the leaf and the too little inside -stomata close...plant growth slow.

Humidity over 80% discourages spider mites and encourages fungus and root/stem rot. Humidty 60% and less reduces chances of fungus and rot.

40 to 60% is a safe level that encourages transpiration and discourages fungus growth.
 
Rain water off my roof tests 2ppm on my meter. RO I buy to drink goes 23. City tap 280. I use rainwater on my small garden now, and I drink it!

This is water off of shingles? Aren't shingles tar/asphalt based? I would be worried about oil residues coming off them making my plants or myself sick.
 
1) I am STRONGLY wondering if maybe our well water has nitrates or something else in it that is effecting them. We live on a farm and have always had well water. Right now, our water is slow running cuz we need to dig a new sand point. We do NOT drink our water. I KNOW it is hard water and high in iron - cuz it leaves the stains behind everywhere it drips. I am going to switch to store-bought water just to see if it makes a difference. This may be my problem right here. Only time will tell.

I would suggest that if you have 30 plants you should consider investing in a good Reverse Osmosis Water Purifier. They might run you a couple hundred bucks but it would be a heck of alot cheaper than buying gallons of water to supply 30 plants from now till harvest. I would also recommend getting a PH tester - PH is an often initially overlooked critical factor in a plants well ebing...PH has a significant impact on the plants overall ability to take in nutes and grow.
 
Thank you to everyone for your input!!! McBudz... I just visited your journal with another question - just love your setup! PG - so very good to see you too! With all the wonderful support here, hopefully my journal will grow with some success!

StormChaos - what great info! I will look forward to discussions on the humidity, effects of low reflective light, and whatever the discussion brings!

Just stopped in for a bit - will write more tomorrow when I have more time. I think I figured out what is wrong with some of my babes. I revisited the Cannabis Plant and Pest Problem Solver - Pictorial page and even tho I tried NOT to and repeatedly read that it was one of the things newbies did the most often... I think I have been overwatering. From the pics - the overwatering pic is definitely the most similar to my babes that are struggling. And dangit, I just watered last night before reviewing this page today. The light green/yellowish color and droopy leaves - yes that is what I am seeing on some of them.

1134overwtering1.jpg


This is good news tho if it solves my problem - cuz it is something easy to fix (STOP DOING IT!!!). I let the top dry out good (cracking), but must not be letting the rest of the pot dry enough. Feel like an idiot cuz I read NOT to do this OVER and OVER!

It just does not look like anything else on that page to me, so I think maybe my water should be okay. I will upload some images tomorrow and see if any of you think differently.

Until then... enjoy yer life, loved ones, and yer bud :peace:
 
granny i posted a response in mcbuds journal to a question you posed. sorry i didnt see your grow in your sig till now.

wow, great strain selection. could be a little difficult for a beginner to grow that many strains because they will all be different heights, and want different amounts of nutrients, and possibly have different issues. but if you come out in the end with a good bunch, you will certainly be in weed heaven for a long time!

if you start picking up your plants to check how heavy they are you will quickly learn when they are dry enough to water. then you will know the schedule for your plants/environment, and will learn to tell when they need more by eye from that.

looks like your doing great granny. i will be pulling for ya.

Hey WheeloFortune, thank you for the responses. I'm gonna respond to both of them here. :)

Yes, there is a great variety here and they will all grow differently. Am finding that out already. I will be posting pics of the different plants in a bit that point this out, especially with the Thai. I had read that Thai is an especially hard strain to grow, and that the Haze varieties can be too.

I was picking up my plants/pots and checking the weight - but I don't think I was picky enough about each individual plant. When a fair number needed watering, I watered all - MISTAKE. I think the Thai, above all is showing this. So your point is well taken on treating them all as individuals. I will have to heed this strongly as I continue.


granny,

the biggest advantage of venting outside a tent or to the outside of your house (preferable) is that it creates a negative pressure in the growing area. that means that fresh air is pulled in form where ever there are vents or leaks, and all of the air being vented has been cleaned.

my friend ran a scrubber in his room, and i could still smell it at his front door. he ran a hose (like a dryer) outside and i cant smell it now untill i get into the room right next to them. this is because the clean air will slowly drift to the grow op and then cleaned and out. the smell never stands a chance if you do it this way.

Very helpful info about your friend cuz the room I am using is upstairs with the downstairs door about 10 feet from where ppl enter our home and right above our main bathroom. Odor control is vital and this will *hopefully* be a fairly large grow.

I have tentative plans for controlling the odor and am going to ramble about this in a separate update today. Will look forward to any response you have. And I am also going to keep my options open and do what I need to do as I go along. More on this in a bit. And thank you!

:peace:
 
Thank you to everyone for your input!!! McBudz... I just visited your journal with another question - just love your setup! PG - so very good to see you too! With all the wonderful support here, hopefully my journal will grow with some success!

StormChaos - what great info! I will look forward to discussions on the humidity, effects of low reflective light, and whatever the discussion brings!

Just stopped in for a bit - will write more tomorrow when I have more time. I think I figured out what is wrong with some of my babes. I revisited the Cannabis Plant and Pest Problem Solver - Pictorial page and even tho I tried NOT to and repeatedly read that it was one of the things newbies did the most often... I think I have been overwatering. From the pics - the overwatering pic is definitely the most similar to my babes that are struggling. And dangit, I just watered last night before reviewing this page today. The light green/yellowish color and droopy leaves - yes that is what I am seeing on some of them.

1134overwtering1.jpg


This is good news tho if it solves my problem - cuz it is something easy to fix (STOP DOING IT!!!). I let the top dry out good (cracking), but must not be letting the rest of the pot dry enough. Feel like an idiot cuz I read NOT to do this OVER and OVER!

It just does not look like anything else on that page to me, so I think maybe my water should be okay. I will upload some images tomorrow and see if any of you think differently.

Until then... enjoy yer life, loved ones, and yer bud :peace:


Yes its easy to over water I think we all did it in the beginning. its easy to love the little gals to death lol. Just wait for the pots to get light before watering again. But not like the sahara just to the point when its significantly lighter then when first watered. If the plants are wilting before you water again then water a tad sooner.

ALso you will find that when watering a dry pot you should water very slowly and give it time to absorb the water. Most will run right out of the bottom if you water dry soil too fast.
 
Well, my babes show signs of wear and tear from this newbie's first grow... live and learn. Nothing ventured, nothing gained.

I'm not sure if this was my problem in the beginning, but I believe I see clear signs of overwatering on a number of my babes. I will solve this in the future and treat each plant much more individually (instead of watering all when maybe not all needed it. Really cussin' myself but I can't undo what is done. I can only work on improving.

Images all taken last night, Sept 2.

First, a group shot from above.

Sept2_GroupShot.JPG


Then I'll begin individually with the worst... my poor lil Thai Tanic. Both are pictured in the image below and both are struggling thus far. Pray for them - and me! I so want at least a little of this strain and hope I can bring them back and treat them better!
Sept2_BothThai.JPG


The pic below shows the leaf deformations of TT1. Hope future growth is better.

Sept2_TT1LeafDeformation.JPG


And TT3 below - this one I strongly believe shows clear signs of overwatering when compared to the pic of overwatering. Droopy leaves and light green/yellowish color. I'm sorry TT3! I WILL DO BETTER!

Sept2_TT3OverwateredSigns.JPG


Then I will go to the lone LD - also showing signs of overwatering but does have some good growth too. Should rebound nicely.

Sept2_TheLoneLD.JPG


The 2 Utopia Haze below (as with all) had problems, but are doing better.

Sept2_BothUH.JPG


Then the Super Nova Chronic. Big difference in these from SN10 being extremely nice (sprouted much earlier too) to SN1 which looks like maybe I have almost drowned (been struggling since the beginning) and the remainder which I now believe also have struggled with overwatering.

Sept2_All5SN.JPG


And the White Widow... same thing...

Sept2_All5WW.JPG


The Medijuana is really doing much better than it may appear in the image below. These are the shortest, stockiest plants. I read these are strong indica and mainly grow just one main thick cola. Maybe they will shoot upward... guess we'll see along the way.

Sept2_All5M.JPG


And all three G13 Haze... same thing - signs of overwatering.

Sept2_All3GH.JPG


My goodness - this is sure going on and on!!!

I had to come back and edit to add the Blueberry - with 9 varieties this is going to get long with images and me lil ol' peabrain is going to have to work extra hard! I had G13 Haze listed twice and no Blueberry... so here are the Blueberry babes with the same problems as all...
Sept2_All3BB.JPG


Last (*I think*).. is the Cheese - femonized...

Sept2_All3C-F.JPG


Just goes to show that no matter what I have done wrong, MJ is a SURVIVOR!!! I will definitely treat each plant much more individually and will be changing my watering techniques.

Do others agree a number of these plants look like the overwatering image shown below? Droopy leaves and light green to yellowish color?
1134overwtering1.jpg


Image above is from the 420Magazine info page: Cannabis Plant and Pest Problem Solver - Pictorial

Have mucho updates today and will be breaking it up into different messages. This is it for the first.

:peace:
 
Topic: Odor Control

Been thinking really strong about this subject for some time. I'm going to start with what I will call a DIY ONA/Carbon Scrubber - but I do NOT know yet how this will work. I will test it and will always remain open to changing or adding to what I'm doing as needed. If I need to buy a couple carbon scrubbers - I WILL.

I ran across a DIY odor control bucket at another website and numerous responses from those who have tried it. Many said that is all they used and it worked wonderfully, while others said they tried it and it didn't work for them.

I have taken the main concept of how this is done from that information and then added to it. Their DIY project uses ONA as the odor control, I am attempting to alter it to add carbon filtration also.

DIY ONA/CARBON SCRUBBER

Supplies
1 5-gallon bucket with lid.
1 9" round fan (that allows operation with detachment of stands or legs)
Activated Carbon Filter
Activated Carbon
1 (?or 2?) round wire wreath rings (or whatever you have that would work!)
Tools to remove extra/outer fan parts
Tools to drill holes in bucket and to cut lid of bucket
Possibly supplies to mark bucket for where holes go
NOT PICTURED BELOW
Liquid ONA (odor neutralizing agent)
Soil Moist
Water

Here is an image of the basic "bucket" supplies that I used, some because they would work and I had them on hand (image does not include Soil Moist or ONA)
DIYOdorScrubberBasicSupplies.JPG


Below, I marked the bucket for where to create ventilation holes. I left room at the bottom of the bucket to hold the water, liquid ONA and Soil Moist mixture (when complete), and room above the ventilation hole area so I can fit a carbon filter. I may need to create more holes, but did test with carbon filter and fan and seemed to be drawing air in nicely.

The guys here would have laughed at how I did the holes. Hubby has all his tools in his work trailor, so I had no drill (did have the right bits tho), so I used a heat pen I have for crafting and burnt them! Didn't even smell too bad. Whatever it takes sometimes! :)
DIYOdorScrubberBucketWithHoles.JPG


Next I removed the stand from the 9" round fan and cut the lid so the fan will fit in it. The fan will be faced out so that it is pulling air into the bucket via the holes in the bucket and blowing the clean air out into the room.
DIYOdorScrubberFanAndBucketLid.JPG


Now, I don't know if it will work or not - I may need to tweak this along the way.... but I thought I could maybe add a carbon filter that may help even further with this DIY odor control bucket.

I dug out some wreath rings (granny has done a lot of crafting)...
DIYOdorScrubberWreathRings.JPG


and cut the outer-most ring so I could fit it snugly inside the bucket. I then cut a peice of carbon filter and wrapped it to the wreath ring (below)
DIYOdorScrubberCarbonFilterAndWreathRing.JPG


Below, I filled the carbon filter with 9 oz of activated charcoal (but may add more to this as I test it) and inserted it snugly into the bucket.

DIYOdorScrubberCarbonFilterAndCarbonInBucket.JPG


I have a second wreath wrapped with carbon filter that I have the option of inserting above the layer shown above - I will be testing the ventilation if I use it. I did test a different type of carbon air filter for furnaces - but the air could not move thru as well.

Anyways, when it is all put together, it looks like this...
DIYOdorScrubberBucketComplete.JPG


Then, the bottom mixture (I am waiting on delivery of ONA I purchased online) as recommended is:
Put 9 cups water in the bucket. Add about 1 cup of liquid ONA and stir to mix. Add 1 to 2 cups Soil Moist, making sure all liquid is absorbed and remembering that Soil Moist expands 50 times (so add and allow to absorb before adding more).

The Soil Moist is reusable after it dries out. Info said this lasts approximately 3 to 4 weeks. When dry, you mix more water and ONA and add to the current Soil Moist. I purchased Soil Moist at our local garden center. Just an interesting tidbit: Soil Moist is also used in cooling kerchiefs worn by bikers. The soil moist is sown into a kerchief. Get them wet, wrap them around yer neck, and they hold in the cool water and cool you while ya ride. They work pretty nicely.

I purchased liquid ONA, gel ONA, and a new ONA "Pro" spray that is supposed to be as close to "oderless" as you can get. I am going to set up a couple of these DIY buckets and try the spray (didn't have that flavor yet in liquid) in one of them. Will see what differences there are when I test.

Anyways... I don't know IF or HOW this little project will work and will update as time goes on and the real test of MJ fragrance comes. The reviews from just the basic ONA (NO carbon filtration added) setup were mixed but numerous bud growers swore this worked wonderful for them and that they didn't need a carbon scrubber.

Of course, I am completely aware that I am attempting a very large grow and the stink thus increases. I will purchase a carbon scrubber immediately if I feel I am not controlling the odor.

But I also have other thoughts about odor control in my environment. If temps and humidity are not too high in the room (don't feel that will be a problem), I may try a small fan venting up into our upper attic area to help the room air to rise up out of the room.

As is, I do have the room air venting out thru the 1000w light straight to a roof vent (and will have a second 1000w doing the same thing when plant sizes require the second light). The first seems to remove smells quickly. When I burned (melted plastic odor) the holes in the plastic bucket, the air moved quickly out of the room, didn't even bother me, and I couldn't smell it downstairs. I thought this was a good sign that the room air is exiting nicely.

Have one more to post (and then payroll and bookwork to do!)... but off for a 420 break with our middle son first.

:peace:
 
wow, this last post was not what i expected to see when i came here. +REPs on he DIY. granny after my own heart!!!

very nice. very nice. we'll see how good it works, but i like it no matter what.

yeah, some of your babies look to be a bit overwatered to me too, but nothing they cant come back from. the TT deformities might not be from you, I have had plants in the past look like that, and it wasn't anything i did, just the type of weed, and the specific seed i think.

looking good, you have some time to figure out you ventilation. they won't be smelling too badly for a while yet, but with that many strains you WILL have some major stink from some of them. it will beome a problem later, but it looks like your equipped to handle it!

gl granny. looking nice.
 
Greets Granny,

I am pretty new to growing as well and have spent countless hours researching my new most favorite hobby. While using aluminum foil is a viable solution, there are better options.

The following is a chart of different materials and their effectiveness for reflecting light.

Material................... % reflected

Foylon............................94-95%
Reflective Mylar............... 90-95%
Flat White Paint................85-93%
Semi Gloss White..............75-80%
Flat Yellow......................70-80%
Aluminum Foil...................70-75%
Black..............................<10 %

The other thing I read and I cant remember the source but I am going to search for it and post it, perhaps somene with more experience can verify this... but it is not good to place reflective materials under the plants as the underside of the leaf isnt designed for light asborption and the light can actually damage the stomata (sp?) and stunt growth.

ALso, I have read from several different sources that any light over the 18/6 cycle has diminishing returns because the plants cant effectively process more than 18hours of light.

Discussion on these last 2 statements are welcomed and encouraged.

Greetings StormChaos :)

This was really interesting info. As for the info about "it is not good to place reflective materials under the plants", I have placed gray tarp on the floor and would love to hear other's thoughts on this too.

I am using aluminum foil for a few reasons. I would prefer to use mylar, but I have limitations on what I can do to the room I am using and on funds. (We should call this "Poor Granny's Grow"!) We refinished this room and my hubby will have a cow if I damage the newly sheet-rocked and finished walls. The ceiling and upper walls (which are the old style slanted from the ceiling to the wall 4 foot from the floor) are flat white (see that's a good thing!). The lower 4' is all I really have to worry about.

I also wanted something I could maybe adjust to the outer edges as the plants grow. What I made are really portable and they are working wonders for reflecting light back in - the images below kindda show this, but my camera is not taking very good images in the lighting.

Granny's DIY Portable Reflection (for the poor person!) :)
Supplies
1 large box, folded so it is 2 layers thick.
Extra Strong Aluminum Foil
Adhesive Spray which works on both cardboard and metals
Clear Mailing Tape
Scissors
DIYPortableReflection_BasicSupplies.JPG


The arrows in the image below show:
1) The larger arrows show where I added extra layers of mailing tape for support.
2) The smaller arrows going both ways at the bottom show cuts I made in one layer of the cardboard so I could create support stands. I cut approximately 1/3 of the distance in on each of the two sides.
DIYPortableReflection_ReinforcedAreaAndStandSupportCuts.JPG


The next pic is the supports finished and working from the back. In this image, you can sure see that it works to reflect the light.
DIYPortableReflection_StandSupports.JPG


I didn't take any pics of actually applying the aluminum foil, but I put it on with the dull side out (read somewhere that was best) and sealed all edges and seams with clear mailing tape. In the image below, you see two of the finished products working side by side. My camera didn't like the lighting in this position, but you can clearly see it is lighter in front and darker behind.
DIYPortableReflection_2InAction.JPG


It really is working like a charm and I like it cuz it's all portable so it will keep the light close while the plants grow.

Yes its easy to over water I think we all did it in the beginning. its easy to love the little gals to death lol. Just wait for the pots to get light before watering again. But not like the sahara just to the point when its significantly lighter then when first watered. If the plants are wilting before you water again then water a tad sooner.

ALso you will find that when watering a dry pot you should water very slowly and give it time to absorb the water. Most will run right out of the bottom if you water dry soil too fast.

Hey McBudz! Thx for the info. I did wait for MOST of the pots to be light and the top soil was cracking (part of the problem is not treating them as the individuals that they are!) and then, yes you described just what else I probably did wrong - I most likely watered too fast cuz it would drip out the bottom but not be watered, so I watered more and let them absorb what leaked out. End result was probably too wet of pots in the end. I will sure work to do much better with this cuz the poor babes have not been liking my mistreatment!

Oh... and the humidifier seems to be helping the humidity a little. It has been 40% to 65%. I know MJ does best with higher humidity in the veg time, but there is not much else I can do and I'm trying to KISS. Worrying about every little thing can lead to overdoing. I don't need mold or bugs from trying to get the humidity up and feel for now, it is best to just leave well enough alone.

Peace out for my journal today. All I can do is give my babes time to dry out and NOT OVERWATER. Am not giving any extras. Will see what the next week brings for growth. I have clean 1 gal pots and soil all ready to go when they need a bit more room.

:peace: to all!
 
Thats really cool granny nice work.. Only drawback I see is the fan type.. Not really designed for dealing with backpressure. Great work though

Do you have any recommendations?

I did connect everything and when I insert a finger into a hole, I can definitely feel the air flow inside the bottom. However, I'm just not sure if this setup is strong enough for good quality carbon control, or if this fan can take it.

When I tried an activated carbon furnace filter cut to fit snugly inside the bucket, the fan definitely sounded like it was working too hard so I filched that idea until I could *think* more about it. I was kindda thinking that the furnace filter would add an additional, and possibly more effective, carbon filtering layer for the carbon control, but the fan has got to be stronger. I am sure welcoming any suggestions.

Thx! :peace:
 
wow, this last post was not what i expected to see when i came here. +REPs on he DIY. granny after my own heart!!!

very nice. very nice. we'll see how good it works, but i like it no matter what.

yeah, some of your babies look to be a bit overwatered to me too, but nothing they cant come back from. the TT deformities might not be from you, I have had plants in the past look like that, and it wasn't anything i did, just the type of weed, and the specific seed i think.

looking good, you have some time to figure out you ventilation. they won't be smelling too badly for a while yet, but with that many strains you WILL have some major stink from some of them. it will beome a problem later, but it looks like your equipped to handle it!

gl granny. looking nice.

Thx so much WheeloFortune. Sure appreciated. I am NOT mechanically inclined but do have a hubby and 3 sons who definitely are so I know just enough to be dangerous! LOL

I think I will do some tweaking in the fan department when I put together a second model so l can add another carbon filter layer. I want to make this a bit more effective and think McBudz has nailed it with the fan being problematic. So I'm gonna sit back and see what suggestions come in for a better fan and where to possibly purchase one. I think I can cut and fit an opening for any fan sized smaller than the lid. Hopefully together, we can all come up with something that just might work effectively... and then we can share it! :)

:peace:
 
Do you have any recommendations?

I did connect everything and when I insert a finger into a hole, I can definitely feel the air flow inside the bottom. However, I'm just not sure if this setup is strong enough for good quality carbon control, or if this fan can take it.

When I tried an activated carbon furnace filter cut to fit snugly inside the bucket, the fan definitely sounded like it was working too hard so I filched that idea until I could *think* more about it. I was kindda thinking that the furnace filter would add an additional, and possibly more effective, carbon filtering layer for the carbon control, but the fan has got to be stronger. I am sure welcoming any suggestions.

Thx! :peace:

Fro the ONA solution I think that fan will work fine. Just need to move air over the liquid/gel. For a true carbon filter I feel like the best bet is an inline duct fan like the vortex or fantech or canfan's these guys are designed to work with the back pressure. Also for a carbon filter to be effective for such a large room and that many plants you'll need a lot of activated carbon and a lot of air movement through it.
 
Fro the ONA solution I think that fan will work fine. Just need to move air over the liquid/gel. For a true carbon filter I feel like the best bet is an inline duct fan like the vortex or fantech or canfan's these guys are designed to work with the back pressure. Also for a carbon filter to be effective for such a large room and that many plants you'll need a lot of activated carbon and a lot of air movement through it.

Thx for continuing to answer my questions! Sure do appreciate it, McBudz. :thanks:

I completely agree that this fan will work just fine for the ONA, but is not right for quality carbon filtration. As it was designed originally (no carbon), it will be a wonderful addition for my future stink war.

I read your response earlier and have been looking around at fans. What do you think about using a 10" (300cfm free air) inline fan similar to what you put on your ONA gal jug? Maybe that fan isn't strong enough? I need a fan with enough power to pull the air thru the carbon layers that I want to include in the bucket. I agree the activated carbon needs to be much thicker and I want to add a layer using a finer carbon furnace filter. Will look forward to hearing what you, or anyone else thinks.

I did look at vortex and fantech inline duct fans too... they absolutely looked like they were powerful enough for what I want, but if I spend that much I may as well go a little higher and buy a pre-built carbon scrubber instead. Kind of defeats my purpose of trying to build a DIY that is less expensive yet effective.

:peace:
 
DIY ONA Odor Control Bucket - PASSES FIRST TEST

DIY ONA Odor Control Bucket - Passes Initial Test with NO CARBON!!!

Well, my ONA arrived so I am running a half-strength test of this bucket with NO CARBON added. And I'm totally impressed!!! I'll still work on figuring out something with carbon... but this really is a wonderful addition to the odor arsenal.

I had to make a couple changes from what I had written earlier, so instead of confusing folks, I will post the complete process here for a basic DIY ONA Odor Control Bucket.

Supplies:
1 5-gal bucket with lid ($5 - or free with the right friends)
1 9" fan ($12)
ONA (Odor Neutralizing Agent) ($15/qt - makes numerous batches)
Soil Moist ($10 & reusable)
Water
Tools to cut holes in the bucket and lid as required

DIYOdorScrubberBucketWithHoles.JPG


Mark the bucket so the holes will be fairly uniform (or not, like mine!), yet will leave room in the bottom for adding the liquid ingredients later.

Then remove the outer stand from the fan and cut the lid to fit the fan, as pictured below...
DIYOdorScrubberFanAndBucketLid.JPG


For my first test I filled the bottom of the bucket with a one-half strength of ONA Liquid (Linen Fresh). I don't have plants reeking it up yet, but soil has an odor of it's own so the room definitely needed freshening. Thought I'd just see what 1/2 strength did.

The mixture regularly calls for:
9 cups water
1 cup ONA liquid
1 to 2 cups Soil Moist

I used:
9 cups water
1/2 cup ONA liquid (Linen Fresh) (bought online)
1 8oz. package of Soil Moist granules (bought at local garden center)

I mixed the water and ONA liquid, then added the package of Soil Moist. I let it sit to absorb the liquid (10 minutes) and then continued...

I placed the lid and fan on the top of the bucket. I tried the fan facing outward first - but found it was NOT the best. When I faced the fan downward so it is blowing room air IN to the bucket - wahlah! Here's an image...
Sept5-ONABucket_NoCarbon.jpg


At first I had the fan on high and could feel the air blowing really hard out of the side holes. Turned the fan down and still have real good air flow coming out of the side holes. Almost instantly had fresh air in the whole room. This is kindda cool cuz I feel like I will be able to adjust to a stonger odor control strength by either using more ONA and/or adjusting the fan speed.

Of course, this DIY will require more hands on monitoring and may not be enough down the road. I'm not dealing with the sweet stinky smell of plants YET. But it sure does seem like this would be a wonderful choice to place in troublesome areas outside of the growroom too.

I can tell you I LIKE - I LIKE - I LIKE!!!

:slide:
 
Back
Top Bottom